Carburetors: Conversion from Injection to Carburetors MMKT0404 Kit
Single Point Injection to Carb Conversion
IMPORTANT NOTE: This change should be considered a significant deviation from stock and thus should only be undertaken by a competent mechanic.
-
 MMKT0404List: $1,299.95Sale Price $1,149.95
Historically, the drive to keep the classic Mini in production and marketable meant the factory decided to modernize the fuel system of the Mini from Carb to Fuel Injection. Thus in 1991 the first FI was installed on the Mini. Known as Single-Point Injection or "SPi" for short, the system also incorporated its first ECU into the car. This version of the Mini was produced until late 1997 when it was changed to the Twin- or Multi-Point Injection version (also known as an "MPi" Mini). The MPi model is a completely different set of problems and thus will not be addressed by this review. The SPi Mini might have achieved the objective of better fuel economy and emissions control, the loss of performance and reliability still chronicles the life of a SPi Mini. In addition, the SPi Mini is very difficult at best to upgrade to get any significant performance enhancements.
Thankfully, the best solution is still very practical- convert the car back to a single 1-3/4" SU carb, and eliminate the ECU. This opens up the entire universe of performance enhancements & upgrades that have been developed so successfully over the years.
The basic elements of the conversion process are simple enough: Remove the entire FI assembly and ECU, then install a conventional 1-3/4” HIF series carb and manifold, replace the ECU with a simple relay, install a fuel pressure regulator and replace the Distributor.
- Wire and plum all of this together and you have it!
- Wiring and plumbing diagrams are provided in the kit!
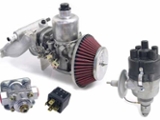
Included in this kit are all the basics you will need:
- 1x Mini 1-3/4” carb
- 1x K&N filter
- 1x Mini/aftermarket inlet manifold
- 1x Mini Electronic A+ Distributor
- 1x Fuel Regulator
- 1x Relay
- 3x Brass fittings
Please note that NOT included in this kit are various sundry accessory items that you will need for this conversion, including wire, fuel hose, misc. electrical connectors, hose clamps, etc. Please be sure to contact us if you have any questions regarding these items.

The first job is to remove the injection unit, which unbolts like any normal carb manifold. Because the inlet and exhaust manifolds are two separate units, you can retain your stock exhaust manifold. Further gains in performance can be expected if the exhaust manifold and muffler system are also upgraded. On removal of the inlet, the mating face on the head needed cleaning to remove the traces of old gasket, after which, a new manifold gasket was put on. Next, we bolted on the new carb and manifold.
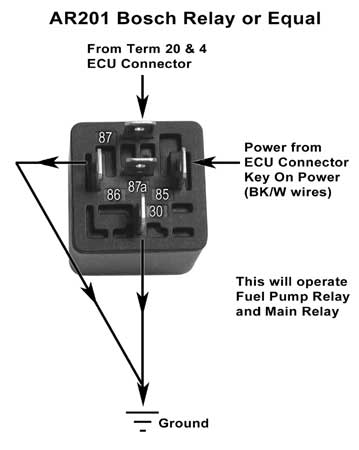
Next is the distributor, the one for the SPi is no good for a carb Mini because it doesn’t have the little box on the side for the coil connections; it uses a control box which is linked to the ECU. For this application we will simply install a later model electronic distributor (see AR201 image for how it's hooked up).
The included electronic A+ distributor has a super simple two-wire set up. Disconnect and remove the old distributor. Then, install the new distributor and simply connect the black wire from the distributor to the NEGATIVE side of the coil and the red wire to the POSITIVE side. That’s all there is to it! Do not remove the ballast resistor as the original coil and resistor will give the 3 Ohms of total resistance needed for the ignition circuit.
Ignition (distributor) timing should be such that total advance should be in the 28-degree range at 3,500 rpm.
The next step involves getting the correct fuel pressure to the carb and getting a return line back to the fuel tank. When you removed the ECU you removed the means to activate the fuel pump, etc. The pressure put out by the stock pump is way too much for any carb set-up. Thus, we have to plumb the regulator in line from the tank before the carb. But as the pressure is very high and the car was already set-up with a return line to the tank, the best method short of replacing the gas tank and fuel pump is to simply install the regulator with a second output that returns the unwanted pressure back to the gas tank. It is also important not to vent too much pressure and thus we use a .001 mechanical restriction in this line. Connect the line from the tank to the input side of the regulator; one of the outputs goes directly to the carb, while the second out goes through the restrictor to the rear. Provided in this kit are 3 brass adapters for the regulator. A visual check will tell you that one of the smaller fittings has a restrictor inserted into it and thus should be used on the line returning to the fuel tank. The largest of the three should be used to connect the input line from the tank to the regulator. The third one is used to connect the regulator output to the input of the carb.
Next comes the process to activate the fuel pump and the rest of the primary electrical system now that the ECU has been removed. While it might sound simplistic, we are going to use the single relay included in this kit to replace the ECU. Find a suitable place to securely mount the relay. The wiring diagram included in this kit shows connecting from the ECU plug terminal 11 to terminal 85 of the new relay. From Terminal 20 & 4 of the ECU plug to terminal 87 of the relay and then take terminals 30 & 86 of the relay and go to ground.
E.C.U. connector #5 to coolant temperature sensor on cylinder head.
The car should now be ready to go! Try it - you will love it!
 Download this article as a PDF, click here