Modified Mini Car Club S.A INC
The big Metro 4-pot conversion
From my time on the Internet it became apparent that in England there is an easy and inexpensive option to upgrade Mini brakes, thanks to their favourite donor car, the Rover Mini Metro. (If you want to know what a Metro looks like, watch The Bill on the ABC - the small patrol cars they drive are Metros)
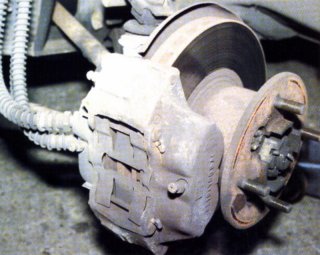
Before release, the motoring public anticipated the Metro to be the ‘replacement for the Mini’. Time has shown was not the case (with the Mini still in production until October or so this year) and now Metros are usually called ‘poxy’. Nevertheless they appear to be great donor cars in England as their engines, gearboxes, brakes and some suspension parts are salvageable. Fortunately, or unfortunately, as the case may be we never got the Metro in Australia, but if you can import the brakes you can put a 4-pot brake setup on your Mini or Moke quite easily with a few modifications. The rotors measure 8.4", so you will need at least 12" wheels to clear the callipers.
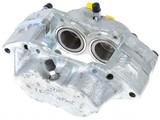
You’ve got two options with the overall rotor set-up, Metro vented or non-vented. The callipers themselves are essentially the same, but the callipers for the vented disks have a spacer in between the two halves to clear the extra thickness of the rotor.

Things you definitely need to get hold of:
· Metro callipers
· Metro rotors
· Metro drive flanges
· Different brake hoses – either buy the Aeroquip conversion sets, or get your own made up
Things you will need it you’re converting from a drum set-up
· Mini disk brake CV joints (larger diameter splined shaft), the castellated nut and the conical washer thing that goes under the nut.
· Either Mini disk brake uprights (hubs) or the Metro uprights. Using Metro uprights can alter the suspension geometry somewhat, but not excessively. From memory it gives you more negative camber. This is probably the cheaper option, rather than buying Mini uprights from somewhere in Australia. If you choose to use the Metro uprights you will also possibly need to replace the ball joints on it. The later, vented Metro uprights have a different taper on the ball joint, and won’t fit in Mini suspension arms. Earlier Metro hubs had a nearly identical ball joint taper to the Mini, so you can buy the earlier Metro ones new, and replace the ball joints on the later upright. The Metro hubs also have different bearings. You will need to swap your drum hub’s steering arm with the Metro one too.
· Timkin taper bearings are always nice whatever you’re doing.
· A master cylinder with a larger reservoir is recommended, but not required unless you’re the type of person who only checks the fluid level when it’s time to change pads.
If you’re converting from drums, take the whole drum shebang off the car by undoing the castellated nut, splitting the upright’s ball joints and the steering arm ball joint and pull it off the car. Remove the driveshaft, change the CV joint over to the larger variety, and stick the shaft back into the diff.
The Metro drive flange will probably require some modification before you fit it to the car. See if you can bolt one of your wheels onto the driveflange face – chances are that the four strange sticking-out wheel-centering flanges on the face will interfere with your wheel bolting on completely flat. It is very important to check this otherwise you will break wheel studs. If the centering flanges in any way interfere, remove them in a lathe, or use an angle grinder if you’re a butcher. The studs in the driveflange are a bit longer than the usual mini ones – if you use domed wheel nuts (ie. for mag wheels) you may need to shorten or replace them. They have the identical thread to the Mini studs.
The upright can go back onto the car (don’t forget the bearing spacer if it’s a Mini upright – the Metro hub doesn’t need one). Hopefully the steering arms are compatible with your rack – otherwise you might have to get different tie rod ends.
The whole Metro hybrid rotor/hub goes together quite easily – the rotor bolts straight onto the driveflange, and the whole lot slides back onto the driveshaft. Put the cone washer on and tighten the castellated nut to 150ftlb. If there’s any play in the hub after doing this your upright is probably stuffed and you’ll have to either shorten the bearing spacer or ensure the bearing outers don’t move, or both.
The callipers bolt straight onto the uprights. The metric internal diameters of the calliper-mounting holes are slightly larger than should be used with the Imperial bolt, but they seem to have held up OK on mine with the proper torque. If you get the Aeroquip hose kit the hydraulic hook-up is quite easy provided that your brake lines aren't split on the ends from previous butchers overtightening brake fittings in the past. I had trouble and on advice from my friendly PBR man (I still don’t know if he was being smutty or not) used silver solder to build up the ends of the male fittings to ensure a perfect seal.
The pads fit into the calliper with a retaining plate and 2 big split pins. If you like gimmicks you’d like the Metro pads – they have a couple of wires sticking out the top of them with a plug that you can rig up to a light or whatever to tell you when they’re getting thin.
Bleeding the system isn’t too bad, just a bit tedious – each calliper has three bleed nipples. If you’re converting from drums this is also the time to check your rear brake cylinders – you will probably need to replace them with smaller diameter Cooper or LS ones to correct brake bias. The brake bias can be checked – have a test drive and stamp on the brakes while cornering – if you end up facing the wrong way you’ll need to do something about it.
When I got my brake setup, it looked like the whole lot had been sitting at the bottom of the sea for fifty years. If I had seen them on an Aussie car at the wreckers I wouldn’t have bought them. Things must go rusty a lot faster in England, because once I’d removed the pistons from the callipers they looked as good as new in the inside and the pistons had no rust at all. Spare parts like pistons, rotors, seals and pads can be sourced from NSW mini places like Karcraft and Mini Kingdom for about the same cost as the Cooper S items, but ring around for prices as they vary considerably.