

|
Total posts: 328
Last post: Jun 9, 2018 Member since:Sep 28, 2010
|
Cars in Garage: 1
Photos: 67 WorkBench Posts: 0 |
|
I had a rear that the nut was frozn to the hard line. I ended up freeing the flex line from the other end first, then loosened the jamb nut a little and finally unscrewed the entire hose from the nut frozen to the hard line. It was a bit tedious as I had to continually loosen the jamb nut as I went.
And much to my surprise when I put the replacement line in it actually sealed. But again it was a bit tedious to spin on the whole rubber line while continually tightening the jam nut a little at a time but it worked.
Obviously the proper way would have been to replace the hard line but I just didn't want to go there.
|
|
Total posts: 440
Last post: May 2, 2017 Member since:Sep 24, 2013
|
Cars in Garage: 0
Photos: 0 WorkBench Posts: 0 |
Yup, I am lessening the right things. Getting the right most nut to come loose is very hard without it just spinning and twisting the brake line.
This usually happens when the nut is binding on the tube, either because of corrosion between tube and nut or because the flare on the tube has been squeezed too hard or too often and is jamming inside the nut.
I guess, you´ll have to replace the tube.
If possible, have new tubes made up from kunifer tubing with brass nuts. Kunifer is an alloy from copper, nickel and iron. Is corrosion resistant and a lot easier to work with that steel tubes.
If not possible, order copper tubes:
//www.minimania.com/part/SPB6/Pipe-Proportioning-Valve-To-Right-Rear-Hose
//www.minimania.com/part/SPB24/Brake-Pipe-Proportioning-Valve-To-Left-Rear-Dry-Suspension
Cheers, Diddi
MORE TORQUE! (and overnight with more penetrating oil)
Got them off. One side installed. Just put a pot of sauce on and now back downstairs to get the second one installed. The right hand side came off WAY easier than the left. Combination of knowing what I am doing, pentrating oil, and the Mini Gods smiling down at me.
'73 Innocenti Mini (non-export)
Morristown, NJ
|
|
Total posts: 37
Last post: May 25, 2015 Member since:Dec 26, 2014
|
Cars in Garage: 0
Photos: 0 WorkBench Posts: 0 |
Yup, I am lessening the right things. Getting the right most nut to come loose is very hard without it just spinning and twisting the brake line.
This usually happens when the nut is binding on the tube, either because of corrosion between tube and nut or because the flare on the tube has been squeezed too hard or too often and is jamming inside the nut.
I guess, you´ll have to replace the tube.
If possible, have new tubes made up from kunifer tubing with brass nuts. Kunifer is an alloy from copper, nickel and iron. Is corrosion resistant and a lot easier to work with that steel tubes.
If not possible, order copper tubes:
//www.minimania.com/part/SPB6/Pipe-Proportioning-Valve-To-Right-Rear-Hose
//www.minimania.com/part/SPB24/Brake-Pipe-Proportioning-Valve-To-Left-Rear-Dry-Suspension
Cheers, Diddi
|
|
Total posts: 440
Last post: May 2, 2017 Member since:Sep 24, 2013
|
Cars in Garage: 0
Photos: 0 WorkBench Posts: 0 |
Yup, I am lessening the right things. Getting the right most nut to come loose is very hard without it just spinning and twisting the brake line.
'73 Innocenti Mini (non-export)
Morristown, NJ
|
|
Total posts: 328
Last post: Jun 9, 2018 Member since:Sep 28, 2010
|
Cars in Garage: 1
Photos: 67 WorkBench Posts: 0 |
|
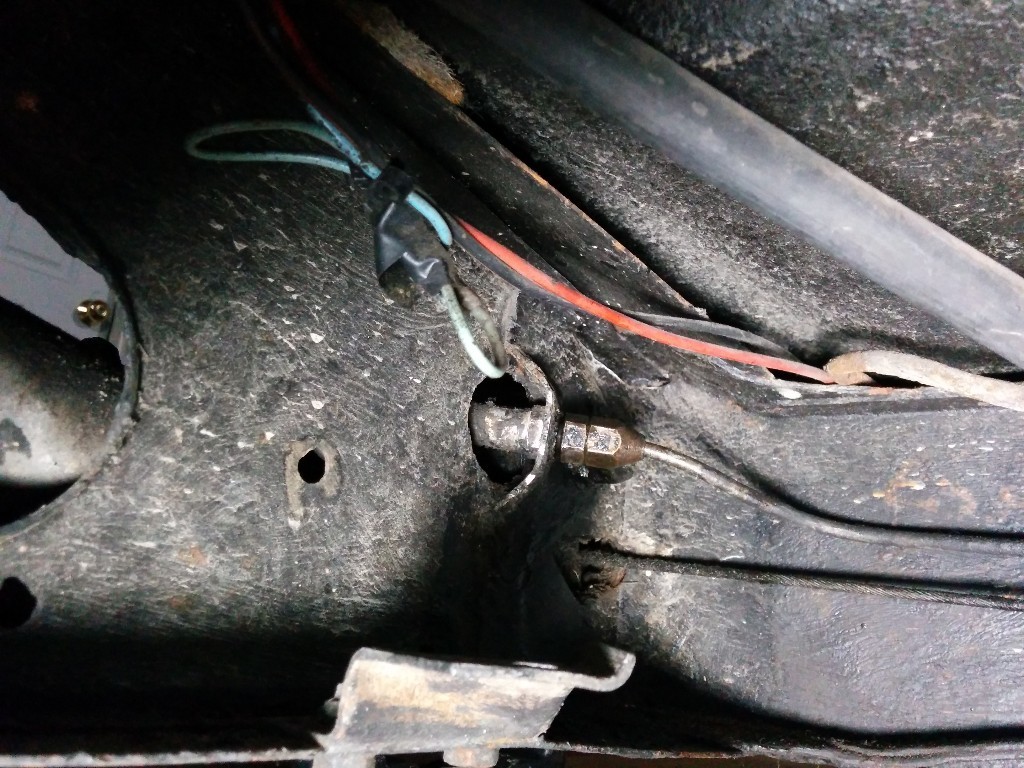
Just to make sure you're turning the correct parts...
In your picture there are three different places to wench: the left most one is part of the hose fitting and needs to be held steady while you loosen the right most fitting. The center is a jam nut that tightens against the subframe bracket and hose fitting. So after you have loosened and backed all the way off the right most nut (which disconnects the hard line from the rubber line), you will then continue to hold the left most nut and loosen the center jamb nut. Once the jamb nut has been removed you can pull the hose out of the subframe bracket.
Hope that helps.
|
|
Total posts: 440
Last post: May 2, 2017 Member since:Sep 24, 2013
|
Cars in Garage: 0
Photos: 0 WorkBench Posts: 0 |

I am in the middle of replacing the rear rubber lines with my shiny new steal braded. My question is how the heck do I get that subframe to detach? I am trying to get a 16mm open socket round the "hose-side" and a 15mm line wrench (yay! new tool) on the outside. But i just can get a good grip on the damn thing. Any tricks?
'73 Innocenti Mini (non-export)
Morristown, NJ
|
|
Total posts: 440
Last post: May 2, 2017 Member since:Sep 24, 2013
|
Cars in Garage: 0
Photos: 0 WorkBench Posts: 0 |
This video showed up on my YouTube feed
'73 Innocenti Mini (non-export)
Morristown, NJ
|
|
Total posts: 440
Last post: May 2, 2017 Member since:Sep 24, 2013
|
Cars in Garage: 0
Photos: 0 WorkBench Posts: 0 |
Gotchya, should i do this with everything off the car then?
It also can be done on the car, if your "assistant" is again willing to help 
This time lying under the car and supporting the backside of the backplate with a deep socket, just larger than the outside diameter of the adjusters and a heavy enough hammer to give it some "weight", while you punch the backplate from the outside.
And her knitting gear will not be needed this time 
If she´s not happy with this, it would be better to do it on the bench, as otherwise the backplate will "flex" too much without a solid suppourt...
Cheers, Diddi
I'll just take them off the car, seems like the "more right" way to do it anyway.
Thanks All
'73 Innocenti Mini (non-export)
Morristown, NJ
|
|
Total posts: 37
Last post: May 25, 2015 Member since:Dec 26, 2014
|
Cars in Garage: 0
Photos: 0 WorkBench Posts: 0 |
Gotchya, should i do this with everything off the car then?
It also can be done on the car, if your "assistant" is again willing to help
This time lying under the car and supporting the backside of the backplate with a deep socket, just larger than the outside diameter of the adjusters and a heavy enough hammer to give it some "weight", while you punch the backplate from the outside.
And her knitting gear will not be needed this time
If she´s not happy with this, it would be better to do it on the bench, as otherwise the backplate will "flex" too much without a solid suppourt...
Cheers, Diddi
|
|
Total posts: 8382
Last post: Jan 13, 2022 Member since:Feb 7, 2006
|
Cars in Garage: 0
Photos: 0 WorkBench Posts: 0 |
|
I would so you have a solid surface to work on when using the punch.
If clamping the hoses did in fact ruin them they were junk anyway, a small price to pay for finding out one of the problems and the front ones must be in good shape as they survived being clamped.
If in doubt, flat out. Colin Mc Rae MBE 1968-2007.
Give a car more power and it goes faster on the straights,
make a car lighter and it's faster everywhere. Colin Chapman.
|
|
Total posts: 440
Last post: May 2, 2017 Member since:Sep 24, 2013
|
Cars in Garage: 0
Photos: 0 WorkBench Posts: 0 |
RESULTS
Fronts: Both fronts showed the same thing. I could adjust the shoes, but then as my wife pumped the brakes i could watch the front/lower adjuster wiggle back and forth slowly moving it back out of adjustment.
Rears: I removed one clamp from the back passenger side and again had Liz pump the brakes. She said it was firm, but felt kind like a balloon depressing. I then had her repeat while i watch the rubber brake line. What do you know, it was pulsing like a balloon. The other side was worse off and was now leaking from where the clamp was.
Overall, the rear rubber needs to be replaced. I am kind of pissed the mechanic didn't recommend that or spot that. Those seem "easy" to replace and then rebleed. If i keep the cap on the MC should that limit how much brake fluid dumps out of the system?
What do i do about the front adjusters???
So, you finally found the reason for your brakes unadjusting themselfes at the front.
As I allready mentioned in my 1st reply, the front adjusters may unadjust themselfes when they are too loose.
With a new set of backplates, you might even have the same problem as they sometimes seem to be assembled too loose from the production.
A method that worked for me in the past is to use a centerpunch and apply a set of "dots" close to and all the way around the adjuster on the shoe side of the backplate.
This will tighten up the seat of the adjuster. Try to move them between "dots"! You don´t want to make them too tight.
As Shrimps mentioned, to prevent too much fluid draining out when replacing components, is to "lock" the brake pedal half way down. It works perfect! The "foil under cap" method also never worked for me.
You also can empty the whole system, using your pressure bleeding kit without fluid. Open the bleed nipples and catch the fluid until only air flows out. If the fluid is fresh and still clean and catched in a clean container, it might even be reused.
Regarding your rear brake hoses: As tsumini notes, the hoses might have become damaged because of clamping, as if done too hard, they will brake up internally.
I don´t think, that the mechanic is to blame not to have it spotted...
Cheers, Diddi
Yeah that is a fair point about the hoses. The clamping was the finally straw that made the old rubber fail.
Would this be the right tool for making the "dot"?
//www.homedepot.com/p/General-Tools-Hardened-Steel-Center-Punch-89/202025674
How many dots do you think would be good? Should i start at 12-3-6-9 (o'clock), then test and add? Also confirm the process.
1. Remove shoes
2. Create center punches around the loose adjuster (see picutre with green marks)
3. This will push out on the adjuster and the washers on the engine side of the back plate giving more "bite"
4. Test
What did you mean by move them betwen the dots?
This center-punch in your link is more suitable for thin sheet metal. I´d use a solid one with a hammer.
Yes, start with a 12-3-6-9 o`clock pattern and try to move the adjuster in between applying the dots. If it still feels too lose, apply some more dots and re-try again. Repeat until you are happy with the adjusters.
Cheers, Diddi
Gotchya, should i do this with everything off the car then?
'73 Innocenti Mini (non-export)
Morristown, NJ
|
|
Total posts: 37
Last post: May 25, 2015 Member since:Dec 26, 2014
|
Cars in Garage: 0
Photos: 0 WorkBench Posts: 0 |
RESULTS
Fronts: Both fronts showed the same thing. I could adjust the shoes, but then as my wife pumped the brakes i could watch the front/lower adjuster wiggle back and forth slowly moving it back out of adjustment.
Rears: I removed one clamp from the back passenger side and again had Liz pump the brakes. She said it was firm, but felt kind like a balloon depressing. I then had her repeat while i watch the rubber brake line. What do you know, it was pulsing like a balloon. The other side was worse off and was now leaking from where the clamp was.
Overall, the rear rubber needs to be replaced. I am kind of pissed the mechanic didn't recommend that or spot that. Those seem "easy" to replace and then rebleed. If i keep the cap on the MC should that limit how much brake fluid dumps out of the system?
What do i do about the front adjusters???
So, you finally found the reason for your brakes unadjusting themselfes at the front.
As I allready mentioned in my 1st reply, the front adjusters may unadjust themselfes when they are too loose.
With a new set of backplates, you might even have the same problem as they sometimes seem to be assembled too loose from the production.
A method that worked for me in the past is to use a centerpunch and apply a set of "dots" close to and all the way around the adjuster on the shoe side of the backplate.
This will tighten up the seat of the adjuster. Try to move them between "dots"! You don´t want to make them too tight.
As Shrimps mentioned, to prevent too much fluid draining out when replacing components, is to "lock" the brake pedal half way down. It works perfect! The "foil under cap" method also never worked for me.
You also can empty the whole system, using your pressure bleeding kit without fluid. Open the bleed nipples and catch the fluid until only air flows out. If the fluid is fresh and still clean and catched in a clean container, it might even be reused.
Regarding your rear brake hoses: As tsumini notes, the hoses might have become damaged because of clamping, as if done too hard, they will brake up internally.
I don´t think, that the mechanic is to blame not to have it spotted...
Cheers, Diddi
Yeah that is a fair point about the hoses. The clamping was the finally straw that made the old rubber fail.
Would this be the right tool for making the "dot"?
//www.homedepot.com/p/General-Tools-Hardened-Steel-Center-Punch-89/202025674
How many dots do you think would be good? Should i start at 12-3-6-9 (o'clock), then test and add? Also confirm the process.
1. Remove shoes
2. Create center punches around the loose adjuster (see picutre with green marks)
3. This will push out on the adjuster and the washers on the engine side of the back plate giving more "bite"
4. Test
What did you mean by move them betwen the dots?
This center-punch in your link is more suitable for thin sheet metal. I´d use a solid one with a hammer.
Yes, start with a 12-3-6-9 o`clock pattern and try to move the adjuster in between applying the dots. If it still feels too lose, apply some more dots and re-try again. Repeat until you are happy with the adjusters.
Cheers, Diddi
|
|
Total posts: 440
Last post: May 2, 2017 Member since:Sep 24, 2013
|
Cars in Garage: 0
Photos: 0 WorkBench Posts: 0 |
RESULTS
Fronts: Both fronts showed the same thing. I could adjust the shoes, but then as my wife pumped the brakes i could watch the front/lower adjuster wiggle back and forth slowly moving it back out of adjustment.
Rears: I removed one clamp from the back passenger side and again had Liz pump the brakes. She said it was firm, but felt kind like a balloon depressing. I then had her repeat while i watch the rubber brake line. What do you know, it was pulsing like a balloon. The other side was worse off and was now leaking from where the clamp was.
Overall, the rear rubber needs to be replaced. I am kind of pissed the mechanic didn't recommend that or spot that. Those seem "easy" to replace and then rebleed. If i keep the cap on the MC should that limit how much brake fluid dumps out of the system?
What do i do about the front adjusters???
So, you finally found the reason for your brakes unadjusting themselfes at the front.
As I allready mentioned in my 1st reply, the front adjusters may unadjust themselfes when they are too loose.
With a new set of backplates, you might even have the same problem as they sometimes seem to be assembled too loose from the production.
A method that worked for me in the past is to use a centerpunch and apply a set of "dots" close to and all the way around the adjuster on the shoe side of the backplate.
This will tighten up the seat of the adjuster. Try to move them between "dots"! You don´t want to make them too tight.
As Shrimps mentioned, to prevent too much fluid draining out when replacing components, is to "lock" the brake pedal half way down. It works perfect! The "foil under cap" method also never worked for me.
You also can empty the whole system, using your pressure bleeding kit without fluid. Open the bleed nipples and catch the fluid until only air flows out. If the fluid is fresh and still clean and catched in a clean container, it might even be reused.
Regarding your rear brake hoses: As tsumini notes, the hoses might have become damaged because of clamping, as if done too hard, they will brake up internally.
I don´t think, that the mechanic is to blame not to have it spotted...
Cheers, Diddi
Yeah that is a fair point about the hoses. The clamping was the finally straw that made the old rubber fail.
Would this be the right tool for making the "dot"?
//www.homedepot.com/p/General-Tools-Hardened-Steel-Center-Punch-89/202025674
How many dots do you think would be good? Should i start at 12-3-6-9 (o'clock), then test and add? Also confirm the process.
1. Remove shoes
2. Create center punches around the loose adjuster (see picutre with green marks)
3. This will push out on the adjuster and the washers on the engine side of the back plate giving more "bite"
4. Test
What did you mean by move them betwen the dots?
'73 Innocenti Mini (non-export)
Morristown, NJ
|
|
Total posts: 37
Last post: May 25, 2015 Member since:Dec 26, 2014
|
Cars in Garage: 0
Photos: 0 WorkBench Posts: 0 |
RESULTS
Fronts: Both fronts showed the same thing. I could adjust the shoes, but then as my wife pumped the brakes i could watch the front/lower adjuster wiggle back and forth slowly moving it back out of adjustment.
Rears: I removed one clamp from the back passenger side and again had Liz pump the brakes. She said it was firm, but felt kind like a balloon depressing. I then had her repeat while i watch the rubber brake line. What do you know, it was pulsing like a balloon. The other side was worse off and was now leaking from where the clamp was.
Overall, the rear rubber needs to be replaced. I am kind of pissed the mechanic didn't recommend that or spot that. Those seem "easy" to replace and then rebleed. If i keep the cap on the MC should that limit how much brake fluid dumps out of the system?
What do i do about the front adjusters???
So, you finally found the reason for your brakes unadjusting themselfes at the front.
As I allready mentioned in my 1st reply, the front adjusters may unadjust themselfes when they are too loose.
With a new set of backplates, you might even have the same problem as they sometimes seem to be assembled too loose from the production.
A method that worked for me in the past is to use a centerpunch and apply a set of "dots" close to and all the way around the adjuster on the shoe side of the backplate.
This will tighten up the seat of the adjuster. Try to move them between "dots"! You don´t want to make them too tight.
As Shrimps mentioned, to prevent too much fluid draining out when replacing components, is to "lock" the brake pedal half way down. It works perfect! The "foil under cap" method also never worked for me.
You also can empty the whole system, using your pressure bleeding kit without fluid. Open the bleed nipples and catch the fluid until only air flows out. If the fluid is fresh and still clean and catched in a clean container, it might even be reused.
Regarding your rear brake hoses: As tsumini notes, the hoses might have become damaged because of clamping, as if done too hard, they will brake up internally.
I don´t think, that the mechanic is to blame not to have it spotted...
Cheers, Diddi
|
|
Total posts: 233
Last post: Oct 2, 2021 Member since:Jun 4, 2012
|
Cars in Garage: 0
Photos: 0 WorkBench Posts: 0 |
|
. If i keep the cap on the MC should that limit how much brake fluid dumps out of the system?
Not sure what you mean by "brake fluid dumps out of the system".
Once you get the hoses sorted (not baggy/stretchy) and the adjusters to stay put and the level corrct, the hydraulic system should be constant and not blow back through the cap or drain down. The cap should be vented (built in) and should be allowed to vent, otherewise the action of the master cylinder will cause a partial vacuum in the reservoir making it harder to apply brakes or needlessly pull fluid back when you release the pedal, or try to collapse the reservoir (not too likely). I don't know if Mini master cylinder caps have diaphragms in them but modern masters have a soft rubber diaphragm between the vent and the fluid to keep humidity out. When you depress the pedal, the fluid level goes down in the reservoir and comes back up when you let go, except for the amount needed to make up for shoe/pad wear over time. Atmospheric air pressure presses in on the diaphragm so the vacuum doesn't occur and suck the fluid back. The cap needs no seal othere than waht it was built with, and the vent needs to be functional. You should never see the dripping observed by your wife several posts back.
I can offer the following obserzations referencing a cross section view of a bean can MC:
Notice The small hole connecting the MC bore and the reservoir is just forward of the Primary seal cup lip. As the piston moves forward a small amount of brake fluid can be observed (looking down into fill hole) squirting back into the resevoir. Most noticable when tank is half full. If the resevior is kept topped up you may see cap discharge such as reported.
Additionaly notice that as the piston travels forward the secondary cup pushes brake fluid out the larger hole (Rearward of primary cup) and back into the resevoir. Normally I would say this is minimal since the pistion (Pedal) doesn't travel very far. However Poster has reported discharge thru the cap when the pedal goes to the floor. Constant top up and pedal movement would aggrevate the situation IMHO. I never fill MC resevoirs. They need a little room for fluctuation.
Rhetorical question: Why is it OK to clamp off a rubber hose and risk hose failure. Yes they do fatigue.
|
|
Total posts: 328
Last post: Jun 9, 2018 Member since:Sep 28, 2010
|
Cars in Garage: 1
Photos: 67 WorkBench Posts: 0 |
|
If i keep the cap on the MC should that limit how much brake fluid dumps out of the system?
I've tried the plastic wrap under the cap which was not helpful for me.
What does work very well is a section of PVC pipe long enough to push the brake pedal down about half way and then wedged behind the steering wheel. It wasn't my idea (read it on here though) and I'm not sure of the specifics but I believe the concept is the master cylinder piston when pushed into the bore will close off the passageway to the resevoir creating a sealed hydraulic system which will not allow the system to drain as easily. You'll lose a little but nothing like if you didn't do anything.
|
|
Total posts: 8382
Last post: Jan 13, 2022 Member since:Feb 7, 2006
|
Cars in Garage: 0
Photos: 0 WorkBench Posts: 0 |
|
Finish yourself the last mechanic did nothing for you and just left you with a car with no brakes, at least you will know it is done right.
If in doubt, flat out. Colin Mc Rae MBE 1968-2007.
Give a car more power and it goes faster on the straights,
make a car lighter and it's faster everywhere. Colin Chapman.
|
|
Total posts: 440
Last post: May 2, 2017 Member since:Sep 24, 2013
|
Cars in Garage: 0
Photos: 0 WorkBench Posts: 0 |
Ahhhh!
I beleive some people use the plastic wrap trick - remove the cap, cover opening with plastic wrap and replace cap lightly. The less air below the film the better - you're going to bleed it down later anyway, so fill the reservoir. Replace hoses etc. Remove plastic wrap and re-bleed system.
As you take the hose apart, wash down any painted surfaces affected - brake fluid makes an excellent paint remover (if you didn't already know that). since the bleeder is at the other 'end' of the cylinder, the hose may not drain out, so I'd just remove the hose. If you are relacing the backing plates to get good working adusters, then it's a bit academic anyway.
I don't plan our replacing the back plate on the rears, they are in decent condition. But i do follow you on the process. Either way I am going to have to rebleed EVERYTHING. ![]() robably a good time to replace my brake light switch while I'm at it. Super tempted to farm this out to a mechanic, but I've come so far, might as well finish what I started.
robably a good time to replace my brake light switch while I'm at it. Super tempted to farm this out to a mechanic, but I've come so far, might as well finish what I started.
'73 Innocenti Mini (non-export)
Morristown, NJ
|
|
Total posts: 8382
Last post: Jan 13, 2022 Member since:Feb 7, 2006
|
Cars in Garage: 0
Photos: 0 WorkBench Posts: 0 |
|
I wanted to know how to mimimize the mess when removing the damaged brake hose. I'm thinking to open the bleeder and set up a catch, then remove the hose from the subframe first allowing it to drain out through the bleeder. Then replace and rebleed.
I have a email out to 7Ent to see about replacing either just the backs or the enter setup.
Put some plastic under the vented cap it should slow it down some. Sometimes those rubber brake hoses come off relatively easy sometimes they are a bear. I would spray the hard lines with some pentrant before you start the job as the lines want to twist up on you if rusted. Some Mini rubber hoses i have had to cut up to get the necessary tools on them for removal. Glad you found the problem(s) it took a while but you got there eventually.
If in doubt, flat out. Colin Mc Rae MBE 1968-2007.
Give a car more power and it goes faster on the straights,
make a car lighter and it's faster everywhere. Colin Chapman.
|
|
Total posts: 9542
Last post: Apr 18, 2024 Member since:Aug 14, 2002
|
Cars in Garage: 0
Photos: 0 WorkBench Posts: 0 |
|
Ahhhh!
I beleive some people use the plastic wrap trick - remove the cap, cover opening with plastic wrap and replace cap lightly. The less air below the film the better - you're going to bleed it down later anyway, so fill the reservoir. Replace hoses etc. Remove plastic wrap and re-bleed system.
As you take the hose apart, wash down any painted surfaces affected - brake fluid makes an excellent paint remover (if you didn't already know that). since the bleeder is at the other 'end' of the cylinder, the hose may not drain out, so I'd just remove the hose. If you are relacing the backing plates to get good working adusters, then it's a bit academic anyway.
.
"Hang on a minute lads....I've got a great idea."


