

|
Total posts: 606
Last post: Feb 2, 2024 Member since:Mar 11, 2010
|
Cars in Garage: 0
Photos: 6 WorkBench Posts: 1 |
|
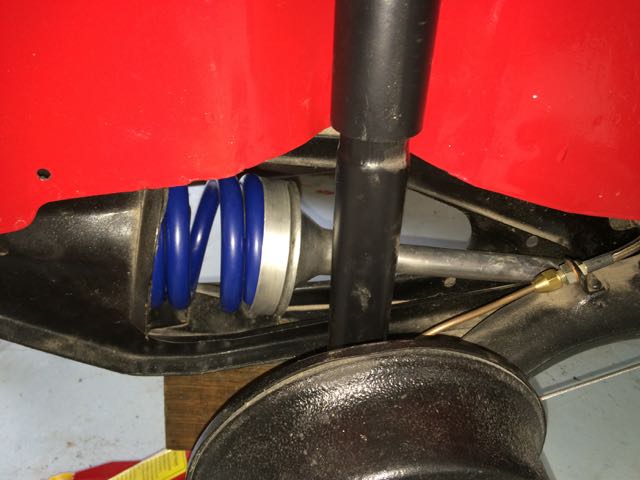
Rear fit in easily. Had to unscrew about 3/4" to take out the play when shocks are in.
 |
 |

|
|
Total posts: 2277
Last post: Oct 6, 2022 Member since:Nov 18, 2007
|
Cars in Garage: 0
Photos: 77 WorkBench Posts: 2 |
|
Yup. Sounds like you got it right. I mean... they came with the kit for a reason, right?![]() Glad you've got them in.
Glad you've got them in.
|
|
Total posts: 606
Last post: Feb 2, 2024 Member since:Mar 11, 2010
|
Cars in Garage: 0
Photos: 6 WorkBench Posts: 1 |
|
I want it as low as I can without modifications. And I think that is what I achieved, since I'd have to extend the hi-lows to make up the difference. Otherwise, they would bounce around and out of possition.
|
|
Total posts: 2277
Last post: Oct 6, 2022 Member since:Nov 18, 2007
|
Cars in Garage: 0
Photos: 77 WorkBench Posts: 2 |
|
Richard,
If you're not too concerned with lowering the car considerably, you'll have no issue having that spacer in there. If you're after stock ride height, it's probably better that you used it as it will mean less thread needs to be showing on the Hi-Lo's in order to achieve the height. If you do want to go lower than stock height by any considerable amount, you'll want to remove it.
|
|
Total posts: 606
Last post: Feb 2, 2024 Member since:Mar 11, 2010
|
Cars in Garage: 0
Photos: 6 WorkBench Posts: 1 |
|
The size was perfect for the opening in the hi-low, so I figured that is how it should go. With that it only took a couple of turns to take out all of the play and hold it tight.
|
|
Total posts: 1723
Last post: Oct 20, 2020 Member since:Jun 18, 1999
|
Cars in Garage: 0
Photos: 0 WorkBench Posts: 0 |
|
I see that you put the spacer inbetween the spring and hilo. are you sure you need that piece? I believe that less is more.
|
|
Total posts: 606
Last post: Feb 2, 2024 Member since:Mar 11, 2010
|
Cars in Garage: 0
Photos: 6 WorkBench Posts: 1 |
|
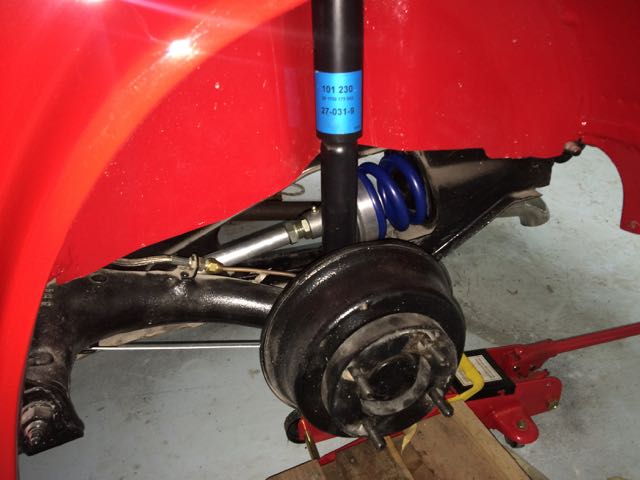
Here are the fronts installed, with a repaint of the subframe.
 |
|
|
Total posts: 606
Last post: Feb 2, 2024 Member since:Mar 11, 2010
|
Cars in Garage: 0
Photos: 6 WorkBench Posts: 1 |
|
Fronts are in. Super easy, 15 min per side without any compressor. Just put the sub frame upside down. I glued a thin (1/8") fiber reinforced circle of rubber on the frame where the spring sits.
(of course I had the engine out, so it was easy to flip the frame)
|
|
Total posts: 606
Last post: Feb 2, 2024 Member since:Mar 11, 2010
|
Cars in Garage: 0
Photos: 6 WorkBench Posts: 1 |
|
Today I got a new battery for my caliper, and discovered the difference in the front and back. Once you take them off the aluminum plates, they are the same height. But front coils are 14.9mm and the rear are 14.4mm. I guess that extra 0.5mm is for the extra weight the front carries.
|
|
Total posts: 2100
Last post: Oct 22, 2023 Member since:May 1, 2007
|
Cars in Garage: 1
Photos: 220 WorkBench Posts: 0 |
|
Riley, you have a hovercraft?![]()
Aye, and it's full of eels.
|
|
Total posts: 3749
Last post: Mar 26, 2024 Member since:Jun 23, 2000
|
Cars in Garage: 1
Photos: 201 WorkBench Posts: 0 |
|
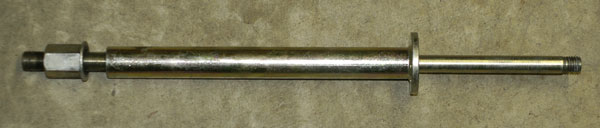
This is what I purchased for the metric version:
|
|
Total posts: 1723
Last post: Oct 20, 2020 Member since:Jun 18, 1999
|
Cars in Garage: 0
Photos: 0 WorkBench Posts: 0 |
|
I made mine using standard 1/2 x 13 threaded rod and welded a metric cap screw on the rod tip ( cutting the hex head off first ) and ground grooves for thread cleaning.
|
|
Total posts: 9543
Last post: Apr 20, 2024 Member since:Aug 14, 2002
|
Cars in Garage: 0
Photos: 0 WorkBench Posts: 0 |
|
I added a note about the tip.
The core material seems to be a tool-grade steel. With old, hard cones, the forces needed can be quite large. Standard grade threaded rod may not be enough, but judging form your work, you'll do OK!
.
"Hang on a minute lads....I've got a great idea."
|
|
Total posts: 606
Last post: Feb 2, 2024 Member since:Mar 11, 2010
|
Cars in Garage: 0
Photos: 6 WorkBench Posts: 1 |
|
Thanks. I'll rig something close enough.
|
|
Total posts: 9543
Last post: Apr 20, 2024 Member since:Aug 14, 2002
|
Cars in Garage: 0
Photos: 0 WorkBench Posts: 0 |
|
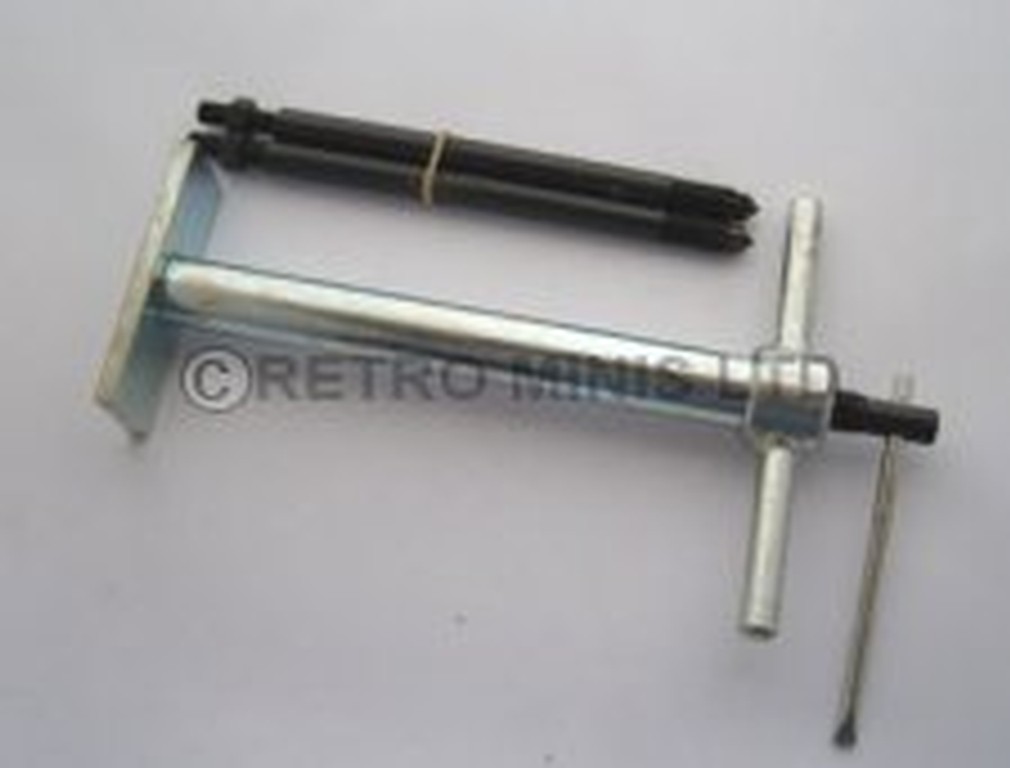
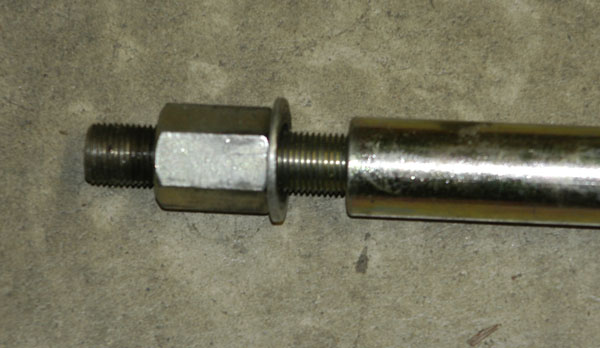
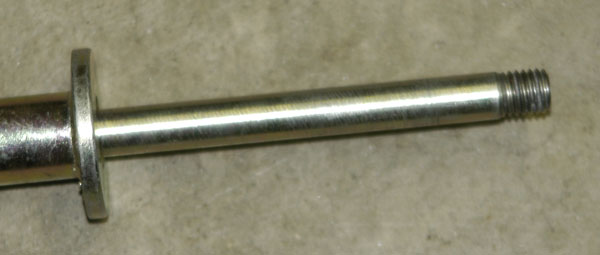
Anyone know the length of the spring compression tool?
I have one simialr to this: (measurements using tape measure!)
- outer shell 217mm, inside diameter 17mm, outside diameter 25mm (heavy wall!), base palte 100x40x8mm
- main pulling shaft with threaded T-pulling handle and sliding insertion handle (smaller one) 15or 16mm dia x 267mm overall. Bottom end bored and threaded for alternate metric or imperial pulling extension.
- pulling extension: diameter 12 or 13mm, oveall length 220mm which includes 10mm x 11mm diameter pointed unthreaded alignment tip, 20mm cone end thread (metric or imperial) and 25mm long x 9mm(+/-) dia threaded joining section with lock-nut.
- assmbled length of core : 465mm
- All theads right hand!
Note the bottom alignment tip is small enough to slide into the threads in the cone plate. The cone engagement tread has 3 thread-cleaning kerfs. The thread is not tapered like a threading tap and the kerfsa re not intednded to cut thread, but to only clean it. Insertion needs to be gradual and gentle so as not to damage the threads, which are probably compromised already in an old cone. The tip needs to be fully inserted into the cone.
.
"Hang on a minute lads....I've got a great idea."
|
|
Total posts: 2277
Last post: Oct 6, 2022 Member since:Nov 18, 2007
|
Cars in Garage: 0
Photos: 77 WorkBench Posts: 2 |
|
Riley, you have a hovercraft?![]()
|
|
Total posts: 606
Last post: Feb 2, 2024 Member since:Mar 11, 2010
|
Cars in Garage: 0
Photos: 6 WorkBench Posts: 1 |
|
Anyone know the length of the spring compression tool?
|
|
Total posts: 2100
Last post: Oct 22, 2023 Member since:May 1, 2007
|
Cars in Garage: 1
Photos: 220 WorkBench Posts: 0 |
|
the Japanese have a saying, okyakusamawa kamisama 'the customer is God.'
They also have another saying "herro!!!"
What a tuss.
Leun a sylli yw ow skath bargesi.
|
|
Total posts: 1911
Last post: Jan 18, 2016 Member since:Oct 30, 2002
|
Cars in Garage: 0
Photos: 0 WorkBench Posts: 0 |
|
the Japanese have a saying, okyakusamawa kamisama 'the customer is God.'
They also have another saying "herro!!!"
Red one sold years ago. Blue one "tuned" a bit.
|
|
Total posts: 8382
Last post: Jan 13, 2022 Member since:Feb 7, 2006
|
Cars in Garage: 0
Photos: 0 WorkBench Posts: 0 |
|
From what i have seen the older donuts last a lot longer than the newer 90's ones. Supposedly Rover sofened them up on the 90's cars to improve the ride. I have seen some older ones switched from front to rear with decent results.
If in doubt, flat out. Colin Mc Rae MBE 1968-2007.
Give a car more power and it goes faster on the straights,
make a car lighter and it's faster everywhere. Colin Chapman.


