
| Orig. Posting Date | User Name | Edit Date |
| Sep 4, 2014 04:38PM | jeg | |
| Sep 3, 2014 01:03PM | tmsmith | Edited: Sep 14, 2014 09:21AM |
| Aug 15, 2014 01:30PM | jeg | |
| Aug 15, 2014 12:16PM | tmsmith | |
| Aug 14, 2014 02:22PM | jeg | Edited: Jan 20, 2017 10:47AM |
| Aug 12, 2014 09:51AM | EnglishJob | |
| Aug 11, 2014 10:48AM | Air2air | |
| Aug 11, 2014 07:27AM | tmsmith | |
| Aug 7, 2014 11:23AM | pommie | |
| Aug 6, 2014 11:35PM | Air2air | Edited: Aug 6, 2014 11:37PM |
| Aug 6, 2014 04:02PM | malsal | |
| Aug 6, 2014 02:52PM | tmsmith | |
| Aug 6, 2014 02:47PM | tmsmith |

|
Total posts: 7075
Last post: Nov 5, 2019 Member since:Apr 25, 2000
|
Cars in Garage: 0
Photos: 0 WorkBench Posts: 0 |
|
That setup doesn't look too bad, at least it'll give some space when you want to remove the radiator. I tried to mount my fan like that, but it was as loud as a siren. It's really quiet now that I've moved it and mounted it to the radiator. I really wish I could remember to take the camera to the garage; you wouldn't believe how tight my MSC setup is.
Funny thing happened today - I took the mini out and brought the engine up to around 6500 rpm. With the 4-blade fan blowing through the electric fan, the small indicator lamp that I wired to the switch illuminated. It dims at lower rpms and gets brighter as rpms rise. There's no-glow below 4k. Looks like my electric fan is also a generator -
 The peasants are revolting...
 ![]()
"Gone with the Wind" - a brief yet moving vignette concerning lactose intolerance
|
|
Total posts: 3749
Last post: Mar 26, 2024 Member since:Jun 23, 2000
|
Cars in Garage: 1
Photos: 201 WorkBench Posts: 0 |
|
I found this old picture I had saved from somewhere and it how the new style Kenlowe with custom brackets fits in the location I would prefer.
It is possible the actual fan is smaller so maybe this is not a Kenlowe.
Terry
|
|
Total posts: 7075
Last post: Nov 5, 2019 Member since:Apr 25, 2000
|
Cars in Garage: 0
Photos: 0 WorkBench Posts: 0 |
|
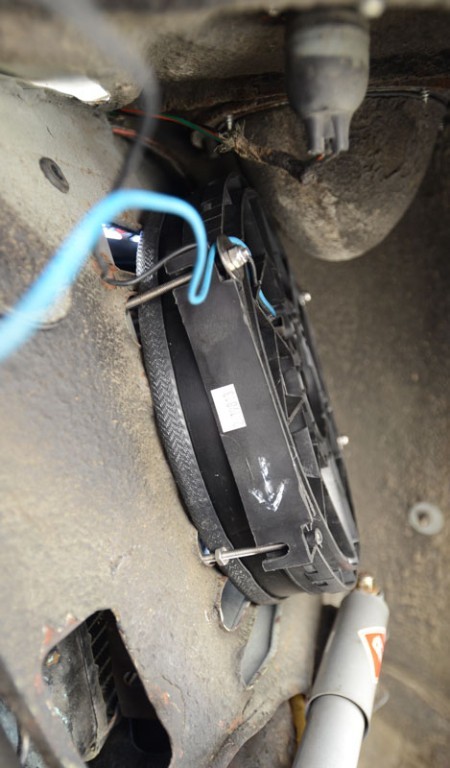
I didn't know KC was on Facebook; no, he's not building anything for me right now. The only modification to the inner wing that I needed was a slight massage with a shot-filled dead-blow hammer to give around 1/4" clearance for the electric fan.
Although my electric fan installation was developed to fit the later one-piece shroud, it's a devil to fit and I can't imagine trying to use anything but the 4-blade fan on the waterpump. As it is, tightening the fan screws was one flat at a time, took forever and I don't look forward to doing it again. Funny enough, though, I was forced to repeat the excercise when KC sent the small waterpump pulley in order to increase flow through the radiator when at idle. And, to add insult to injury, I thought it a good time to install the shiny, new waterpump which had arrived after I'd grown tired of waiting for it to be delivered and had reassembled the car.
Well, long story short, the new waterpump pulley/fan mounting flange didn't fit the interior bore of the small pulley; too big by approximately 3mm. I called KC and he measured one that he'd just received that same morning and his was fine, mine was bigger. It'll fit the large pulley just fine, but not the small. So, I'm still using the old waterpump (which is still good), have a too-big brand-new spare, and haven't had to use the electric fan since I installed the small pulley.
I'll try to take a few pictures the next time I'm up at the garage.
The peasants are revolting... ![]()
"Gone with the Wind" - a brief yet moving vignette concerning lactose intolerance
|
|
Total posts: 3749
Last post: Mar 26, 2024 Member since:Jun 23, 2000
|
Cars in Garage: 1
Photos: 201 WorkBench Posts: 0 |
|
Thanks for the photo John.
Is that a yellow engine KC is building for you on his facebook page?
I do not want to modify either the fender well "grate" or the early built-in shroud on the radiator side, so that limits the options.
The original fan had one of the mounting points very high into the bonnet drip rail. This one won go that high. but I may be able to raise it enough.
Terry
|
|
Total posts: 7075
Last post: Nov 5, 2019 Member since:Apr 25, 2000
|
Cars in Garage: 0
Photos: 0 WorkBench Posts: 0 |
|
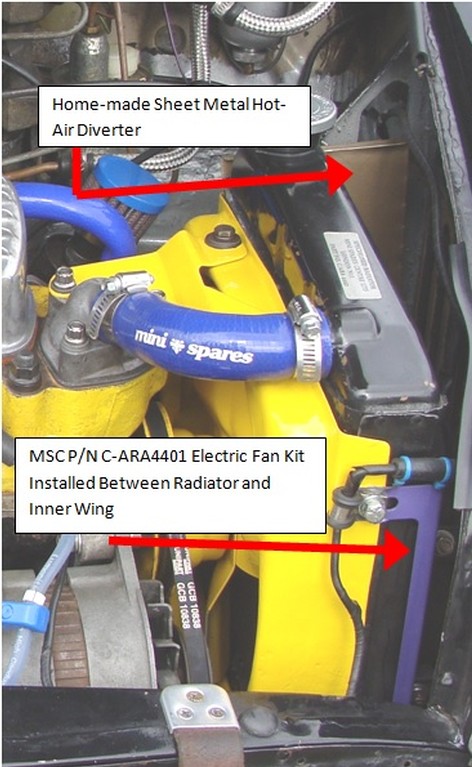
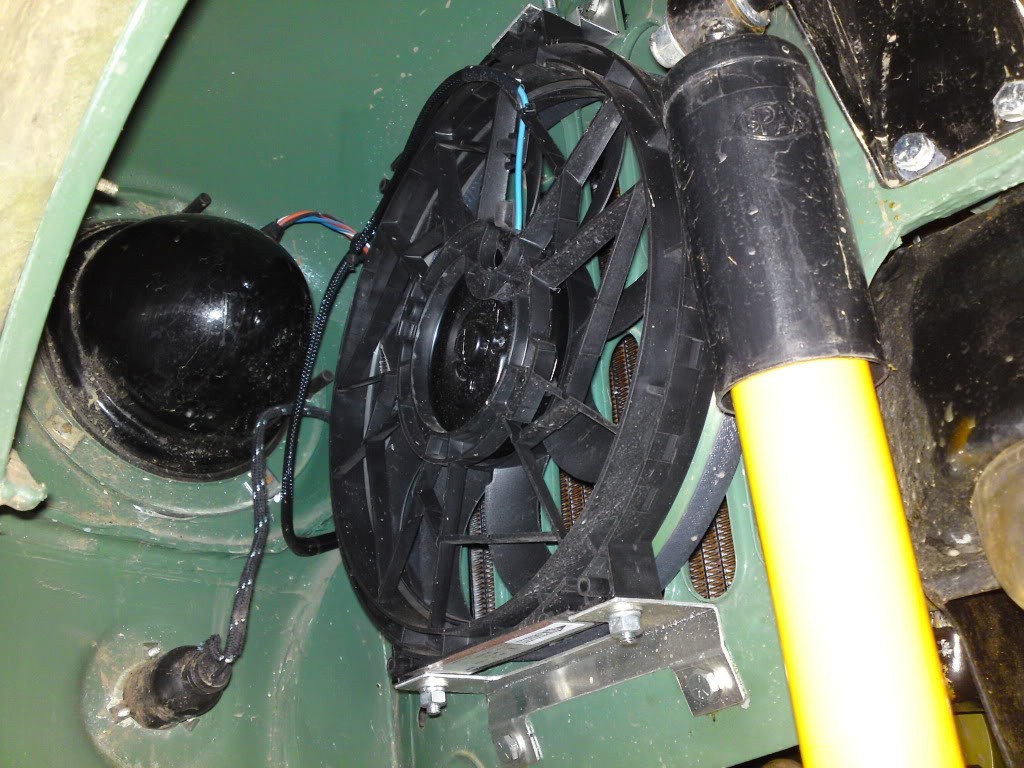
Although it's not exactly the same as yours, I initially installed my electric fan using zip-ties to the inner wing, but found it to be alarmingly noisy. It sounded like a siren. I now have it installed directly onto the radiator between the radiator and inner wing, using the shroud screws to hold the brackets. Much quieter, and very effective. I also made a simple sheet metal shroud extension to help close-off the rearmost edge of the radiator to inner wing gap. I figure that the gap between the bonnet and radiator probably won't allow too much hot air to escape into the engine compartment when moving, but the gap at the rear of the radiator should have 'something' to help direct hot air into the wheel well. It's fastened to the radiator, simply using only the uppermost shroud screw. No vibration and holding fast. Works for me -
The peasants are revolting... ![]()
"Gone with the Wind" - a brief yet moving vignette concerning lactose intolerance
|
|
Total posts: 21
Last post: Aug 17, 2016 Member since:Apr 5, 2011
|
Cars in Garage: 0
Photos: 0 WorkBench Posts: 0 |
|
Responding to Air2Air.
My 73 Innocenti has a Scott's fan (installed by a previous owner) mounted in the fender directly onto the grid using zip ties. It has a much lower profile than the Kenlowe fan and does not interfere with the wheel or suspension.
There's never been an issue drawing heat away from the radiator.
I also have a new Kenlowe fan that I have yet to install on my Cooper S because I really do not want to alter the fender grid.
1967 Austin Mini Cooper S
1970 Austin Mini Cooper S
1973 Innocenti Mini Cooper Export 1300
|
|
Total posts: 1557
Last post: Sep 26, 2016 Member since:Nov 24, 2012
|
Cars in Garage: 0
Photos: 0 WorkBench Posts: 0 |
Nice sealing there Terry. For what it's worth I didn't think to do any of that clearance measurement at all. Never an issue.
Thought I'd put that there in case I try to sell my car years from now and the buyer wants to find out how careful an owner I was.
When I sealed it, my concern was that the fan would merely draw from the square corners surrounding it, and not through the radiator. So I blanked off the square grill with rubber sheeting with a big hole in the middle. The tradeoff is that of course my flow is worse without the fan but much better with it on.
|
|
Total posts: 3749
Last post: Mar 26, 2024 Member since:Jun 23, 2000
|
Cars in Garage: 1
Photos: 201 WorkBench Posts: 0 |
|
Here is a shot of my attempt.
The older all metal fan fit in this position, but the motor was ailing. The headlight bucket prevents the fan assembly from moving further away from the wheel and tire line. To test, I used a spring compressor to flatten the rubber cone and then used a floor jack to the lift the suspension. It seemed to clear with about 1/2 inch at full lock, but on the road with body lean and other environmental factors, it is a no go.
I need to be creative or get a different fan. I do like the new style thermostatic control.
|
|
Total posts: 1290
Last post: Mar 9, 2019 Member since:Apr 2, 2002
|
Cars in Garage: 1
Photos: 1 WorkBench Posts: 4 |
|
Installed a Kenlowe 7 years ago, not sure if it is the same as the current model. Required a bit of trimming to fit, held in with zip ties. If I were to do it again I would mount it on the outside, if it fails in this location the radiator has to come out to get to it.
Si
[URL=//s279.photobucket.com/user/limmey/media/DSCN3443.jpg.html]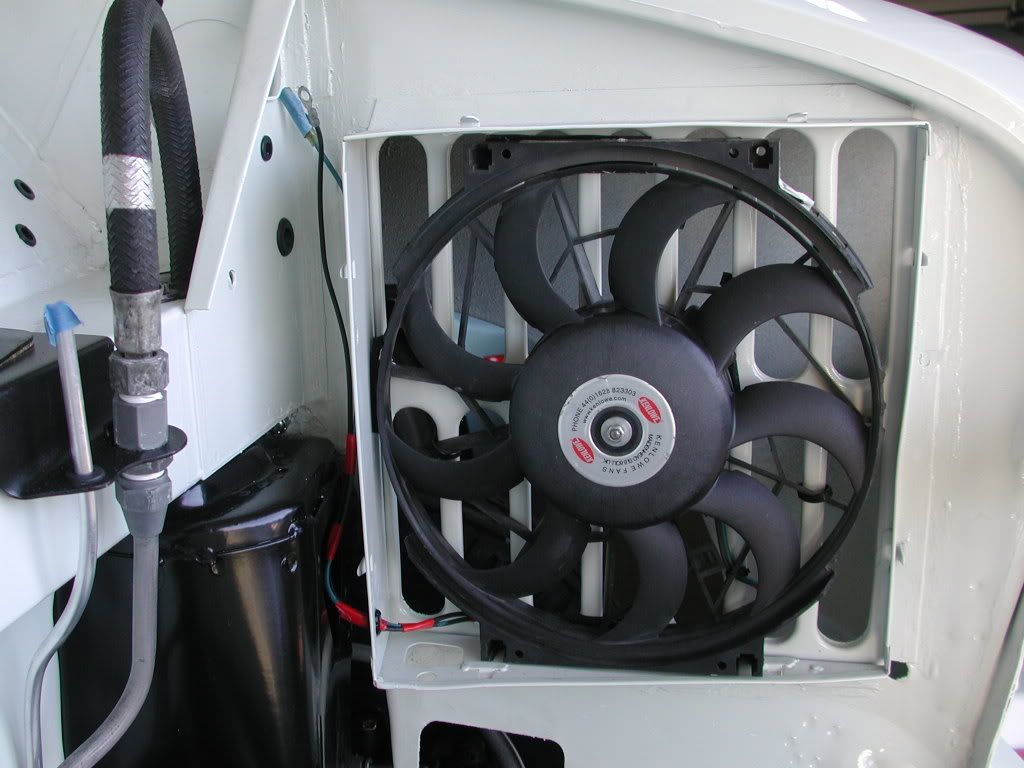 [/URL]
|
|
Total posts: 1557
Last post: Sep 26, 2016 Member since:Nov 24, 2012
|
Cars in Garage: 0
Photos: 0 WorkBench Posts: 0 |
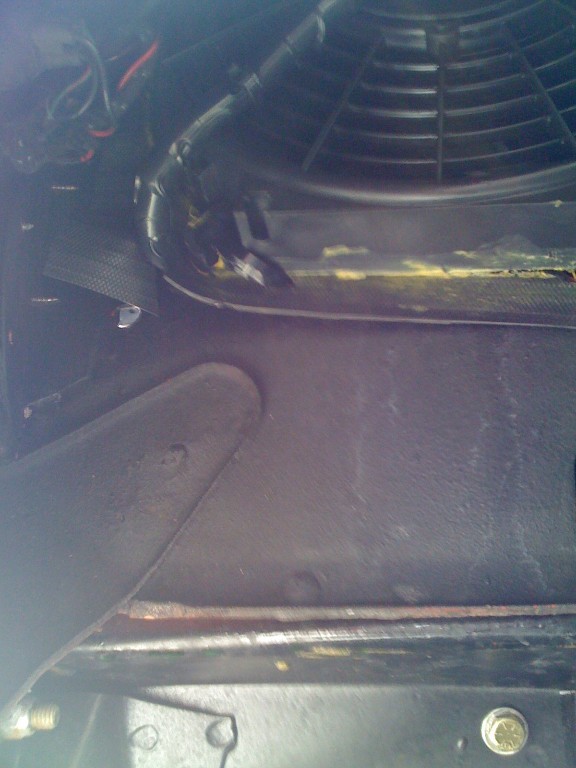
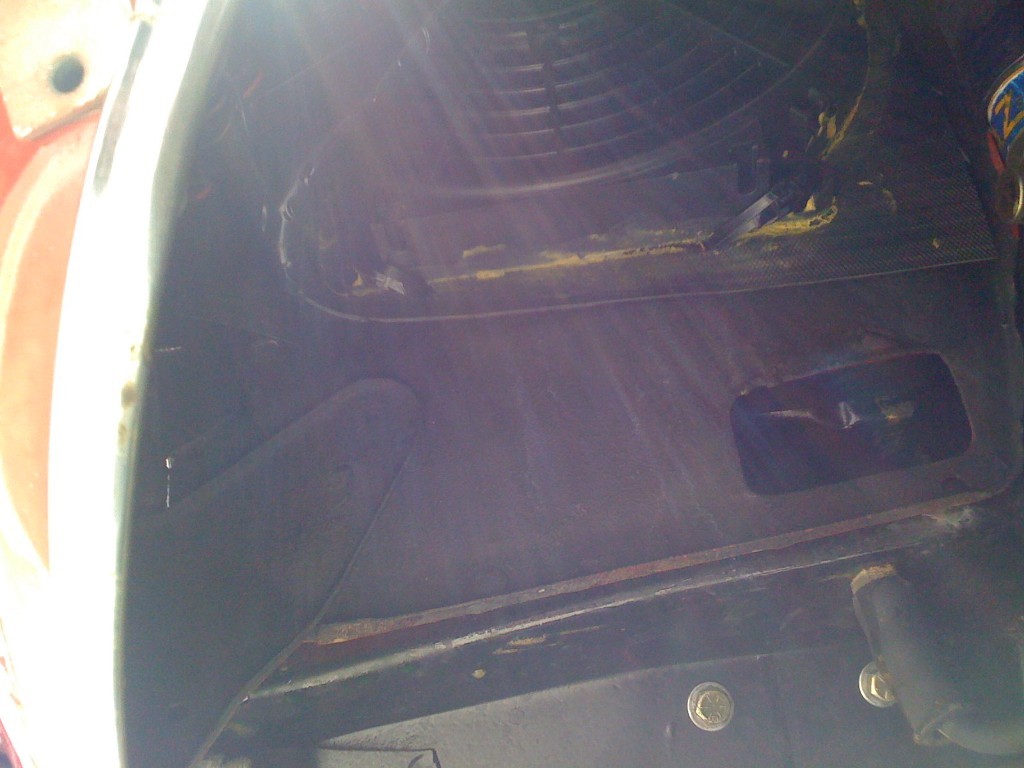
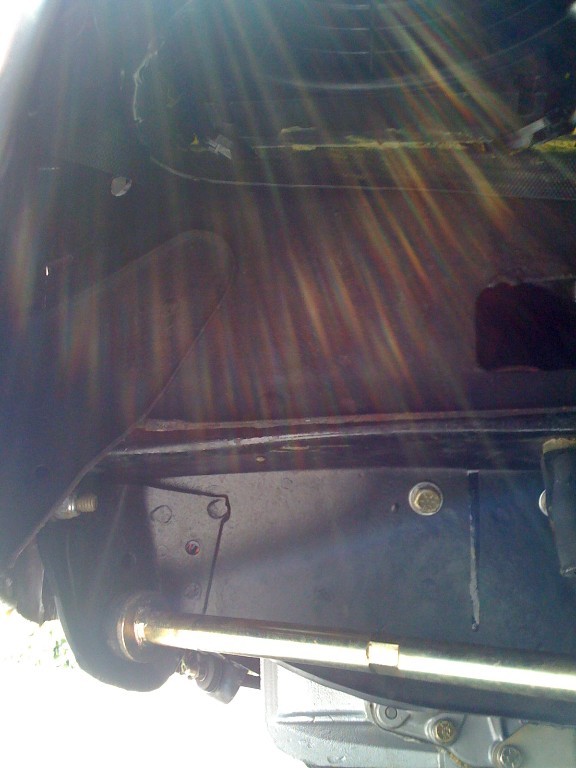
Same as Malcolm here. Sorry the photos aren't so hot. I decided to ziptie it to the grille just because anything else would have meant brackets, drilling etc and it's been great.
The yellowish mess is from permatexing a flexible rubber shroud around it on the exit side to ensure the fan was pulling only from the radiator side. Whether or not that shroud was a good idea is questionable since it blocks flow a bit when the fan is off.
|
|
Total posts: 8382
Last post: Jan 13, 2022 Member since:Feb 7, 2006
|
Cars in Garage: 0
Photos: 0 WorkBench Posts: 0 |
|
Not much help on the Kenlowe fan Terry but i have seen several 10 inch ebay fans mounted without the grate removal.
If in doubt, flat out. Colin Mc Rae MBE 1968-2007.
Give a car more power and it goes faster on the straights,
make a car lighter and it's faster everywhere. Colin Chapman.
|
|
Total posts: 3749
Last post: Mar 26, 2024 Member since:Jun 23, 2000
|
Cars in Garage: 1
Photos: 201 WorkBench Posts: 0 |
|
This site in the UK shows the suggested method:
//www.tomsminisite.co.uk/article_new.php?id=76&pid=11
|
|
Total posts: 3749
Last post: Mar 26, 2024 Member since:Jun 23, 2000
|
Cars in Garage: 1
Photos: 201 WorkBench Posts: 0 |
|
Anyone use a current Kenlowe fan on a MK I car with shroud?
Kenlowe Electric Fan Kit Mini & Mini Cooper S Part No: C-ARA4400
//www.minimania.com/part/C-ARA4400/Kenlowe-Electric-Fan-Kit-Mini--Mini-Cooper-S
The current version requires you to cut the fender well "grate" and mount the fan directly to the radiator.
I would prefer not to cut the body.
I tried mounting on the outside, but there is a slight amount of interference with the tire at full lock and full compression.
Terry


