
| Orig. Posting Date | User Name | Edit Date |
| Sep 12, 2014 07:03AM | Dan Moffet | Edited: Sep 13, 2014 07:51AM |
| Sep 12, 2014 06:55AM | Spitz | |
| Sep 12, 2014 06:23AM | MtyMous | |
| Sep 12, 2014 05:22AM | CooperTune | |
| Sep 11, 2014 12:12PM | Spitz | |
| Sep 11, 2014 09:35AM | 6464 | |
| Sep 11, 2014 09:18AM | zippypinhead | |
| Sep 11, 2014 08:04AM | Cup Cake | |
| Sep 11, 2014 07:49AM | Dan Moffet | |
| Sep 11, 2014 06:43AM | CooperTune | |
| Sep 11, 2014 06:34AM | Kermit Wold | |
| Sep 11, 2014 06:26AM | MtyMous | |
| Sep 11, 2014 05:09AM | CooperTune | |
| Sep 11, 2014 01:52AM | DRMINI | Edited: Sep 11, 2014 04:19PM |
| Sep 10, 2014 06:56PM | MtyMous |
Found 35 Messages

|
Total posts: 9542
Last post: Apr 18, 2024 Member since:Aug 14, 2002
|
Cars in Garage: 0
Photos: 0 WorkBench Posts: 0 |
|
The radius arm is a hollow casting. The grease nipple is on the outer end of the pivot shaft. when you apply the gease gun, grease gets into the needle bearing (shaft outer bearing) and squeezes out. The tube surrounds the shaft and guides grease to the bronze busing (shaft inner bearing). When the tube splits, your effort with the gease gun tries to fill the whole cavity of the swing arm with grease. (... or so I've read here.) When you grease, your supposed to continue until gease appears at the iner rubber seal. If it doesn't eventually show up, your tube is probably split, which is what my car seems to be doing.
What I'd like to know is why a bronze bushing at one end and needle bearing at the other? Why not needle bearings at both ends, like the front, or bushings? They take the same rotational force and (theoretically) the same laterel force. Is it because the knuckle joint is applying spring pressure near the inner end, in addition to cornering forces?
EDIT: I see from later posts I wasn't clear on inner/outer for the bearings and bushing. Bearings are on the iner end for the added stresses.
.
"Hang on a minute lads....I've got a great idea."
|
|
Total posts: 13978
Last post: Jan 15, 2024 Member since:Jan 22, 2003
|
Cars in Garage: 4
Photos: 381 WorkBench Posts: 1 |
|
The white plastic tube in this picture. Contains the grease.....otherwise it will leak into the arm and take a whole lot of grease to fill up...lol
"Everybody should own a MINI at some point, or you are incomplete as a human being" - James May
"WET COOPER", Partsguy1 (Terry Snell of Penticton BC ) - Could you send the money for the unpaid parts and court fees.
Ordered so by a Judge
|
|
Total posts: 2277
Last post: Oct 6, 2022 Member since:Nov 18, 2007
|
Cars in Garage: 0
Photos: 77 WorkBench Posts: 2 |
|
Can you guys elaborate (maybe post a picture) on what these tubes are? I'm not sure I know what you're talking about.
|
|
Total posts: 4134
Last post: Oct 13, 2020 Member since:Oct 8, 2011
|
Cars in Garage: 0
Photos: 0 WorkBench Posts: 0 |
|
Yes the bushing in the rear arms have to be reamed in line with the needle bearing. Takes a long reamer and a special floating bushing to align the two, Once the bush is reamed the tube and needle bearing can be pressed in. While cleaning up I found a couple of the old metal tubes, will look into have them made. The plastic ones tend to split when adding grease. Steve (CTR)
|
|
Total posts: 13978
Last post: Jan 15, 2024 Member since:Jan 22, 2003
|
Cars in Garage: 4
Photos: 381 WorkBench Posts: 1 |
|
This came in very handy:
//www.harborfreight.com/blind-hole-bearing-puller-95987.html
Definately not Snap-On quality. But, for something you're probably only going to use once, it'll do. Donated it to the Ohio Mini Owners when I was done with it.
BTW the price has gone up I only paid around $35 six or seven years ago.
I have a similar tool..maybe the same one....unfortunately none of the sizes fit the trailing arm bushing
"Everybody should own a MINI at some point, or you are incomplete as a human being" - James May
"WET COOPER", Partsguy1 (Terry Snell of Penticton BC ) - Could you send the money for the unpaid parts and court fees.
Ordered so by a Judge
|
|
Total posts: 1723
Last post: Oct 20, 2020 Member since:Jun 18, 1999
|
Cars in Garage: 0
Photos: 0 WorkBench Posts: 0 |
|
once you get the old bush out and new back in . they have to be reamed to size.
|
|
Total posts: 2510
Last post: Sep 5, 2015 Member since:Jul 15, 2010
|
Cars in Garage: 0
Photos: 0 WorkBench Posts: 0 |
|
This came in very handy:
//www.harborfreight.com/blind-hole-bearing-puller-95987.html
Definately not Snap-On quality. But, for something you're probably only going to use once, it'll do. Donated it to the Ohio Mini Owners when I was done with it.
BTW the price has gone up I only paid around $35 six or seven years ago.
|
|
Total posts: 10335
Last post: Aug 19, 2016 Member since:May 13, 2001
|
Cars in Garage: 0
Photos: 0 WorkBench Posts: 0 |
|
If you have to do the drop gear and 1st motion shaft races more than once in a lifetime you are running a business or have more than 1 Mini. I've done it twice (2 Mini situation), pryed out with a screw driver once and cut out once with a Dremel.
The power of accurate observation is commonly called cynicism by those who have not got it. G.B.S. Sarcasm is the lowest form of wit. Oscar Wilde
//www.cupcakecooper.ca/
|
|
Total posts: 9542
Last post: Apr 18, 2024 Member since:Aug 14, 2002
|
Cars in Garage: 0
Photos: 0 WorkBench Posts: 0 |
|
So a puller for the idler in the clutch housing
Then pay a machine shop to pull (and possibly press in new) the first motion bearing.
Upper and lower control arms can be whacked out in a vice with the right BFH and long enough tool? Obviously taking care not to gouge anything else.
Sound about right? Or am I mis-interpreting something?
I found the upper (front) control arm bearings came out in bits. The Hard paret was getting the outer race shells (very thin, hard steel) out involved cutting with a Dremel disk, and an assortment of sharp, pointy tools to collapse the cylinder shape. Once out, the bores seemed fine.The upper arm shafts were toast - fluted by dry bearing needles which really don't move all that much when the rubber cones are old and collapsed. (Standard lower control arms don't ahve bearings.)
I have yet to try the rear swing arms - the bearings seem OK, thouht I suspect one of the plastic grease cylinders may have split with age.
.
"Hang on a minute lads....I've got a great idea."
|
|
Total posts: 4134
Last post: Oct 13, 2020 Member since:Oct 8, 2011
|
Cars in Garage: 0
Photos: 0 WorkBench Posts: 0 |
|
Kerm, I found the picture again and will have Zip post it soemplace here. Steve (CTR)
|
|
Total posts: 387
Last post: Jan 17, 2020 Member since:Aug 12, 1999
|
Cars in Garage: 0
Photos: 0 WorkBench Posts: 0 |
|
Buy a pilot bearing remover from Snap-on for the idler bushings and put a hook on a slap hammer for the suspension bushings.
|
|
Total posts: 2277
Last post: Oct 6, 2022 Member since:Nov 18, 2007
|
Cars in Garage: 0
Photos: 77 WorkBench Posts: 2 |
|
So a puller for the idler in the clutch housing
Then pay a machine shop to pull (and possibly press in new) the first motion bearing.
Upper and lower control arms can be whacked out in a vice with the right BFH and long enough tool? Obviously taking care not to gouge anything else.
Sound about right? Or am I mis-interpreting something?
|
|
Total posts: 4134
Last post: Oct 13, 2020 Member since:Oct 8, 2011
|
Cars in Garage: 0
Photos: 0 WorkBench Posts: 0 |
|
If you only have to do it once you go crazy. If you do it all the time you look at it awhile then make a tool. Upper arms as fast as I can chuck them in the vise. Rear swing arms same thing just a little slower due to size. Welder for first motion shaft support and puller for idler in clutch housing and socket for idler in tranny case. Steve (CTR)
|
|
Total posts: 8645
Last post: Dec 16, 2020 Member since:Oct 27, 2000
|
Cars in Garage: 0
Photos: 0 WorkBench Posts: 0 |
|
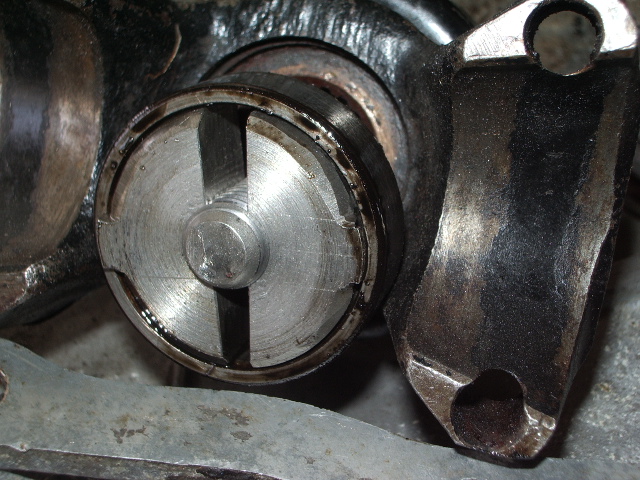
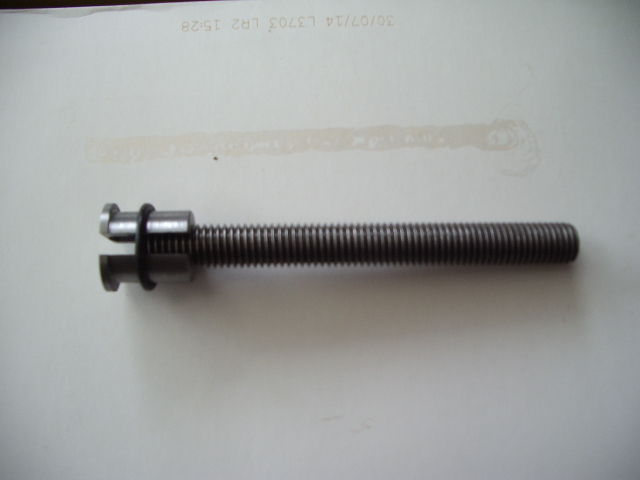
1. I made 2 tools, one for the idler bearing and the other for the outrigger bearing ring. Note the O-ring is just for storage so I don't lose the collets.
[edit[ For many years I used to MIG weld a 3/8 bolt into the idler bearing to pull it out, and another (on a big thick washer) into the outrigger bearing ring. But these split collet tools make it way easier and less messy.
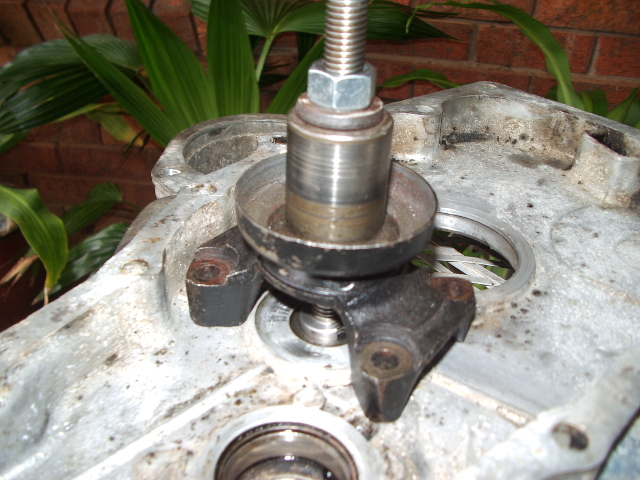
2. The smaller of the tools above also does the upper control arm bearings.
Next time I need to do the rear swing arm bearings I'll just copy this design, upsized to suit the 13/16" needle bearing.
3. To remove the swing arm bushing, I screw a 7/8 UNC tap in there for about an inch. Then I stick a 1/2" steel bar drift in there and knock the tap + bushing out. Rinse and repeat.
Kevin G
1360 power- Morris 1300 auto block, S crank & rods, Russell Engineering RE282 sprint cam, over 125HP at crank, 86.6HP at the wheels @7000+.
|
|
Total posts: 2277
Last post: Oct 6, 2022 Member since:Nov 18, 2007
|
Cars in Garage: 0
Photos: 77 WorkBench Posts: 2 |
|
How do you guys remove the following bearings or brass bushings?
1) Bearings for the drop gears that are pressed in
2) Bearings in the rear swing arms and upper control arms
3) Bushings in the swing arms
Any other tricky bearings im forgetting, and how are you pulling them out? Renting a bearing puller?
Found 35 Messages


