
Found 26 Messages

|
Total posts: 89
Last post: Apr 22, 2021 Member since:Jul 19, 2006
|
Cars in Garage: 0
Photos: 0 WorkBench Posts: 0 |
|
Poconos
|
|
Total posts: 1557
Last post: Apr 12, 2024 Member since:Mar 10, 1999
|
Cars in Garage: 0
Photos: 0 WorkBench Posts: 0 |
|
I do the string thing when I have lots of time. When I am in a hurry, I do this: I set the steering fairly straight ahead and push the car forward on a flat floor for a few feet, without touching the steering wheel. This movement takes up whatever toe play is in the steering, unless by some miracle you had it at zero toe. Stop. Now put a mark at the back of each front tire tread, right at axle height. I use a piece of masking tape stuck to the tire and mark it with a Sharpie. Put a carpenter square with one side flat on the floor, line up the vertical rule with your mark on the tape, put a mark on the floor straight down from the tire mark. Then do the same on the other side. Do the same thing on the back tires. Now roll the car forward without touching the steering wheel and when the mark comes around to axle height...STOP...don't overshoot and roll back a bit, that will mess things up. (You might want to be ready with a piece of wood to block the tire, sometimes the car wants to roll back.)
Now do the same thing with the carpenter square, make more marks on the floor straight down from your marks (which are now at the front of the tire). Push the car out of the way and measure the four track numbers, which are the distance between the four left/right pairs on the floor. Write these down. Then subtract your axle rear tracks from your axle front tracks, write down these two numbers. The forward roll distance between a tire's marks is tire circumference/2, meaning it is pi times the radius. With strings and other gizmos, you normally would measure toe at about the tire surface, which is one radius from the axle. To figure toe from your measurements, just divide by 3, or by pi if you are a nitpicker. Not much science but...facts in a hurry. Time spent: 5 minutes.
|
|
Total posts: 4134
Last post: Oct 13, 2020 Member since:Oct 8, 2011
|
Cars in Garage: 0
Photos: 0 WorkBench Posts: 0 |
|
I'm still wondering what happened with the vacuum leak. Steve (CTR)
|
|
Total posts: 1368
Last post: Jul 20, 2023 Member since:Jul 15, 2008
|
Cars in Garage: 0
Photos: 117 WorkBench Posts: 1 |
|
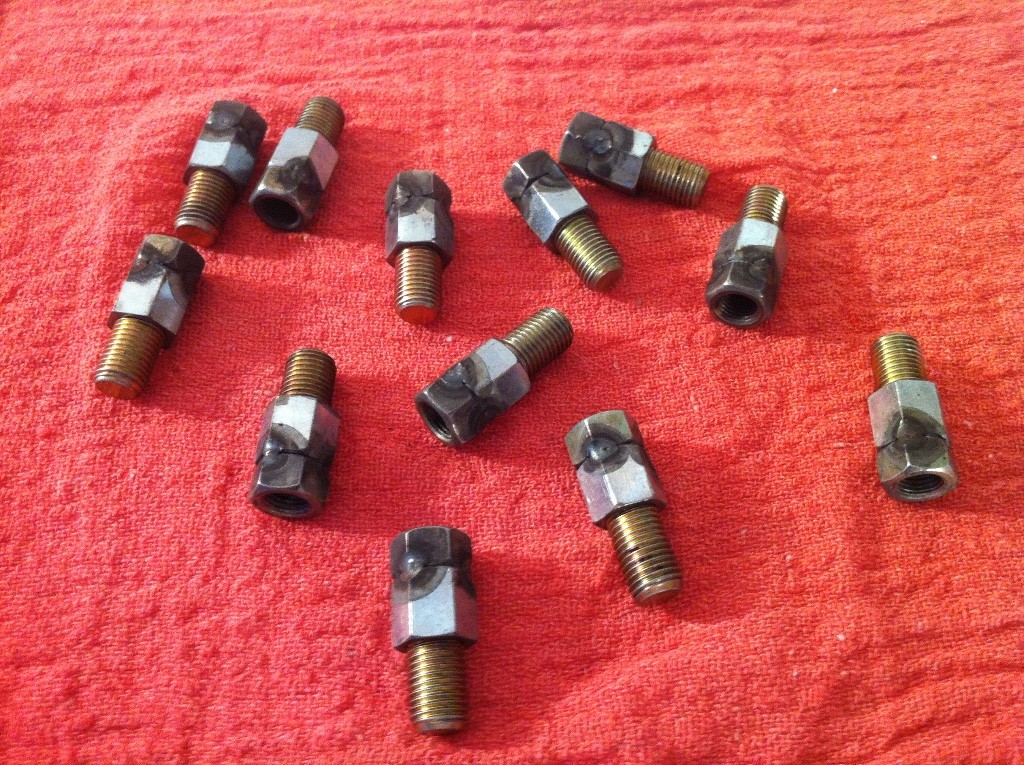
While my car was in and having some fab work done, the mechanic (my nephew) took it to a high-tech alignment shop he uses for wheel balancing and alignment. When the shop said their machine doesn't do 10" wheels, my nephew put together these adaptor studs. Says they'll work with most modern alignment equipment. They dialed in the castor, camber, toe and balance. Rosebud goes down the road straight, true and smooth—until I jump on it. Then, I'm in the other lane! But that's another story...
|
|
Total posts: 4134
Last post: Oct 13, 2020 Member since:Oct 8, 2011
|
Cars in Garage: 0
Photos: 0 WorkBench Posts: 0 |
|
I built my Model A Ford, Sprite, and first two minis in the parents single car. My Moke project is being worked on there now. I built my vintage mini and Alex's 1000E in the single car 11X19 at my house. I bought the I beam as a 22 footer had to saw it in half with chain saw type cut off saw. Imagine getting the two though the coal shoot and into the basement at my house. Getting the whole thing out and over to the shop was even more fun. My first commercial shop was 500 sq ft then I was offered an additional 5000 sq ft with a bath, electric, heat and a walk though door along with three more over head doors. Some think I'm crazy but it's about what a guy needs if he loves playing with little cars. Steve (CTR)
|
|
Total posts: 9544
Last post: Apr 24, 2024 Member since:Aug 14, 2002
|
Cars in Garage: 0
Photos: 0 WorkBench Posts: 0 |
|
I have a frame machine I built years ago which I can mount sub frames on and work from the center line. I use it when building race cars. I have fixtures that allow checking toe and camber with a dial indicator to .001. The main fixture is built of 12 inch I beams. Steve (CTR)
12" I-beams... that "big shop" advantage again!
Today I have to move the Mini closer to the wall for the winter and to make room for the snowblower in the garage.
.
"Hang on a minute lads....I've got a great idea."
|
|
Total posts: 4134
Last post: Oct 13, 2020 Member since:Oct 8, 2011
|
Cars in Garage: 0
Photos: 0 WorkBench Posts: 0 |
|
I have a frame machine I built years ago which I can mount sub frames on and work from the center line. I use it when building race cars. I have fixtures that allow checking toe and camber with a dial indicator to .001. The main fixture is built of 12 inch I beams. Steve (CTR)
|
|
Total posts: 275
Last post: Sep 13, 2016 Member since:Apr 21, 2006
|
Cars in Garage: 0
Photos: 0 WorkBench Posts: 0 |
|
Now that I understand, and a ball of string takes up a lot less room than two 12 foot steel framing studs. A little drilling, slotting and some adjustable stands to center on 10s /12s/ and 13s. A have no problem adjusting toe front or rear using a Dunlop gauge. With so many minis crabbing the relationship between the front and rear is what I'm interested in. I'll take some pictures once I refine this a little. Steve (CTR)
Start by working out the centreline of the car. You might need to work from the suspension mounting points to the centre with a plum bob and a pencil.
Once you have the centreline you then set your strings parallel from that.
Some race teams will make a pair of rods that they hang on the front and rear of the car and they tie the strings between them, pretty easy to make something to hook on a Minis bumper.
My own choice is a pair of telescopic curtain rods.
|
|
Total posts: 6469
Last post: Sep 29, 2022 Member since:Nov 2, 2006
|
Cars in Garage: 4
Photos: 1354 WorkBench Posts: 2 |
|
I visit an alignment shop in B.C.'s Fraser Valley. Owned by the driver of a turboed Mini Ice Racer who also has a very nice Woody...wife has Mini Pickup...there is a Moke and three other Minis at home, more Minis & stacks of subframes and gazillion bits elsewhere....
4-wheel laser alignment allows my Mini to be dialed in with the adjustable bits (though I use shims for the rear subframe mounting to heel board). It had 8.4" disc brakes installed by a PO in Australia so I put S drums on the rear when rebuilding the suspension last spring. I run standard toe-out at front, zero toe at rear and <1 deg. negative camber all round, rolling on 12" alloys with Yokie A539s.
Incidentally, when I stripped out the front suspension I found cracks in the original (41 year old) Wiggly pins for the inboard ends of the lower arms, renewed them, all bushings, knuckles and added longer, greaseable Sprite steering track rod ends.
You will meet both shop owners (Ice Racer and wife) at MMW 2015 - they were at MMW 2013 Bend, MMW 2012 Prescott Valley...MMW 1997 Vallejo (though not married then) etc.
|
|
Total posts: 9544
Last post: Apr 24, 2024 Member since:Aug 14, 2002
|
Cars in Garage: 0
Photos: 0 WorkBench Posts: 0 |
|
The steel stud idea sounds good - they (the light guage ones) are very light and can be "nested" into each other so the 2 take up the space of one. They can be hung on a couple of nails on the shop wall or ceiling. The 2x6 size even might be overkill - sagging from support to support isn't an issue since measurements to the wheels are taken horizontally. For the end pieces to hold them parallel you can use the top/bottom track, which is slightly wider than studs so they fit into the track. The 12-footers can also be cut shorter so the cross-pieces just clear bumpers.
Another idea: Has anybody tried those laser levels? Just make a bracket to hold 2 of them in front of or behind the car so the laser beams are parallel and level, then measure away. No strings or bars to get in the way. Maybe even a clips or brackets to position the frame against the bumper or body.
.
"Hang on a minute lads....I've got a great idea."
|
|
Total posts: 4134
Last post: Oct 13, 2020 Member since:Oct 8, 2011
|
Cars in Garage: 0
Photos: 0 WorkBench Posts: 0 |
|
Having a 5500 sq ft shop with 16 ft ceilings allows me to have all kinds of toys. I do a lot of sub frame removel and powder coating. Once both ends are repaired and rebuilt getting them installed and aligned is the next step. Steve (CTR)
|
|
Total posts: 2277
Last post: Oct 6, 2022 Member since:Nov 18, 2007
|
Cars in Garage: 0
Photos: 77 WorkBench Posts: 2 |
|
I'm pretty interested in setting up something repeatable once I get the mini back on the ground. I really want to be able to align it myself at home. I have a shop do it once but I had no way of checking their work. And Firestone won't touch my car anymore. And I really don't want them to. haha
|
|
Total posts: 4134
Last post: Oct 13, 2020 Member since:Oct 8, 2011
|
Cars in Garage: 0
Photos: 0 WorkBench Posts: 0 |
|
Now that I understand, and a ball of string takes up a lot less room than two 12 foot steel framing studs. A little drilling, slotting and some adjustable stands to center on 10s /12s/ and 13s. A have no problem adjusting toe front or rear using a Dunlop gauge. With so many minis crabbing the relationship between the front and rear is what I'm interested in. I'll take some pictures once I refine this a little. Steve (CTR)
|
|
Total posts: 275
Last post: Sep 13, 2016 Member since:Apr 21, 2006
|
Cars in Garage: 0
Photos: 0 WorkBench Posts: 0 |
|
The correct way to use string is to set the strings parallel about 4 inches away from the car and then measure from the string to the tire with a ruler or tape measure.
You can set the strings on stands or broom handles, as long as they are parallel and the car correctly centred between them.
You just need to remember when you measure that less is more because you are working backwards.
|
|
Total posts: 4134
Last post: Oct 13, 2020 Member since:Oct 8, 2011
|
Cars in Garage: 0
Photos: 0 WorkBench Posts: 0 |
|
I'm sure some effort is better than none. My point is the front track is wider than the rear track. Once the string is wrapped around the two long sides are not parallel to each other. This should introduce some toe out even if you make the wheel even front and rear to the string. The rear would have toe out as well if measured equal front and rear of rim. I don't know what angle the long sides would form buy I know someone who could figure it out. I realize a ball of string takes a lot less room than a couple of 12 foot steel 2 x 6s. With a little more thought I'll set it up so I can measure with dial indicators. Being able to work off zero front toe is key to keeping the rear from crabbing. The rear has more to do with handling than some think. Steve (CTR)
|
|
Total posts: 1723
Last post: Oct 20, 2020 Member since:Jun 18, 1999
|
Cars in Garage: 0
Photos: 0 WorkBench Posts: 0 |
|
coopertune, the string wraps all four tires in the middle of the wheel/tire, pull tight. let's start with front alignment, just loosen the stop nut. I first jack the mini up to get to both nuts, then drive around the block to get the mini to settle back down. then I wrap my string. without raising the mini, loosen the nuts further, to be able to adjust the the back of the wheels to measure 1/32 less than the front of the wheels on both left and right sides giving you the 1/16 toe out. tighten nuts. the same practice applies to the rear alignment . I have to admit that I don't pay attention to the rear swing arms as I don't have the adjustable brackets. try it. it is easy. just lots of measuring
|
|
Total posts: 4134
Last post: Oct 13, 2020 Member since:Oct 8, 2011
|
Cars in Garage: 0
Photos: 0 WorkBench Posts: 0 |
|
I added more info to my post. Is anyone autocrossing on 12s? I know radial tires like a lot more camber than bias ply types. Steve (CTR)
|
|
Total posts: 7075
Last post: Nov 5, 2019 Member since:Apr 25, 2000
|
Cars in Garage: 0
Photos: 0 WorkBench Posts: 0 |
|
Spitz, you've got mail -
 The peasants are revolting...
 ![]()
"Gone with the Wind" - a brief yet moving vignette concerning lactose intolerance
|
|
Total posts: 7075
Last post: Nov 5, 2019 Member since:Apr 25, 2000
|
Cars in Garage: 0
Photos: 0 WorkBench Posts: 0 |
|
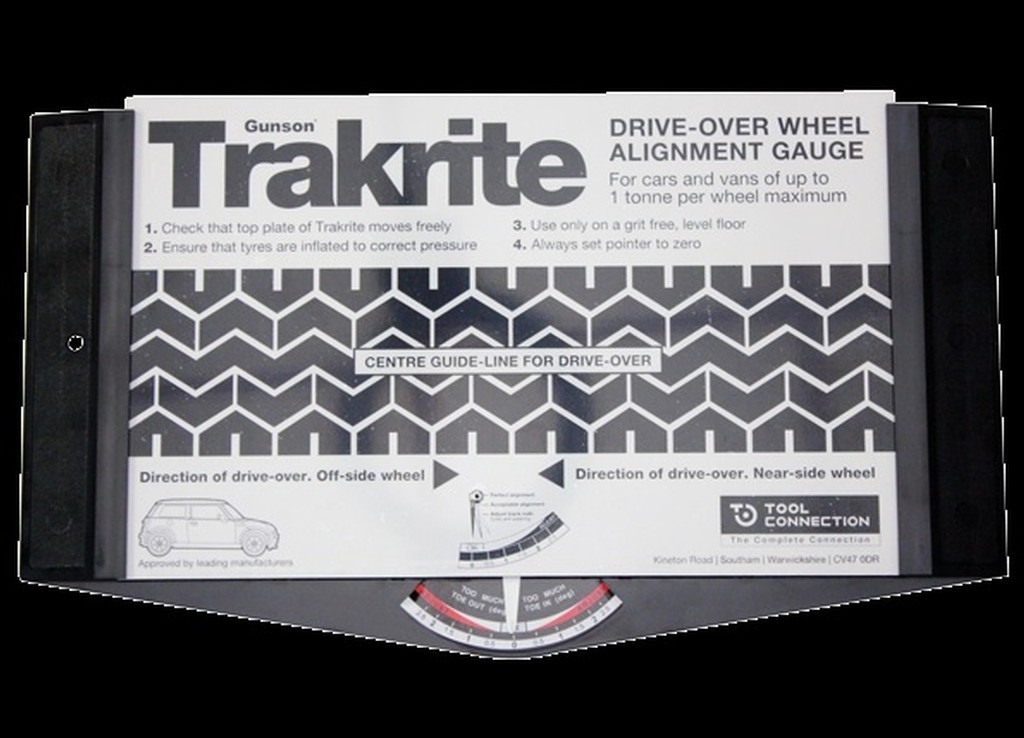
I've never been able to use the string method; Since the bodyshell isn't as wide in the rear as the front and the car is lowered, I always get hung up trying to space the string beyond the wheel arches and keep it centered on the wheels.
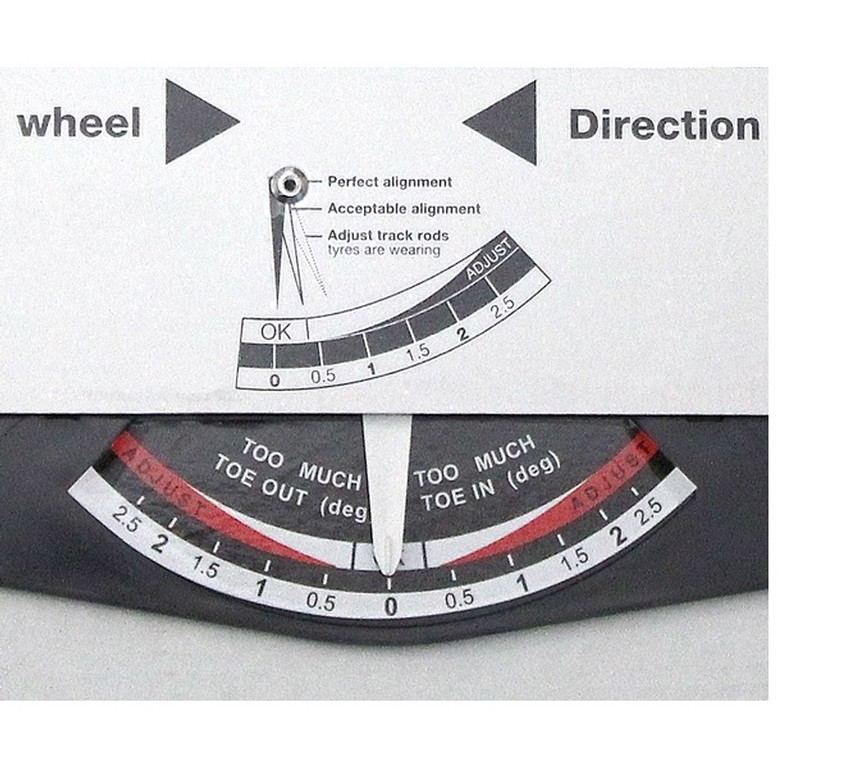
I bought one of these last week and I rolled the front wheels over it today. It doesn't measure what the car has as actual degrees, but rather displays 'Error' in degrees Toe In or Toe Out. I had 1½° (too much) toe out on the LH and the RH showed 1° Toe Out (too much); both were more than 'OK'. In other words, it shows degrees misalignment with the center section as 'ok'.
Since I don't know what 'OK' on the scale means yet, I'll be calling Gunson this week to try to find out, I adjusted the steering rod ends such that the pointer registers right on the edge of the 'OK' & Toe Out scale. It may not be perfect, but it's better than it was and both sides are equally misaligned. It's easy to use, lay it on the clean floor in front of the tire, steering wheel straight ahead. Use a straight edge against the side of the wheel/tire/tyre and align the device such that it's directly in-line with the wheel. Roll the car over it and look at the scale. Simple.
I'll roll the rears over it next time I'm in the garage.
All in all, a nifty bit of budget tool. The needle will fall out if you handle it without thinking about how you're holding it, but it goes back together without drama and comes complete with a hole to hang it on the wall when not in use. They thought of everything, including a picture of a BINI on the lower left corner.
EDIT: 28Nov14: Spoke w/Gunson yesterday. The technical service associate said that the entire 'OK' area of the scale represents 0.25°. So, if my thinking is correct, midway between the centerline and the edge of the 'OK' zone would be 1/8°; 1/8° = 7½ minutes. 0° 7.5"
The peasants are revolting... ![]()
"Gone with the Wind" - a brief yet moving vignette concerning lactose intolerance
|
|
Total posts: 4134
Last post: Oct 13, 2020 Member since:Oct 8, 2011
|
Cars in Garage: 0
Photos: 0 WorkBench Posts: 0 |
|
And how do you deal with the difference in track front and rear? Steve (CTR)
Found 26 Messages


