

|
Total posts: 8382
Last post: Jan 13, 2022 Member since:Feb 7, 2006
|
Cars in Garage: 0
Photos: 0 WorkBench Posts: 0 |
|
If you have bubbles you may have a leaking slave cylinder i believe i posted previously on this issue, the spring has nothing to do with air in the line. Keep an eye on the clutch reservoir fluid level and top up if necessary.
Which new part bent ?
If in doubt, flat out. Colin Mc Rae MBE 1968-2007.
Give a car more power and it goes faster on the straights,
make a car lighter and it's faster everywhere. Colin Chapman.
|
|
Total posts: 440
Last post: May 2, 2017 Member since:Sep 24, 2013
|
Cars in Garage: 0
Photos: 0 WorkBench Posts: 0 |
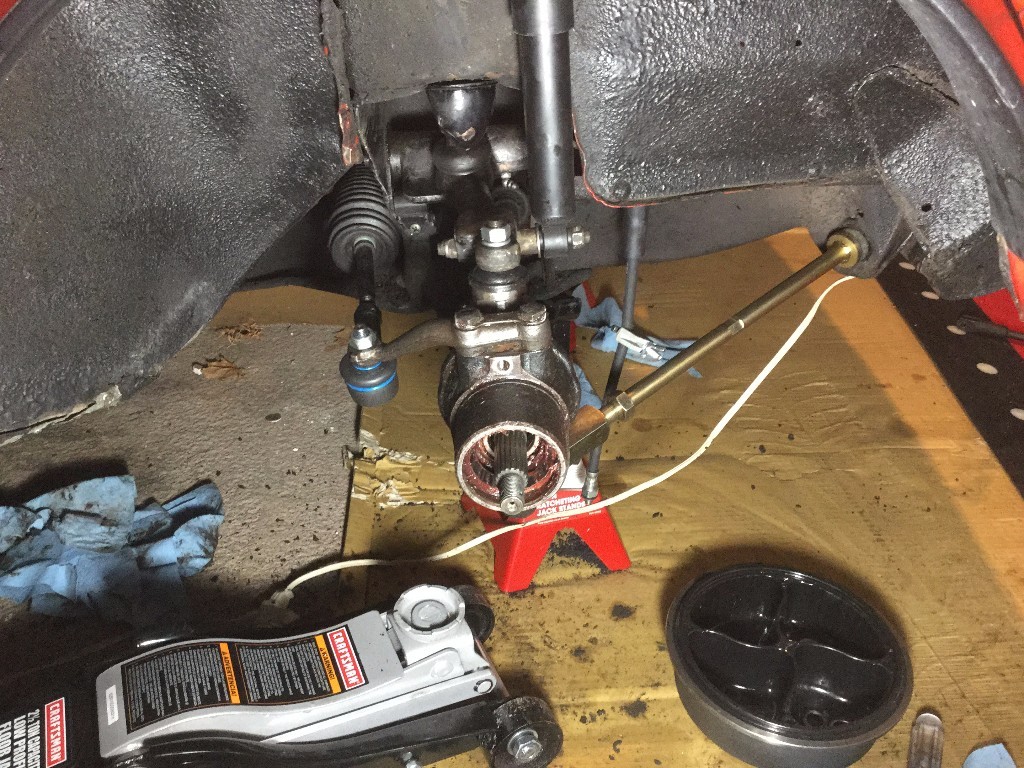
Not to lengthen your list of repairs but judging by the angle the clutch rod is at it looks like it may have wear on the clevis pins or the ball on the end of the arm itself, also if you have not been lubricating things the slave rod looks damp with fluid.
Regarding getting the fused together pieces apart if you are using your trumpets again and not using Hi Lo's you may have to remove the upper arm (or loosen up one side at least) and remove them in one piece, once out soak them with penetrating fluid and beat on them. Your other option is to cut them in half to get them out and use new ones or HI LO's which a lot of people use with new cones as they are high when installed and settle after a while.
While the mechanic was installing the stage 1 kit i had him replace the spring and slip.
1. At first the car would not go into gear. The old spring was soo loose it was hiding the fact i had some bubbles in the clutch line. A quick bleed and it was back to normal.
2. The new part is already bent! WTH?
'73 Innocenti Mini (non-export)
Morristown, NJ
|
|
Total posts: 440
Last post: May 2, 2017 Member since:Sep 24, 2013
|
Cars in Garage: 0
Photos: 0 WorkBench Posts: 0 |
Shade Tree Garage (Morristown NJ) was able to do the allignment for about 1.5 hours in labor. They said i had it prety closed just by eyeing up the old parts.
//www.shadetreegarage.com/
'73 Innocenti Mini (non-export)
Morristown, NJ
|
|
Total posts: 440
Last post: May 2, 2017 Member since:Sep 24, 2013
|
Cars in Garage: 0
Photos: 0 WorkBench Posts: 0 |
Both rears are done! Gas tank side was a bit of a pain in the boot, but finally got it. Now its time for a ride and to let her settle for a week or so before i get her leveled out and alligned.
Thanks all
Next project: Exhaust!
'73 Innocenti Mini (non-export)
Morristown, NJ
|
|
Total posts: 440
Last post: May 2, 2017 Member since:Sep 24, 2013
|
Cars in Garage: 0
Photos: 0 WorkBench Posts: 0 |
I just did the right side (non gas tank side). SO EASY. Took the damper of, then dropped the arm. I sawzalled the old trumpet and put it all back together. 45 minutes.
'73 Innocenti Mini (non-export)
Morristown, NJ
|
|
Total posts: 440
Last post: May 2, 2017 Member since:Sep 24, 2013
|
Cars in Garage: 0
Photos: 0 WorkBench Posts: 0 |
'73 Innocenti Mini (non-export)
Morristown, NJ
|
|
Total posts: 1649
Last post: Jun 22, 2022 Member since:Apr 30, 2009
|
Cars in Garage: 0
Photos: 0 WorkBench Posts: 0 |
|
HF sawzaw is for highly reccomended- only thing youll get wiht a better brand is more amps- and more bone jarring shaking... 20$ will get it done ( but even after removing trumpet- it is HARD to get the old cone out- and NEAR IMPOSSIBLE to get new cone back in with the upper arm in place..... LOoosen upper arm shat
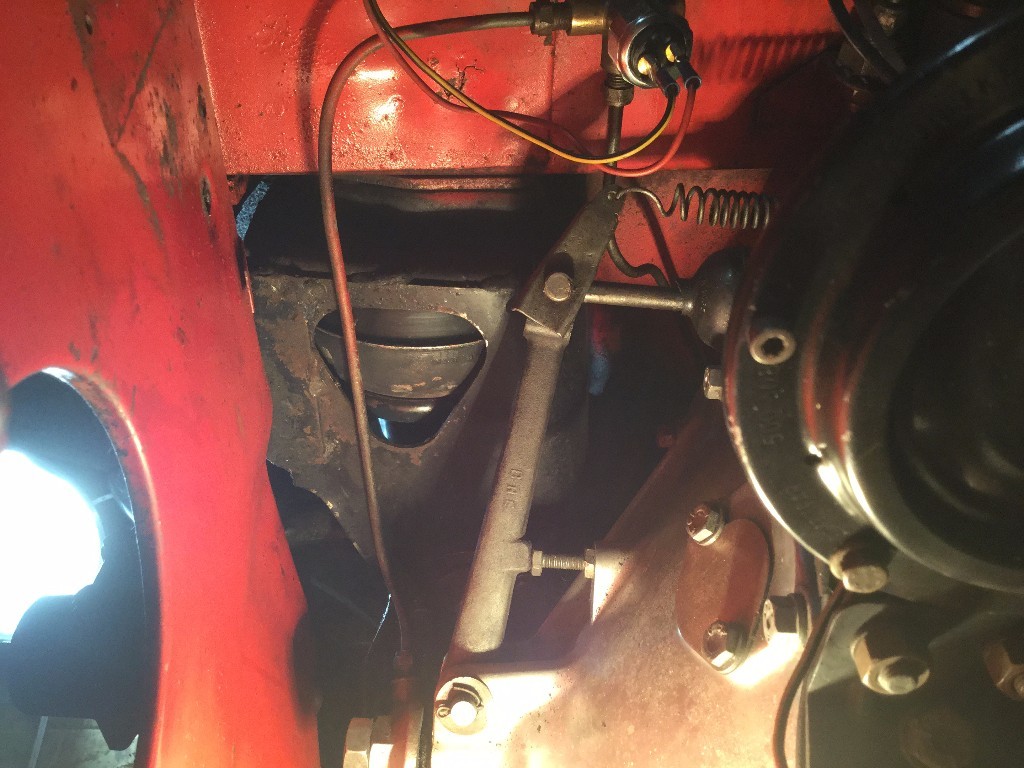
- Removing the upper arm - under the radiator side is competely doable. You do not have to loosen the BIG NUT for the shaft under the radiator - Simply take off the REAR big nut- and the two 1/4 (7/16th) nuts for the upper arm- and it wil move forward(should) as long as the arm isnt worn into grooves.
I attack with a LONG LONG extentions thru the front grille (removed) to remove those 1/4 Bolts on the front to pull the front upper rod out. NO need to remove radiator to do this = Plenty done this way
|
|
Total posts: 8382
Last post: Jan 13, 2022 Member since:Feb 7, 2006
|
Cars in Garage: 0
Photos: 0 WorkBench Posts: 0 |
|
After the fronts you will love doing the rears they fall out espacially if you are doing shocks and have them loose.
If in doubt, flat out. Colin Mc Rae MBE 1968-2007.
Give a car more power and it goes faster on the straights,
make a car lighter and it's faster everywhere. Colin Chapman.
|
|
Total posts: 440
Last post: May 2, 2017 Member since:Sep 24, 2013
|
Cars in Garage: 0
Photos: 0 WorkBench Posts: 0 |
Brother-in-law suggested I get a good one. A milwaukee 12 amp. Considering i am going to be doing the rear suspension next and we are in a new house, I'll probably need it. ![]() lus NEW TOOL!
lus NEW TOOL!
'73 Innocenti Mini (non-export)
Morristown, NJ
|
|
Total posts: 440
Last post: May 2, 2017 Member since:Sep 24, 2013
|
Cars in Garage: 0
Photos: 0 WorkBench Posts: 0 |
A sawsall is best, If you are not going to use it much Harbor Freight has them on sale occasionally for $20. I have seen one guy chisel one to death it is only aluminum so is pretty easy to destroy. You don't have to fully remove the spindle or the arm just slide it back enough when loose to "cock" it to one side enough to be out of the way. Radiator removal is pretty simple as long as you have a MK III or newer Mini with the one piece shroud, if you go that route replace the water pump and hoses along with the fan belt and by pass hose (if you have one) while you are in there.
"While you are in there" That should be the classic car battle cry.
I think i will just buy the Sawzall.
'73 Innocenti Mini (non-export)
Morristown, NJ
|
|
Total posts: 8382
Last post: Jan 13, 2022 Member since:Feb 7, 2006
|
Cars in Garage: 0
Photos: 0 WorkBench Posts: 0 |
|
A sawsall is best, If you are not going to use it much Harbor Freight has them on sale occasionally for $20. I have seen one guy chisel one to death it is only aluminum so is pretty easy to destroy. You don't have to fully remove the spindle or the arm just slide it back enough when loose to "cock" it to one side enough to be out of the way. Radiator removal is pretty simple as long as you have a MK III or newer Mini with the one piece shroud, if you go that route replace the water pump and hoses along with the fan belt and by pass hose (if you have one) while you are in there.
If in doubt, flat out. Colin Mc Rae MBE 1968-2007.
Give a car more power and it goes faster on the straights,
make a car lighter and it's faster everywhere. Colin Chapman.
|
|
Total posts: 440
Last post: May 2, 2017 Member since:Sep 24, 2013
|
Cars in Garage: 0
Photos: 0 WorkBench Posts: 0 |
Good to see you are making progress but if you were installing Hi Lo's why didn't you save yourself some time and just cut the trumpets as i suggested? Anyway this way you are getting to know and understand the workings of your Mini first hand and that you can't put a price on ;-) Good work.
Ijust don't own anything to cut through metal like that. I have a dremil but it isn't large enough....
That leads me to the driver side (radiator side). I just don't see how i will have enough clearance to get the pin out for the upper controll arm. I am thinking i will just rent/buy a sawsall. Any other options? Removing the radiator looks to be pretty straight forward, but i would rather not take something else apart! :-)
'73 Innocenti Mini (non-export)
Morristown, NJ
|
|
Total posts: 8382
Last post: Jan 13, 2022 Member since:Feb 7, 2006
|
Cars in Garage: 0
Photos: 0 WorkBench Posts: 0 |
|
Good to see you are making progress but if you were installing Hi Lo's why didn't you save yourself some time and just cut the trumpets as i suggested? Anyway this way you are getting to know and understand the workings of your Mini first hand and that you can't put a price on ;-) Good work.
If in doubt, flat out. Colin Mc Rae MBE 1968-2007.
Give a car more power and it goes faster on the straights,
make a car lighter and it's faster everywhere. Colin Chapman.
|
|
Total posts: 440
Last post: May 2, 2017 Member since:Sep 24, 2013
|
Cars in Garage: 0
Photos: 0 WorkBench Posts: 0 |
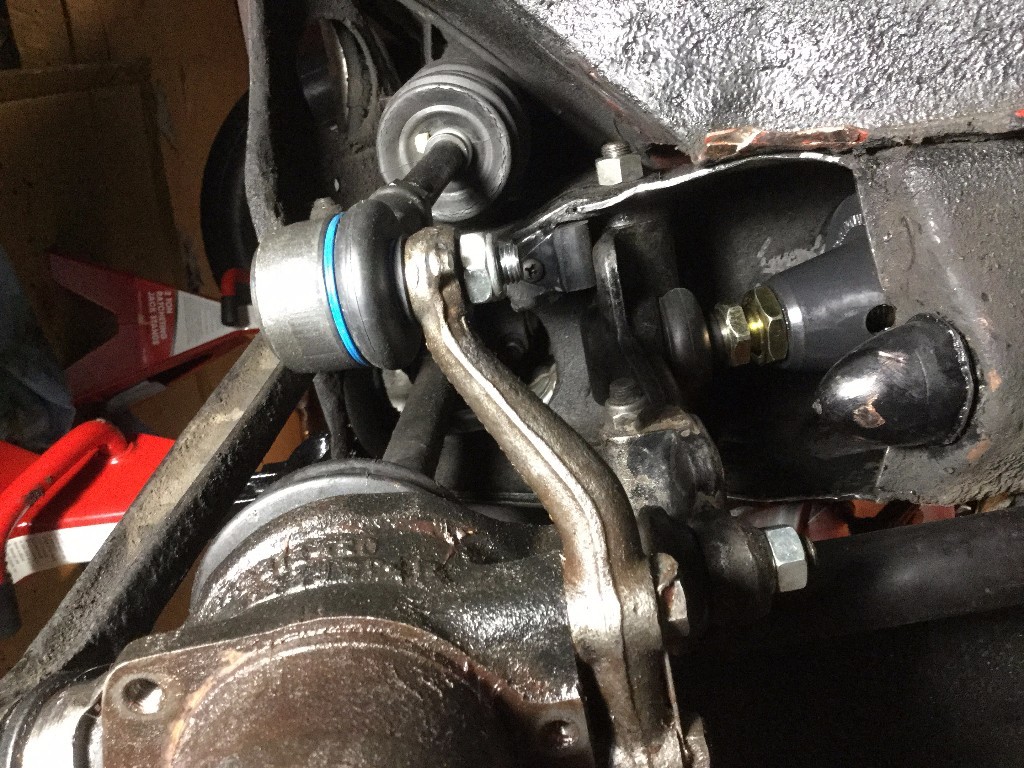
Good Job !
I was going to say....put some anti sieze between the spring and the high low....but you have it together already
No worries! I put a healthy slathering between the HiLo and the rubbers and between the rubber and the sub frame tower.
Oh yeah, new rubber bump stops (under the upper control arm and the cone shape ones).
'73 Innocenti Mini (non-export)
Morristown, NJ
|
|
Total posts: 13978
Last post: Jan 15, 2024 Member since:Jan 22, 2003
|
Cars in Garage: 4
Photos: 381 WorkBench Posts: 1 |
|
Good Job !
I was going to say....put some anti sieze between the spring and the high low....but you have it together already
"Everybody should own a MINI at some point, or you are incomplete as a human being" - James May
"WET COOPER", Partsguy1 (Terry Snell of Penticton BC ) - Could you send the money for the unpaid parts and court fees.
Ordered so by a Judge
|
|
Total posts: 440
Last post: May 2, 2017 Member since:Sep 24, 2013
|
Cars in Garage: 0
Photos: 0 WorkBench Posts: 0 |

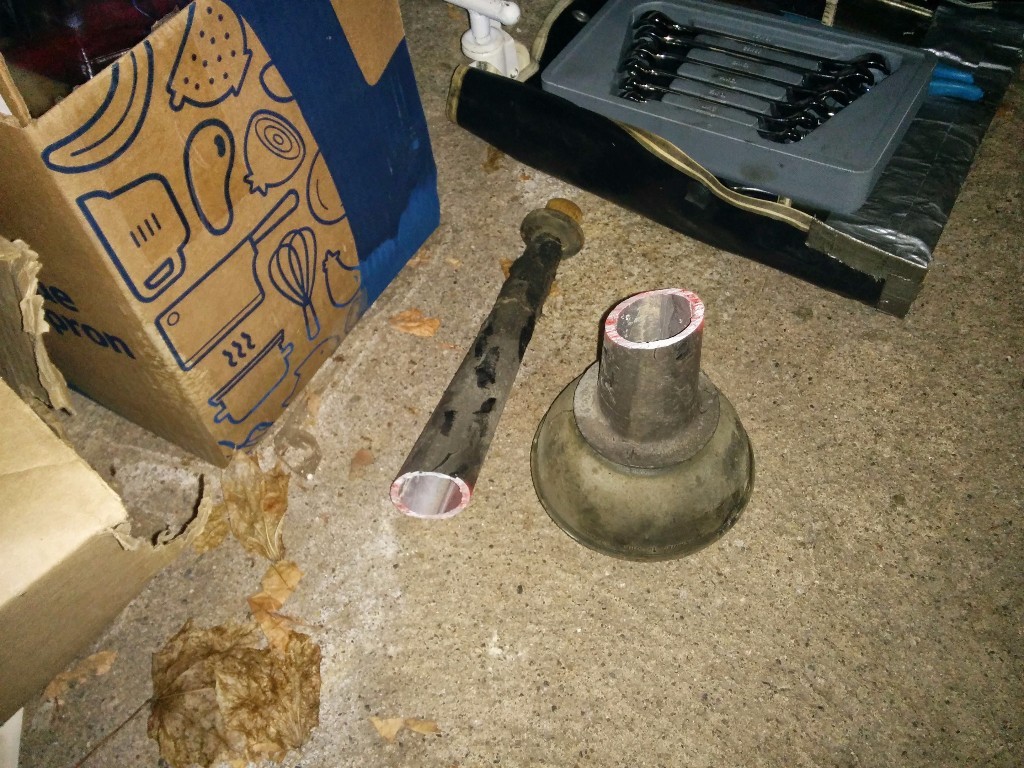
PROGRESS
Got the old cones and trumpets out. I learned that i could get a lot more torque on the compression tool if I put a 6" piece of pipe on it. New tie bar installed, new steeering arm end installed, new HiLos installed, new rubber cones installed.
Just stopped for dinner, but the next step is to put the new backing plate on and FINISH MY STUPID BREAK JOB FROM DECEMBER LAST YEAR.
PS
All the holes in the old rubber was an attempted to get it to come apart and dislodge it self before i just took the damn upper arm out :-)
'73 Innocenti Mini (non-export)
Morristown, NJ
|
|
Total posts: 440
Last post: May 2, 2017 Member since:Sep 24, 2013
|
Cars in Garage: 0
Photos: 0 WorkBench Posts: 0 |
SOMETHING has to go in my favor :-)
'73 Innocenti Mini (non-export)
Morristown, NJ
|
|
Total posts: 8382
Last post: Jan 13, 2022 Member since:Feb 7, 2006
|
Cars in Garage: 0
Photos: 0 WorkBench Posts: 0 |
|
PROGRESS!
After fighting to get the rubber cone and trumpet out as one fused peice i gave up. I even tried drilling a bunch of holes through the rubber cone to give it some more play. No dice. I googled a bunch of upper arm removals and it was easy! It looks like its been well greased and came right out. I am nearly at the re-assemply point! I put on a new pump stop and just need to wait for my wife to get home to hold the new rupper cone in place it gets screwed into the compressor tool. Then i can put it all back together!
Step #498 will be moving to the driver side.....CAN'T WAIT.....
Lucky you they are sometimes frozen to the shafts too.
If in doubt, flat out. Colin Mc Rae MBE 1968-2007.
Give a car more power and it goes faster on the straights,
make a car lighter and it's faster everywhere. Colin Chapman.
|
|
Total posts: 440
Last post: May 2, 2017 Member since:Sep 24, 2013
|
Cars in Garage: 0
Photos: 0 WorkBench Posts: 0 |
PROGRESS!
After fighting to get the rubber cone and trumpet out as one fused peice i gave up. I even tried drilling a bunch of holes through the rubber cone to give it some more play. No dice. I googled a bunch of upper arm removals and it was easy! It looks like its been well greased and came right out. I am nearly at the re-assemply point! I put on a new pump stop and just need to wait for my wife to get home to hold the new rupper cone in place it gets screwed into the compressor tool. Then i can put it all back together!
Step #498 will be moving to the driver side.....CAN'T WAIT.....
'73 Innocenti Mini (non-export)
Morristown, NJ
|
|
Total posts: 440
Last post: May 2, 2017 Member since:Sep 24, 2013
|
Cars in Garage: 0
Photos: 0 WorkBench Posts: 0 |
Another follow up (from the Mechanic). I dropped off the hub, bearings, and ball joints to get installed. Two questions.
1. How easy hard should it of been to remove the drive flange? On the driver side i was able to pull it out by hand. On the passenger side (as you know) I had to remove the hub and tap it out which lead me to this whole refresh. He is concerned that the driver side might be worn if it came out that easy. But none of the documentation about the brakes say that removing the drive flange would/should require removing the hub to tap it out.
2. When i took out the old bearigns there were two plastic rings (i think they are spacers). All the new descriptions on minimania/spares say that they are not needed. That is correct?
'73 Innocenti Mini (non-export)
Morristown, NJ


