

|
Total posts: 440
Last post: May 2, 2017 Member since:Sep 24, 2013
|
Cars in Garage: 0
Photos: 0 WorkBench Posts: 0 |
Here is where we stand as of Sunday night, not as stuck as before but still stuck. I can't wait to do the side with a radiator in the way.
Any any tricks to manuver this out?
As i posted, if you want to save the cone loosen the upper arm and push the mounting pin out so one side releases then there should be enough room to remove it. Just remember if you are re using the knuckles they will be just as seized and you may end up destroying the cone anyway.
I pre-emtively bought new knuckles, assuming that they would be fused to the cones!
'73 Innocenti Mini (non-export)
Morristown, NJ
|
|
Total posts: 8382
Last post: Jan 13, 2022 Member since:Feb 7, 2006
|
Cars in Garage: 0
Photos: 0 WorkBench Posts: 0 |
|
Here is where we stand as of Sunday night, not as stuck as before but still stuck. I can't wait to do the side with a radiator in the way.
Any any tricks to manuver this out?
As i posted, if you want to save the cone loosen the upper arm and push the mounting pin out so one side releases then there should be enough room to remove it. Just remember if you are re using the knuckles they will be just as seized and you may end up destroying the cone anyway.
If in doubt, flat out. Colin Mc Rae MBE 1968-2007.
Give a car more power and it goes faster on the straights,
make a car lighter and it's faster everywhere. Colin Chapman.
|
|
Total posts: 13978
Last post: Jan 15, 2024 Member since:Jan 22, 2003
|
Cars in Garage: 4
Photos: 381 WorkBench Posts: 1 |
|
Pulling the rad is easy peasy and may save you some grief getting at the upper arm nut/s and bolt.
As for removing the trumpet/spring......you need to get your tongue in just the right position.
"Everybody should own a MINI at some point, or you are incomplete as a human being" - James May
"WET COOPER", Partsguy1 (Terry Snell of Penticton BC ) - Could you send the money for the unpaid parts and court fees.
Ordered so by a Judge
|
|
Total posts: 440
Last post: May 2, 2017 Member since:Sep 24, 2013
|
Cars in Garage: 0
Photos: 0 WorkBench Posts: 0 |
Here is where we stand as of Sunday night, not as stuck as before but still stuck. I can't wait to do the side with a radiator in the way.
Any any tricks to manuver this out?
'73 Innocenti Mini (non-export)
Morristown, NJ
|
|
Total posts: 440
Last post: May 2, 2017 Member since:Sep 24, 2013
|
Cars in Garage: 0
Photos: 0 WorkBench Posts: 0 |
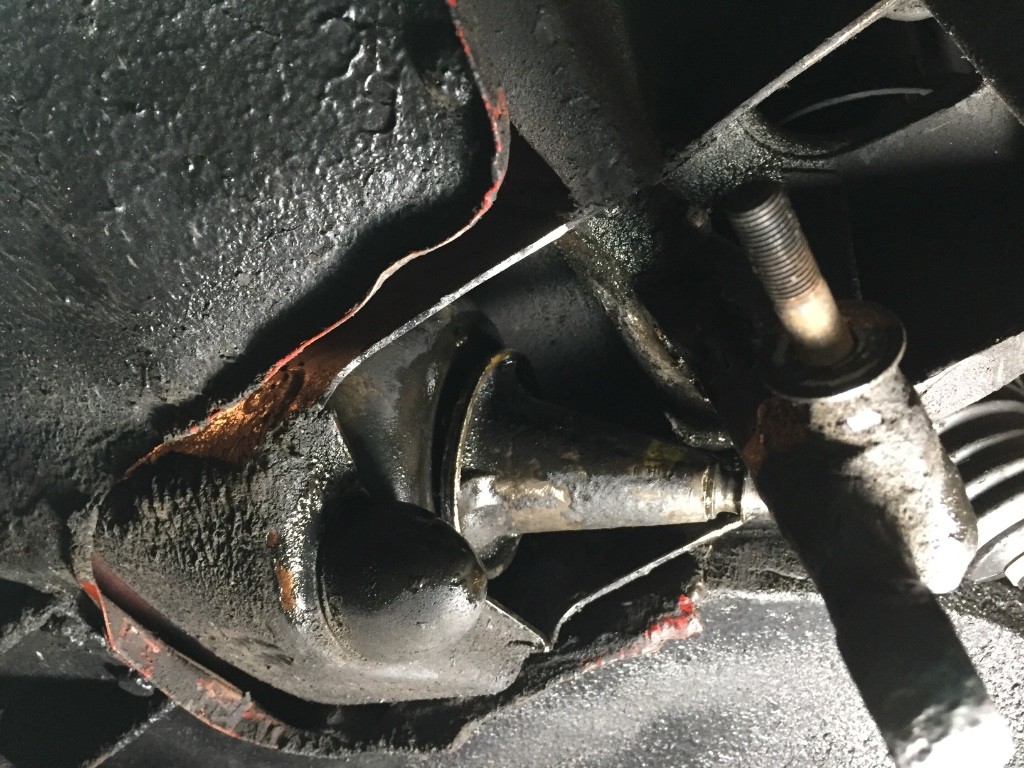
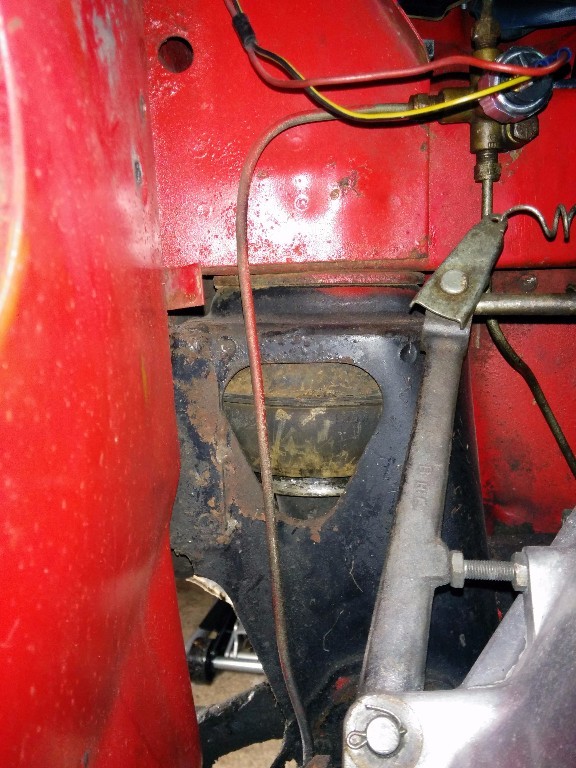
You need to fix/replace this
It should fit snug and follow the shape of the arm
Thanks for the info. Unless this is crucial I will tackle it after the suspension and brakes.
i got the rubber cone to seperate from the top of the subframe tower, but it is still fused to the cone. I put some penetrating oil on it to get it apart. But now that it is loose I should be able to get a better angle for the hammer
'73 Innocenti Mini (non-export)
Morristown, NJ
|
|
Total posts: 13978
Last post: Jan 15, 2024 Member since:Jan 22, 2003
|
Cars in Garage: 4
Photos: 381 WorkBench Posts: 1 |
|
You need to fix/replace this
It should fit snug and follow the shape of the arm
"Everybody should own a MINI at some point, or you are incomplete as a human being" - James May
"WET COOPER", Partsguy1 (Terry Snell of Penticton BC ) - Could you send the money for the unpaid parts and court fees.
Ordered so by a Judge
|
|
Total posts: 8382
Last post: Jan 13, 2022 Member since:Feb 7, 2006
|
Cars in Garage: 0
Photos: 0 WorkBench Posts: 0 |
|
Not to lengthen your list of repairs but judging by the angle the clutch rod is at it looks like it may have wear on the clevis pins or the ball on the end of the arm itself, also if you have not been lubricating things the slave rod looks damp with fluid.
Regarding getting the fused together pieces apart if you are using your trumpets again and not using Hi Lo's you may have to remove the upper arm (or loosen up one side at least) and remove them in one piece, once out soak them with penetrating fluid and beat on them. Your other option is to cut them in half to get them out and use new ones or HI LO's which a lot of people use with new cones as they are high when installed and settle after a while.
If in doubt, flat out. Colin Mc Rae MBE 1968-2007.
Give a car more power and it goes faster on the straights,
make a car lighter and it's faster everywhere. Colin Chapman.
|
|
Total posts: 440
Last post: May 2, 2017 Member since:Sep 24, 2013
|
Cars in Garage: 0
Photos: 0 WorkBench Posts: 0 |
Updates!
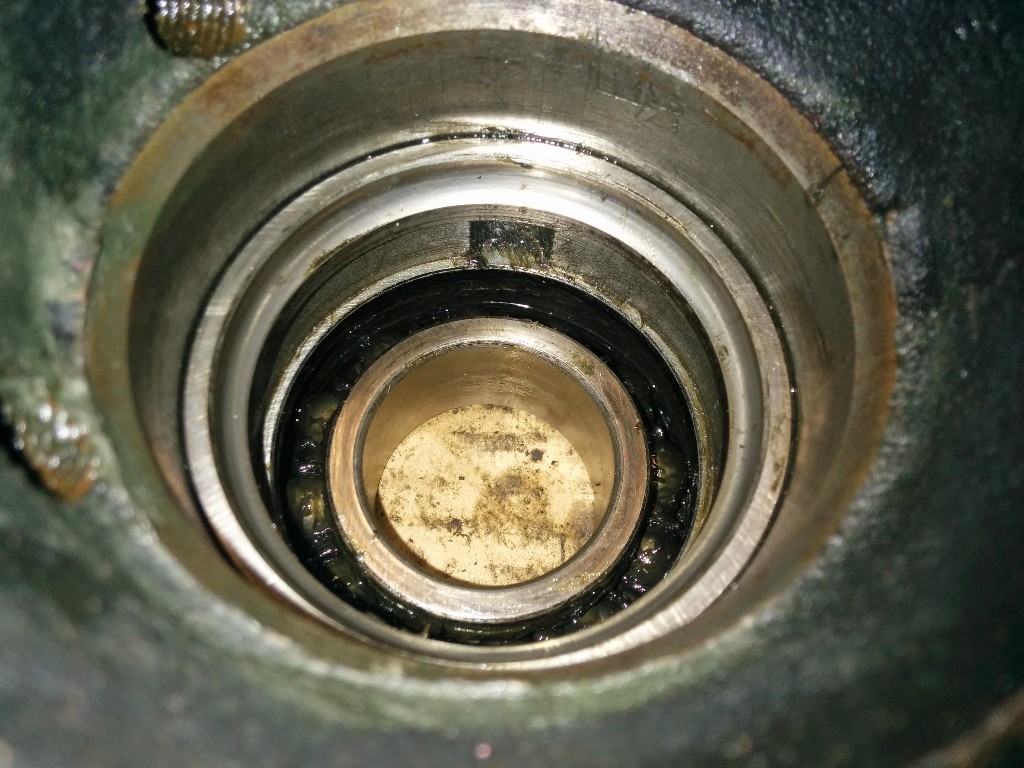
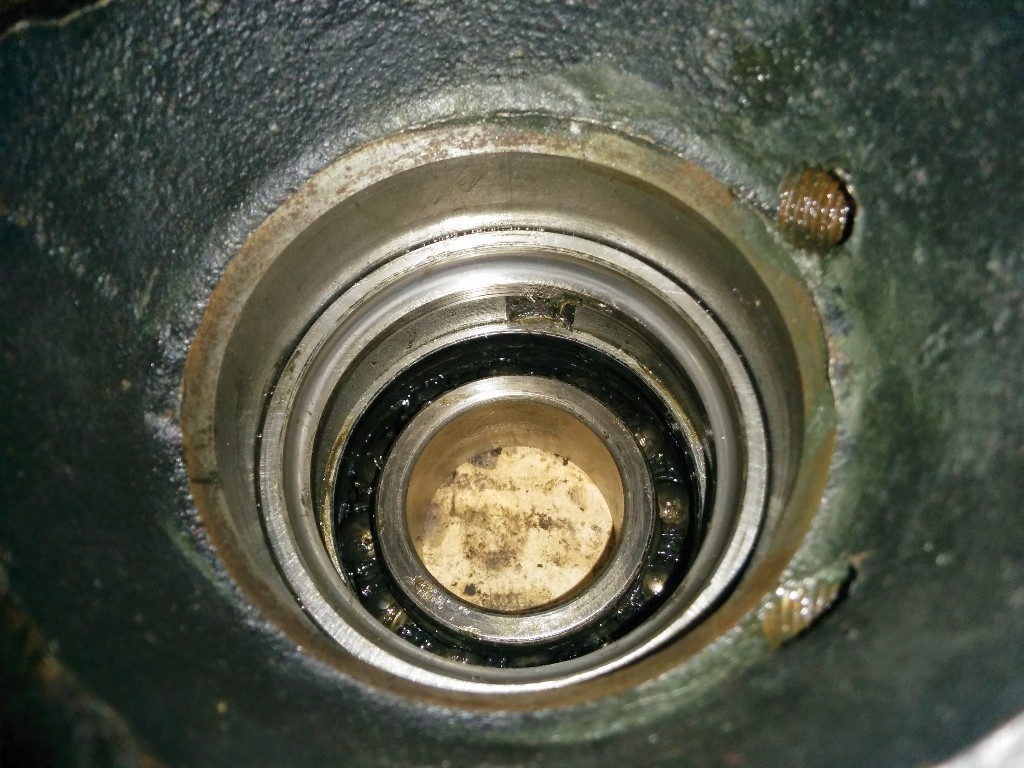
- I finally got the bearings out. That metal "lip" was part of the old oil seal and once i realized that i was able to tap it out.
 lan is to drop off the hub, new bearings, and balljoints to a local mechanic to install. I'll never get them in correctly with the tools i have.
 - The dreaded rubber spings. I rented the compression tool from MiniMania. These are REALLY old, they are the imprerial threaded versions. I have new ones ready to go along with HILOs, but they are damn near fused together. I've tried wedging a screw driver between them from the engine compartment, but no luck.
- I've also got new steering rod ends and new heavey duty adjustable tie rods. I figured, might as well right!?
'73 Innocenti Mini (non-export)
Morristown, NJ
|
|
Total posts: 440
Last post: May 2, 2017 Member since:Sep 24, 2013
|
Cars in Garage: 0
Photos: 0 WorkBench Posts: 0 |
I see nothing wrong with that. I'm sure others won't agree.
I figure once i reinstall one set of wheel bearings i can do the other side and i will be a pro at it!
'73 Innocenti Mini (non-export)
Morristown, NJ
|
|
Total posts: 233
Last post: Oct 2, 2021 Member since:Jun 4, 2012
|
Cars in Garage: 0
Photos: 0 WorkBench Posts: 0 |
|
I see nothing wrong with that. I'm sure others won't agree.
|
|
Total posts: 440
Last post: May 2, 2017 Member since:Sep 24, 2013
|
Cars in Garage: 0
Photos: 0 WorkBench Posts: 0 |
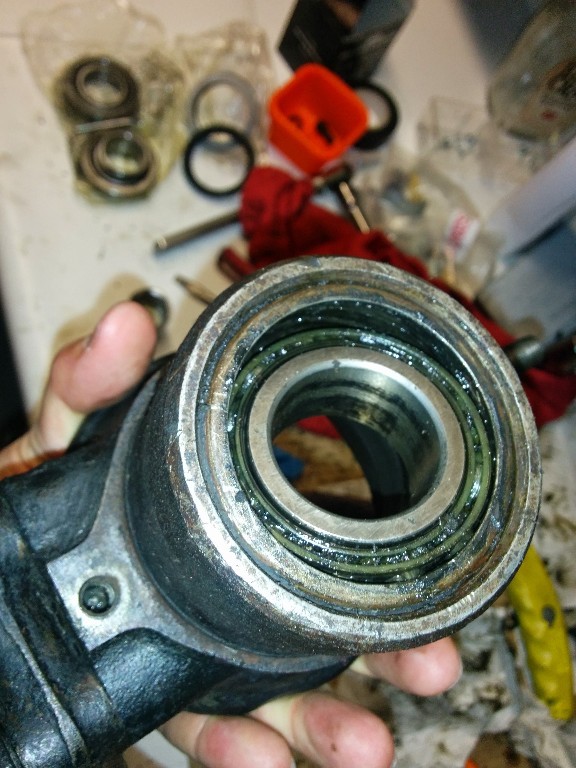
So are you only changing out the bearings on one side? I see the bearings being removed are balls and replace with rollers. Is the other side also balls or rollers? I'm with jedduh if they're not bad just repack.
I assume the other side is balls. I've already bought the roller bearings, so since I had the thing apart i was going to upgrade the bearings. Is there anything wrong with having roller on one side and ball on the other?
I'll get back to work on it this weekend.
'73 Innocenti Mini (non-export)
Morristown, NJ
|
|
Total posts: 233
Last post: Oct 2, 2021 Member since:Jun 4, 2012
|
Cars in Garage: 0
Photos: 0 WorkBench Posts: 0 |
|
So are you only changing out the bearings on one side? I see the bearings being removed are balls and replace with rollers. Is the other side also balls or rollers? I'm with jedduh if they're not bad just repack.
|
|
Total posts: 13978
Last post: Jan 15, 2024 Member since:Jan 22, 2003
|
Cars in Garage: 4
Photos: 381 WorkBench Posts: 1 |
|
There are a couple of pics, diagrams and simple explanation on this thread
"Everybody should own a MINI at some point, or you are incomplete as a human being" - James May
"WET COOPER", Partsguy1 (Terry Snell of Penticton BC ) - Could you send the money for the unpaid parts and court fees.
Ordered so by a Judge
|
|
Total posts: 440
Last post: May 2, 2017 Member since:Sep 24, 2013
|
Cars in Garage: 0
Photos: 0 WorkBench Posts: 0 |
Is a drift a special tool? I saw some on Amazon made of brass for gun maintenance. I assume it is brass so it doesn't mar the metal hub. would a flat head screw driver work?
Also, should I be able to take the bearings out of the wheels side of the hub? Or is that flange/ridge there as a safety stop?
You can use a regular drift just be careful not to mar up the inside of the hub.
Each bearing and race comes out of its respective side, (inside one comes out of the inside of the hub and the outside one comes out of the outside of the hub).
Alright i will use the set of steel punch i already own and just be careful with them.
I'm on the road right now, so i can't go look/play with it, but I still don't follow how i can take the outside brearing out past the metal lip. RIght now the bearing is already dislodged and it won't come through that side. Maybe it will make more sense on Satuday when I get the spaces are such out. The new timkin bearings looks very nice.
'73 Innocenti Mini (non-export)
Morristown, NJ
|
|
Total posts: 8382
Last post: Jan 13, 2022 Member since:Feb 7, 2006
|
Cars in Garage: 0
Photos: 0 WorkBench Posts: 0 |
|
Is a drift a special tool? I saw some on Amazon made of brass for gun maintenance. I assume it is brass so it doesn't mar the metal hub. would a flat head screw driver work?
Also, should I be able to take the bearings out of the wheels side of the hub? Or is that flange/ridge there as a safety stop?
You can use a regular drift just be careful not to mar up the inside of the hub.
Each bearing and race comes out of its respective side, (inside one comes out of the inside of the hub and the outside one comes out of the outside of the hub).
If in doubt, flat out. Colin Mc Rae MBE 1968-2007.
Give a car more power and it goes faster on the straights,
make a car lighter and it's faster everywhere. Colin Chapman.
|
|
Total posts: 1716
Last post: Oct 18, 2020 Member since:Oct 18, 2011
|
Cars in Garage: 0
Photos: 0 WorkBench Posts: 0 |
Frankly, on the evidence presented in the photos.. I wouldn't bother with any of it.
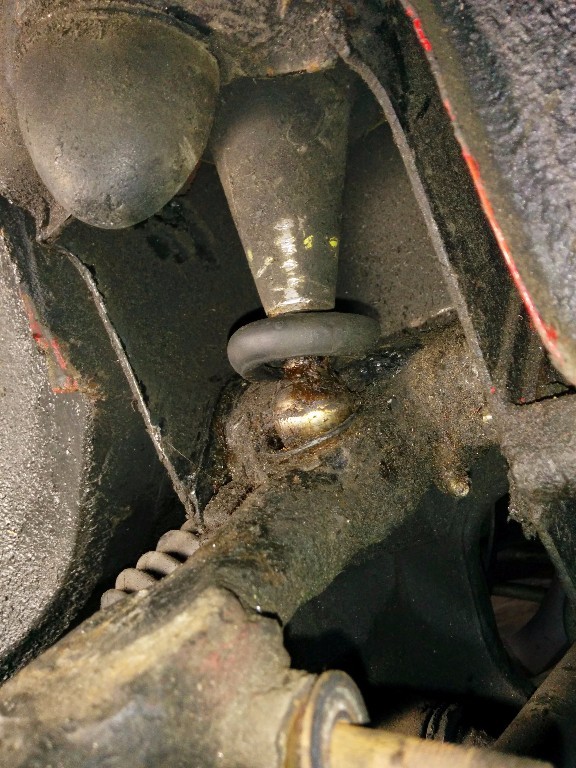
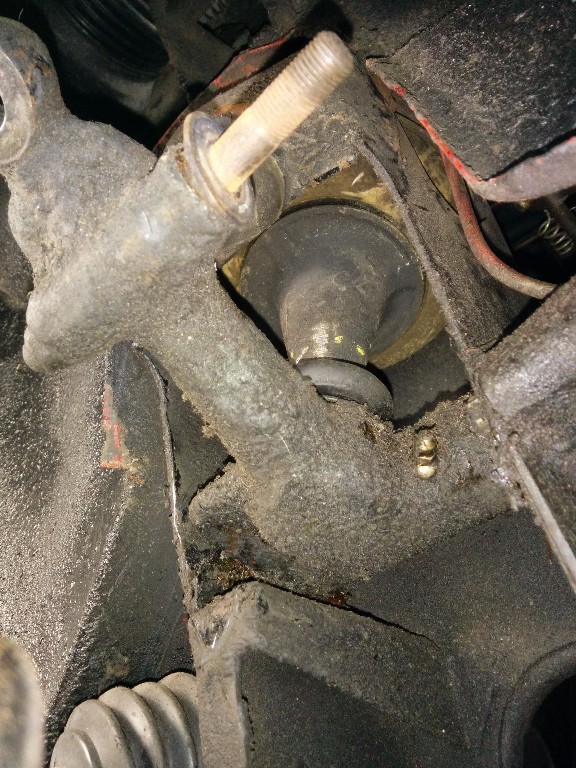
The rack gaiter is worn but shows no sign of letting the oil out ... yet. Although, its probably worth checking if there is any oil inside...
The ball joints - and the upper arm pivots show typical signs of regular greasing and maintenance. The knuckle joints do need to have their rubber boots pulled down and clipped over the ridges in the buckets (clean out the debris on top of the ball first) - but seem quite healthy otherwise.
The inner tie rod bush is still quite intact so I would check the front before making a decision.
The steering tie rod end boot is cactus ...however, if there's no untoward movement in the joint, then it will probably last for years like this. (IME the boots come as part of the rod end and are not separatley serviceable.)..
Only you know if there is enough actual movement/wear in the various parts that warrant their replacement. The photos don't tell us much.
Cheers, Ian
|
|
Total posts: 440
Last post: May 2, 2017 Member since:Sep 24, 2013
|
Cars in Garage: 0
Photos: 0 WorkBench Posts: 0 |
Is a drift a special tool? I saw some on Amazon made of brass for gun maintenance. I assume it is brass so it doesn't mar the metal hub. would a flat head screw driver work?
Also, should I be able to take the bearings out of the wheels side of the hub? Or is that flange/ridge there as a safety stop?
'73 Innocenti Mini (non-export)
Morristown, NJ
|
|
Total posts: 13978
Last post: Jan 15, 2024 Member since:Jan 22, 2003
|
Cars in Garage: 4
Photos: 381 WorkBench Posts: 1 |
|
The outer race is still in...on the side you've removed the bearing. Knock it out with a drift from the otherside using the "gap's" ....the 1/4" or so notches you see across from each other.....do the same from the other side.
There is a flange/ridge that is cast into the hub.....that is what the outer race seats against
"Everybody should own a MINI at some point, or you are incomplete as a human being" - James May
"WET COOPER", Partsguy1 (Terry Snell of Penticton BC ) - Could you send the money for the unpaid parts and court fees.
Ordered so by a Judge
|
|
Total posts: 440
Last post: May 2, 2017 Member since:Sep 24, 2013
|
Cars in Garage: 0
Photos: 0 WorkBench Posts: 0 |

Hey All,
Help me out here. I got the engine side bearings out, but the wheel side is proving difficult. Photos are attached. Are both bearings suppose to comout out on the engine side? On the tire side there seems to be a metal lip. I seem to be about halfway there.
'73 Innocenti Mini (non-export)
Morristown, NJ
|
|
Total posts: 440
Last post: May 2, 2017 Member since:Sep 24, 2013
|
Cars in Garage: 0
Photos: 0 WorkBench Posts: 0 |
***edit***
are this the bushings thT mount to the tie rods near the front bumper?
------------------
i would love them, but I am flying out Monday morning. You won't be there at 530am will you? :-)
let me me see if my dad can meet you after he drops me off at the airport. Email me? [email protected]
'73 Innocenti Mini (non-export)
Morristown, NJ


