
Found 21 Messages

|
Total posts: 6469
Last post: Sep 29, 2022 Member since:Nov 2, 2006
|
Cars in Garage: 4
Photos: 1354 WorkBench Posts: 2 |
|
If you have main caps with the block...and I'm assuming you have had the older bits, block, head crack tested...use the caps you have.
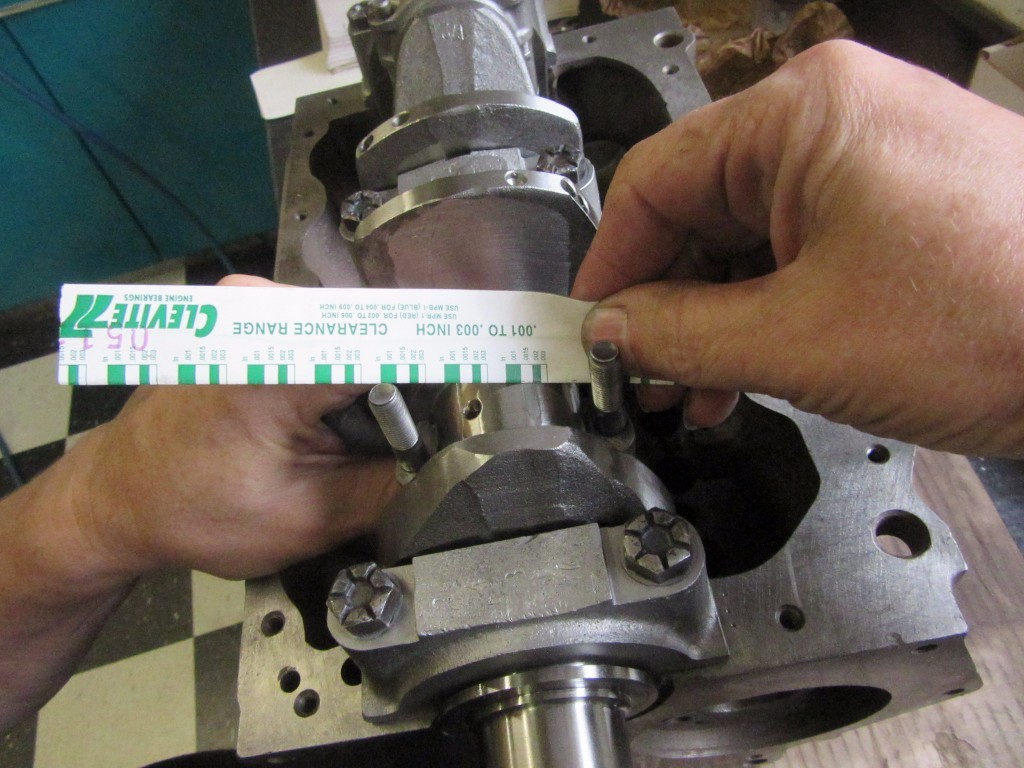
On my dry build, I had less clearance than needed on the mains 0.0017 instead of 0.0025 so an align hone to get the 0.0008 needed. You want 0.0015 on the rod big ends. If you have new crank & rods they might yield this straight away, as mine did.
As for centre main straps, I have not used a high revving cam to get power being more than happy with the SW5 power in the 1380 street build...but unless you will be track racing versus autocross etc., like Norm, I don't see a main strap as necessary. In fact I have a pretty one sitting on the shelf.
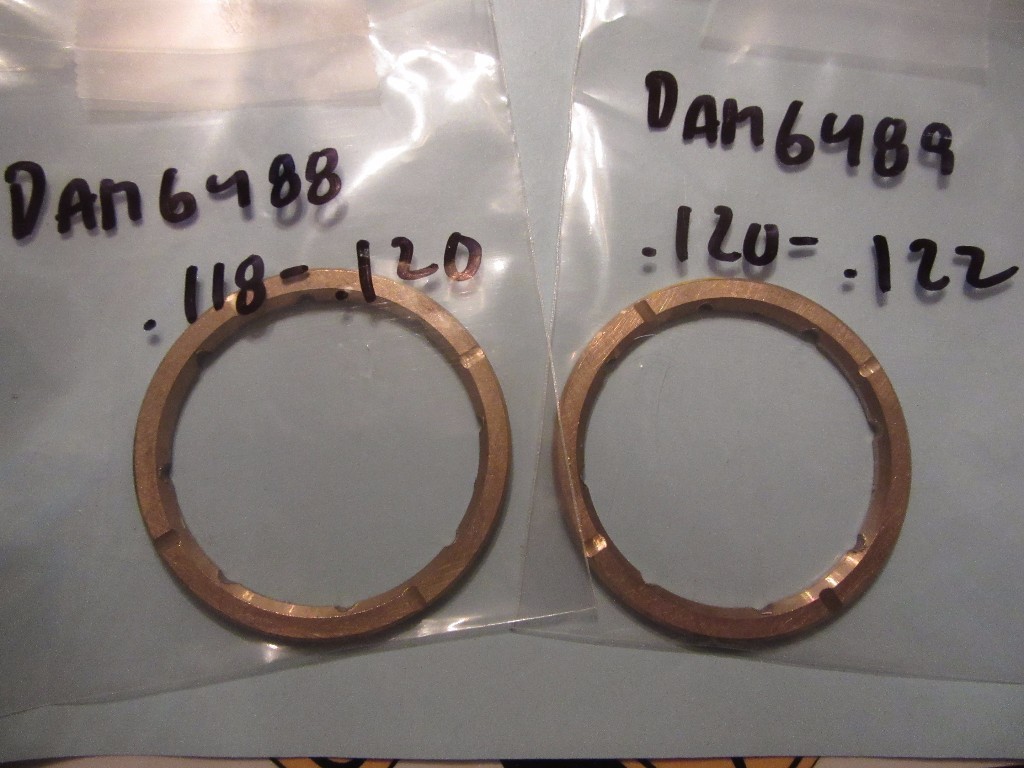
Make sure the crank thrusts are faced on the stamped steel side as this raised area can add a few thou...creating a loose crank down the line.
But as stated earlier, measure, measure, measure....
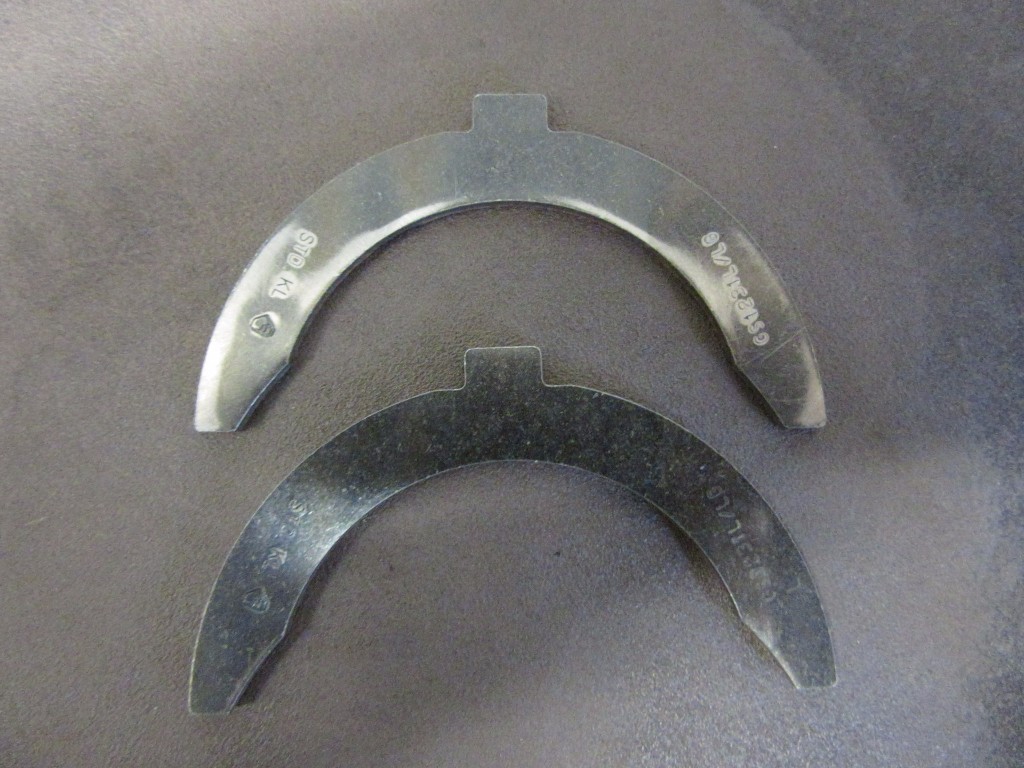
Often when new valve guides are sourced the supplier will say ream & hone to this size...BUT what if your intake & exhaust stems are not the same diameter. Measure and ream/hone to suit the sets of valves if they differ leaving a little more clearance for the exhaust stems say 0.0025 versus intake 0.0015.
I had a funny exchange with a name UK supplier when I got new guides with written instructions to ream/hone to this size. When I told them about the different stem diameters and the necessary ream/hone difference (int. vs. exh.), their reply was, "That's what we do with all our engines." I mean why would anyone want to put pre-worn guides in a head build??
You don't want to do exactly what anyone tells you if the advice does not fit your parts etc.
|
|
Total posts: 2277
Last post: Oct 6, 2022 Member since:Nov 18, 2007
|
Cars in Garage: 0
Photos: 77 WorkBench Posts: 2 |
|
Get all cleances right...easy to overlook primary gear clearance (thrusts are relatively inexpensive) to 0.003-0.004. Same with crank thrusts and...face off the rise from stamping the steel backing.
Make sure with a more powerful engine that the block oilways to the main bearings line up...lead the oil to the bearing, not simply a bigger hole in the bearing.
You don't mention new rods but, if so, you may have excellent clearance results on dry build (my new A+ rods & crank yielded 0.0015, where you want to be).
Have all rotating parts balanced from damper to flywheel...
Hunter, I'm having the machine shop do the dry build to measure all clearances and get them into spec. If needed, I'll order different thrusts and bearings to accommodate. Is it worth it to buy all new uprated main caps and have them line bored? Or is just as good for my application to just have a main strap?
|
|
Total posts: 2277
Last post: Oct 6, 2022 Member since:Nov 18, 2007
|
Cars in Garage: 0
Photos: 77 WorkBench Posts: 2 |
|
Thanks for the input, Norm. My intent is to race this car on the odd weekend but still have a toy for the street. The cam setup was specifically chosen for that. It's not un-streetable, and enjoys the higher end of the RPM Range. I've been talking with a few engine builders and they recommend somewhere in the ballpark of 10.5:1 CR. I don't mind running premium or higher fuel. I've taken the advice of other members here and I'm going to do a dry build, have the block zero decked and then get some measurements so I can get the head built to spec.
Anyone have recommendations on a good main strap?
|
|
Total posts: 6469
Last post: Sep 29, 2022 Member since:Nov 2, 2006
|
Cars in Garage: 4
Photos: 1354 WorkBench Posts: 2 |
|
Get all cleances right...easy to overlook primary gear clearance (thrusts are relatively inexpensive) to 0.003-0.004. Same with crank thrusts and...face off the rise from stamping the steel backing.
Make sure with a more powerful engine that the block oilways to the main bearings line up...lead the oil to the bearing, not simply a bigger hole in the bearing.
You don't mention new rods but, if so, you may have excellent clearance results on dry build (my new A+ rods & crank yielded 0.0015, where you want to be).
Have all rotating parts balanced from damper to flywheel...
|
|
Total posts:
Last post: Mar 25, 2022 Member since:Sep 4, 2000
|
Cars in Garage: 0
Photos: 3 WorkBench Posts: 0 |
|
A new oil pump with the right drive for the cam.
|
|
Total posts: 654
Last post: Dec 20, 2017 Member since:Sep 24, 2011
|
Cars in Garage: 0
Photos: 0 WorkBench Posts: 0 |
|
From the description of your engine, that sounds like what you will be doing with it.
However, if you are planning all of this for a street engine, then besides the straight cut gears making a hell of a racket, and the 286 cam making the engine become a bit more "peaky" (though the large bore will help with that some), in any case you'll probably not need the center strap.
So far you haven't mentioned compression ratio. Go for at least 9.7:1 ~ 10:1, so you can get as much power out of it as possible. If you have a good source for high octane fuel go higher (nothing creates power more effectively than CR).
Norm
|
|
Total posts: 2277
Last post: Oct 6, 2022 Member since:Nov 18, 2007
|
Cars in Garage: 0
Photos: 77 WorkBench Posts: 2 |
|
Follow up question here. There was discussion about Main straps earlier. Is it wise to go ahead and get a good main strap while I have the engine in for service? Keep in mind that right now I don't need to have the thing line bored because there's not any warping and I have the original main caps. But. With everything at the machine shop, is it worthwhile to go ahead and buy beefy main caps and have them machined? Or is this overkill for a 1380 with a Kent289? It's certainly an extra cost I'd like to avoid if there's no real benefit to my application.
I am likely going to get these chunkier main dowels from Swiftune, though.
|
|
Total posts: 8645
Last post: Dec 16, 2020 Member since:Oct 27, 2000
|
Cars in Garage: 0
Photos: 0 WorkBench Posts: 0 |
|
I have had great results with ACL crank, thrust and cam bearings, which were made here in Oz (Tasmania). Unfortunately, ACL have now closed down. Minispares and others still have some stock.
It's now a case of take what you can get. Last motor I built here got King bearings (made in Israel!)
Kevin G
1360 power- Morris 1300 auto block, S crank & rods, Russell Engineering RE282 sprint cam, over 125HP at crank, 86.6HP at the wheels @7000+.
|
|
Total posts: 2277
Last post: Oct 6, 2022 Member since:Nov 18, 2007
|
Cars in Garage: 0
Photos: 77 WorkBench Posts: 2 |
|
Thanks for the helpful sugestions, guys. You've given me some clarity on a lot of stuff that's been keeping me gunshy on buying parts to get to the next step.
Coop, you make a good point. I fully intended to give the gasket thickness a good look because I've heard that the variability now days in thickness can cause bad float and screw up tolerances. Even on the diff outputs and drop gears. So it does look like it's time for me to invest in a good dial gauge. I've been needing one anyway. It'll make many of the other jobs easier as well.
Jemal, thanks for posting on the head gasket. I've had good luck in the past with the copper, but that could be falsely attributed because I had an ever so slightly modded 998. This is a totally different animal. I think I'll go with the higher quality gasket the first time and spare the headaches.
So as for crank and cam bearings, do any of you have good/bad experience stories with certain brands? I want to make sure I get the best available, but I don't want to just buy the most expensive bits. Past lessons tell me that the most expensive isn't necessarily the best with these sort of things.
|
|
Total posts: 1087
Last post: Sep 15, 2023 Member since:Nov 3, 2011
|
Cars in Garage: 0
Photos: 0 WorkBench Posts: 0 |
|
Off-setting the bore to go big is necessary to give the current head gaskets a better chance to seal. There is much written about how far to move all 4 holes, but I found the easy way with 100% reliability is to simply move the centers of #s 2 & 3 OUTWARDS towards 1 & 4 respectively by .0075". That makes the wall thickness between 2 & 3 about .115" (gaining .015 in the wall.... enough to give most head gaskets a good bite!). For anything more than "street performance" consider the serious head gaskets from Cometic.... we've had lots of trouble with sealing the oil port between the block and head with poorly made copper 'o-rings' that are too thin to crush properly....
//www.minimania.com/part/TAM1521COMP-A/Competition-Head-Gasket--Full-Race-735mm-Bore
|
|
Total posts:
Last post: Apr 19, 2024 Member since:Jul 26, 2000
|
Cars in Garage: 0
Photos: 16 WorkBench Posts: 0 |
|
With all the new/different parts, you are really going to need to spend the time to get this all setup and within spec. You seem to be spending a fare amount of money already, the few extra coin for different bushings/shims/thrusts, should really not be overlooked. Last build I did, with a similar list of parts replaced, I built the motor up to check all clearances and then went out and bought the correct thrust/bushings/gaskets where I needed. I remember I acutally bought 3 different transfer case gaskets in order to get the correct thickness. These things should not be overlooked as they are all VERY important.
Dont rush the build. Really spend the time. Maybe a good time to buy a dial gauge as well as its usually a little more accurate then using feeling gauges.
|
|
Total posts: 2277
Last post: Oct 6, 2022 Member since:Nov 18, 2007
|
Cars in Garage: 0
Photos: 77 WorkBench Posts: 2 |
|
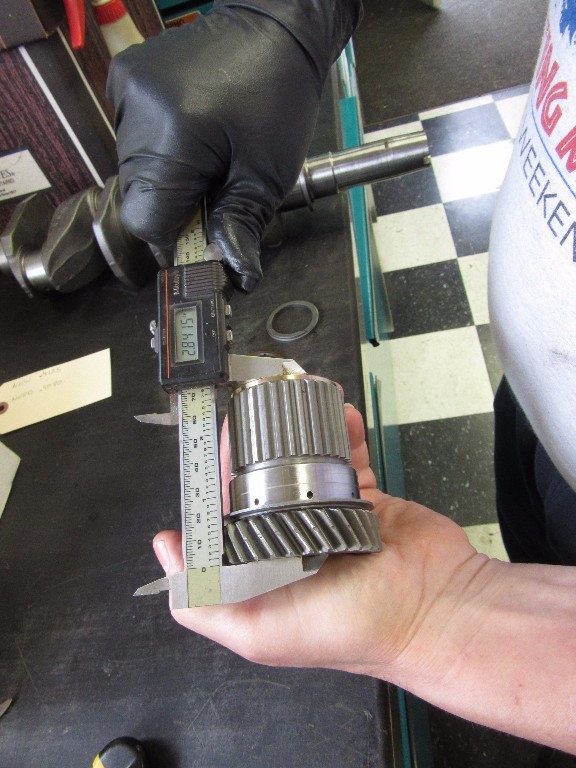
Thanks for bringing up the offset bore, alex. I've been meaning to ask about that. Most people mention it, but that doesn't come with much technical information. Which direction should they be offset? How much? Are there other adjustments that need to be made after doing this? Does the head need to be adjusted in any way to compensate? I'm going with a 1380 The transmission won't be replaced "willy-nilly" haha. But I get what you're saying. I had a bad double bearing and that caused some excess wear on the gears. They need ti be replaced, so I'll be going with a SCCR set. When I started the teardown, the first issue I noticed was that an entire tooth was missing on my idler bearing and that caused a weird wear pattern on both of the other drop gears so guess what... they're no good either. I have other gears in the garage that might be good, but I'd have to get them checked. They came from a working trans, but I'd rather go to MED and get a full kit. layshaft had some wear and it's easier to replace, etc. Shift forks are lightly worn and since I'm in there.... You see the trend. About the only thing I want to re-use are shift forks and some other small pieces that don't show wear and aren't prone to failure.
|
|
Total posts: 10237
Last post: Apr 9, 2024 Member since:Mar 24, 1999
|
Cars in Garage: 0
Photos: 0 WorkBench Posts: 0 |
|
Good used synchro rings are often better than new ones. Don't just change everything willy-nilly for new without a careful examination and measure first.
If going for a big oversize, offset the bores.
|
|
Total posts: 8645
Last post: Dec 16, 2020 Member since:Oct 27, 2000
|
Cars in Garage: 0
Photos: 0 WorkBench Posts: 0 |
|
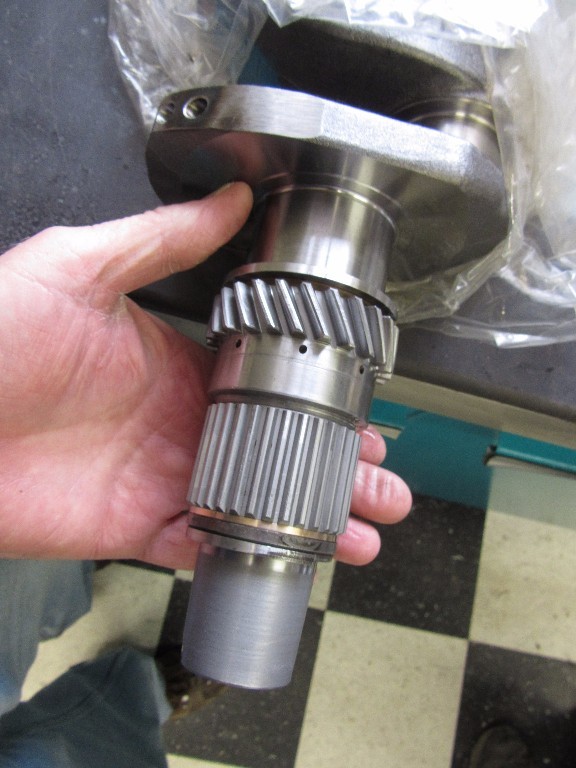
How about ARP studs? One thought, if you install a crank center main support, the cap will have to be machined and I didn't know until mine went to the machine shop, it had to be align bored because of the addition of the support kit.
No need to machine the cap. IMO doing that weakens it from the start.
I made one for my 1412 stroker from an EN25 offcut, stepped it to fit the stock cap (lightly surfaced). I gave it about .001" preload, no need to line bore the block.
Note the strap is slightly short, it's all the EN25 bar my mate had handy.
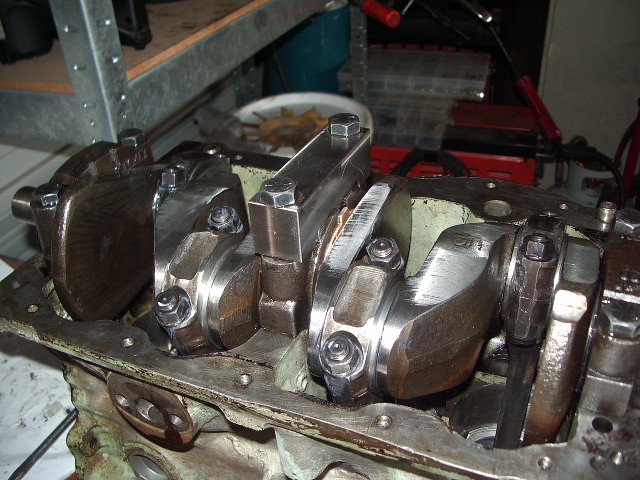
Kevin G
1360 power- Morris 1300 auto block, S crank & rods, Russell Engineering RE282 sprint cam, over 125HP at crank, 86.6HP at the wheels @7000+.
|
|
Total posts: 146
Last post: Dec 16, 2023 Member since:Feb 18, 2013
|
Cars in Garage: 0
Photos: 0 WorkBench Posts: 0 |
How about ARP studs? One thought, if you install a crank center main support, the cap will have to be machined and I didn't know until mine went to the machine shop, it had to be align bored because of the addition of the support kit.
|
|
Total posts: 2277
Last post: Oct 6, 2022 Member since:Nov 18, 2007
|
Cars in Garage: 0
Photos: 77 WorkBench Posts: 2 |
|
Yes, I'll be replacing all bearings, Cam, Pistons, Crank (Main and Big End), and Thrust washers. The oil and water core plugs wil be replaced, all of the normal gaskets will be replaced.
The pistons will be oversized anyway, but good catch, CupCake. My transmission will have everything replaced inside with new and different gears. The drop gears will be new as well and all bearings for drops and gearbox will be replaced. The head will be built for me and bought as a full assembly. Only thing that may need to be changed is the springs if they do not match my cam. I'll be deleting the speedo cable, fuel pump, and distributor so they will all be blanked and gasketed as well.
|
|
Total posts: 10335
Last post: Aug 19, 2016 Member since:May 13, 2001
|
Cars in Garage: 0
Photos: 0 WorkBench Posts: 0 |
|
You'll need new pistons, the next size up.
The power of accurate observation is commonly called cynicism by those who have not got it. G.B.S. Sarcasm is the lowest form of wit. Oscar Wilde
//www.cupcakecooper.ca/
|
|
Total posts: 3523
Last post: Jul 9, 2023 Member since:Feb 26, 1999
|
Cars in Garage: 0
Photos: 0 WorkBench Posts: 0 |
|
Are you replacing the camshaft bearings?
|
|
Total posts: 2277
Last post: Oct 6, 2022 Member since:Nov 18, 2007
|
Cars in Garage: 0
Photos: 77 WorkBench Posts: 2 |
|
Thanks, DrMini. I know that the crank is new and not a regrind, so I'll nab the standard size. My concern comes from my experience building other engines. I've had one go to the machine shop with a new crank and the builder came back asking to buy oversized because there was still some slop. It was years ago, but I believe it was an issue with the mains and required a line bore. I know this isn't the norm, but just wanted to hear from some experienced guys.
Is there anything else you guys would recommend checking or buying before I send it to the machine shop?
|
|
Total posts: 8645
Last post: Dec 16, 2020 Member since:Oct 27, 2000
|
Cars in Garage: 0
Photos: 0 WorkBench Posts: 0 |
|
If the crank is NEW not reground, std size bearings will fit fine. If reground, you will need to measure the journals to be sure.
re the camshaft; nobody grinds camshaft bearing journals undersize now as only std bearings are available. Years ago you could get -.010" cam bearings but now they seem to be NLA.
Kevin G
1360 power- Morris 1300 auto block, S crank & rods, Russell Engineering RE282 sprint cam, over 125HP at crank, 86.6HP at the wheels @7000+.
Found 21 Messages


