
| Orig. Posting Date | User Name | Edit Date |
| Oct 3, 2015 03:19PM | armycook | |
| Oct 3, 2015 01:49PM | Spank | |
| Oct 3, 2015 10:58AM | armycook | |
| Oct 2, 2015 08:10PM | dimitris | |
| Oct 2, 2015 07:39PM | armycook | |
| Sep 13, 2015 07:12PM | armycook | Edited: Sep 13, 2015 07:15PM |
| Sep 5, 2015 09:23AM | armycook | Edited: Sep 5, 2015 11:24AM |
| Sep 3, 2015 07:44PM | armycook | |
| Sep 3, 2015 08:38AM | armycook | |
| Sep 3, 2015 08:32AM | malsal | |
| Sep 3, 2015 07:09AM | armycook | |
| Sep 3, 2015 07:06AM | mystacreation | |
| Sep 3, 2015 05:59AM | armycook | Edited: Sep 3, 2015 06:02AM |
| Sep 3, 2015 05:35AM | armycook | |
| Sep 3, 2015 04:35AM | Dan Moffet | |
| Sep 3, 2015 03:25AM | jeg | |
| Sep 2, 2015 08:45PM | armycook | |
| Sep 2, 2015 05:54PM | jeg | Edited: Sep 2, 2015 05:55PM |
| Sep 2, 2015 05:47PM | armycook | |
| Sep 2, 2015 05:26PM | jeg | Edited: Sep 2, 2015 05:47PM |

|
Total posts: 678
Last post: Sep 29, 2022 Member since:Apr 26, 2011
|
Cars in Garage: 0
Photos: 0 WorkBench Posts: 0 |
Thanks Mike. I started a new thread for this wheel side to side play issue that I have. After I fixed the play then work on alignment.
|
|
Total posts: 6349
Last post: Oct 22, 2023 Member since:Mar 9, 1999
|
Cars in Garage: 0
Photos: 0 WorkBench Posts: 0 |
|
I don't facebook so can't see the SDMinis group, but if you only have stock suspension components, you can only set toe. And for setting toe (which is 1/16" toe out setting), you only need a tape measure.
If you have adjustable tie rods and camber arms, then you can set camber and castor.
//www.minimania.com/SUSPENSION___Basic_set_up_method_1048
Actually, all of Calver's articles on suspension are informative:
//www.minimania.com/articlelist/ALL/Calver's%20Corner/SUSPENSION
|
|
Total posts: 678
Last post: Sep 29, 2022 Member since:Apr 26, 2011
|
Cars in Garage: 0
Photos: 0 WorkBench Posts: 0 |
nada. Been looking for one in months and I just posted it on sd minis page if they can recommend one here in San Diego. Hard to find one in the area who does for our cars. Still looking though. Hopefully that will fix it. Thanks D!
|
|
Total posts: 2022
Last post: Jan 14, 2022 Member since:Mar 8, 2002
|
Cars in Garage: 0
Photos: 1 WorkBench Posts: 1 |
|
when was the last time you did a proper front wheel alignment?
|
|
Total posts: 678
Last post: Sep 29, 2022 Member since:Apr 26, 2011
|
Cars in Garage: 0
Photos: 0 WorkBench Posts: 0 |
The brakes work and doesn't pull anymore when stopping. Cv boot kept coming off and spraying grease on the rotor. I fixed that by grinding the head of the new zip tie so it wouod clear the new caliper. That problem is solved.
But I notice a slight pull to the right again but this time it's when I immediately release the gas after acceleration. I step on the gas and it will pull back. I checked the tie rods and they are all secure and no play. I notice a very slight movement/ play (maybe few thousandths of an inch.. Not a lot but it's there) when I hold the right wheel at 9 and 3 o clock position. At 12 and 6 position it's solid. I just did torque checks on both wheel bearings few days ago and I did it again today. I had to dremel one of the castle nuts so it can meet torque value to be able to secure the cotter pin in. I know the bearings are properly sitting flush inside because me and another friend double checked that. I'm running out of things to check. I do remember even when I had my 7" disc brakes that the right wheel would do this. I do drive it very carefully and doesn't aggressively push on gas and brakes that's why I never really noticed but today I did test drive it by quick on and off gas/ acceleration. please help.
|
|
Total posts: 678
Last post: Sep 29, 2022 Member since:Apr 26, 2011
|
Cars in Garage: 0
Photos: 0 WorkBench Posts: 0 |
The car stops and I am loving it except At 45mph and up I noticed as soon as I release gas, the car slightly pulls to the right. It goes straight on acceleration again when gas pedal is pushed and stays straight braking as well. I also noticed a not so loud metal to metal little noise when braking. I checked under neath and couldn't find what it is. I know I used that lubricant for the caliper cotter pins. Any ideas? I'll have to find somebody to sit inside while car is on jacks and have him step on brakes to see what's grinding perhaps.
|
|
Total posts: 678
Last post: Sep 29, 2022 Member since:Apr 26, 2011
|
Cars in Garage: 0
Photos: 0 WorkBench Posts: 0 |
Yesterday I went and gradually tested the new disc brakes in the driveway and street at 15-20mph which took us nearly 3 hours to get rid of old brake fluid and bubbles. yesterday, I tested doing some real push on these new disc brakes by stopping at 40mph and 50mph and noticed a huge pull to the left. I went underneath and checked and noticed the passenger (longer) driveshaft boot metal zip tie came off and got black grease all over and probably got the rotors wet. I went and jacked the car up, replaced the ziptie. Steered full left and right and the damn zip tie keeps coming off. I swear to God I was using dykes to put tension on the metal zip tie but it just keeps coming off. I tried wiping it down to eliminate grease from having it slipping. Finally bought the thicker plastic black zipties and it held pretty good. Overall I'm very happy with the upgrade and soon will upgrade more stuff needed before I jump up to a more daily driver road worthy engine.
I was so busy with the conversion I forgot to sign up for the Coronado Speedfest car show :(
|
|
Total posts: 678
Last post: Sep 29, 2022 Member since:Apr 26, 2011
|
Cars in Garage: 0
Photos: 0 WorkBench Posts: 0 |
Drained and flushed old brake fluid and was able to find the same washer but this one is grade8. Properly seated the wheel bearings and then installed the tapered washer and torqued castlenut finally and secured it with they cotter key. I nstalled the new 10x5 wheels. bled the brakes and did a few test drives and bled them again. Took me awhile to get rid if bubbles but it's all good now. 7.5" brakes are awesome! Best investment so far.
Tomorrow I'll drive it to school and do torque checks on the front lug nuts and wheel bearing nut.


|
|
Total posts: 678
Last post: Sep 29, 2022 Member since:Apr 26, 2011
|
Cars in Garage: 0
Photos: 0 WorkBench Posts: 0 |
Basically the shimming of ball joints are the one that took us forever because we don't have a vice but managed to torque it to 75ftlbs with our hand not able to move that ball around Unless you are wearing thick gloves with a gpod amount of force or tap it with a mallet or something hard. But it is fairly tight. Thanks to my cousin and his hotrod builder friends helping with the ball joints. I have a vernier caliper and I will look for this tool21 at Marshalls hardware. I know john left measurements of the tool but couldn't find it now. This isn't grade 8 washer by any chance is it? I also managed to find 10x5 minilites (not the magnesium one but looks fairly identical to the real thing). Sorry but I really hate arches lol. The gold 10x6 GB wheels will be sold to Socalminifan.
Bleeding the brakes today and torquing that nut today. I wanna ask Why is there a cut on that tapered washer before the castle nut?
So that it compresses everything together tightly. You can use a normal thick heavy duty washer to do the first torque before re fitting the correct washer for the final torque. This is not something to screw up on it absolutely needs to be torqued correctly and re checked down the road.
Good morning Malcolm,
I figured maybe I can find something similar to this tool21 washer at Marchalls hardware where all kinds of hardwares are available instead of waiting around just to find out I can just buy something similar. Will continue when I get home at noon today.
|
|
Total posts: 8382
Last post: Jan 13, 2022 Member since:Feb 7, 2006
|
Cars in Garage: 0
Photos: 0 WorkBench Posts: 0 |
|
Basically the shimming of ball joints are the one that took us forever because we don't have a vice but managed to torque it to 75ftlbs with our hand not able to move that ball around Unless you are wearing thick gloves with a gpod amount of force or tap it with a mallet or something hard. But it is fairly tight. Thanks to my cousin and his hotrod builder friends helping with the ball joints. I have a vernier caliper and I will look for this tool21 at Marshalls hardware. I know john left measurements of the tool but couldn't find it now. This isn't grade 8 washer by any chance is it? I also managed to find 10x5 minilites (not the magnesium one but looks fairly identical to the real thing). Sorry but I really hate arches lol. The gold 10x6 GB wheels will be sold to Socalminifan.
Bleeding the brakes today and torquing that nut today. I wanna ask Why is there a cut on that tapered washer before the castle nut?
So that it compresses everything together tightly. You can use a normal thick heavy duty washer to do the first torque before re fitting the correct washer for the final torque. This is not something to screw up on it absolutely needs to be torqued correctly and re checked down the road.
If in doubt, flat out. Colin Mc Rae MBE 1968-2007.
Give a car more power and it goes faster on the straights,
make a car lighter and it's faster everywhere. Colin Chapman.
|
|
Total posts: 678
Last post: Sep 29, 2022 Member since:Apr 26, 2011
|
Cars in Garage: 0
Photos: 0 WorkBench Posts: 0 |
Yes please do. here is my email address: [email protected] I can email you my mailing address. Thank you so much for offering.
|
|
Total posts: 147
Last post: Mar 19, 2018 Member since:Feb 18, 2010
|
Cars in Garage: 1
Photos: 39 WorkBench Posts: 1 |
|
Army cook I am in Nevada and I have this huge washer that you need to seat the cv joints. If you want I can send it to you to borrow and pick it up when I make my way down to San Diego on the first week of April. It would probably just take a couple of days to get there. Let me know I'm happy to help!
|
|
Total posts: 678
Last post: Sep 29, 2022 Member since:Apr 26, 2011
|
Cars in Garage: 0
Photos: 0 WorkBench Posts: 0 |
Basically the shimming of ball joints are the one that took us forever because we don't have a vice but managed to torque it to 75ftlbs with our hand not able to move that ball around Unless you are wearing thick gloves with a gpod amount of force or tap it with a mallet or something hard. But it is fairly tight. Thanks to my cousin and his hotrod builder friends helping with the ball joints. I have a vernier caliper and I will look for this tool21 at Marshalls hardware. I know john left measurements of the tool but couldn't find it now. This isn't grade 8 washer by any chance is it? I also managed to find 10x5 minilites (not the magnesium one but looks fairly identical to the real thing). Sorry but I really hate arches lol. The gold 10x6 GB wheels will be sold to Socalminifan.
Bleeding the brakes today and torquing that nut today. I wanna ask Why is there a cut on that tapered washer before the castle nut?
|
|
Total posts: 678
Last post: Sep 29, 2022 Member since:Apr 26, 2011
|
Cars in Garage: 0
Photos: 0 WorkBench Posts: 0 |
Sure - but I still recommend getting hold of one of these tools and using it when you do your final install. Torque the nut with the tool installed, remove the nut and tool, insert the tapered washer and torque again. The link to MSC's Tool21 has the basics in their description.
Glad to hear that you're getting help with it and hope you're feeling better.
Yeah I'll look for this online and torque it to seat the bearings. I've been staying up late doing school stuff and working on the mini during the day after school. I must be really getting old. I'm just restless these days.
|
|
Total posts: 9544
Last post: Apr 24, 2024 Member since:Aug 14, 2002
|
Cars in Garage: 0
Photos: 0 WorkBench Posts: 0 |
|
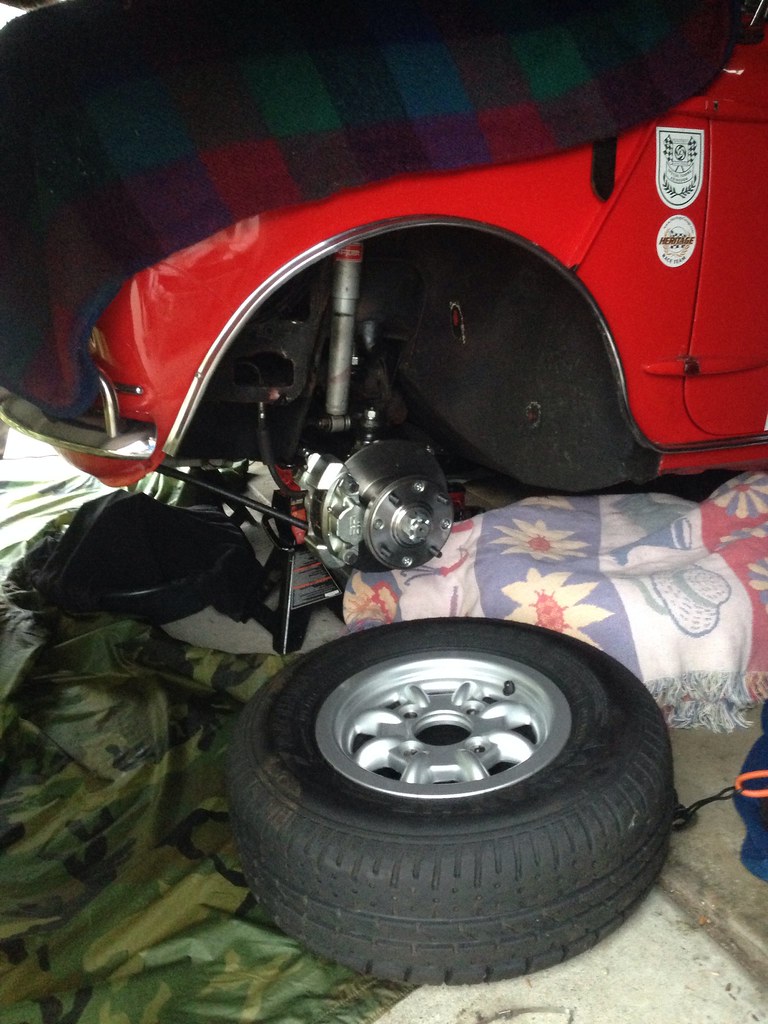
Heavy box arrived. Lots of shiny parts. Will paint calipers later. Checking and sorting every hardware fits before installing it. Ive been having migraines lately so Im gonna take my time on this. And yes I know finger tight to line up hole then cotterkey on that castle nut. This is a lot easier than working on military helicopters. It just looks intimidating at first lol. I'll post or message you guys if I get stuck on something.
*Dumbell plate not included in the parts I ordered.
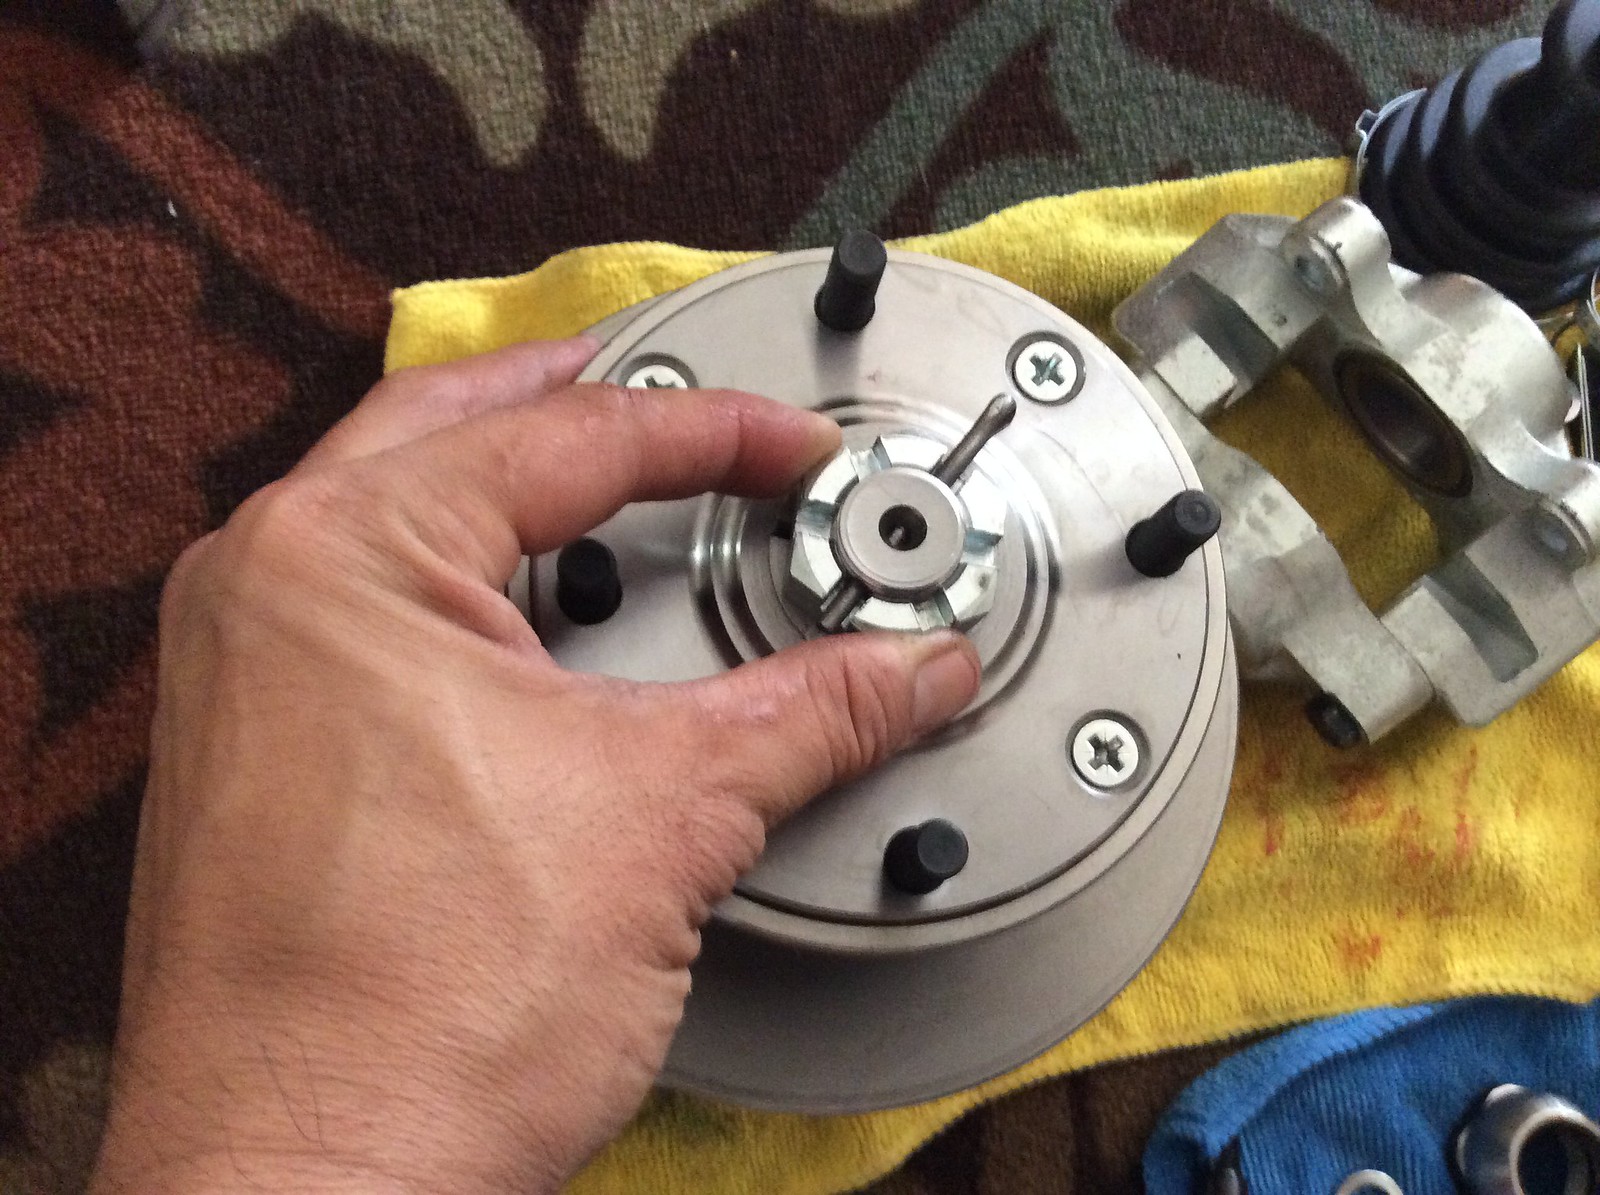
Dennis, did you remember to use a thick, flat washer (TOOL21 ) to seat the bearing (before you installed the tapered collar) before you torqued the nut to spec? ...'finger tight'... funny!
150ftlbs lol finger tight for prep. I have the timken tapered rolling bearings John. It did came with a spacer and I placed that in between those two bearings. I haven't done any torques yet. Still haven't done shimming other side balljoints. (Just thinking about it makes me wanna punch somebody)
No wonder you've had a migraine. You may have good hand strenght but 150 ft-lbs using fingers is a LOT of stress!
.
"Hang on a minute lads....I've got a great idea."
|
|
Total posts: 7075
Last post: Nov 5, 2019 Member since:Apr 25, 2000
|
Cars in Garage: 0
Photos: 0 WorkBench Posts: 0 |
|
Sure - but I still recommend getting hold of one of these tools and using it when you do your final install. Torque the nut with the tool installed, remove the nut and tool, insert the tapered washer and torque again. The link to MSC's Tool21 has the basics in their description.
Glad to hear that you're getting help with it and hope you're feeling better.
 The peasants are revolting...
 ![]()
"Gone with the Wind" - a brief yet moving vignette concerning lactose intolerance
|
|
Total posts: 678
Last post: Sep 29, 2022 Member since:Apr 26, 2011
|
Cars in Garage: 0
Photos: 0 WorkBench Posts: 0 |
Heavy box arrived. Lots of shiny parts. Will paint calipers later. Checking and sorting every hardware fits before installing it. Ive been having migraines lately so Im gonna take my time on this. And yes I know finger tight to line up hole then cotterkey on that castle nut. This is a lot easier than working on military helicopters. It just looks intimidating at first lol. I'll post or message you guys if I get stuck on something.
*Dumbell plate not included in the parts I ordered.
Dennis, did you remember to use a thick, flat washer (TOOL21 ) to seat the bearing (before you installed the tapered collar) before you torqued the nut to spec? ...'finger tight'... funny!
150ftlbs lol finger tight for prep. I have the timken tapered rolling bearings John. It did came with a spacer and I placed that in between those two bearings. I haven't done any torques yet. Still haven't done shimming other side balljoints. (Just thinking about it makes me wanna punch somebody)
|
|
Total posts: 7075
Last post: Nov 5, 2019 Member since:Apr 25, 2000
|
Cars in Garage: 0
Photos: 0 WorkBench Posts: 0 |
|
TOOL21 is what you'll need to make or borrow if you haven't one already - mine is 5 or 6mm thick with a decent chamfer on the inner orifice. I edited my earlier post - it's in your trusty Haynes.
Our host doesn't carry it, but maybe one of the other suppliers local to you does.
The peasants are revolting... ![]()
"Gone with the Wind" - a brief yet moving vignette concerning lactose intolerance
|
|
Total posts: 678
Last post: Sep 29, 2022 Member since:Apr 26, 2011
|
Cars in Garage: 0
Photos: 0 WorkBench Posts: 0 |
Heavy box arrived. Lots of shiny parts. Will paint calipers later. Checking and sorting every hardware fits before installing it. Ive been having migraines lately so Im gonna take my time on this. And yes I know finger tight to line up hole then cotterkey on that castle nut. This is a lot easier than working on military helicopters. It just looks intimidating at first lol. I'll post or message you guys if I get stuck on something.
*Dumbell plate not included in the parts I ordered.
Dennis, did you remember to use a thick, flat washer to seat the bearing (before you installed the tapered collar) before you torqued the nut to spec? ...'finger tight'...
John, I followed this 3D illustration. all the parts it came with are exactly what's in this video. Let me know if this is wrong. I have not torqued the cattle nut yet until I'm done with shimming passenger side ball joints.
|
|
Total posts: 7075
Last post: Nov 5, 2019 Member since:Apr 25, 2000
|
Cars in Garage: 0
Photos: 0 WorkBench Posts: 0 |
|
Heavy box arrived. Lots of shiny parts. Will paint calipers later. Checking and sorting every hardware fits before installing it. Ive been having migraines lately so Im gonna take my time on this. And yes I know finger tight to line up hole then cotterkey on that castle nut. This is a lot easier than working on military helicopters. It just looks intimidating at first lol. I'll post or message you guys if I get stuck on something.
*Dumbell plate not included in the parts I ordered.
Dennis, did you remember to use a thick, flat washer (TOOL21 ) to seat the bearing (before you installed the tapered collar) before you torqued the nut to spec? ...'finger tight'... funny!
The peasants are revolting... ![]()
"Gone with the Wind" - a brief yet moving vignette concerning lactose intolerance


