
| Orig. Posting Date | User Name | Edit Date |
| Dec 1, 2015 05:41AM | CooperTune | |
| Nov 28, 2015 04:59AM | dklawson | |
| Nov 27, 2015 02:54PM | Minerva | Edited: Nov 28, 2015 07:29AM |
| Nov 26, 2015 08:34AM | Hunter2 | |
| Nov 26, 2015 03:48AM | Dan Moffet | |
| Nov 25, 2015 07:43PM | DRMINI | |
| Nov 25, 2015 06:58PM | Isleblue65 | |
| Nov 25, 2015 06:56PM | Alex | |
| Nov 25, 2015 04:51PM | Hunter2 | |
| Nov 25, 2015 04:18PM | MiniMike | |
| Nov 25, 2015 03:22PM | Hunter2 |

|
Total posts: 4134
Last post: Oct 13, 2020 Member since:Oct 8, 2011
|
Cars in Garage: 0
Photos: 0 WorkBench Posts: 0 |
|
Plungers are not the only early clutch parts suffering. The thrust plate on new non verto pressure plates are soft. I have removed some after a short 6 to 8 months and find a ring worn into the plate. I need to take that one and a old one in for testing. I have gone though all the old pressure plates on hand and removed the older hard thrust plates to use on new jobs.
What is it about A + wheels? I picked up a heavy curb rash set and had my welder tig the faces and I have been working the edges. Now I have found a much better set of four. I can assemble a set of 5 and not worry about the last three. Just for fun I painted one all black and with a black wall tire it does not look the part. Being different from your run of the mill alloys is what I like about them. I have run my D1 5X10 Dunlops though three sets of tires may sell both the Dunlops and A+ and look for something else different. Steve (CTR)
|
|
Total posts: 9241
Last post: Aug 17, 2023 Member since:Jun 5, 2000
|
Cars in Garage: 0
Photos: 0 WorkBench Posts: 0 |
|
I am the cook at our house so the oven is mine. Many car parts have seen the inside of the oven. Thankfully, the hood in the kitchen draws a lot of the fumes out so my family doesn't complain too much about solvent smells.
In my youth I also baked paints in a garage oven at my parent's house. I did make one major screw up there. I put some parts in the oven before the fresh paint had "flashed". After a few moments in the oven, the heating element came on and ignited the fumes. There was a "boom" and the oven door blew open. Nothing but my pride was damaged. Since then I have pre-heated the oven to some higher temperature then put the parts in and reduced the set point to something close to 200 oF. So far... no more explosions.
For wheels, I have always had good luck with the wheel paints sold by Eastwood. I have never baked rims though.
|
|
Total posts: 614
Last post: Sep 21, 2021 Member since:Jan 7, 2013
|
Cars in Garage: 0
Photos: 0 WorkBench Posts: 0 |
If it's not Scottish....it's crap! (Cry of the Mini Tartan Owners' Clan)
|
|
Total posts: 6469
Last post: Sep 29, 2022 Member since:Nov 2, 2006
|
Cars in Garage: 4
Photos: 1354 WorkBench Posts: 2 |
|


Yup Dad,
Years ago I baked paint on 14 100+ aluminum wheels in 3 batches over the years, each wheel took 2 turns in the oven...but I was careful to do it when wifey was out of Dodge.
Unless one has a very large oven, it was one wheel at a time...the process might interest others here.
First, I stripped all old paint off the rims, carefully massaged any slight rash, then had them professionally polished. Initially, polishing the rims and spoke faces was $10 a wheel, the price rose to $12,50 per wheel later (probably more now).
Second on return from the polishing shop I scrubbed them clean with soap and clean rinse. Set aside to dry. Then masked off rims and spoke faces...waited for wifey to visitb her Mom 300 miles away...
Third, using relatively cheap tremclad Rust paint in Gloss Black I set about spraying and baking...painting every surface not masked off. Since the wheels had to be turned, 2 trips to the oven. Oven at 200 F for 30 minutes. Then set the wheels aside still masked for 6-8 weeks to allow paint to fully set up.
Last, remove masking, clean as required to remove dust etc. and spray on several coats of clear lacquer...emphasis on several light coats...very many severals.
Result, wheel finishes that lasted every bit as long or longer than factory finish.
I refinished Roo's 12" wheels using automotive paint and clear...results very poor by comparison...fronts darkened almost immediately as brake dust contaminated the finish.
PHOTOS 2nd set on the original Pooh...the 1st set looked as good on Jeremy's Mini in 2004 as when installed in 1993.
|
|
Total posts: 9542
Last post: Apr 18, 2024 Member since:Aug 14, 2002
|
Cars in Garage: 0
Photos: 0 WorkBench Posts: 0 |
|
TECH TIP - ...
BEST to do this when the wife is not about. Mine will be here in 2 hours. The hood fan is on TURBO to remove the fumes!
"Geez Honey, I tried cleaning the oven for you while you were away... I guess I didn't do it right. Sorry"
.
"Hang on a minute lads....I've got a great idea."
|
|
Total posts: 8645
Last post: Dec 16, 2020 Member since:Oct 27, 2000
|
Cars in Garage: 0
Photos: 0 WorkBench Posts: 0 |
|
I needed one this week but couldn't be bothered ordering, and paying a premium for the supposedly good one.
So I did what Isleblue did, except I annealed an old worn HARD plunger instead. Then drilled it. With a hard (silver steel) bush in there, I didn't bother re-hardening the plunger.
Kevin G
1360 power- Morris 1300 auto block, S crank & rods, Russell Engineering RE282 sprint cam, over 125HP at crank, 86.6HP at the wheels @7000+.
|
|
Total posts: 3113
Last post: Mar 5, 2021 Member since:Feb 9, 2002
|
Cars in Garage: 0
Photos: 1 WorkBench Posts: 0 |
|
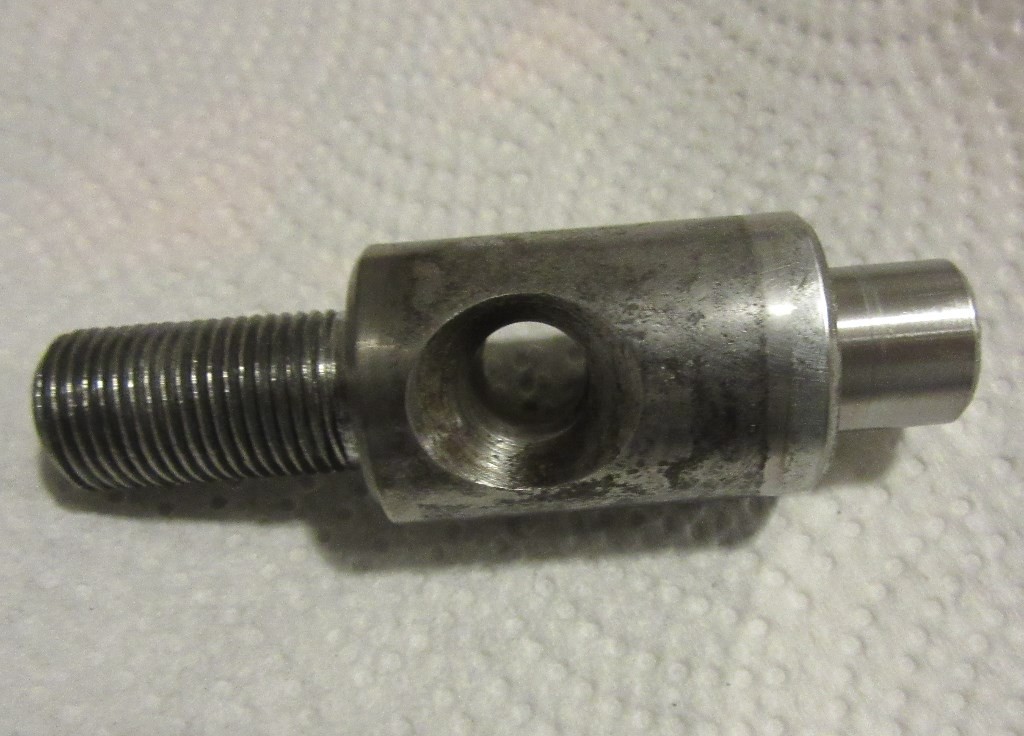
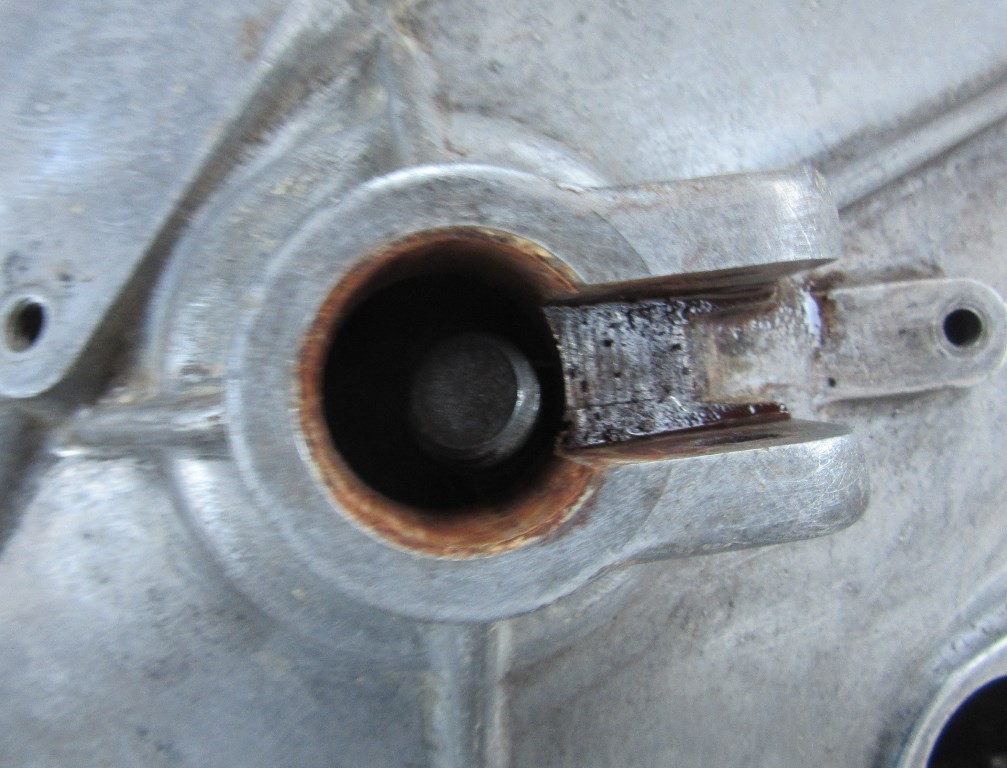
Tiring of cheap, soft Chinese made plungers and improperly hardened ball ends of the arms (see dimple in plunger from ball, and bent arm (bottom) with flattened ball that is not visible)


I corrected the problem by milling out a pocket from the non tapered side of the plunger hole a few mm short of coming through into the taper, machining and hardening a bushing using Cherry Red hardening compound, and pressing the bush into the hole until flush. Follow this up by hardening the ball and tapered cone portion of a new arm, and both surfaces are hard and very long wearing.

"I drive a Mini. What are you compensating for?"
|
|
Total posts: 10237
Last post: Apr 9, 2024 Member since:Mar 24, 1999
|
Cars in Garage: 0
Photos: 0 WorkBench Posts: 0 |
|
I find that 30 seconds of heat from a blowlamp is just as efficient, and carries far less risk of upsetting Higher authority ![]()
|
|
Total posts: 6469
Last post: Sep 29, 2022 Member since:Nov 2, 2006
|
Cars in Garage: 4
Photos: 1354 WorkBench Posts: 2 |
|

House is vented...
Cleaned up the plunger with wire wheel on threads and 1200 wet/dry & wax/grease remover on shaft, also shaft access in Wok. Works fine. These bits are from the early 70s and have been in dry storage for 25 years or thereabouts.
Have new EN24T plunger enroute, will compare and get Rockwell Hardness tested on the old & new one. Out of curiosity...as NEW Chinese Cheese plunger tested at 5.9-6.5 Rockwell Hardness (I did NOT use...might be Ok in Mini driven on and off a trailer, but I would not use in a daily driver).
|
|
Total posts: 2057
Last post: Feb 5, 2024 Member since:Sep 24, 1999
|
Cars in Garage: 1
Photos: 231 WorkBench Posts: 11 |
|
|
|
Total posts: 6469
Last post: Sep 29, 2022 Member since:Nov 2, 2006
|
Cars in Garage: 4
Photos: 1354 WorkBench Posts: 2 |
|
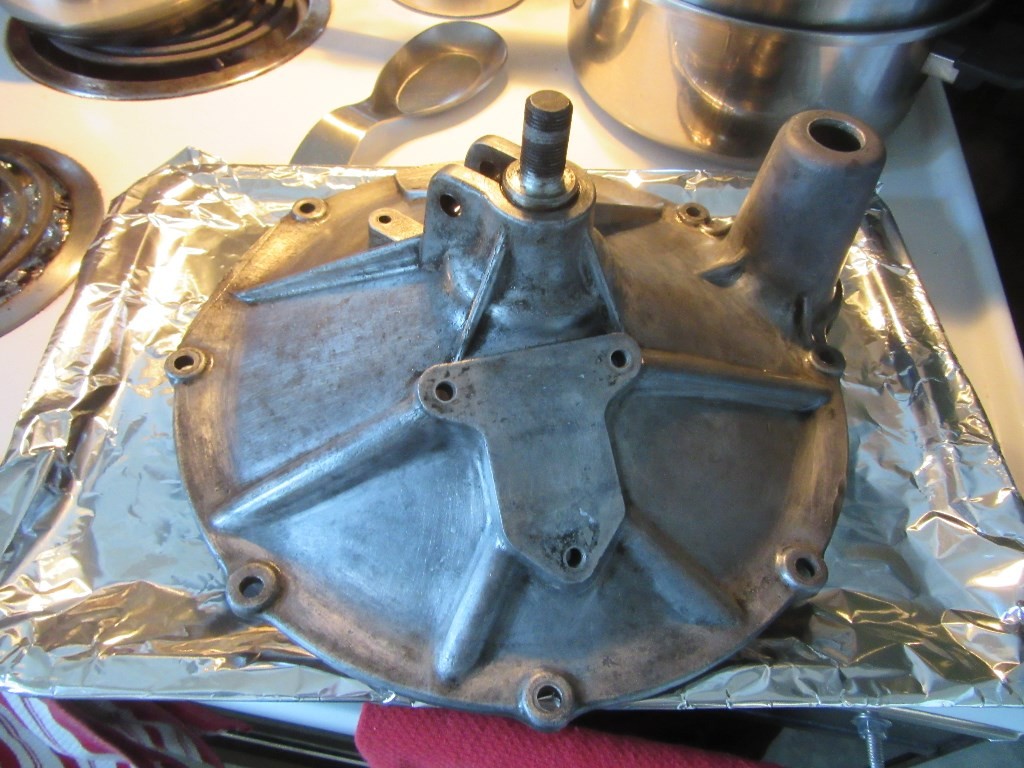
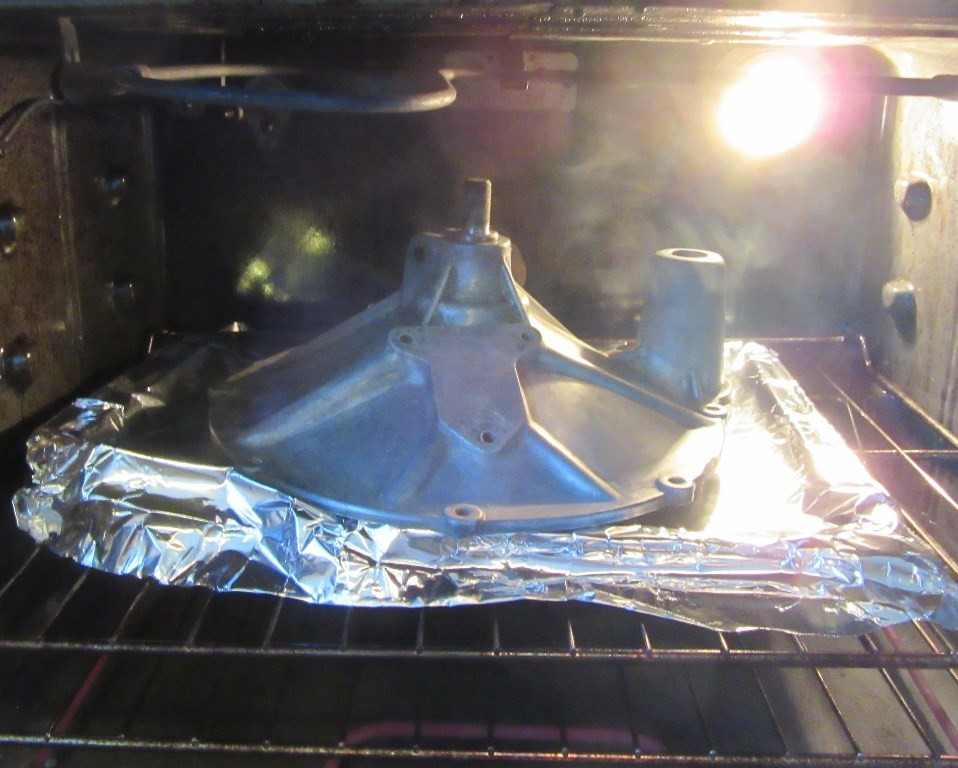
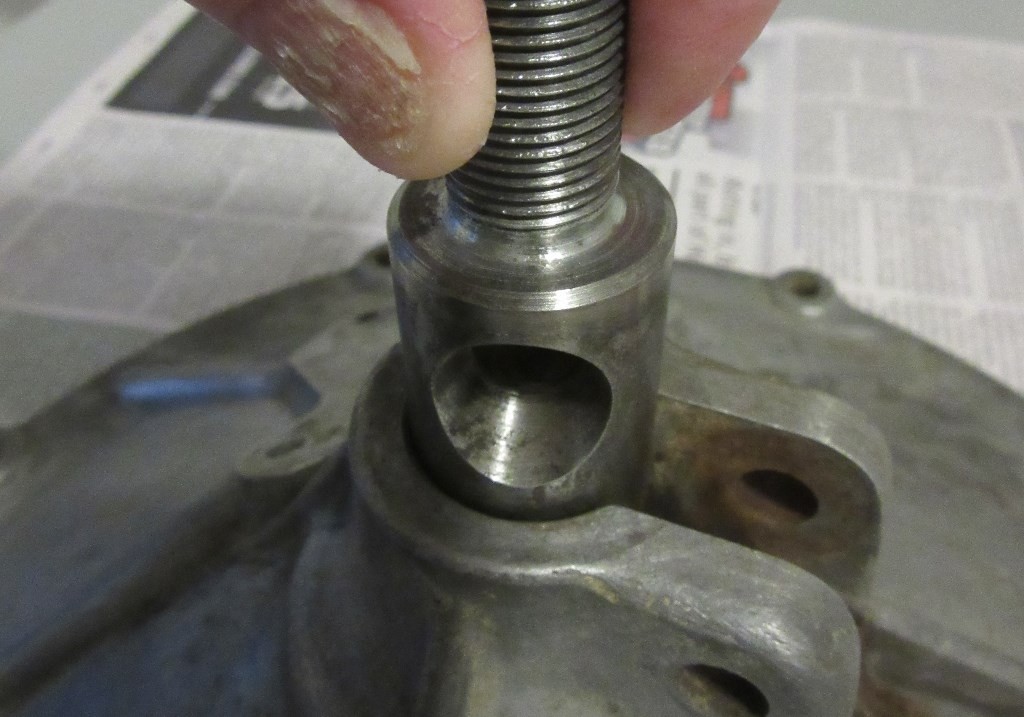
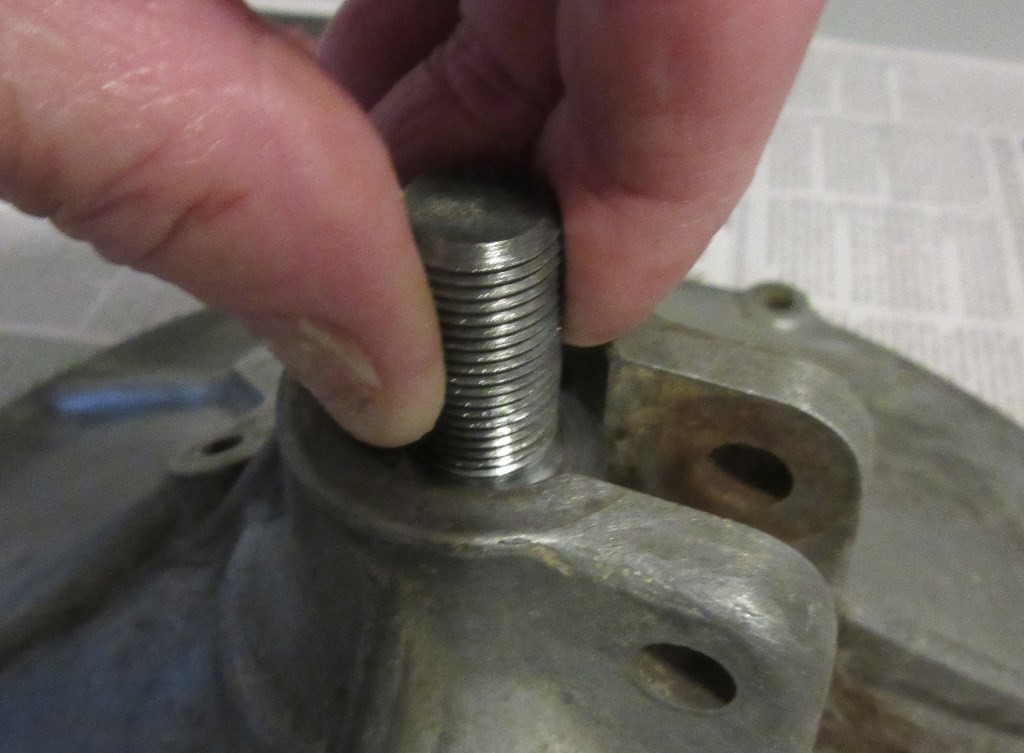
TECH TIP - a pre-verto clutch plunger is stuck in the "WOK" (clutch cover) which has been sitting in the parts bin for who know how long. Applying penetrant and tapping with rubber mallet does nothing.
Now, since aluminum expands more rapidly than steel...
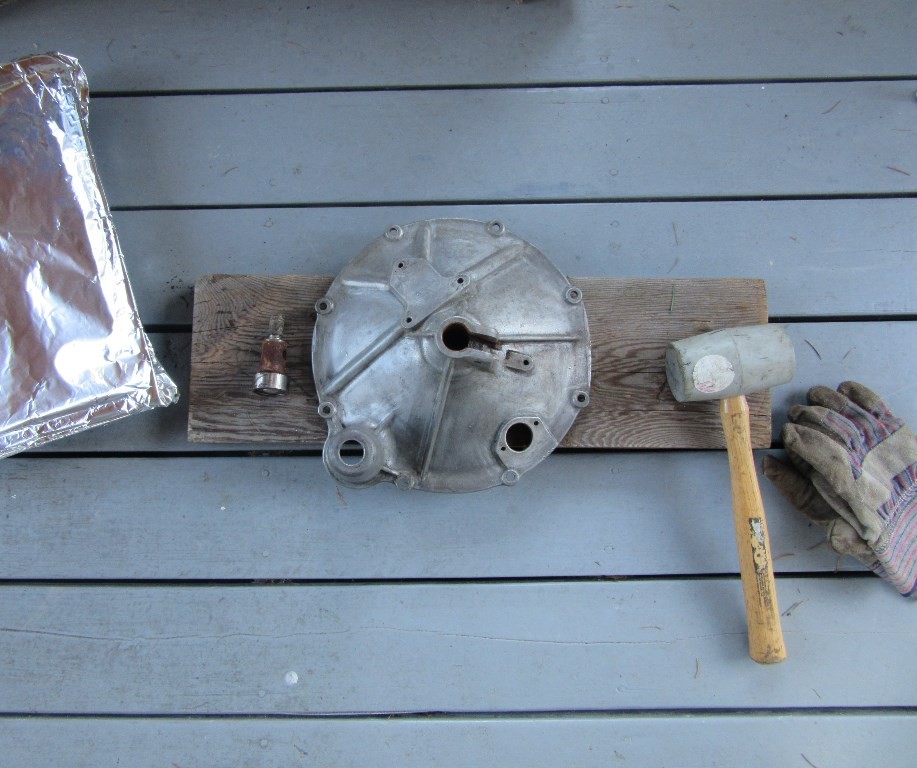
Heat up the kitchen oven to 400 F, put WOK on foil covered baking sheet and stuff in the oven, leave for 15 minutes, remove baking sheet with oven mitts, place WOK on some clean wood and tap the plunger again.
Did this today, plunger popped right out.
BEST to do this when the wife is not about. Mine will be here in 2 hours. The hood fan is on TURBO to remove the fumes!


