
| Orig. Posting Date | User Name | Edit Date |
| Oct 8, 2016 09:55AM | CooperTune | |
| Oct 8, 2016 07:13AM | Dan Moffet | |
| Oct 8, 2016 06:27AM | CooperTune | |
| Oct 7, 2016 05:51PM | Jamison70 | |
| Oct 7, 2016 05:39PM | MiniDave7 | |
| Oct 1, 2016 09:20AM | Dan Moffet | |
| Oct 1, 2016 05:15AM | Jamison70 | |
| Oct 1, 2016 03:43AM | DRMINI | Edited: Oct 1, 2016 03:49AM |
| Oct 1, 2016 03:08AM | Dan Moffet | |
| Sep 30, 2016 06:28PM | specialist | Edited: Oct 1, 2016 01:45AM |
| Sep 30, 2016 05:16PM | Jamison70 | |
| Sep 25, 2016 01:29PM | SAlexander | |
| Sep 24, 2016 05:40PM | specialist | |
| Sep 24, 2016 04:26PM | MiniDave7 | |
| Sep 8, 2016 05:55AM | Dan Moffet | |
| Sep 7, 2016 08:19AM | Jamison70 | |
| Sep 7, 2016 04:16AM | malsal | |
| Sep 7, 2016 02:59AM | Dan Moffet | Edited: Sep 7, 2016 03:00AM |
| Sep 6, 2016 07:43PM | minimans | |
| Sep 6, 2016 06:48PM | mousy |
Found 21 Messages

|
Total posts: 4134
Last post: Oct 13, 2020 Member since:Oct 8, 2011
|
Cars in Garage: 0
Photos: 0 WorkBench Posts: 0 |
|
On my vintage car I cut two remotes in half, adding three inches this way and that. Ending up with a housing six inches longer of course one six inches shorter. Welded long halves together. Same deal with the rod. Left over used rod became tool. Steve (CTR)
|
|
Total posts: 9543
Last post: Apr 20, 2024 Member since:Aug 14, 2002
|
Cars in Garage: 0
Photos: 0 WorkBench Posts: 0 |
|
Steve: you lost me somewhere around "extending a remote housing...", but I caught up to you.
Didn't know that could be done.. or why?
Didn't know that could be done.. or why?
.
"Hang on a minute lads....I've got a great idea."
|
|
Total posts: 4134
Last post: Oct 13, 2020 Member since:Oct 8, 2011
|
Cars in Garage: 0
Photos: 0 WorkBench Posts: 0 |
|
After extending a remote housing I had some inner rod left over. I ground a step into one end and use it to drive bearing out. I can have both out in a couple minutes. Steve (CTR)
|
|
Total posts: 82
Last post: Jul 27, 2019 Member since:Jun 24, 2014
|
Cars in Garage: 0
Photos: 0 WorkBench Posts: 0 |
You know what Dave, I didn't quite understand it when I read it the first time. Now after messing around with the arm myself, I get it. You're putting the bolt in from the opposite side of the bearing you're trying to remove and forcing it out. It is a very good idea, if you have access to a grinding wheel. Otherwise get a smaller bolt, a couple washers and a nut and you might be able to do the same thing.
|
|
Total posts: 62
Last post: Sep 2, 2020 Member since:Nov 13, 2015
|
Cars in Garage: 0
Photos: 0 WorkBench Posts: 0 |
I posted a really simple way to do it with no expense and perfect results and it got ignored.
I did mine today on my 89 Mini and again, it worked perfectly, just FWIW.
I did mine today on my 89 Mini and again, it worked perfectly, just FWIW.
|
|
Total posts: 9543
Last post: Apr 20, 2024 Member since:Aug 14, 2002
|
Cars in Garage: 0
Photos: 0 WorkBench Posts: 0 |
|
Dr Mini's tool is really nice. .... If i knew how to machine steel and had the equipment. Ditto for welding. Jamison70: the sharp tool and peeling away method is what i was writing about. That's how i did mine. If you were trying to remove the bearings, it would be because they are already shot, so no loss.
.
"Hang on a minute lads....I've got a great idea."
|
|
Total posts: 82
Last post: Jul 27, 2019 Member since:Jun 24, 2014
|
Cars in Garage: 0
Photos: 0 WorkBench Posts: 0 |
Unfortunately I don't know how to weld. Plus, knowing me, I'd probably end up welding the bolt to the arm itself and really mess things up. Two of the bearings gave the guy some trouble. So he took what looked like a punch, or a tool that you would use to countersink a nail, and ground it like a flathead screwdriver then used it to peel a strip off the bearing casing wall. The bearing were long gone by this point. All in all I'm extremely happy that I went to this shop. I dealt with the owner and he spent almost an hour of his time and charged me $20. Worth every penny!
|
|
Total posts: 8645
Last post: Dec 16, 2020 Member since:Oct 27, 2000
|
Cars in Garage: 0
Photos: 0 WorkBench Posts: 0 |
|
I made a split collet puller for the idler gear bearing, and it also does the top arm bearings.
O-ring shown is just to keep the bits together in storage.
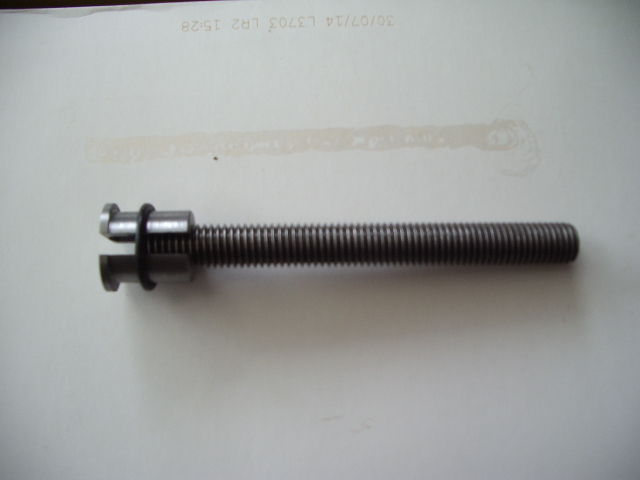
Machine the pair in 1 piece from bar stock 1045 or better- I used a bit of 4140. No heat treatment.
Collet body diameter 0.750" (19.05mm) x 20mm long.
Flange diameter 23mm x 2mm wide. [edit] this was 24mm but I've reduced it so the tool works on top arm bearings.
Tap M12 right through.
Slot 5mm wide end to end, to make 2 collets. I used a slot drill in the mill, held in vice, did 1 side then turned it over.
Deburr edges, hold the pair of cut collets in a 4 jaw chuck and clock up the oval flange so it's concentric.
Turn the flange to 0.740" diameter, so that it will fit through the bearing.
Stud is 12mm threaded rod, 120mm long.
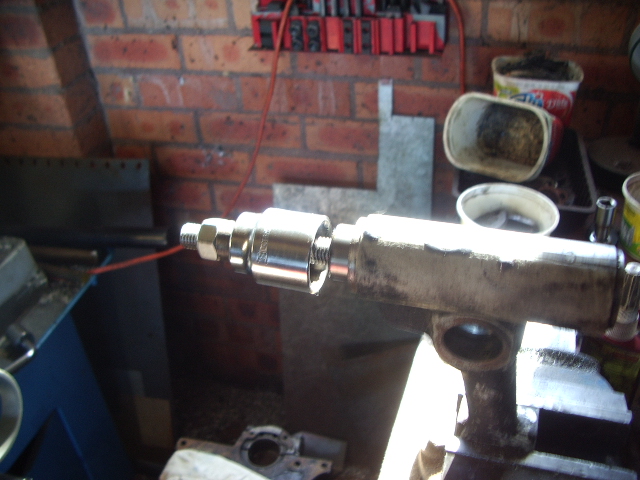
To use, drop the collets into the bearing, check they are level with each other and screw the stud in. Then drop a Mini drive yoke over it, fit washer and tighten nut. You could make up an outer body instead, but this works fine.
I warm the alloy up a bit (200C?) with a hot air gun to reduce drag.
This tool works with both the 1" OD 3 synchro idler bearings, and the 1-1/16" OD 4 synchro ones. it is NOT for A+ housings.
It will now also remove the front suspension upper arm needle roller bearings. Use with a 1-1/16" or 27mm, 1/2" drive socket.
O-ring shown is just to keep the bits together in storage.

Machine the pair in 1 piece from bar stock 1045 or better- I used a bit of 4140. No heat treatment.
Collet body diameter 0.750" (19.05mm) x 20mm long.
Flange diameter 23mm x 2mm wide. [edit] this was 24mm but I've reduced it so the tool works on top arm bearings.
Tap M12 right through.
Slot 5mm wide end to end, to make 2 collets. I used a slot drill in the mill, held in vice, did 1 side then turned it over.
Deburr edges, hold the pair of cut collets in a 4 jaw chuck and clock up the oval flange so it's concentric.
Turn the flange to 0.740" diameter, so that it will fit through the bearing.
Stud is 12mm threaded rod, 120mm long.
To use, drop the collets into the bearing, check they are level with each other and screw the stud in. Then drop a Mini drive yoke over it, fit washer and tighten nut. You could make up an outer body instead, but this works fine.
I warm the alloy up a bit (200C?) with a hot air gun to reduce drag.
This tool works with both the 1" OD 3 synchro idler bearings, and the 1-1/16" OD 4 synchro ones. it is NOT for A+ housings.
It will now also remove the front suspension upper arm needle roller bearings. Use with a 1-1/16" or 27mm, 1/2" drive socket.
Kevin G
1360 power- Morris 1300 auto block, S crank & rods, Russell Engineering RE282 sprint cam, over 125HP at crank, 86.6HP at the wheels @7000+.
|
|
Total posts: 9543
Last post: Apr 20, 2024 Member since:Aug 14, 2002
|
Cars in Garage: 0
Photos: 0 WorkBench Posts: 0 |
|
Using a welded in bolt is OK, if you have a welder. And one could use the same bolt over again. But if you don't have a welder, or have time to take it to a machine shop, you can break the bearing apart (if it didn't already come apart) and then cut the outer race using a Dremel and/or sharp tools. Once you cut the wall of the outer race, it peels away.
.
"Hang on a minute lads....I've got a great idea."
|
|
Total posts: 1188
Last post: Aug 13, 2020 Member since:Aug 9, 2016
|
Cars in Garage: 0
Photos: 0 WorkBench Posts: 0 |
...or if you have an access to a welding machine you can do what this guy did on the video. He welded a large size bolt to the bearing and pulled it with a nut. But then if your shop only charge you $4 yes its better to just send it to the shop . Because the big sized bolt cost about $7 in lowes. And you need four of those.
And if you watch this video, its my first time to see a mechanic who uses a roll of tissue paper inside a shop, normally we would use rag or old shirt right? . ???? aaanyway! And seriously it's my first time to see a mechanic with red lips. Aaanyway hope this video help newbies out there on how to remove upper arm bearing.
Here's the video----> https://youtu.be/NKexa90a3T8
|
|
Total posts: 82
Last post: Jul 27, 2019 Member since:Jun 24, 2014
|
Cars in Garage: 0
Photos: 0 WorkBench Posts: 0 |
So I went ahead and got new 2 new sets which included the pins, washers, needle bearings, etc... I "rented" a bearing puller from O'Reilly's and it didn't go well. I was freaking out, because I didn't know how I was going to get the busted bearing out. I ended up going to a local repair shop and dealt with the owner. He was super nice and busted the bearing on the other arm, grin. He then took a torch to the end and the bearing came out on the 3rd tug. Unfortunately I didn't realize the cup knuckle joint was plastic and it melted. Crap! Another $4 worth of parts and $12 shipping.
So for anyone reading this in the future and you want to know how to remove the needle bearings. I would suggest taking the part to a local repair shop. Otherwise if you're going to do it yourself, heat the arm up with a torch first then use a bearing remover.
Jamie
So for anyone reading this in the future and you want to know how to remove the needle bearings. I would suggest taking the part to a local repair shop. Otherwise if you're going to do it yourself, heat the arm up with a torch first then use a bearing remover.
Jamie
|
|
Total posts: 985
Last post: Jul 2, 2019 Member since:Aug 5, 2000
|
Cars in Garage: 0
Photos: 2 WorkBench Posts: 0 |
|
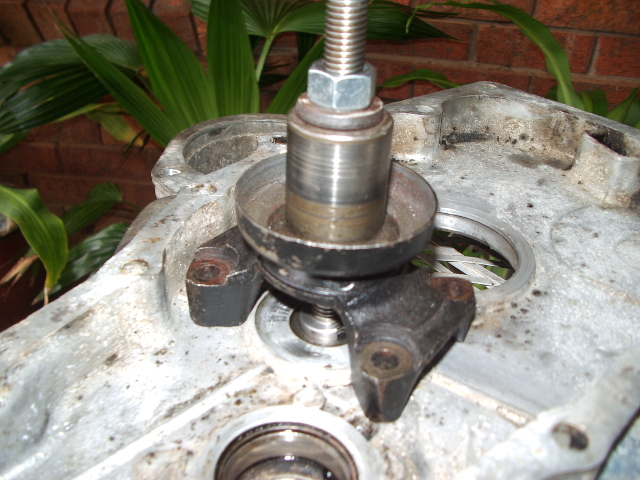
Depends how long you plan to keep your car and how quickly you need it back on the road.....it will go a long time with slight wear on the shaft if the bearings are still working. at least clean & grease it well. You will sacrifice with a bit of variable alignment which affects tires and handling. However if it is really clunking around, you should install the shaft and bearing kit while you have it apart. The grooves are to distribute grease to the thrust faces.
Retired manufacturer of VTEC/Mini performance conversion kits
|
|
Total posts: 1188
Last post: Aug 13, 2020 Member since:Aug 9, 2016
|
Cars in Garage: 0
Photos: 0 WorkBench Posts: 0 |
Grab the upper arm and wiggle it, just a little bit. Observe, if it has even a little bit of a play, then replace it.. If NON, then take it off , clean it thoroughly, repack with grease and put it back. And put the money in your pocket for the rainy season.
|
|
Total posts: 62
Last post: Sep 2, 2020 Member since:Nov 13, 2015
|
Cars in Garage: 0
Photos: 0 WorkBench Posts: 0 |
You absolutely should replace the upper control arm shafts and needle bearings..... getting the bearings out is a little tricky - I made a tool out of an 8" long 1/2" bolt - took the head to the grinder and rounded one side (just took off the points) you need a slight jog in the bolt to clear a step inside the arm, then you can just tap the bearings out of the arm.
|
|
Total posts: 9543
Last post: Apr 20, 2024 Member since:Aug 14, 2002
|
Cars in Garage: 0
Photos: 0 WorkBench Posts: 0 |
|
Quote:
Originally Posted by Jamison70
Dan,
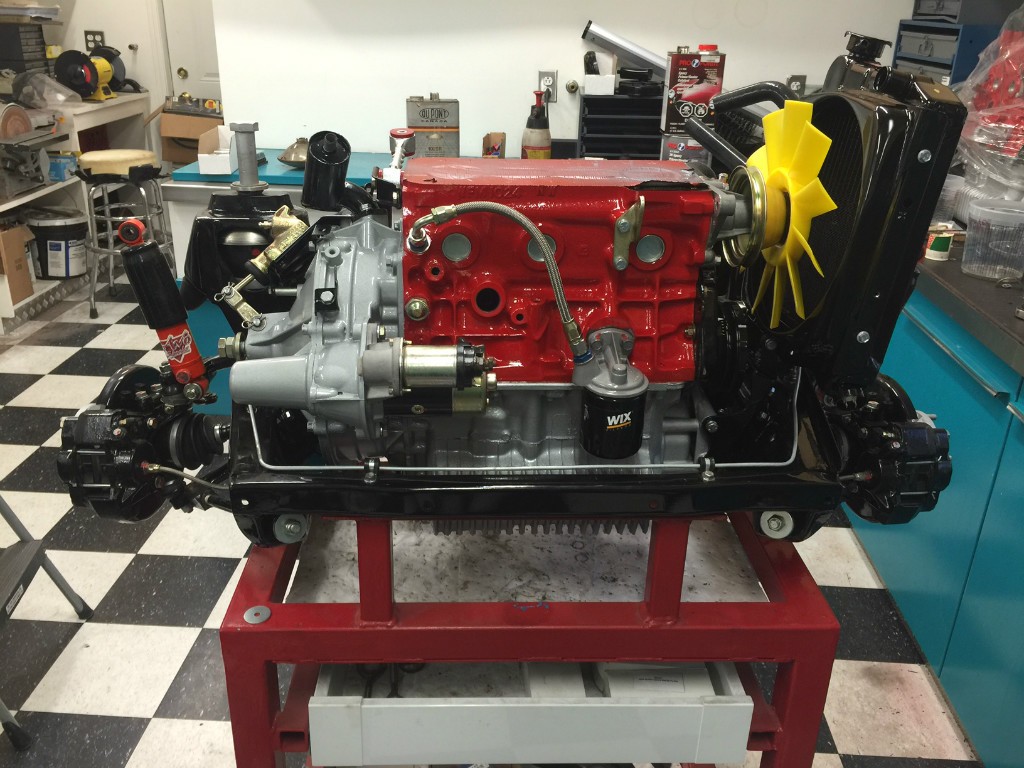
I noticed your fuel filter is oriented vertically. Is there a benefit to this? Or is it just a personal preference?
Jamie
.
"Hang on a minute lads....I've got a great idea."
|
|
Total posts: 82
Last post: Jul 27, 2019 Member since:Jun 24, 2014
|
Cars in Garage: 0
Photos: 0 WorkBench Posts: 0 |
Mousy,
Thanks for the response. I found a kit that includes everything. By the way, your engine/subframe looks great! I would love to do the same thing. But this would add too much time and money to my project. We'll see were I end up.
Dan,
I noticed your fuel filter is oriented vertically. Is there a benefit to this? Or is it just a personal preference?
Jamie
|
|
Total posts: 8382
Last post: Jan 13, 2022 Member since:Feb 7, 2006
|
Cars in Garage: 0
Photos: 0 WorkBench Posts: 0 |
|
Nice set up Dan. One thing i would put an overflow line from the carb away from the exhaust manifold unless this is an old picture and you have already done it.
If in doubt, flat out. Colin Mc Rae MBE 1968-2007.
Give a car more power and it goes faster on the straights,
make a car lighter and it's faster everywhere. Colin Chapman.
|
|
Total posts: 9543
Last post: Apr 20, 2024 Member since:Aug 14, 2002
|
Cars in Garage: 0
Photos: 0 WorkBench Posts: 0 |
|
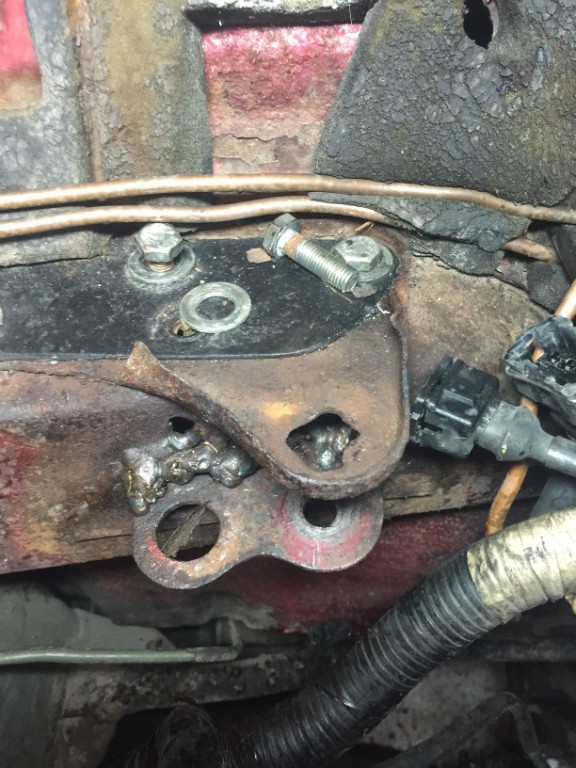
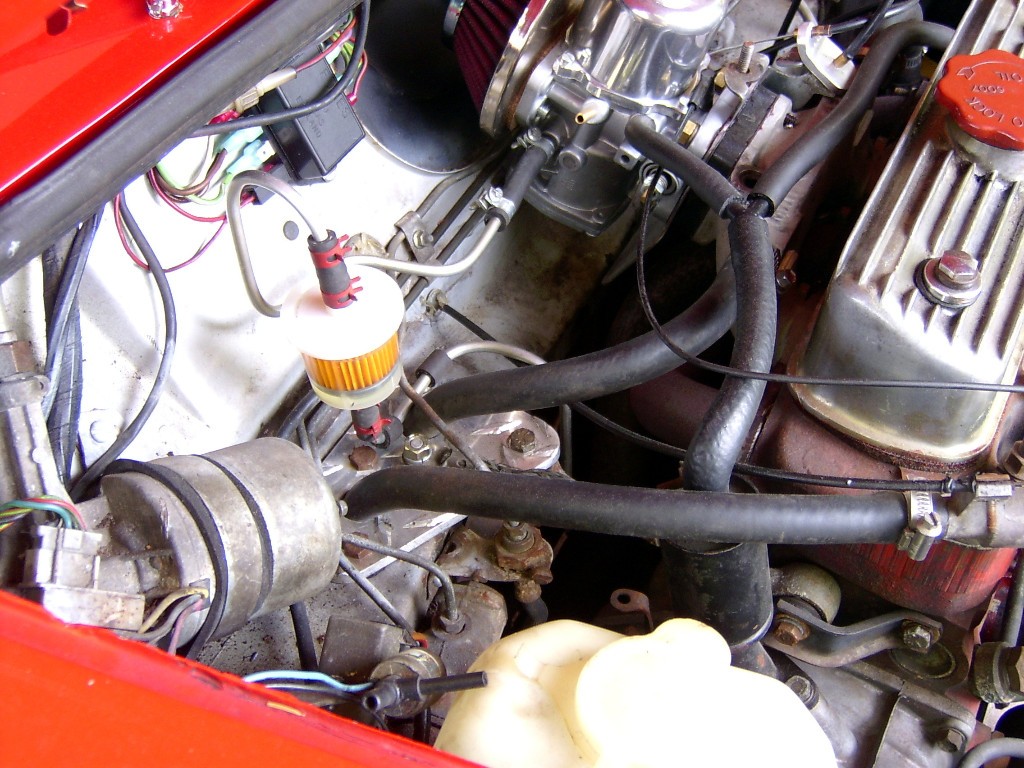 Mousy: your dogbone firewall brackets are worse than mine were!My solution was to fabricate the upper plate from 1/4" checkerplate aluminum and make a new lower bracket from 1.25" steel angle, which I bolted through the wall of the cross-member. Obviously welding does not seem to work! The hardest part was doing up the bolts through the firewall... one needs reallly loooong arms, or ingenuity. In the picture, you can see the old lower bracket turned 90 degrees and used as a clip for the clutch line. If and when I need to replace or bleed the clutch line, I will mount it properly on the lower steel angle.
.
"Hang on a minute lads....I've got a great idea."
|
|
Total posts: 1404
Last post: Jun 21, 2018 Member since:Oct 8, 2013
|
Cars in Garage: 0
Photos: 0 WorkBench Posts: 0 |
Off set groove is for the grease seal as far as I know? The groove in the face of the washer is to let excess grease out
Mini's are like buses they come along in a bunch
|
|
Total posts: 1059
Last post: Sep 25, 2020 Member since:Mar 3, 1999
|
Cars in Garage: 0
Photos: 0 WorkBench Posts: 0 |
|
Image Gallery
Mousy
Found 21 Messages


