

|
Total posts:
Last post: Dec 10, 2023 Member since:Jul 16, 2001
|
Cars in Garage: 0
Photos: 18 WorkBench Posts: 0 |
|
That being said, I have made them to special sizes for lowered Minis upon customer requests. If anyone is interested I would be more than happy to send the complete drawings by way of email so you can build one yourself. Or if you choose, I have a few sitting on the shelf, ready for mailing.
Send me an email if your interested.
Dismissing something that some does as a waste of time is just plain rude, and shows no class!
|
|
Total posts: 654
Last post: Dec 20, 2017 Member since:Sep 24, 2011
|
Cars in Garage: 0
Photos: 0 WorkBench Posts: 0 |
|
thx,
Norm
|
|
Total posts: 10237
Last post: Apr 9, 2024 Member since:Mar 24, 1999
|
Cars in Garage: 0
Photos: 0 WorkBench Posts: 0 |
|
|
|
Total posts: 8382
Last post: Jan 13, 2022 Member since:Feb 7, 2006
|
Cars in Garage: 0
Photos: 0 WorkBench Posts: 0 |
|
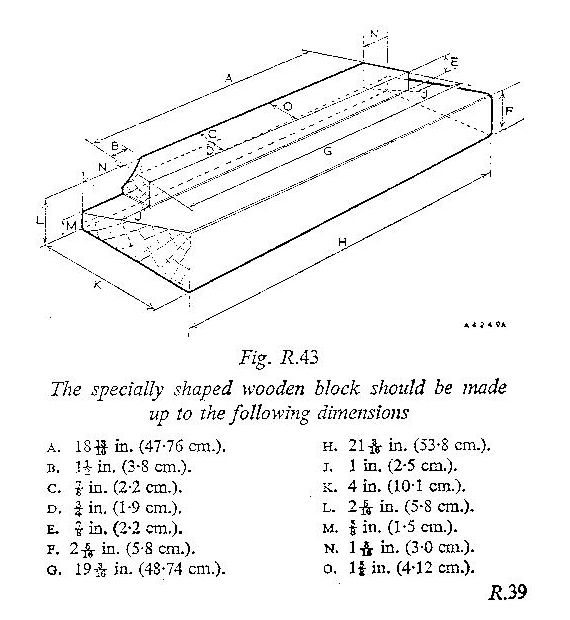

These originally designed Mini jack blocks by BMC DO NOT sit against the front valence! They fit only on the front subframe as when lifting the front of the Mini it is important that the weight is on the jack block from the subframe, no where else. 2X3 does not spread the weight across the front of the subframe and does not lock the block to the subframe. Safety in jacking a Mini is NOT a waste of time!
This is not complex wood working, it is simple and has been around for a long time. If I can do it anyone can!
My question to you was "is that a Dooder block" made originally by Dean W from Dooder wear. I am guessing as you did not answer no it is a block i made from old BMC drawings.
If in doubt, flat out. Colin Mc Rae MBE 1968-2007.
Give a car more power and it goes faster on the straights,
make a car lighter and it's faster everywhere. Colin Chapman.
|
|
Total posts:
Last post: Dec 10, 2023 Member since:Jul 16, 2001
|
Cars in Garage: 0
Photos: 18 WorkBench Posts: 0 |
|
These originally designed Mini jack blocks by BMC DO NOT sit against the front valence! They fit only on the front subframe as when lifting the front of the Mini it is important that the weight is on the jack block from the subframe, no where else. 2X3 does not spread the weight across the front of the subframe and does not lock the block to the subframe. Safety in jacking a Mini is NOT a waste of time!
This is not complex wood working, it is simple and has been around for a long time. If I can do it anyone can!
|
|
Total posts: 1716
Last post: Oct 18, 2020 Member since:Oct 18, 2011
|
Cars in Garage: 0
Photos: 0 WorkBench Posts: 0 |
But, other than that, anything beyond the humble 2x3 (or whatever) is pretty much a waste of time ..
Cheers, Ian
|
|
Total posts: 8382
Last post: Jan 13, 2022 Member since:Feb 7, 2006
|
Cars in Garage: 0
Photos: 0 WorkBench Posts: 0 |
|
If i have the need to jack one up on the tie rod mount i use a 4 x 4 scrap piece of 2 x 4 which gives it the clearance it needs to not bend the tie rod.
If in doubt, flat out. Colin Mc Rae MBE 1968-2007.
Give a car more power and it goes faster on the straights,
make a car lighter and it's faster everywhere. Colin Chapman.
|
|
Total posts: 1716
Last post: Oct 18, 2020 Member since:Oct 18, 2011
|
Cars in Garage: 0
Photos: 0 WorkBench Posts: 0 |
Once lifted use axle stands under the front tie rod mounts... or at the rear under the rear bottom section of the wheel openings... or maybe under the subframe depending what you want to get at.
The same bit of 2x3 fits under the rear cross piece of the rear subframe in case you want to get both ends on axle stands.
Cheers, Ian
|
|
Total posts: 8382
Last post: Jan 13, 2022 Member since:Feb 7, 2006
|
Cars in Garage: 0
Photos: 0 WorkBench Posts: 0 |
|
Azbornmini. Is that a Dooder block?
If in doubt, flat out. Colin Mc Rae MBE 1968-2007.
Give a car more power and it goes faster on the straights,
make a car lighter and it's faster everywhere. Colin Chapman.
|
|
Total posts:
Last post: Mar 25, 2022 Member since:Sep 4, 2000
|
Cars in Garage: 0
Photos: 3 WorkBench Posts: 0 |
|
|
|
Total posts:
Last post: Dec 10, 2023 Member since:Jul 16, 2001
|
Cars in Garage: 0
Photos: 18 WorkBench Posts: 0 |
|
|
|
Total posts: 9544
Last post: Apr 24, 2024 Member since:Aug 14, 2002
|
Cars in Garage: 0
Photos: 0 WorkBench Posts: 0 |
|
Tip on video shooting: don't do it where the background is brighter than the subject... automatic light metering wipes out the subject. Turn off auto metering or at least select centre-metering mode. Use fill lighting (even a shop trouble light would help) to illuminate what you want to be seen. Review and re-shoot as necessary.
.
"Hang on a minute lads....I've got a great idea."
|
|
Total posts: 10237
Last post: Apr 9, 2024 Member since:Mar 24, 1999
|
Cars in Garage: 0
Photos: 0 WorkBench Posts: 0 |
|

|
|
Total posts: 1188
Last post: Aug 13, 2020 Member since:Aug 9, 2016
|
Cars in Garage: 0
Photos: 0 WorkBench Posts: 0 |
|
|
Total posts: 46
Last post: Aug 28, 2018 Member since:Feb 11, 2016
|
Cars in Garage: 0
Photos: 0 WorkBench Posts: 0 |
Less video time of guys standing around talking about what the video will be about, and more clear images of actually where you did put the jack and the jack stands would be a bonus (and can speed up/shorten the videos).
It can be very difficult to get good lighting and good images of what is being explained, especially when under the car on pavement.
Suggestions: hold up the car on a hoist and then position the jack head, or the jack stand, where you need it while you are standing beneath the hoisted vehicle with lots of ambient lighting can really help to improve the clarity of things like that, and allow you to get your camera view right where you want it.
Illustrations / line drawings also go a long way to conveying the best places to support from, and the places to avoid. Words, on the other hand, are very subjective (people interpret differently) but images can be quite clear.
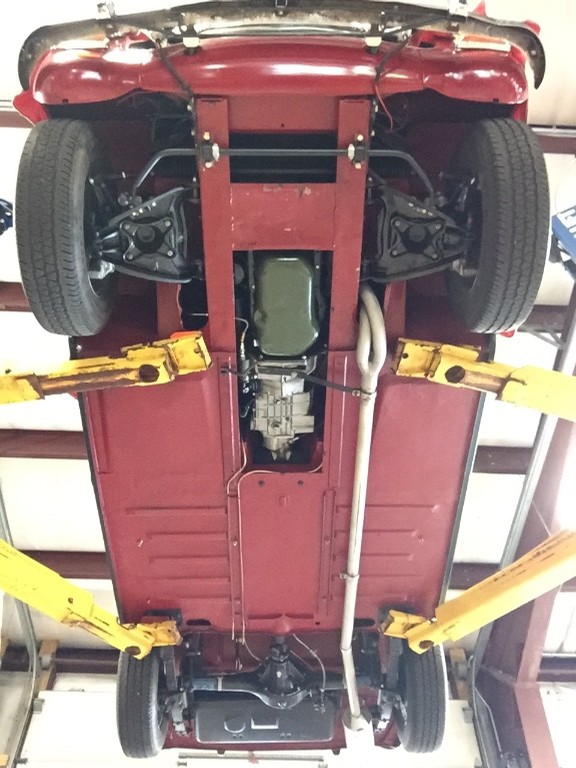
Example: photos from beneath while the car is up on a hoist, you can mark up with OK and NG areas and then edit those images into your video as stills.
Attached is an example from my Midget, for reference of how good a view you can get from there.
N
*Purposeful Parts For Select Classic Cars*
|
|
Total posts: 654
Last post: Dec 20, 2017 Member since:Sep 24, 2011
|
Cars in Garage: 0
Photos: 0 WorkBench Posts: 0 |
|
 More advice (hope this doesn't sound like "piling on"). Good instructional videos can be worth their weight in gold, but mostly when they are short, and to the point. John Twist has quite a few on youtube, and the Project Binky videos, can be very informative (though, they tread a fine line between being entertaining and being too darn long).
Less video time of guys standing around talking about what the video will be about, and more clear images of actually where you did put the jack and the jack stands would be a bonus (and can speed up/shorten the videos).
It can be very difficult to get good lighting and good images of what is being explained, especially when under the car on pavement.
Suggestions: hold up the car on a hoist and then position the jack head, or the jack stand, where you need it while you are standing beneath the hoisted vehicle with lots of ambient lighting can really help to improve the clarity of things like that, and allow you to get your camera view right where you want it.
Illustrations / line drawings also go a long way to conveying the best places to support from, and the places to avoid. Words, on the other hand, are very subjective (people interpret differently) but images can be quite clear.
Example: photos from beneath while the car is up on a hoist, you can mark up with OK and NG areas and then edit those images into your video as stills.
Attached is an example from my Midget, for reference of how good a view you can get from there.
N
|
|
Total posts: 6909
Last post: Apr 13, 2024 Member since:Feb 26, 1999
|
Cars in Garage: 0
Photos: 0 WorkBench Posts: 0 |
|
|
|
Total posts: 46
Last post: Aug 28, 2018 Member since:Feb 11, 2016
|
Cars in Garage: 0
Photos: 0 WorkBench Posts: 0 |
*Purposeful Parts For Select Classic Cars*
|
|
Total posts: 10237
Last post: Apr 9, 2024 Member since:Mar 24, 1999
|
Cars in Garage: 0
Photos: 0 WorkBench Posts: 0 |
|
1min 37sec in shows you bending the front subframe by putting an axle stand in an inappropriate position - it needs to be further forward (as shown later on) and with a rubber pad for grip, the axle stands you're using are notorious for slipping.
|
|
Total posts: 46
Last post: Aug 28, 2018 Member since:Feb 11, 2016
|
Cars in Garage: 0
Photos: 0 WorkBench Posts: 0 |
We are starting to make monthly tech tips and decided to start out simply with a how to jack up the mini and put it on jack stands (have seen enough dented floor pans to know that not everyone knows how to do this correctly).
Anyways enjoy the video and stay tuned for more!
https://youtu.be/vZnoBsGfJBw
*Purposeful Parts For Select Classic Cars*


