Classic Motorsports Magazine and Mini Mania have teamed up to restore a 1967 Mini Cooper S. This rare jewel still has a complete Cooper S drivetrain and hydrolastic suspension as well as an under-the-hood original Tartan Red paint job. The folks over at Classic Motorsports have been chronicling the restoration since September 14 on their website here. So, here we will catch you up on the work that has been done and will keep you updated on what's next.
From ClassicMotorSports.net:
Project Introduction: 1967 Mini Cooper S
September 14, 2012
|
This car has not been driven since 1978 |
Sitting on rollers, the hydrolastic suspension collapsed |
The gutters aren't terrible but will need minor repair |
The doors will also need fixing, they are rusty |


It wasn’t much to look at, however; it had had its original Tartan Red paint job masked by a dull silver respray.
Since the inception of this publication, it has been our intent to tackle a Mini project car. With incredible handling, cheeky styling, and a reputation as a giant-killer, everyone from British car enthusiasts to racers, collectors, and microcar fans loves Minis.
Some ten years ago we were made aware of a very rare Mini, a real 1967 1275 Cooper S. It was sitting in a warehouse in south Florida, where it hadn’t been touched for nearly 30 years. Intact, except for the driveline (which had been disassembled and carefully bagged and tagged), this matching numbers 1275 Cooper S was a perfect restoration candidate. It wasn’t much to look at, however; it had had its original Tartan Red paint job masked by a dull silver respray.
The owner originally wanted $10,000 for the car, explaining that the car was worth $25,000 when finished. We politely explained that he was indeed correct: Once we put $25,000 in parts, body, and paint work (along with hundreds of hours of our own labor), his $10,000 Mini was certainly worth at least $25,000. He wouldn’t budge on his price, though, so we passed on the car.
As time marched on, we checked on the little car occasionally. Finally, during this last recession, this owner wound up needing some money, and sold us this great little project for a much more reasonable sum of $5500. While still a lot for a car that doesn’t run or drive, this was a fair price due to this car’s rarity and completeness.
We hitched up the trailer, loaded the Mini on, and brought it home where it sits now. Soon, we’ll be tearing into this project at full speed.
- See more at: http://classicmotorsports.net/project-cars/1967-mini-cooper-s/project-introduction
Picking Through the Parts
September 24, 2012
|
Our mechanic Jere, looks through boxes to see what came with the car |
Everything was wrapped well & very little was missing |
Using the 6" Cosmic wheels would require fender flares, which we don't want to do |


The first order of business after getting this project home was to sift though all the boxes that came with it. We needed to see how what we got compared to what the seller said it came with.
The former owner had disassembled much of the car, but thankfully he had meticulously boxed everything and marked it well. This made figuring things out much easier. Even better news: This same owner had been collecting new parts for years, and we got all these parts with the car.
Just about everything we would need—especially when it came to the mechanicals—was sitting new, inside boxes in 30-year-old wrapping paper: pistons, gasket sets, motor mounts, a set of 10x6-inch Cosmic wheels, an extra head, and a bunch of other parts that will be good trade bait as we build this thing up.
There was very little bad news. We were missing a few parts, but the seller found most of them. We dragged them home in a subsequent trip. At this point we’re only missing the original intake manifold. Please contact us if you have one.
Shortly after picking this car up, we got a tip that DJ’s Minis over towards the west coast of Florida had some original optional reclining seats that were only correct for late Mk1 Coopers. We made a deal and dragged these seats home as well: They are more comfortable than the stock seats. We only got one stock seat with the car anyway, so this turned out to be a major score.
- See more at: http://classicmotorsports.net/project-cars/1967-mini-cooper-s/picking-through-parts
Starting Our Mini's Rebuild
October 1, 2012
|
Jere Dotten studies the original engine that came with our Mini Cooper S |
Correct head (below) and wrong head (above) |
Don Racine of Mini Mania confirmed that this was the proper transmission case |


When restoring a car, normally we leave the engine and transmission together while we start on the bodywork. Then, later in the process, we’ll come back to the drivetrain. This time, things would be different.
When we bought our 1967 Mini Cooper S, the engine and transmission had been completely disassembled for a rebuild 30 years ago. And that rebuild did not happen.
We figured that rather than disassemble the rest of the car, we’d be better off by assembling what had already been taken apart. Later, we can continue with the disassembly.
When we went through all the bags and boxes of parts, we found most of what we needed, including the correct numbers-matching block and head as well as the correct gearbox and differential for a 1967 Cooper S. Don Racine of Mini Mania checked out all these pieces and confirmed their correctness.
We also found the block was standard bore, but was worn about 0.006 inch over. We could have just bored it 0.010 or 0.020, but for some reason the project came with four new 0.040-over Hepolite pistons.
We discussed this dilemma with BMC A-series engine guru Dave Anton. Since the block needed to be bored, he suggested that we order a 0.040-inch overbore and use the $400 worth of pistons that came with the project. This would give it a bit more torque, too. Additionally, we’d be leaving some room to grow, too, as Anton says that these blocks can be overbored up to 0.060 inch.
- See more at: http://classicmotorsports.net/project-cars/1967-mini-cooper-s/starting-our-minis-engine-rebuild
Building the Lower End
November 6, 2012
|
The guy we bought the Mini from sent us this photo |
With the machine work done, it was time to start engine assembly |
We used ARP assembly lube on our new main bearings |


We took our block, stock Cooper S rods and crank to Gerald and Charlie’s Auto Machine Shop in Sanford, Florida. This is a good, local shop that prices their services very reasonably.
They handled all our machine work for about $300. This included boiling: the block; resizing our rods to make sure the journals are round; checking the block for flatness; boring the block .040 over, and installing new cam bearings that we got from APT. The crank was also checked and machined to accept .010-inch oversize main bearings.
All in all, our Mini engine was in pretty good shape and was very original. Next we will take a look at the head and cam.
- See more at: http://classicmotorsports.net/project-cars/1967-mini-cooper-s/building-lower-end
Head Work
November 28, 2012
|
The engine bay is empty, and the cylinder head is sitting on our bench |
The top head is not original to a 1275 Cooper S, but the bottom head is |


Once you start changing stuff, where does it stop?
Our Mini came with a head, though it wasn’t bolted to the engine. Or anything, for that matter. In fact, it wasn’t even near the car. We managed to dig it out from the pile of old Mini parts that had come with the car.
We decided to send the head to Dave Anton at APT, so he could look it over. There are very few of these 1275 Cooper S heads around anymore, as they had a tendency to crack. Apparently, most have been run hard and don’t take kindly to it (at least in stock form).
Fortunately, ours was not cracked, but it did need valve seats. It had had several valve jobs over its life, and at least the last one had not been done well.
Dave suggested we just use a much more common Sprite/Midget head, then put this rare piece on a shelf. We refused, as we want to keep this car as original as possible. Like George Washington’s proverbial axe—once you start changing stuff, where does it stop?
We’ll cover the engine build in more detail when we start the project series in Classic Motorsports magazine in the spring.
- See more at: http://classicmotorsports.net/project-cars/1967-mini-cooper-s/head-work
Time for a Clutch
December 5, 2012
|
There is still nothing under the hood, and there won't be until the drivetrain is sorted |
Jere Dotten finds that we have all of the original clutch components |


With our engine coming together, it was time to find a clutch.
Our car came with a new, stock clutch and pressure plate. Though they were 30 years old, we decided this OE British Leyland equipment would work fine for our nearly-stock Mini. We bead-blasted and painted the bellhousing, then painted it silver before assembling everything.
- See more at: http://classicmotorsports.net/project-cars/1967-mini-cooper-s/time-clutch
Putting Our Mini's Transmission Back Together
December 19, 2012
|
Our Mini needed some transmission love |
Mini Mania owner, Don Racine inspects our Mini's gearbox internals |
Our gearbox came out perfectly |


When we bought our car, the engine and transmission were pretty much completely disassembled. While there isn’t much on an old British car that scares us, we had never messed with a Mini transmission.
Armed with an original shop manual, it wasn’t long before we had things pretty much figured out. We then called Mini Mania and started to order parts. About five minutes into the call, when we obviously couldn’t answer questions as to what shims and other parts we needed, Mini Mania owner Don Racine asked, “Why don’t you just ship us the transmission and let us rebuild it. We do these things every day and if we build it, we know it will be right.” We countered with the very real concern that if they built it, we wouldn’t get the story; and after all, in this business we are in it for the story as much as we are to end up with another cool car.
We were on our way to Monterey in a few weeks, and since Mini Mania is located about three hours from Monterey in the mountains northeast of San Francisco, a compromise was agreed upon. We would come to Mini Mania the day after the Monterey Motorsport Reunion and learn how to build Mini transmissions.
What a good move, as we learned a lot and realized that while we could have muddled our way through it, we were better off going this route.
- See more at: http://classicmotorsports.net/project-cars/1967-mini-cooper-s/putting-transmission-back-together
Changing Our Mini's Rings and Pinion Gears
December 26, 2012
|
Changing the ring and pinion gears helped our final drive ratio |
The pinion gear for the 3.0:1 final drive was physically too large to fit in the retainer |
The retainer was ground down so the pinion gear would not interfere |


While rebuilding our transmission we got into a discussion with the folks at Mini Mania about final driver ratio selection. The standard ratio for the 1275cc Cooper S was 3.44:1. And while our car still had this stock, standard ratio, Mini Mania owner, Don Racine, suggested that if our intended use for the finished car would be some highway use and higher speed, long distance rally work, then we may be happier with a higher (lower numerically) final drive. He pointed out that with the stock 3.44:1 final drive ratio, a Mini Cooper is straining and turning very high rpm at today’s legal highway speeds.
As we had tweaked our head a bit and had a little hotter cam, our engine would be good for another 5-10 percent more horsepower. So we felt we would still be able to come off the line even with the higher final ratio.
Generally, we like to test everything for ourselves, but we had no desire to take apart the gearbox twice, and Racine and his crew have many years of Mini experience, so we trusted them. He recommended a 3.10:1 final drive as a good compromise for overall drivability.
There are a few tricks needed to install the physically larger ring gear, which we will get into when we start our story series in the May issue of Classic Motorsports.
- See more at: http://classicmotorsports.net/project-cars/1967-mini-cooper-s/changing-ring-and-pinion-gears
Tiny Wheels and Tires
January 16, 2013
|
We matched the original off white wheel color w/ off the shelf paint |
Mini Mania's dog dish hubcaps & Vredestein Sprint Classic tires |


There are a lot of tire and wheel options for the Mini Cooper. From the factory, the Cooper S came standard with 3.5-inch-wide slotted steel wheels that were 10 inches in diameter. Optional 4.5-inch-wide wheels were also available.
On the Mk. 1 Cooper S, these wheels were all painted Old English White, which is a creamy, yellowish white, with a hint of black in it as well. We queried Mini Mania’s Mini Cooper forum to get some answers as to how to duplicate this color.
Members suggested the original code was WT3 and that Dupont Alesta PFT50058 or Sherman Williams Almond P/142/8 are close substitutes. On either of the stock wheels, simple, lightweight, dog-dish style hubcaps were attached. We got three of these caps with the car, but one was damaged.
Our car came with a set of really cool Cosmic 10x6-inch wheels, and two of the original, optional 4.5-inch steel wheels. The Cosmics, while super cool looking, are too wide to fit under stock Mini fenders. We are trying to restore, not highly modify this car, so we decided to stick with the original wheels and caps. Fortunately, Mini Mania sells excellent reproductions of the original hub caps in either chrome or stainless steel. If we can’t find good used ones from fellow club members, we will pick up a set from Mini Mania.
We found three more 4.5-inch stock wheels from two different club members and went searching for some paint. An off-white Rust-Oleum Biscuit Appliance Epoxy paint at Wal-Mart fit the bill, and for less than $20 we had primed and painted our wheels.
On these wheels we mounted Vredestein Sprint Classic tires. They look absolutely correct on a car from the ‘60s and they ride and handle very well.
- See more at: http://classicmotorsports.net/project-cars/1967-mini-cooper-s/tiny-wheels-and-tires
Rebuilding the Shifter Mechanism
Febuary 13,2013
|
Our shift mechanism is now rebuilt with original style boot & knob from Mini Mania |
Left to right- Early, mid & late shifter designs. Found on the back of your transmission. |
The insides of shifter housing were simple. Just required some clean-up. |


There are three types of shifter mechanisms on classic Minis. The earliest cars used what is commonly referred to as the “magic wand” gear selector. This was, obviously, inferior.
In September of 1961, when the Cooper and Super models were introduced, the shift mechanism was revised and enclosed in an alloy housing. This system provided not only more positive shifting, but also added support to keep he engine from rocking back and forth. This support was provided by a rubber mount at the end of the shift housing that attached to the body structure behind the shift lever.
The final iteration of Mini shifting mechanism was introduced in December of 1972, when the rod-change shift linkage was introduced. This system provided even more positive shifting, but lost in the process was the mount to keep the engine from rocking back and forth.
While many car owners have converted to the rod style mechanism over the years, our car still had its correct alloy housing linkage.
We tore it down and found it in very good condition. After a thorough cleaning in our ProUltrasonic and a couple of rubber plugs from Mini Mania, it was ready to go back into the car.
- See more at: http://classicmotorsports.net/project-cars/1967-mini-cooper-s/rebuilding-shifter-mechanism
Stripping Down the Little Body
February 22, 2013
|
We started by taking off the doors, hood and decklid |
Our buddy Rennie Bryant removed the subframes |
Here is our mini eight hours later. Next, pressure wash & media blast the shell |


We made a conscious decision to not take any more of the car apart until we had the engine and gearbox back together. With those tasks complete, it was time to strip the shell. In our case, this was relatively easy: The seats, most of the interior and, of course, the drivetrain had already been removed by the previous owner.
As always, extra time here, bagging tagging and photographing will make or break your restoration. It is so easy to get caught up in the excitement of tearing the car apart that you just pile pieces on the bench to deal with later.This is also the best time to make a parts list. As you disassemble everything, make careful notes about what appears to be missing or damaged.
Overall, our disassembly went very easily. Everything is so lightweight on a Mini that it only takes one person to remove the doors. We had very few rust issues and we only broke off a couple of bolts during disassembly. The entire process took about eight hours. We would recommend leaving the subframes intact until you are ready to restore and reassemble them.
- See more at: http://classicmotorsports.net/project-cars/1967-mini-cooper-s/stripping-down-tiny-body
Pressure Washing the Tub
March 8, 2013
|
We tipped the shell on its side & cleaned the whole underside |
After using common home pressure washer Remember to use eye protection |
We cleaned the subframes while we were cleaning the body |


With our body shell stripped bare, our next step was to clean off all the oil, grease, dirt and as much as the factory undercoating as we could. Most media blasters will tell you this is a must before you bring them a shell to blast.
A steam cleaner works best for this level of cleaning, but is an expensive tool to own. Dousing the underside of the chassis repeatedly with a spray bottle full of diesel fuel or kerosene is effective at removing undercoating, but it is environmentally tough to deal with the aftermath, and that stuff can’t be good for your skin.
Ultimately, a common pressure washer and some Simple Green or similar cleaner does a pretty good job on all but the toughest chassis grime and undercoating.
Obviously you have to be aware of your runoff and act responsibly. You can do this job at a public car wash, but you won’t be popular. You can also put lots of cardboard underneath your work area and dispose of it properly when you are done.
It took us a few hours and our backs were sore for a day or two—we also cleaned the subframes at the same time—but we got 99% of everything off the bottom of our car and were pleased with the results.
- See more at: http://classicmotorsports.net/project-cars/1967-mini-cooper-s/pressure-washing-tub
Rehabbing Subframes and Suspension
April 3, 2013
|
Rear subframe was slightly tweaked. We hammered & dolly it straight again before it could go to the powdercoater. |
We have everything ready to powdercoat. We have thrown some other parts like the air cleaner into the mix. |


With everything clean, we could begin disassembling our subframes. Normally, we would recommend that you leave major subassemblies like these together until you are ready to work on it, but in this case, we were powder coating all the black steel pieces. Powder coating is much cheaper when done as a package deal, so we had to disassemble everything.
Dissasembly went smoothly enough. We made sure we took pictures and notes so we could see how things went back together. It is surprising just how many bump stops and other complexities are involved when it comes to taking Hydrolastic Mini suspension apart.
The rear subframe was slightly tweaked, so we had to hammer and dolly it straight again before it could go to the powder coater.
- See more at: http://classicmotorsports.net/project-cars/1967-mini-cooper-s/rehabbing-subframes-and-suspension
Blasted Media!
April 24, 2013

We knew we needed to get the old paint, rust and fiberglass repairs out of our Mini tub. We just had to decide the best way to do it.
Dipping a car has some advantages, but its biggest disadvantage is you can’t get all the solution back out, and if anything leaks out when painting, it can make a real mess. Also, dipping removes everything, so factory paint, sealants and the like will be taken out, even where you can’t get new materials back in.
Because of these reasons, we decided to dry strip the car with soda and media. If done right, media blasting might be the best way to strip a car. Our paint expert, Tom Prescott, preferred we prep the car this way.
We met Steve and Debbie of Blast Masters, Inc. at the Turkey Rod Run car show in Daytona. We liked them right off. They knew a lot of the same people we knew. They even knew the guy we had bought our Mini from, and had tried to buy the same car.
They took the time to come look our car over again while they were up our way. They said they could get it stripped down inside and out for between $1200 and $1400, which sounded way easier than trying to do it ourselves with our Eastwood home equipment.
We took the car down a couple of weeks later and found their shop very professional. It took them nearly two full days. Stripping a car is a lot of work. They did a beautiful job. They even coated the car with some anti-rust oil so we could get it back home and prime it. They took the extra time to get the job done right.
We have only good things to say about Blast Masters. We learned a lot about media blasting, which we will share with you in an upcoming issue of Classic Motorsports. Subscribe today, so you don’t miss this issue. You can call Blast Masters at (561) 685-5378.
- See more at: http://classicmotorsports.net/project-cars/1967-mini-cooper-s/blasted-media
Assessing the Remains
May 8, 2013
|
The left front fender is junk, as is the front valence/grill surround.
|
The corners were essentially gone from our cowl. We have already removed the ill-fitting right front fender. |


Wow, with the car completely stripped we were pretty depressed. We knew we had some rust and restoration issues when we bought the car, but we didn’t know how bad they were. This poor Mini had been really been ridden hard and put away wet, and it had been crashed at least once.
Our left fender was beat up and crashed beyond belief. We would need to replace it. The right fender was in good shape, but had been replaced and poorly fitted to the car. The front valence (which is also the whole front end of a Mini) was badly rusted and damaged. It would also need to be replaced.
The rear trunk floor was even more rusty than we thought, so it would need to be totally replaced instead of just patched. Our left door was basically unsaveable due to rust. Our right door would need to be reskinned. The rear valence also had some rust that would need to be dealt with.
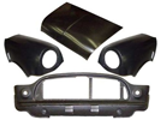
The good news was that the front floors weren‘t as bad as we originally thought. In addition, sheet metal is cheap and readily available. Mini Mania sells either aftermarket or authentic Heritage original panels. Naturally, we opted for the original pieces. We ordered cowl repair panels for both sides, a left front fender, a front valence, an entire trunk floor, a door skin for the passenger’s door and patch panels for the front floors.
We also sourced a perfect Mk. 1 Mini driver’s door from Heritage Garage in Costa Mesa, CA. This was a lucky find, as later Mini parts are easy to find, but Mk. 1 pieces are getting quite rare.
- See more at: http://classicmotorsports.net/project-cars/1967-mini-cooper-s/assessing-remains
Priming the Whole Car
May 21, 2013
|
Instead of a rusty, dirty mess, we had an essentially new-looking unibody. We just had to cut out and replace some rusty pieces. |

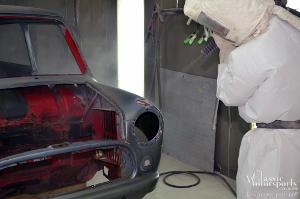
With the car stripped, media blasted and coated with a solution that would neutralize the baking soda, it was time to get our little Mini shell primed before any of the rust returns.
We went directly to The Body Werks, where Tom Prescott, our trusted painter for the last 30 years, carefully prepped and primed the car–inside and out–with PPG DP40 epoxy primer. We’ve had excellent luck with his rust-inhibiting primer and always use it as a first step when refinishing one of our project cars.
- See more at: http://classicmotorsports.net/project-cars/1967-mini-cooper-s/priming-whole-car
Rebuilding the Hydrolastic Displacers
May 23, 2013
|
Our Mini rolled into our shop like this, its suspension all gone bad.
|
The inner rubber displacer unit is molded to an outer metal shell. Usually, these units aren't damaged. |
The problem with these units are the line brekas, which render them useless.
|
The final step is to pressure test the newly built displacer unit.
|


In the mid ’60s, Minis were equipped with what was called Hydrolastic suspension. Commonly called a “wet” suspension system, these cars were equipped with hydraulic displacer units that allowed compressed fluid (water mixed with antifreeze) to move back and forth slowly from front to rear as the car hit bumps in the road. Surprisingly, even without the use of conventional shocks and springs, this system made for a much better-riding Mini. Some would argue that the handling was not as sharp, as on the earlier (and later) more conventional “dry” suspension cars.
Many Mini experts told us to get rid of the troublesome wet suspension system and convert to springs and shocks. A few, like Kip Lankenau of Kip Motor Company, told us the wet suspension worked wonderfully if rebuilt properly, and he was one of the few people on the planet who’d figured out how to repair these nearly unobtainable displacer units.
Our curiosity, not to mention our desire to restore and not modify this neat little car, made us follow Kip’s pitch. We sent him the displacers—bags, as they’re commonly called. We also realized that if we didn’t like the wet suspension, we could always change to a dry system later.
As Kip explained, the displacer units themselves are very durable; it’s rotten attachment hoses that render them unusable. Kip also told us the one thing that can damage the displacer unit itself: jumping your wet-suspension Mini, like they did in the movies.
The displacer unit is molded and crimped into a metal container using a hydraulic press; it doesn’t come apart. And, of course, you’ll ruin the rubber bag-type device if you try to weld or solder a new hose onto it.
Kip has devised a proprietary system of soldering a new hose under water, so that the original displacer unit is not damaged. He’s done 30-40 units successfully and tells us that even if you could figure out his system, the failure rate in attempting the process is so high that you’d soon tire of the ordeal and call Kip Motor Company to take over the job.
This is tricky, and after every repair, the process has to be leak-checked. Kip told us it would take a competent professional 20 tries or more to get one right.
At around $1500 per car (four displacers), this service is not cheap. But only a few NOS displacer units are left in the world, so Kip Motor Company is providing a vital service to the Mini community.
- See more at: http://classicmotorsports.net/project-cars/1967-mini-cooper-s/rebuilding-hydrolastic-displacers
Powdercoating the Suspension
May 27, 2013
|
Dissassembled suspension & under- carriage pieces, ready to go off to the powder coater. |
Can you tell the difference between a powder coated part and one painted satin black? |


With everything cleaned and disassembled, it was time to powder coat all our black pieces. While these pieces were originally painted in satin black, we have found that a powder coat finish is much more durable. The difference is nearly impossible to detect, and since our local powder coater will also blast and prep these pieces at a very reasonable price, getting it done is very economical.At the last minute, we decided to paint the gas tanks in the picture instead of powder coating them, as we were concerned that the heat of the oven that cures powder coated pieces might cause the seams to come apart and the tanks to leak.Our local powder coater, East Coast Ornamental Welding did the whole job for well under $300. They can be reached at (386) 672-4340.
- See more at: http://classicmotorsports.net/project-cars/1967-mini-cooper-s/powder-coating-suspension
Body Welding
May 29, 2013
|
It's hard to imagine how must rust was hiding underneath this car. |
Exhibit A The Rusty Cow! |
We thankfully already had a patch panel for this from Mini Mania |

We thankfully already had a patch panel for this from Mini Mania |

Eastwood's Weld-Thru primer works great for these kinds of repairs. |
Here's the finished repair. Now it's time to move on to the next rusty repair |


With our subframes and related components out for powder coating and our body all primed, it was time for the inevitable: We had a lot of welding to do. As we outlined in a previous update, we knew when we bought the car that it had some rust issues and had been badly repaired in the past. How bad the rust and damage really was did not become apparent until we got the entire body stripped and primed.
With our new Mini Mania-sourced Heritage-built Mini body panels and repair panels in hand, it was time get started. One of the first panels to arrive from Mini Mania was the cowl repair sections. This would be an easy place to start.
Sometimes it’s best to start with a nice simple job, do it quickly and well, and then get filled with self-confidence. This makes tackling the more difficult jobs, like replacing our trunk floor, that much more bearable.
When we pulled the outer cover off our cowl, we realized that the inner cowl panel was rusted as well. In hindsight, it would have made sense to cut this outer panel away and then order the inner panel as well from Mini Mania.
Instead, we cut the old, rusty inner panel out. In about half an hour with our Woodward Fab cutting and bending tools, had replicated the needed piece.
- See more at: http://classicmotorsports.net/project-cars/1967-mini-cooper-s/body-welding
Visiting Heritage Garage
June 3, 2013
|
Heritage Garage is a Mini enthusiast's dream come true. |
Ours should turn out very much like this 1275cc Cooper S. |
The shop's owner, Graham Reid, showed us his newest project Cooper. |


On one of our recent trips to Southern California, we made it a point to stop at Heritage Garage in Costa Mesa. Graham Reid, the owner, has built one heck of a business restoring and servicing Minis as well as selling new and used Mini parts. Heritage Garage has been operating for many, many years.
We got to look over and photograph a couple of real Cooper S cars on our tour. That taught us a lot. As we mentioned a previous update, we sourced a used driver’s door from Heritage Garage. We also picked up the throttle support and air cleaner mounting plate for a 1275 Cooper S.
Another cool item that Heritage Garage makes is the correct speedometer gear for when you convert your final drive from the original 3.44:1 to our more highway-friendly 3.10:1 final drive.
- See more at: http://classicmotorsports.net/project-cars/1967-mini-cooper-s/visiting-heritage-garage