|
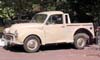
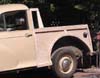
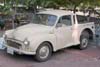
Conversion of an
old Morris Traveler Woody to a Woody Pickup.
I already have a
very nicely restored Traveler, but I obtained a very sad looking traveler
with all the wood rotted off. I had the idea to remake it into a woody
pickup which would be very useful to me.
The first thing
was to strip off all the old rotted wood, rusted bolts, and dirt. I
am sorry that I don't have the earliest and dirtiest picture. To my
delight this car has never been hit and has only a small amount of rust
(as Old English cars go). The inside of the wheel wells even has the
original paint in fairly good condition.
The old wood came
off in small pieces. The fixed nuts, that hold the fender on, had rusted
solid and the wood had rotted. Each one had to be cut out of the wood
the hard way.
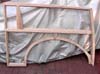
I ordered a full
set of "assembled" traveler wood from Mini-Mania. Ordering the "assembled"
wood frames is the way to go. Although they come knocked down, all the
screw holes are lined up to get the frame assembled in proper shape.
The sides of these cars is extremely complex and the geometry is very
strange. I would not want to try to set one up without this help.
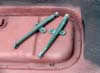
After a trial assembly
in my living room of one frame, I assembled both sides using square
drive stainless screws (from McFealys) and Gorilla Glue. The glue is
a urethane glue that foams a bit and fills voids. It is activated by
moisture. (Wont rot) The screws supplied from England were just plated
iron and would have rusted in a few years! I guess they still don't
understand rust over there!
All this later work
was done on my dining room table protected with large amounts of cardboard.
Note: in a proper
traveler the space between the wood frame is filled with some aluminum
panels. Both my cars are instead built with Plywood panels instead.
I prefer this and it makes varnishing the sides much easier. (You will
have to do this every few years).
I purchased furniture
grade 1/4 plywood with solid cores for this. One of the tough projects
was bending this wood to fit the wonderful curves of the frame. This
was fairly difficult in some places, but I got it done and it is drum
tight.
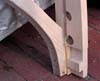
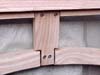
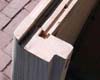
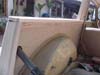
Since I am making
this a pickup, I wanted to extend the cab area by about 7 or 8 inches.
I fabricated a triangular bracket to hold up the top rail and cut off
the tail post and top rail. There are some detail photos. Then the top
rail was fitted with a 1x3 ASH cap rail attached with glue and screws.
The final shaping done with a sander.
I am partial to
flame graining of the oak/ash family. A very light touch with a hand
propane torch darkens the dark grain and leaves the light grain alone.
This enhances the grain as if the wood had decades of age on it. Age
gives the same effect. I have a kitchen done like this and 50 year wood
matches perfectly to new flame grained wood.
I am using "Golden
Oak" stain on the wood (Pictures to come in next installment) and using
exterior UV urethane varnish. Right now the completed sides are out
to a paint specialist who is better at this than I am.
The insides of the
sides will be lined with another ply panel for finish and to make the
sides double walled. I am using Ash over MDF plywood, also 1/4 inch
(not shown yet as I cannot fit them until the side come back next week).
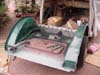
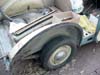
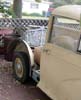
In the mean time,
I am making the rear metal work nice. All was washed, abraded, etc.
to remove dirt, loose paint and whatever. Everything was treated with
"Metal Prep" washed with "TSP" and cleaned many times. It still looked
awful. Even though none of this was going to show, except maybe part
of the wheel arch, It helps my visualization if I get it right.
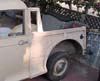
First nearly everything
got Rust-Oleum Red rust primer to make a barrier against surface rust.
Next it got a nice regular gray primer. I decided to try to make the
wheel arch nice enough to show if I didn't carpet it. It got a lot of
"bondo" to cover up where I chopped off some brackets and a lot of general
bumps and scrapes. I am in the process of finishing the wheel arches
with good old Rust-Oleum Dark Forest Green. This is close to the color
I had planned on using and I am getting to like it. The rough areas
where the chassis had been covered with TAR and the painted over (by
the factory) with the original blue paint was very checked and rough.
There was no way to get off the tar layer. This area as well as the
underside of the wheel wells was sprayed with an undercoat layer of
black. This spray can product gives a nice textured finish that dries
to a nice rubbery layer. I left the gas tank top in red primer so as
not to cover the screws holding it in. The project for the next few
days is to plan out the bed of the pickup and the brackets holding it
up. The bed will be solid 3/4 plywood. I am also adding a tow receiver
at the back. A photo shows today's state of the back chassis. I had
to get all this messy paint done before I amounted the sides again.
I am going to use
a non-setting urethane caulk around where the wood sides join to the
back of the cab. I am also using it around the wheel arch join with
the wood. The cab area is still rough. There is a bit of rust at the
back of the floor board area (all from the top). I have only found one
rust problem with the frame up by the right front. It looks easily repairable.
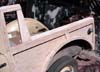
The fenders and
thresholds under the doors have been removed, stripped and are going
to get painted soon.
This project is
going along quickly. It is much easier starting over than trying to
mess with lots of bad conditions.
Much thanks to Mini-Mania
for their help and parts for this old car. More will come.
|