
| Orig. Posting Date | User Name | Edit Date |
| Oct 8, 2018 05:46AM | HelloIamJuan | |
| Oct 8, 2018 04:48AM | CooperTune | |
| Oct 8, 2018 03:41AM | HelloIamJuan | Edited: Oct 8, 2018 03:42AM |
| Jun 12, 2012 05:43AM | CooperTune | |
| Jun 12, 2012 04:49AM | DRMINI | |
| Jun 12, 2012 03:45AM | CooperTune | |
| Jun 11, 2012 06:51AM | mur | |
| Jun 11, 2012 05:59AM | Nicholasupton | |
| Jun 11, 2012 05:47AM | gurunutkins | |
| Jun 10, 2012 08:46PM | DRMINI | Edited: Jun 10, 2012 08:48PM |
| Jun 10, 2012 07:39PM | tjw998 | |
| Jun 9, 2012 05:25AM | gurunutkins | |
| Jun 8, 2012 10:40PM | DRMINI | |
| Jun 8, 2012 09:36PM | tjw998 | Edited: Jun 8, 2012 09:49PM |
| Jun 2, 2012 09:27PM | gurunutkins | |
| Jun 2, 2012 09:11PM | gurunutkins | Edited: Jun 2, 2012 09:28PM |
| Jun 2, 2012 04:12PM | DRMINI | Edited: Jun 2, 2012 04:16PM |
| Jun 2, 2012 06:09AM | gurunutkins | |
| Jun 2, 2012 06:03AM | gurunutkins | |
| Jun 1, 2012 07:41AM | tjw998 |
Found 32 Messages

|
Total posts: 5
Last post: Oct 8, 2018 Member since:Jul 19, 2018
|
Cars in Garage: 0
Photos: 0 WorkBench Posts: 0 |
Best,
Juan
|
|
Total posts: 4134
Last post: Oct 13, 2020 Member since:Oct 8, 2011
|
Cars in Garage: 0
Photos: 0 WorkBench Posts: 0 |
|
|
|
Total posts: 5
Last post: Oct 8, 2018 Member since:Jul 19, 2018
|
Cars in Garage: 0
Photos: 0 WorkBench Posts: 0 |
I have a Mini 1275 automatic and having trouble gearing reverse, I need to replace the bevel gear assembly (I assume is the whole planetary) for an 1275 auto, we can I find this part?
https://www.dropbox.com/s/9rvbfsfsj3mesvn/IMG_0145.jpeg?dl=0
https://www.dropbox.com/s/q67f4nd22l0zfj5/IMG_0339.jpg?dl=0
Thanks,
Juan
|
|
Total posts: 4134
Last post: Oct 13, 2020 Member since:Oct 8, 2011
|
Cars in Garage: 0
Photos: 0 WorkBench Posts: 0 |
|
Thanks for the reply. Maybe someone who has worked one will come along. I'm planning on a cam change with tranny in place. I'll put it all on engine stand and put nose of crank down when I pull the cam if spider drive it will either come with cam or stay on pump. It it falls I hope it makes it out of cam bores.
Steve (CTR)
|
|
Total posts: 8645
Last post: Dec 16, 2020 Member since:Oct 27, 2000
|
Cars in Garage: 0
Photos: 0 WorkBench Posts: 0 |
|
Steve,
All the early autos 998 and 1275 until early 80s had a spider drive cam, with a BIG splined pump. It's maybe 2.5x wider rotors than a manual pump. Outputs all oil direct to the tranny by a pipe behind the torque convertor. Oil then comes UP the banjo pipe from the trans, into the motor.
Not sure what drive type the Rover autos have, I've never stripped one.
Kevin G
1360 power- Morris 1300 auto block, S crank & rods, Russell Engineering RE282 sprint cam, over 125HP at crank, 86.6HP at the wheels @7000+.
|
|
Total posts: 4134
Last post: Oct 13, 2020 Member since:Oct 8, 2011
|
Cars in Garage: 0
Photos: 0 WorkBench Posts: 0 |
|
A bit off topic but seems a good place to ask. I'm going to install a new cam in the hand control mini I have been working on for years now. Young fellow in chair wants a cool sounding engine even if not fast. We have an A+ 998 auto power unit. I think autos have a different oil pump and I'm now wondering what type pump drive cam is in it?
I'm pulling an 998 auto power unit this week and I'm impressed with how nice the car is over all. Granted it's no rocket ship but it gets right along and acts like you'd expect an auto to. This unit is for sale complete.
Steve (CTR)
|
|
Total posts: 5840
Last post: Nov 1, 2019 Member since:Nov 12, 1999
|
Cars in Garage: 0
Photos: 0 WorkBench Posts: 0 |
|
This is an awesome thread. It has been more than 20 years since I touched an automatic mini, but I am pretty sure that workinprogress and I were simply lucky when we put that thing together; though we may have had the tool.
Then he, another friend and I decided it should go to MME in Atlanta after a 10 minute test drive. You certainly get great memories out of decisions like that, but in hindsight it sure seems foolish.
|
|
Total posts: 1974
Last post: Sep 12, 2020 Member since:Apr 2, 2005
|
Cars in Garage: 0
Photos: 0 WorkBench Posts: 0 |
|
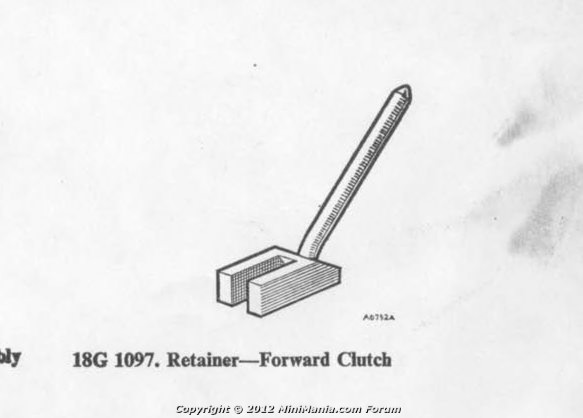
When I did the auto box on my clubby estate I made the tool that holds the forward clutch while you install the cover. I also used a little patrolum jelly to lube the clips and sheath. went on easy peasy.
After I was done I hung the homemade tool on the pegboard, incase I have to do it again some day.
|
|
Total posts: 397
Last post: Sep 27, 2018 Member since:Jul 29, 2008
|
Cars in Garage: 1
Photos: 107 WorkBench Posts: 1 |
|
thats a bugger TJ - if you have a local hydraulic shop they usually have the equipment to make up cables and the autobox cable is a very simple one. You can always get them to mock one up for you, a landrover discovery shifter cable has the same cable ends if you can modify the mounting points.
Sorry Kevin - I feel your pain  , first box I rebuilt I didnt know about the little sealing ring inside the spigot in the forward clutch and kept loosing all of the oil pressure when selected. To complete my embarasement I had to phone john in jpat and ask him as there werent many people who could help - first thing he said was do you have a seal left over because this is where it goes!
I would guess with the sort of fast drop you are seeing its probably that big seal around the diaphragm although you would think the mini shop would have replaced it when they did the plates?
cheers
Barri
some new cars, 99 disco II, 88 jag xj40, 76 cadilac de ville 500c.i. (8.2l), 74 450sl, 69 lotus 7, 61 countryman (restoration)
the best view is always from the point of no return
|
|
Total posts: 8645
Last post: Dec 16, 2020 Member since:Oct 27, 2000
|
Cars in Garage: 0
Photos: 0 WorkBench Posts: 0 |
|
I replaced a forward clutch (had just had 2 new plates put in it by a Mini shop) in a 1275 auto a few weeks ago. When the owner finally re-installed and started it yesterday, he found had NO forward drive at all, in any gear.
When I did a pressure check at the filter block today, I found the oil pressure went south ( from 75psi to 0!) whenever a forward gear is engaged. So, it's coming out, again. I suspect the fwd clutch diaphragm is ruptured, or a seal ring is toasted, or it's a feed pipe issue.
But before it goes back in the car, again, this time we will fire it up on the floor and do a pressure check...![]()
[edit] typo
Kevin G
1360 power- Morris 1300 auto block, S crank & rods, Russell Engineering RE282 sprint cam, over 125HP at crank, 86.6HP at the wheels @7000+.
|
|
Total posts: 7
Last post: Feb 23, 2013 Member since:Jan 15, 2012
|
Cars in Garage: 0
Photos: 0 WorkBench Posts: 0 |
So, just a little update. Refitting the forward clutch and governor plate back in was a pain in the butt. It took me and two buddies to A) hold the forward clutch in place by using screwdrivers from the kickdown hole and beside the valve body, B) align and seat the connecting linkage from the governor to the valve body, C) ensure the oil feed pipe is properly aligned, and D) press the cover plate flush with the rest of the gearbox. All while trying not to disturb the RTV covered gasket. bleh
So after those 4 hours, we buttoned it all up and refit the engine. Unfortunatly, when we pulled it out, I forgot about the shift cable attached to the gearbox, and we tried to lift it out of the var with it still attached, and pulled the steel braided jacket out of the aluminum collar at the end of the shift cable. I managed to twist it back into the collar, but it will not stay while shifting through the gears. I am trying to source a new cable from a fellow member, and I'll update here on how that goes.
-TJ
|
|
Total posts: 397
Last post: Sep 27, 2018 Member since:Jul 29, 2008
|
Cars in Garage: 1
Photos: 107 WorkBench Posts: 1 |
|
Kevin x2, from the marks it looks like your inner rod to the valve block was out of the forks ![]()
when you reinstall the front cover and have a cover over the rings (hopefully you kept the original or have an new one?) make a forward clutch retainer to hold it all in place then line everything up get the rod hooked onto the forks (the kick down mechanism will be out to hold the retaining tool) then confidently, with your tongue at the correct angle, push the whole assembly together. If you pause halfway through then you should start all over again as its likely one of the rings came out of the plastic sleeve and is jamming. Basically once it starts sliding in keep it sliding in dont pause 
good luck
Barri
some new cars, 99 disco II, 88 jag xj40, 76 cadilac de ville 500c.i. (8.2l), 74 450sl, 69 lotus 7, 61 countryman (restoration)
the best view is always from the point of no return
|
|
Total posts: 8645
Last post: Dec 16, 2020 Member since:Oct 27, 2000
|
Cars in Garage: 0
Photos: 0 WorkBench Posts: 0 |
|
Those splines look normal to me. They drive the aux oil pump, as well as the speedo drive.
If speedo isn't working check the cable fit into the driveshaft. The square hole or cable can wear round, then no worky.
Kevin G
1360 power- Morris 1300 auto block, S crank & rods, Russell Engineering RE282 sprint cam, over 125HP at crank, 86.6HP at the wheels @7000+.
|
|
Total posts: 7
Last post: Feb 23, 2013 Member since:Jan 15, 2012
|
Cars in Garage: 0
Photos: 0 WorkBench Posts: 0 |
Ok. I finally had some time and some help to remove the engine yet again from the mini to get at the governor. Upon removing the access plate, It became apparent what I think the problem was. As you can see in the picture to the right, the linkage that connects the governor to the valve body should clip into the little 'fork' looking thing. But from the wear marks, it looks like it was never fully set on the governor side. ![]() I have also made a video that I took really quick to better illustrate this instead of a photo. Here is the link to the youtube video.
I have also made a video that I took really quick to better illustrate this instead of a photo. Here is the link to the youtube video.

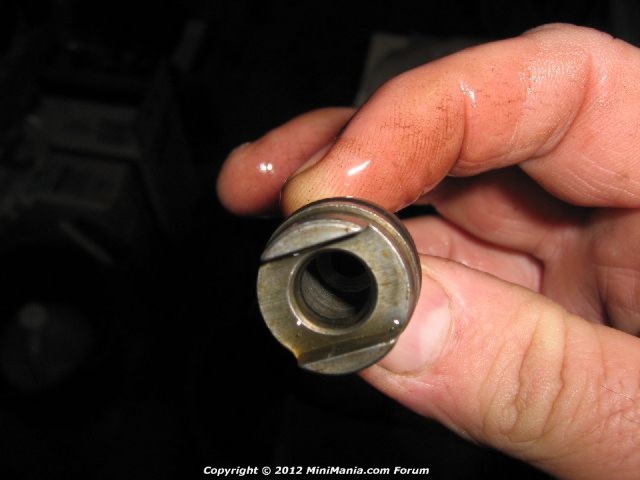
Also, I was wondering what you guys thought about the splines on the shaft of the forward clutch. It kind of looks like the spines were ground down a little, possibly why the speedometer wasn't working, but I want a second opinion about it before I seal it all back up.

Also Also, when I seated the forward clutch into the governor housing the first time, I didnt realize what that plastic sheath was for, and I kind of forced the plate back onto the shaft. In doing so, it looks as if I mutilated the inner spring clip. Luckily, I have a replacement from my overhaul kit from JPAT, but I just wanted to point that out.
I have several pictures hosted offsite as well.
|
|
Total posts: 397
Last post: Sep 27, 2018 Member since:Jul 29, 2008
|
Cars in Garage: 1
Photos: 107 WorkBench Posts: 1 |
|
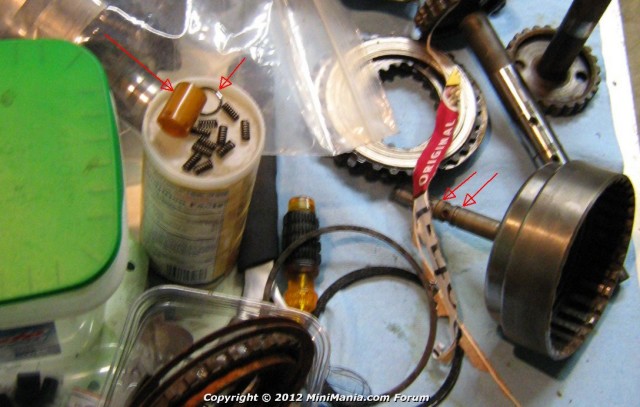
this is the only picture I could find but I have arrows pointing at the grooves on the shaft out of the front of the clutch pack where the 2 rings sit and on top of the plastic container arrows pointing at the plastic sheath or tube that slides over them to compress them so they can go back into the governor housing
some new cars, 99 disco II, 88 jag xj40, 76 cadilac de ville 500c.i. (8.2l), 74 450sl, 69 lotus 7, 61 countryman (restoration)
the best view is always from the point of no return
|
|
Total posts: 397
Last post: Sep 27, 2018 Member since:Jul 29, 2008
|
Cars in Garage: 1
Photos: 107 WorkBench Posts: 1 |
|
here is a better picture - as Kevin says this one is essential unless you have a 3rd arm grafted to your chest.
The plastic ring is usually found at the clutch end of the shaft sticking out of the cllutch pac that goes into the governor set up. it covers 2 smally expandable steel rings that sit halfway up the shaft. Just compress the rings with your fingers and slide the plastic sheath back up the shaft to cover the rings and keep them compressed. As you push on the end cover it pushes the plastic sheath back down the shaft and the 2 rings slide into the governor.
some new cars, 99 disco II, 88 jag xj40, 76 cadilac de ville 500c.i. (8.2l), 74 450sl, 69 lotus 7, 61 countryman (restoration)
the best view is always from the point of no return
|
|
Total posts: 8645
Last post: Dec 16, 2020 Member since:Oct 27, 2000
|
Cars in Garage: 0
Photos: 0 WorkBench Posts: 0 |
|
| Originally Posted by gurunutkins and the special tool to line up the pipes to the auxilliary pump in the front cover. I have rebuilt 3 boxes and dont use one though - just eyeball it and be carefull. Just a fun fact but these autoboxes have the front pump driven from essentially the differential so you can push start the car. Just get it up to around 15mph and the aux pump makes enough pressure to allow the clutches to engage and turn the engine |
I don't have that pipe tool either, but one tool worth making is the one visible behind it in your pic, top RH corner. It's pretty much a bolt welded to a washer, attached to the kickdown linkage flange at back. It sticks down diagonally and holds the forward clutch in position, so your other 3 hands can fit the front cover and hold the governor linkage rod in place.![]()
[edit] Ensure the plastic `ring compressor' sleeve is intact, and positioned over the 2 seal rings on the pump shaft when refitting. Otherwise, you will damage these rings when refitting the assembly into the box.
Kevin G
1360 power- Morris 1300 auto block, S crank & rods, Russell Engineering RE282 sprint cam, over 125HP at crank, 86.6HP at the wheels @7000+.
|
|
Total posts: 397
Last post: Sep 27, 2018 Member since:Jul 29, 2008
|
Cars in Garage: 1
Photos: 107 WorkBench Posts: 1 |
|

and the special tool to line up the pipes to the auxilliary pump in the front cover. I have rebuilt 3 boxes and dont use one though - just eyeball it and be carefull. Just a fun fact but these autoboxes have the front pump driven from essentially the differential so you can push start the car. Just get it up to around 15mph and the aux pump makes enough pressure to allow the clutches to engage and turn the engine
some new cars, 99 disco II, 88 jag xj40, 76 cadilac de ville 500c.i. (8.2l), 74 450sl, 69 lotus 7, 61 countryman (restoration)
the best view is always from the point of no return
|
|
Total posts: 397
Last post: Sep 27, 2018 Member since:Jul 29, 2008
|
Cars in Garage: 1
Photos: 107 WorkBench Posts: 1 |
|
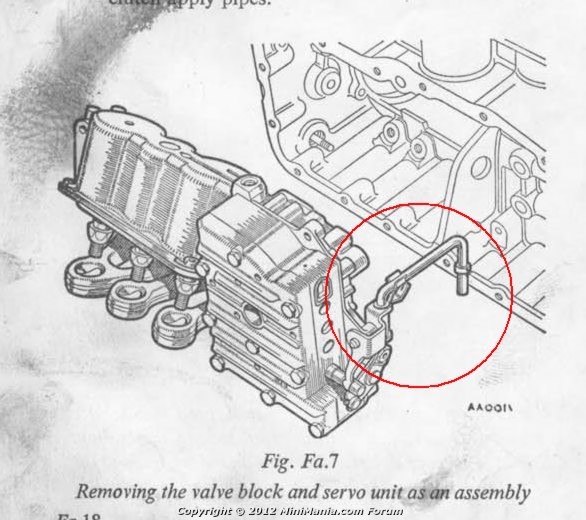
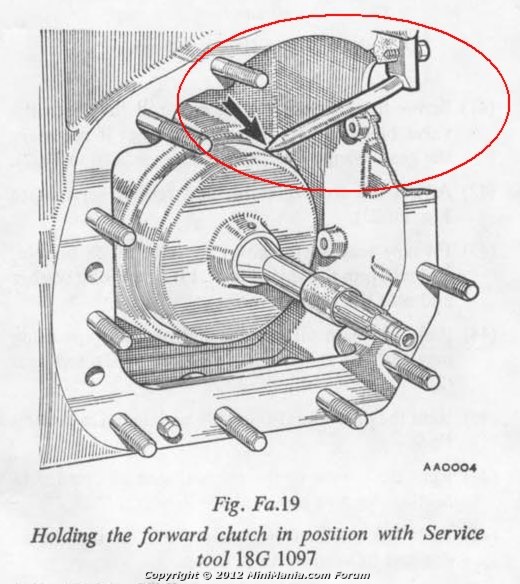
unfortunately thats probably your problem. As you can see in the pictures above there are 2 rods, one from the carb down to the governor linkage then on the inside the governor linkage to the valve block. Its quite possible, as Dr mini suggested earlier, that the inner linkage is either not in the governor linkage or on the outside of the linkage.
as the gearbox spins faster in a gear the governor inside the gbox spins faster - the 2 weighted arms pull out and make the arms on the governor turn upwards (the governor gets shorter). This way if the carb is only on half throttle as the governor arm moves out it hits the throttle linkage tab inside the box and cannot go out further keeping the governor body long and not moving the connecting rod into the valve blockand the box changes at the set speed. If the throttle is floored the tab on the end of the linkage is moved out of the arc of the swing arms on the governor and the governor can collapse totally shortening enough to allow the rod to the valve block to either drop a gear or hold it in the existing gear longer.
I think you might have to pull the front cover (radiator side) and check your linkages. There is a fancy tool to do it but you can pretty much eyeball it as well
the picture of the linkage from the valve body to the governor in red circle
some new cars, 99 disco II, 88 jag xj40, 76 cadilac de ville 500c.i. (8.2l), 74 450sl, 69 lotus 7, 61 countryman (restoration)
the best view is always from the point of no return
|
|
Total posts: 7
Last post: Feb 23, 2013 Member since:Jan 15, 2012
|
Cars in Garage: 0
Photos: 0 WorkBench Posts: 0 |
When I first put the gearbox back together and dropped it back into the car, the catch on the governer linking rod was on the wrong side of the tab on the governer inside the gearbox (talking about the last picture). When I tried to connect the linkage to the carburetor, there was not enought free movement of the linking rods to connect it correctly, and when it was operated by hand, it made a loud clinking noise. I figured that the two contact points were on the wrong side of each other. So I was able to remove the lower part of the linkage our of the gearbox while everything was still in the car, make sure it had the proper rotation, and then re-seat it. now it has the full range of motion needed to operate the throttle on the carb, and near the "floored" position, there is spring tension on the rod provided by the internal governer.
Found 32 Messages


