

|
Total posts: 58
Last post: Dec 22, 2022 Member since:Jul 19, 2016
|
Cars in Garage: 0
Photos: 0 WorkBench Posts: 0 |
... a proper compression check. I got results of 280 - 0 - 0 - 282. Do those seem high?
Questions I still have:
The speedo has a Red/Green wire...
Could it also be the bulbs that illuminate the speedo?
Is there anyway to tell if an uprated cam was used without removing it from the block?
Your numbers are high... and low. If you really had "zero" on 2 & 3, you are either measuring wrong, have valves that are WAY out of adjustment, or something is wrong with the head or head gasket. I would expect numbers uniform (within 10%) across all cylinders, over 100 PSI and less than 200 PSI. Visit YouTube, watch some videos on compression testing and try again.
Lighting circuits use red, red/white, and/or red green wires. The bulbs you found are almost certainly for gauge illumination. Try the light switch and see what happens. The lamps need to be plugged into the speedo to work and the speedo has to have a ground connection.
You can map out the cam's profile. Again, visit YouTube. Watch videos on how to degree a cam. Use the technique shown in the videos to map out the cam lift for each 10 degrees of crank rotation.
|
|
Total posts: 9241
Last post: Aug 17, 2023 Member since:Jun 5, 2000
|
Cars in Garage: 0
Photos: 0 WorkBench Posts: 0 |
|
... a proper compression check. I got results of 280 - 0 - 0 - 282. Do those seem high?
Questions I still have:
The speedo has a Red/Green wire...
Could it also be the bulbs that illuminate the speedo?
Is there anyway to tell if an uprated cam was used without removing it from the block?
Your numbers are high... and low. If you really had "zero" on 2 & 3, you are either measuring wrong, have valves that are WAY out of adjustment, or something is wrong with the head or head gasket. I would expect numbers uniform (within 10%) across all cylinders, over 100 PSI and less than 200 PSI. Visit YouTube, watch some videos on compression testing and try again.
Lighting circuits use red, red/white, and/or red green wires. The bulbs you found are almost certainly for gauge illumination. Try the light switch and see what happens. The lamps need to be plugged into the speedo to work and the speedo has to have a ground connection.
You can map out the cam's profile. Again, visit YouTube. Watch videos on how to degree a cam. Use the technique shown in the videos to map out the cam lift for each 10 degrees of crank rotation.
|
|
Total posts: 58
Last post: Dec 22, 2022 Member since:Jul 19, 2016
|
Cars in Garage: 0
Photos: 0 WorkBench Posts: 0 |
Finally had some time to mess with the mini. I figured out the starting problem and it was......wait for it.......the starter. Put in a new one and the engine spins like it should. With that I was able to do a proper compression check. I got results of 280 - 0 - 0 - 282. Do those seem high? Even with raised compression flat pistons? I checked each cylinder multiple times and ended up with the same numbers.
I discovered a few things:
The ign light was not working because the bulb socket had fallen out of the back of the speedo.
I don't have an oil light because the oil gauge is plugged into the pressure switch port. I couldn't find a white/brown wire as well.
It has a Fetcher header. Don't know much about that.
Questions I still have:
The speedo has a Red/Green wire pluged in bulbs at both 3 & 9. What could these do? Research shows that this color wire is for “Lighting switch to side and tail lamp.” Could it also be the bulbs that illuminate the speedo?
When this motor was put together high compression pistons, header, intake manifold, 44 carb & 123 dizzy were used. Is there anyway to tell if an uprated cam was used without removing it from the block? The PO said the cam and head were stock spec but he didn't build the motor and he said the guy he got it from wasn't very truthful with the cars history. Why would you go to all this effort to add performance parts just to skimp out on the cam and head when building a motor? Cost savings? I was considering changing out the cam but would hate to go to all the effort just to find it already has an uprated one installed. Plus wouldn't it be beneficial to know what cam you have so you can properly adjusted the tappets? I'll know soon enough if the head is stock once I remove it.
Thanks for the help. I have learned loads and I appreciate the answers and suggestions offered.
|
|
Total posts: 9241
Last post: Aug 17, 2023 Member since:Jun 5, 2000
|
Cars in Garage: 0
Photos: 0 WorkBench Posts: 0 |
|
Your test is simple. Find the white/brown wire in the engine bay and disconnect it at the pressure switch in the block. Have an assistant watch the dash and turn the key to the run position. Hold the terminal on the end of the white/brown wire to ground (bare metal spot on the engine block). Ask your assistant if the lamp is on or off. If it is off, you either have a bad ignition switch, a wire break, or a burned out bulb. If the lamp is on when you ground the terminal and off when you connect the terminal to the switch, you have a bad switch.
|
|
Total posts: 5840
Last post: Nov 1, 2019 Member since:Nov 12, 1999
|
Cars in Garage: 0
Photos: 0 WorkBench Posts: 0 |
|
|
|
Total posts: 58
Last post: Dec 22, 2022 Member since:Jul 19, 2016
|
Cars in Garage: 0
Photos: 0 WorkBench Posts: 0 |
|
|
Total posts: 8382
Last post: Jan 13, 2022 Member since:Feb 7, 2006
|
Cars in Garage: 0
Photos: 0 WorkBench Posts: 0 |
|
If in doubt, flat out. Colin Mc Rae MBE 1968-2007.
Give a car more power and it goes faster on the straights,
make a car lighter and it's faster everywhere. Colin Chapman.
|
|
Total posts: 5840
Last post: Nov 1, 2019 Member since:Nov 12, 1999
|
Cars in Garage: 0
Photos: 0 WorkBench Posts: 0 |
|
|
|
Total posts: 8382
Last post: Jan 13, 2022 Member since:Feb 7, 2006
|
Cars in Garage: 0
Photos: 0 WorkBench Posts: 0 |
|
Just look inside the radiator through the neck and see how many rows/cores you have. Super two core is the way to go with a stock plastic fan they work fine here in Florida. the fan should be installed with the center smooth side facing the water pump.
Pull the lights out of the back of the speedo and sort them out one by one like i said the ignition one may be functioning but not inserted in the holder correctly, they are probably all there but maybe installed incorrectly. That is the pita with any older car undoing what a po has "re worked" before you.
Do the tests to determine what you need stay stock for now and go from there.
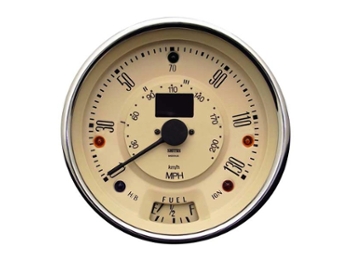 This is the speedo I have . Maybe I'm being thick but I thought 5 and 7 o'clock were obvious, 12 is the blinkers, so one of 3 and 9 is the oil light? Should it light up when I turn on the ignition? IF one of the lights at 3 and 9 is the oil light what would the other light be used for?
What is the best way to get to the bulbs in the speedo? inside engine bay or inside car?
If in doubt, flat out. Colin Mc Rae MBE 1968-2007.
Give a car more power and it goes faster on the straights,
make a car lighter and it's faster everywhere. Colin Chapman.
|
|
Total posts: 9241
Last post: Aug 17, 2023 Member since:Jun 5, 2000
|
Cars in Garage: 0
Photos: 0 WorkBench Posts: 0 |
|
The constants are the blue and red jewels at the bottom used for high-beam and charge warning respectively.
Green at the top can be used for turn signals if applicable. Mk1 cars have an indicator lamp on the turn signal stalk instead so the green jewel is not used.
The two amber jewels (when used) were for the oil pressure warning light and the plugged oil filter warning light. I don't think the filter warning light was common. The oil pressure warning light is used on most cars that do not have an oil pressure gauge.
If your car has an oil pressure switch on the block then one of the two amber jewels can be used for the low oil pressure warning light. You are looking for a white wire coming from the ignition switch to a lamp socket and a white/brown wire leaving that lamp socket going to the pressure switch in the engine bay. No other wires should be on that bulb.
Finally, you are correct. If you have an oil pressure warning lamp it should be on when the key is in the run position with the engine NOT running. It should go off once the engine starts and is idling.
|
|
Total posts: 58
Last post: Dec 22, 2022 Member since:Jul 19, 2016
|
Cars in Garage: 0
Photos: 0 WorkBench Posts: 0 |
Just look inside the radiator through the neck and see how many rows/cores you have. Super two core is the way to go with a stock plastic fan they work fine here in Florida. the fan should be installed with the center smooth side facing the water pump.
Pull the lights out of the back of the speedo and sort them out one by one like i said the ignition one may be functioning but not inserted in the holder correctly, they are probably all there but maybe installed incorrectly. That is the pita with any older car undoing what a po has "re worked" before you.
Do the tests to determine what you need stay stock for now and go from there.
This is the speedo I have . Maybe I'm being thick but I thought 5 and 7 o'clock were obvious, 12 is the blinkers, so one of 3 and 9 is the oil light? Should it light up when I turn on the ignition? IF one of the lights at 3 and 9 is the oil light what would the other light be used for?What is the best way to get to the bulbs in the speedo? inside engine bay or inside car?
|
|
Total posts: 8382
Last post: Jan 13, 2022 Member since:Feb 7, 2006
|
Cars in Garage: 0
Photos: 0 WorkBench Posts: 0 |
|
Just look inside the radiator through the neck and see how many rows/cores you have. Super two core is the way to go with a stock plastic fan they work fine here in Florida. the fan should be installed with the center smooth side facing the water pump.
Pull the lights out of the back of the speedo and sort them out one by one like i said the ignition one may be functioning but not inserted in the holder correctly, they are probably all there but maybe installed incorrectly. That is the pita with any older car undoing what a po has "re worked" before you.
Do the tests to determine what you need stay stock for now and go from there.
If in doubt, flat out. Colin Mc Rae MBE 1968-2007.
Give a car more power and it goes faster on the straights,
make a car lighter and it's faster everywhere. Colin Chapman.
|
|
Total posts: 58
Last post: Dec 22, 2022 Member since:Jul 19, 2016
|
Cars in Garage: 0
Photos: 0 WorkBench Posts: 0 |
I was looking at the Calver 1:4 set from the UK.
You can't 'look' for leaks, but rather listen. A hissing noise from the dipstick hole, exhaust pipe or carb will identify the source of the leak.
With my engine having done well over 100K miles the noise was quite obvious and the pressure drop quite embarrassing... especially in front of the assembled club members there to observe how a leak down test is done. But then it still runs quite well so we'll just soldier on for the moment.
IMHO thoughts of high lift rockers are a bit premature at present.
I'm sorry I don't remember whether you've published an engine spec for your car but there are more useful mods to a standard set up than high lift rockers... And while $700 is a reasonable price for a tuned cylinder head its too much for a simple refurbishment... which is what you might need should leaking valves be part of your problem....which you can check while you have the head off for the gasket job...
I would fix the gasket, sort out the electrics (the oil light should not be green ..and you must have a red ignition light somewhere) and then think how much extra power ($$$$
 you want/need and go from there.
Cheers, Ian
PS. If you haven't already, I think its worth investing in one of David Vizard's books. As well as all the MiniPorn he gives good overview of where your $$s will provide the best bang for your bucks.
Isn't the green light at 12 o'clock in the speedo the oil light? When I first got the car I noticed a nuber of wires going to that bulb. Probably why the same light blinks with the turn signals instead of the arrows at 3 and 9.
I have David Vizard's book and The A series High Performance Manual. I'm pretty sure I am going to put the car back together the way it is without any new modifications. The car is a mostly stock 1275 with high compression pistons, 44 carb, RC exhaust and 123 distributor. Cam and head are said to be stock. Car is / was pretty fun the way it is but someday I would like to upgrade the head and cam.
I need to sort out the starter issues first and then move onto the head gasket and cooling. I was reading about fans being installed backwards but mine seems to be on correctly. I did see quite a bit of gunk on the fins of the radiator that could be one reason the car would get warmer then I felt it should at idle and stop and go driving.
Is there anyway to tell what radiator the car has by looking at it? I tried to find a number to cross reference but I couldn’t find anything. I was told it was a 4 core radiator but in the pile of parts receipts that came with the car I can only find where a stock radiator was ordered. Maybe I should look to upgrade to the 'super cool' 2 core? Tropical fan? How much louder are those and do I really need it?
Oh, I've never had a working ignition light. Its been a year since I bought the car so I suppose its not just a simple bulb replacement since the charging system worked fine all that time.
|
|
Total posts: 1716
Last post: Oct 18, 2020 Member since:Oct 18, 2011
|
Cars in Garage: 0
Photos: 0 WorkBench Posts: 0 |
I was looking at the Calver 1:4 set from the UK.
You can't 'look' for leaks, but rather listen. A hissing noise from the dipstick hole, exhaust pipe or carb will identify the source of the leak.
With my engine having done well over 100K miles the noise was quite obvious and the pressure drop quite embarrassing... especially in front of the assembled club members there to observe how a leak down test is done. But then it still runs quite well so we'll just soldier on for the moment.
IMHO thoughts of high lift rockers are a bit premature at present.
I'm sorry I don't remember whether you've published an engine spec for your car but there are more useful mods to a standard set up than high lift rockers... And while $700 is a reasonable price for a tuned cylinder head its too much for a simple refurbishment... which is what you might need should leaking valves be part of your problem....which you can check while you have the head off for the gasket job...
I would fix the gasket, sort out the electrics (the oil light should not be green ..and you must have a red ignition light somewhere) and then think how much extra power ($$$$
you want/need and go from there.Cheers, Ian
PS. If you haven't already, I think its worth investing in one of David Vizard's books. As well as all the MiniPorn he gives good overview of where your $$s will provide the best bang for your bucks.
|
|
Total posts: 8382
Last post: Jan 13, 2022 Member since:Feb 7, 2006
|
Cars in Garage: 0
Photos: 0 WorkBench Posts: 0 |
|
Calver's 1.4's should be good.
If in doubt, flat out. Colin Mc Rae MBE 1968-2007.
Give a car more power and it goes faster on the straights,
make a car lighter and it's faster everywhere. Colin Chapman.
|
|
Total posts: 58
Last post: Dec 22, 2022 Member since:Jul 19, 2016
|
Cars in Garage: 0
Photos: 0 WorkBench Posts: 0 |
I was looking at the Calver 1:4 set from the UK.
|
|
Total posts: 8382
Last post: Jan 13, 2022 Member since:Feb 7, 2006
|
Cars in Garage: 0
Photos: 0 WorkBench Posts: 0 |
|
Yes the 1.3 or 1.4 should not put as much stress on the valve train and is a better option than the 1.5's on a basic standard engine, they should fit fine just make sure there is no spring bind and buy a set from a reputable manufacturer there were a lot of inferior ones out there for a while, good one's cost more they cost but are worth it in the long run.
I would have your head checked first before spending $700 on one, there may not be that much wrong with it and it may turn out a lot cheaper.
I would also do one thing at a time that way you don't end up with a mess and can sort out the issues and any changes as you go.
If in doubt, flat out. Colin Mc Rae MBE 1968-2007.
Give a car more power and it goes faster on the straights,
make a car lighter and it's faster everywhere. Colin Chapman.
|
|
Total posts: 58
Last post: Dec 22, 2022 Member since:Jul 19, 2016
|
Cars in Garage: 0
Photos: 0 WorkBench Posts: 0 |
I'm not afraid to tackle any of the work on the car. I know with the help of this forum and a general overall understanding of tools and mechanicals I can probably get through most repairs. Of course time and money might have something to say about that. Do you have a particular leak down tester you would recommend or should I just look to a decent tool brand. Maybe my local parts house has them in there rental items.
I ask about machine shop prices because I can get a rebuilt head from MM for about $700 so maybe that is a better way to go. Just sorting through all the options.
|
|
Total posts: 8382
Last post: Jan 13, 2022 Member since:Feb 7, 2006
|
Cars in Garage: 0
Photos: 0 WorkBench Posts: 0 |
|
Head work varies from State to State and the shop you use depends on what you need a range would be from a low of $300 to maybe $700 but as i said it varies wildly on the work needed. A good reputable machine shop should be able to do the work.
A stage 2 or 3 head will improve things but the rest of the engine has to be in good order and it would work best with other modifications to carb and exhaust and maybe the rocker ratio's distributor etc. A lot of power is lost on the porting of Mini heads and that is where the most improvement can be gained. Installing the 1.4 ratio rockers is an easy way to get away without replacing the cam but it is not just bolt on you need to check other parts.
Where you are currently with your car i would locate the compression loss and decide where to go from there as all your compression figures need to be 180 + or - 10%, if you can't get to that point it is no use throwing extra parts and money at it. Remember all these mods put an extra strain on the bottom end of the engine it has to be in good shape or it will not last.
If you are not capable or do not have the tools required to do this work i suggest you find a competent Mini mechanic in your area to check the engine over and advise you as to what you need.
If in doubt, flat out. Colin Mc Rae MBE 1968-2007.
Give a car more power and it goes faster on the straights,
make a car lighter and it's faster everywhere. Colin Chapman.
|
|
Total posts: 58
Last post: Dec 22, 2022 Member since:Jul 19, 2016
|
Cars in Garage: 0
Photos: 0 WorkBench Posts: 0 |
Before you do that i would do a cylinder leak down test to see where that 20 lbs of compression is going on number 4. Compression's should be in the 10 per cent range of each other that one is just outside that and a leak down test will reveal where the loss is as it could be rings, valves, bores who knows.
I would use the best head gasket you can find along with the best valve guide seals.
Remove all the studs out of the block and make sure it is level and flat by using something perfectly flat and some wet/dry sandpaper along with some lubricant if you are doing it with the engine in the car. Also make sure you get the machine shop to skim the head to make sure that is flat and level, you will see a burn area between the two cylinders you need to remove that with the skim.
You may as well re seat all the valves and check the tolerances on the guides too while you have it apart.
I first need to take out my starter and have it checked since it wasn't spinning the engine at a decent speed when I did the compression test on that cylinder and it only turned over for a couple turns before it stopped and went back to clicking. BTW what is a good compression number for a healthy motor? Would higher compression pistons make that number higher?
How does a leak down test work exactly? I understand the idea but not how it can tell where the compression loss is coming from.
When it comes to the head, what is a ballpark that it would cost to have a machine ship give it a once over? That might not be an answerable question but I thought i'd ask. Anything special about a Mini head that the standard machine shop I have used before would have trouble with or should I drive the 1.5 hours up to Mini Mania or the other guys? Would I see much difference if I went with a stage 2 or 3 head instead even though the PO said the cam was stock? Calver head? 1.4:1 rockers? Man do I have questions.


