
Found 26 Messages

|
Total posts: 62
Last post: May 21, 2019 Member since:Jul 28, 2016
|
Cars in Garage: 0
Photos: 0 WorkBench Posts: 0 |
 ... Do you have the proper hardened washers under the manifold retaining bolts?? Doesn't look like it in the photos....Just tell her that's what a garage is supposed to smell like. With modern cars having hermetically sealed fuel systems, we forget what garages used to smell like.Before you grind wrenches to thin them, look for a set of "ignition wrenches". They used to be common in automotive stores, now you probably have to order them online. Sears still has some and there are plenty of sets to choose from on Amazon.
Scott | 1963 Austin Cooper | 2003 MINI Cooper S | 2018 MINI Cooper 4-door
|
|
Total posts: 10330
Last post: Jan 27, 2021 Member since:Dec 3, 2002
|
Cars in Garage: 0
Photos: 0 WorkBench Posts: 0 |
|
|
|
Total posts: 9544
Last post: Apr 24, 2024 Member since:Aug 14, 2002
|
Cars in Garage: 0
Photos: 0 WorkBench Posts: 0 |
|
. As it is, the whole garage stinks like fuel right now, even without any leaks. My wife is *not* pleased. I'm assuming the smell is because I still have the carbs open to the air without the air filters on.
.
"Hang on a minute lads....I've got a great idea."
|
|
Total posts: 8382
Last post: Jan 13, 2022 Member since:Feb 7, 2006
|
Cars in Garage: 0
Photos: 0 WorkBench Posts: 0 |
|
I have been meaning to create some "home-made" thin wrenches, but I don't have my own grinder so it just hasn't happened yet. This is not the first time I have been swearing about that exact problem.
Now you have me worried that I may have overtightened the cable clamp. I didn't go crazy on it, but I wouldn't describe it as "just nipping it". Hmmm.
I DO have all three springs. That was another adventure... As I was trying to stretch the brand new center spring to connect to the trunnion, one of the spring hook ends popped out of the spring and disappeared into the engine bay, never to be seen again. Thankfully I had the old rusty springs still and I was able to salvage the hook from one of those. As an aside, this whole project was a reminder to go see the eye doctor as I realized that focusing on all these tiny bits is getting harder and harder and my glasses just aren't cutting it.
Good call on the ignition wrenches Doug, i have a set from Sears but am not sure they include 7/16" i will have to look.
To fit the 3rd spring pulling up that Ian mentioned i believe you need the factory air box, i have seen them fitted facing down when the air box is changed out to separate air filters.
If in doubt, flat out. Colin Mc Rae MBE 1968-2007.
Give a car more power and it goes faster on the straights,
make a car lighter and it's faster everywhere. Colin Chapman.
|
|
Total posts: 1716
Last post: Oct 18, 2020 Member since:Oct 18, 2011
|
Cars in Garage: 0
Photos: 0 WorkBench Posts: 0 |
Sears will sell you some neat little thin open enders/rings.... (You only need 2 (of the same size) .. but others in the set will be useful elsewhere (or so I find
 .
.Personally I don't worry about the third spring (haven't fitted one for decades).. but if you do ..remember that it pulls up... ie..in the opposite direction to the other two
I find the easiest way to clamp the cable is to remove the springs allowing the throttle to go full open and bringing the clamp area up to the top.. But remember...before you remove the springs, push the cable into place and adjust the length to give a tiny bit of slack then mark it .. so when you have the throttle fully open (see above) you know there's enough slack for it to close properly.
Cheers, Ian
PS... just something else to worry about
... Do you have the proper hardened washers under the manifold retaining bolts?? Doesn't look like it in the photos....
|
|
Total posts: 1007
Last post: Jul 19, 2022 Member since:Jul 24, 2014
|
Cars in Garage: 0
Photos: 0 WorkBench Posts: 0 |
|
|
Total posts: 9241
Last post: Aug 17, 2023 Member since:Jun 5, 2000
|
Cars in Garage: 0
Photos: 0 WorkBench Posts: 0 |
|
|
|
Total posts: 62
Last post: May 21, 2019 Member since:Jul 28, 2016
|
Cars in Garage: 0
Photos: 0 WorkBench Posts: 0 |
I have been meaning to create some "home-made" thin wrenches, but I don't have my own grinder so it just hasn't happened yet. This is not the first time I have been swearing about that exact problem.
Now you have me worried that I may have overtightened the cable clamp. I didn't go crazy on it, but I wouldn't describe it as "just nipping it". Hmmm.
I DO have all three springs. That was another adventure... As I was trying to stretch the brand new center spring to connect to the trunnion, one of the spring hook ends popped out of the spring and disappeared into the engine bay, never to be seen again. Thankfully I had the old rusty springs still and I was able to salvage the hook from one of those. As an aside, this whole project was a reminder to go see the eye doctor as I realized that focusing on all these tiny bits is getting harder and harder and my glasses just aren't cutting it.
Scott | 1963 Austin Cooper | 2003 MINI Cooper S | 2018 MINI Cooper 4-door
|
|
Total posts: 8382
Last post: Jan 13, 2022 Member since:Feb 7, 2006
|
Cars in Garage: 0
Photos: 0 WorkBench Posts: 0 |
|
No need to drain the tank just crimp the fuel line.
Use an old 7/16" open end wrench and grind it down to about half of it's thickness to hold the throttle linkage steady while tightening the cable clamp with another 7/16" stubby, just nip it or it will break.
I can't see in the pic whether you have them or not but you need three return springs one on each carb and one in the center on the cable.
If in doubt, flat out. Colin Mc Rae MBE 1968-2007.
Give a car more power and it goes faster on the straights,
make a car lighter and it's faster everywhere. Colin Chapman.
|
|
Total posts: 62
Last post: May 21, 2019 Member since:Jul 28, 2016
|
Cars in Garage: 0
Photos: 0 WorkBench Posts: 0 |
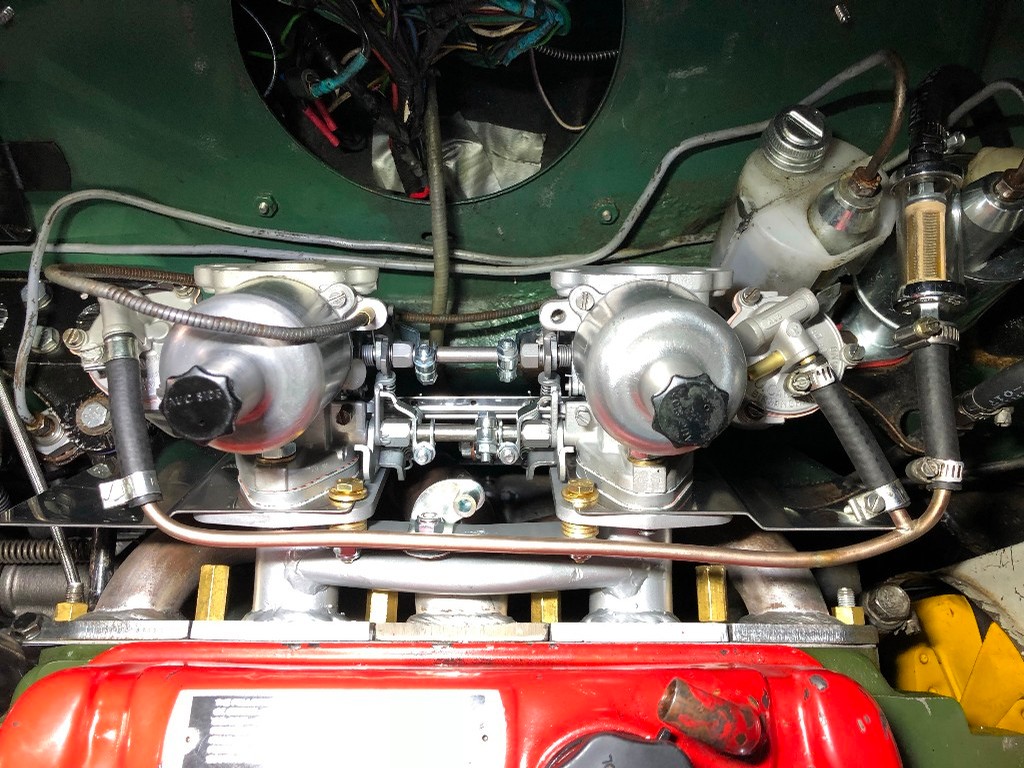
I wanted to close things out and report back on how I did based on all the advice here. Understanding that the secondary tube on the float lid in my original picture was an overflow port was a huge aha moment for me. I rotated it back around and kept it for now. I went ahead and got the original metal pipe and got everything hooked up. I like the idea of moving the fuel filter to the rear, but I haven’t had the time to drain the fuel tank so I have temporarily routed the filter around the master cylinders to keep from kinking the hose. It is a temporary fix, but it will work for now.
After all of this was done, I was surprised by what a pain in the butt it was to connect the throttle cable. With the connection point down below the dual carb linkage it was pretty much impossible to get any tools down there, not to mention the fact that none of my wrenches are thin enough to easily grasp both nuts on the trunnion simultaneously. I’m sure there must be some secret method that escaped me, but I finally muddled through. Now I just need to find the time to get the air filters back on and get everything in tune.
Thank you again for all the help.
Scott
Scott | 1963 Austin Cooper | 2003 MINI Cooper S | 2018 MINI Cooper 4-door
|
|
Total posts: 9544
Last post: Apr 24, 2024 Member since:Aug 14, 2002
|
Cars in Garage: 0
Photos: 0 WorkBench Posts: 0 |
|
Cheers, Ian
In Canada, we have summer gas and winter gas. The winter gas has a different set of additives that do I'm not really sure. The only thing a typical driver sees is the prices jump up due to a "shortage" in the production cycle when the refineries switch from winter to summer. Something we have to put up with, like road salt and potholes.
.
"Hang on a minute lads....I've got a great idea."
|
|
Total posts: 1716
Last post: Oct 18, 2020 Member since:Oct 18, 2011
|
Cars in Garage: 0
Photos: 0 WorkBench Posts: 0 |
When I put my car in long term storage I just filled the tank, changed the oil, removed the battery and put some wooden blocks under the suspension. Four years later I put in a new battery, gave the recalcitrant electric fuel pump a bang with my shoe. It started, we checked the brakes and drove off to get new rego documents. A few weeks later I did change the brake fluid but that was more of a precaution than anything.
Maybe they put stuff in fuel used in colder climates but I must admit its something I've never (sic) worried about with my Minis..
Cheers, Ian
|
|
Total posts: 3346
Last post: Apr 21, 2024 Member since:Jul 20, 2002
|
Cars in Garage: 0
Photos: 0 WorkBench Posts: 0 |
|
|
|
Total posts: 8382
Last post: Jan 13, 2022 Member since:Feb 7, 2006
|
Cars in Garage: 0
Photos: 0 WorkBench Posts: 0 |
|
I have a few follow-up questions.
I did not realize that the second pipe on the right-hand carb was an overflow pipe. I was looking at pictures from google image search to try to figure out how I should try to route everything. If that is an overflow pipe, how does this setup even work?

Or is it the difference between these two lids?


---------------
If I relocate the fuel filter to under the boot, does it matter if I locate it upstream or downstream of the fuel pump? Also, should I switch to a metal filter since this one is glass and it will be exposed to the road?
Thanks!
Scott
The overflow piped lids were used mainly on other Brit cars, the Mini still has an overflow system under the metal tab there is a breather hole.
Metal filters are good but on a low pressure system i prefer a clear plastic one so that you can see the condition of the filter.
I am sure the glass filter would be ok you could even re route the fuel line and mount it in the trunk if you wanted to or just keep it up front with a shorter filter.
If in doubt, flat out. Colin Mc Rae MBE 1968-2007.
Give a car more power and it goes faster on the straights,
make a car lighter and it's faster everywhere. Colin Chapman.
|
|
Total posts: 9544
Last post: Apr 24, 2024 Member since:Aug 14, 2002
|
Cars in Garage: 0
Photos: 0 WorkBench Posts: 0 |
|
.
"Hang on a minute lads....I've got a great idea."
|
|
Total posts: 9241
Last post: Aug 17, 2023 Member since:Jun 5, 2000
|
Cars in Garage: 0
Photos: 0 WorkBench Posts: 0 |
|
|
|
Total posts: 9544
Last post: Apr 24, 2024 Member since:Aug 14, 2002
|
Cars in Garage: 0
Photos: 0 WorkBench Posts: 0 |
|
That way, I have no worries about fuel flowing into the crankcase. My preference is to keep the carb wet so the inlet needle doesn't stick. Since I have a HIF44 installed, it is not possible to completely drain it dry and I doubt HS types would be much better. The small bit of residue might cause gumminess. On the other hand, I wonder if the carb dries out anyway over several months.
.
"Hang on a minute lads....I've got a great idea."
|
|
Total posts: 1007
Last post: Jul 19, 2022 Member since:Jul 24, 2014
|
Cars in Garage: 0
Photos: 0 WorkBench Posts: 0 |
|
|
Total posts: 62
Last post: May 21, 2019 Member since:Jul 28, 2016
|
Cars in Garage: 0
Photos: 0 WorkBench Posts: 0 |
I have a few follow-up questions.
I did not realize that the second pipe on the right-hand carb was an overflow pipe. I was looking at pictures from google image search to try to figure out how I should try to route everything. If that is an overflow pipe, how does this setup even work?
Or is it the difference between these two lids?
---------------
If I relocate the fuel filter to under the boot, does it matter if I locate it upstream or downstream of the fuel pump? Also, should I switch to a metal filter since this one is glass and it will be exposed to the road?
Thanks!
Scott
Scott | 1963 Austin Cooper | 2003 MINI Cooper S | 2018 MINI Cooper 4-door
|
|
Total posts: 8382
Last post: Jan 13, 2022 Member since:Feb 7, 2006
|
Cars in Garage: 0
Photos: 0 WorkBench Posts: 0 |
|
If in doubt, flat out. Colin Mc Rae MBE 1968-2007.
Give a car more power and it goes faster on the straights,
make a car lighter and it's faster everywhere. Colin Chapman.
Found 26 Messages


