
Found 25 Messages

|
Total posts: 62
Last post: May 21, 2019 Member since:Jul 28, 2016
|
Cars in Garage: 0
Photos: 0 WorkBench Posts: 0 |
Quote:
Originally Posted by Dan Moffet
Scrap lumber is great to keep around for this kind of thing. I wouldn't even contemplate using anything less than a 4x4—maybe a 2x4 of treated lumber as it is stronger. I use a pair of treated 4x6 posts across the whole width of the car as my "safety net" in case something were to happen to my jack stands. Better to have something on the Mini buckle than something on me.
-------------------------------------------------------------
Scott | 1963 Austin Cooper | 2003 MINI Cooper S | 2018 MINI Cooper 4-door
Scott | 1963 Austin Cooper | 2003 MINI Cooper S | 2018 MINI Cooper 4-door
|
|
Total posts: 959
Last post: Feb 13, 2023 Member since:Sep 11, 2000
|
Cars in Garage: 0
Photos: 0 WorkBench Posts: 0 |
|
New displacers are impossible to find, so when filks had touble with thier systems, they often converted to dry suspension.
Most racers preferred dry too.
Most racers preferred dry too.
Car engines make CO2 and trees absorb CO2. By running your engine you're feeding a tree and helping the environment.
|
|
Total posts: 20
Last post: Mar 27, 2023 Member since:Dec 5, 2012
|
Cars in Garage: 0
Photos: 0 WorkBench Posts: 0 |
Original 1965 lhd imported to California which I purchased in 1967 from MOA president (Ca. chapter). I assume it was English built. Sold it in 1974. Positively dry suspension. Thought '66's were also dry (not sure). I know '67's had wet suspension. Presently have a 1960 Traveller Estate.
|
|
Total posts: 10330
Last post: Jan 27, 2021 Member since:Dec 3, 2002
|
Cars in Garage: 0
Photos: 0 WorkBench Posts: 0 |
|
Where was it built and what was the build date? If English built, it would have been "wet" starting in Sept. 1964.
|
|
Total posts: 20
Last post: Mar 27, 2023 Member since:Dec 5, 2012
|
Cars in Garage: 0
Photos: 0 WorkBench Posts: 0 |
Had a '65 Cooper S'.... Bought in '67... Dry suspension.
|
|
Total posts: 9542
Last post: Apr 18, 2024 Member since:Aug 14, 2002
|
Cars in Garage: 0
Photos: 0 WorkBench Posts: 0 |
|
Quote:
Originally Posted by mediumcool
Now I see why the rear is slightly higher, or as we like to call it in street rod terms " On a rake".
Thanks for the info!
Thanks for the info!
.
"Hang on a minute lads....I've got a great idea."
|
|
Total posts: 99
Last post: Nov 18, 2018 Member since:Sep 10, 2018
|
Cars in Garage: 0
Photos: 0 WorkBench Posts: 0 |
Now I see why the rear is slightly higher, or as we like to call it in street rod terms " On a rake".
Thanks for the info!
Thanks for the info!
|
|
Total posts: 9542
Last post: Apr 18, 2024 Member since:Aug 14, 2002
|
Cars in Garage: 0
Photos: 0 WorkBench Posts: 0 |
|
Quote:
Originally Posted by mediumcool
Where does the fluid come from for the hydro suspension? I only see my brake fluid tank.
Do not open them!
A hydrolastic pressurization machine is connected and the system is pumped up one side at a time. it is something like a fluid-filled tire or an air conditioning system in that the system is pressurized and stays that way. The displacers (springs) are made partly of rubber so they form part of the pressurization (again a bit like tires).
One neat thing about hydrolastics is that if your car isn't sitting level or a bit too low, it can be pumped up to the right height.
.
"Hang on a minute lads....I've got a great idea."
|
|
Total posts: 99
Last post: Nov 18, 2018 Member since:Sep 10, 2018
|
Cars in Garage: 0
Photos: 0 WorkBench Posts: 0 |
Where does the fluid come from for the hydro suspension? I only see my brake fluid tank.
|
|
Total posts: 2037
Last post: Mar 29, 2024 Member since:Aug 29, 2001
|
Cars in Garage: 0
Photos: 0 WorkBench Posts: 0 |
|
Quote:
Originally Posted by CooperTune
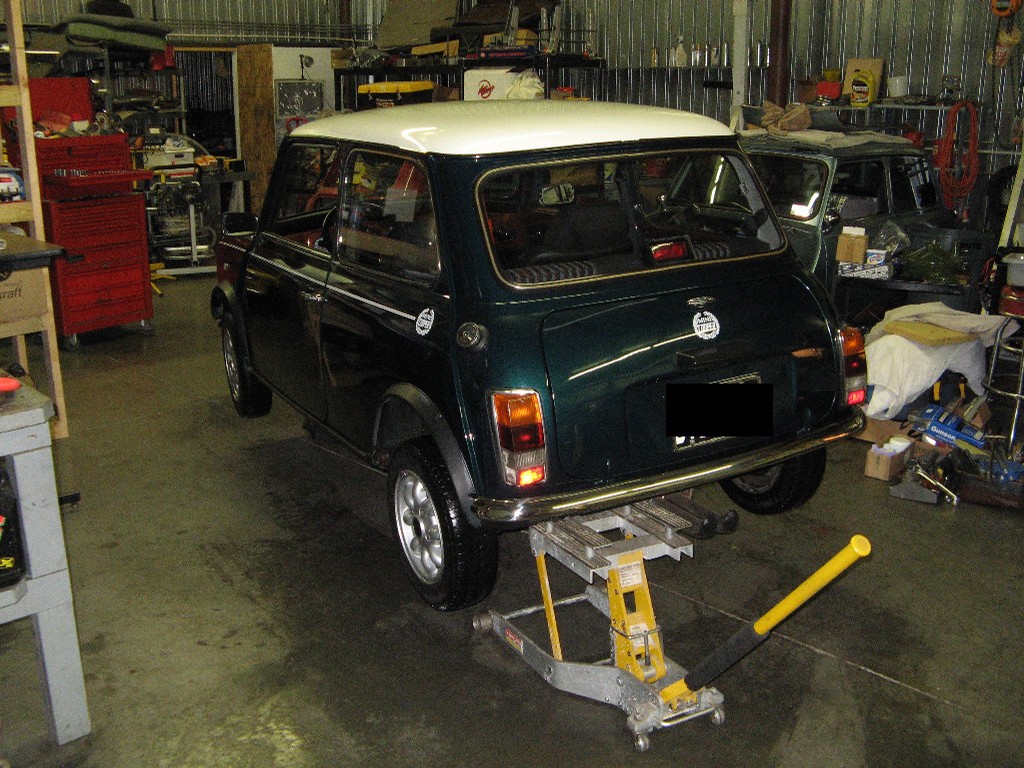
I have an ATV/motorcycle jack from Sears which works great on non center exit exhaust cars. The cross member is just below the valance. You must be careful.
|
|
Total posts: 4134
Last post: Oct 13, 2020 Member since:Oct 8, 2011
|
Cars in Garage: 0
Photos: 0 WorkBench Posts: 0 |
|
64 was the last dry car until early to mid 70s. Steve (CTR)
|
|
Total posts: 99
Last post: Nov 18, 2018 Member since:Sep 10, 2018
|
Cars in Garage: 0
Photos: 0 WorkBench Posts: 0 |
So stock 1968 Austin Minis (not a Cooper) came with the hydrolastic suspension?
|
|
Total posts: 9542
Last post: Apr 18, 2024 Member since:Aug 14, 2002
|
Cars in Garage: 0
Photos: 0 WorkBench Posts: 0 |
|
Quote:
Originally Posted by charrison
Quote:
Originally Posted by mediumcool
Those I see are long narrow coil springs, almost like a heavy-duty screen door spring.
The "real" springs are the displacers inside the subframe members.
Do not jack the car on the bodyshell - esp at the front (heavy) end, the subframes are made of thicker metal.
The factory jacking point midway under the door is weak, very prone to rust and in bad cases rips the sill out as the weight comes on.
To jack the back end up, position the trolley jack in front of the back wheel under the wide horizontal part of the subframe about 6" in.
Once you get under the car, you will see the hydrolastic lines as well as the brake line(s), the fuel line and the battery cable.
Moe about jacking: except for the sill jacking points mentioned, the Mini body has no jacking points. there are some lightweight metal brackets under the floor just behind the front wheel wells. These are factory assembly brackets, not jacking points. Trying to use them just buckles the floor up. (Your car may have already suffered this... many have.)
+1 to the cautions about using a 2x4. My remedy was to bolt a steel angle onto the back cross-member to act as a spreader in the same way. The steel I used was from an old bed frame - harder and stiffer than mild steel and certainly more robust than any 2x4. Since the vertical leg of the angle tucks up under the rear modesty panel it is not visible. With hydrolastics you won't be able to do this as the system pressurizing ports come through the rear subframe there.
.
"Hang on a minute lads....I've got a great idea."
|
|
Total posts: 4134
Last post: Oct 13, 2020 Member since:Oct 8, 2011
|
Cars in Garage: 0
Photos: 0 WorkBench Posts: 0 |
|
I have an ATV/motorcycle jack from Sears which works great on non center exit exhaust cars. The cross member is just below the valance. You must be careful. A customers wife had seen me do this at the track many times. In her desire to help she slid the jack under the back and jacked the valance. I caught is just in time to see the valance going up. Pulled it down and suggested we not talk about it. Steve (CTR)
|
|
Total posts: 1007
Last post: Jul 19, 2022 Member since:Jul 24, 2014
|
Cars in Garage: 0
Photos: 0 WorkBench Posts: 0 |
I think it was OK to take out a few owners with tire changing back in the good old days, US cars were no better. Many here recommend getting a scissors jack from a newer car to have in the boot should you need to jack the car when on the road, along with the proper lug nuts and wrench if the spare is a different wheel than the ones on the car.
|
|
Total posts: 2037
Last post: Mar 29, 2024 Member since:Aug 29, 2001
|
Cars in Garage: 0
Photos: 0 WorkBench Posts: 0 |
|
Quote:
Originally Posted by 1963SV2
Get a nice piece of 2x4 that spans the width of the rear subframe,
Be sure to get grade A lumber, not one with a hidden split or knot.
Even a good one will bend some with the light weight of the rear end of a mini.
I'd prefer a beefer size anyway. Safety in strength. Always "overbuild" is my motto.
|
|
Total posts: 959
Last post: Feb 13, 2023 Member since:Sep 11, 2000
|
Cars in Garage: 0
Photos: 0 WorkBench Posts: 0 |
|
Quote:
Originally Posted by mediumcool
Those I see are long narrow coil springs, almost like a heavy-duty screen door spring.
The "real" springs are the displacers inside the subframe members.
Do not jack the car on the bodyshell - esp at the front (heavy) end, the subframes are made of thicker metal.
The factory jacking point midway under the door is weak, very prone to rust and in bad cases rips the sill out as the weight comes on.
To jack the back end up, position the trolley jack in front of the back wheel under the wide horizontal part of the subframe about 6" in.
Car engines make CO2 and trees absorb CO2. By running your engine you're feeding a tree and helping the environment.
|
|
Total posts: 99
Last post: Nov 18, 2018 Member since:Sep 10, 2018
|
Cars in Garage: 0
Photos: 0 WorkBench Posts: 0 |
That sounds like a good plan, thank you. I will use the floor jacks once up. I am extra cautious since my back operation and have the Mini beginning to look great, just need to check the brakes. I am more of a body and paint guy when it comes to cars these days, but still can turn a wrench pretty well.
|
|
Total posts: 10330
Last post: Jan 27, 2021 Member since:Dec 3, 2002
|
Cars in Garage: 0
Photos: 0 WorkBench Posts: 0 |
|
I do the same method as Ian in the rear. Much easier.
|
|
Total posts: 1716
Last post: Oct 18, 2020 Member since:Oct 18, 2011
|
Cars in Garage: 0
Photos: 0 WorkBench Posts: 0 |
Get a nice piece of 2x4 that spans the width of the rear subframe, place it under the rear cross-member and then place your floor jack under the centre of your 2x4. Leaves plenty of room to place the stands under the subframe once the car is raised...
Same system also works at the front.
Cheers, Ian
Same system also works at the front.
Cheers, Ian
Found 25 Messages


