
| Orig. Posting Date | User Name | Edit Date |
| Nov 2, 2020 10:03AM | theminimark | |
| Oct 31, 2020 03:59PM | 6464s | Edited: Nov 2, 2020 09:43AM |
| Oct 31, 2020 04:40AM | Dan Moffet | |
| Oct 30, 2020 06:44PM | 6464s | Edited: Oct 30, 2020 07:13PM |
| Sep 29, 2020 02:48PM | 6464 | |
| Sep 28, 2020 02:49AM | 850mini | |
| Sep 20, 2020 02:20PM | 6464 | Edited: Sep 21, 2020 04:53AM |
| Sep 17, 2020 05:01PM | malsal | Edited: Oct 31, 2020 09:46AM |
| Sep 16, 2020 04:35PM | 6464 | Edited: Sep 16, 2020 05:44PM |
| Sep 16, 2020 03:27PM | theminimark | |
| Sep 14, 2020 05:58AM | Scargo | |
| Sep 13, 2020 05:57PM | 6464 | Edited: Sep 14, 2020 05:31AM |
| Sep 13, 2020 05:21AM | oldminimover49 | |
| Sep 10, 2020 04:50PM | ve9aa | |
| Sep 10, 2020 04:36PM | 6464 | Edited: Sep 10, 2020 05:05PM |
| Sep 9, 2020 06:52PM | 6464 | Edited: Sep 10, 2020 03:36AM |
| Sep 9, 2020 05:59AM | onetim | |
| Sep 9, 2020 05:25AM | Dan Moffet | |
| Sep 9, 2020 04:35AM | Scargo | |
| Sep 8, 2020 03:22PM | 6464 | Edited: Sep 10, 2020 04:38AM |

|
Total posts: 694
Last post: Apr 13, 2024 Member since:Aug 6, 2002
|
Cars in Garage: 0
Photos: 0 WorkBench Posts: 0 |
|
Wow, Jim, you sure do beautiful work! I'll look forward to seeing the contrast of the boxes against the green!
What sort of carpet; perhaps an indoor outdoor?
What sort of carpet; perhaps an indoor outdoor?
All Together Now.... Everybody......
|
|
Total posts: 499
Last post: Apr 14, 2024 Member since:Jan 25, 2017
|
Cars in Garage: 0
Photos: 0 WorkBench Posts: 0 |
Image Gallery

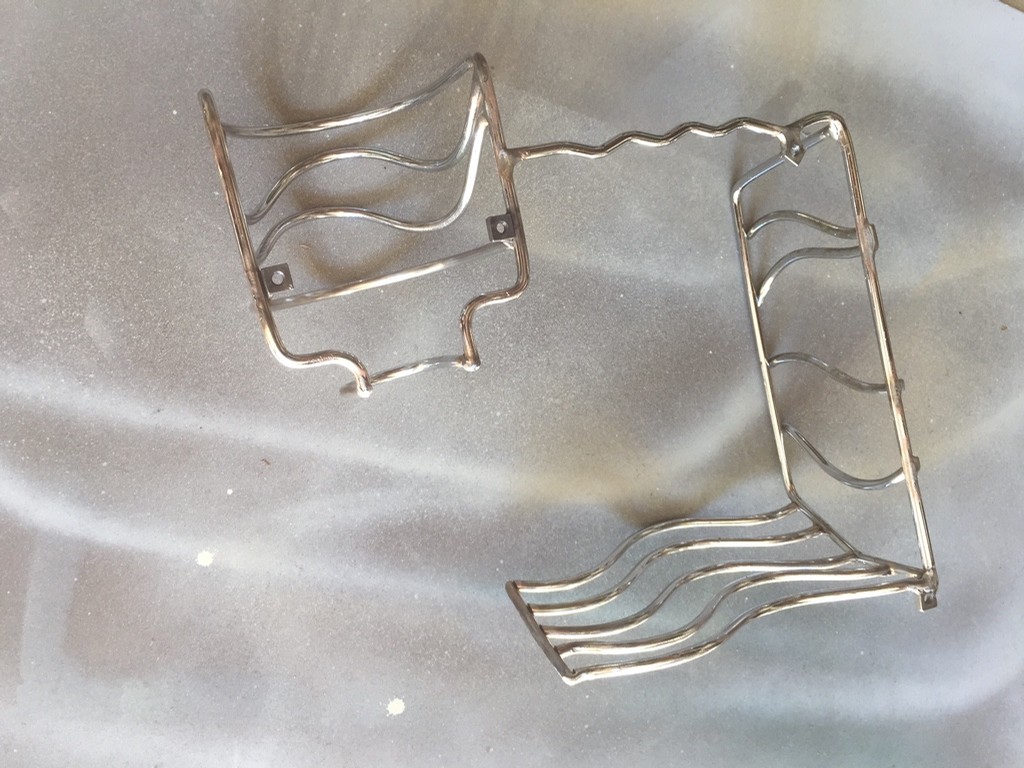
1st pic was the original concept.
2nd pic is Revised version.
3rd pic is the other side , but the back side. Cup holder has waves and when the towel is removed and you look down you will see more waves or ripples.
I have to admit that making these holders took a while to create. I tried to hide all the welds on the under side for a cleaner look. And I tried to camouflage the cut lines of the original rear bins with the round metal stock. These T/C holders are suspended off the floor about 1/2 inch. When the mini is painted BRG, they should stand out nicely.
|
|
Total posts: 9539
Last post: Apr 13, 2024 Member since:Aug 14, 2002
|
Cars in Garage: 0
Photos: 0 WorkBench Posts: 0 |
|
You, sir, are a FIEND!
Very nice - and interesting - work.
Very nice - and interesting - work.
.
"Hang on a minute lads....I've got a great idea."
|
|
Total posts: 499
Last post: Apr 14, 2024 Member since:Jan 25, 2017
|
Cars in Garage: 0
Photos: 0 WorkBench Posts: 0 |
Image Gallery
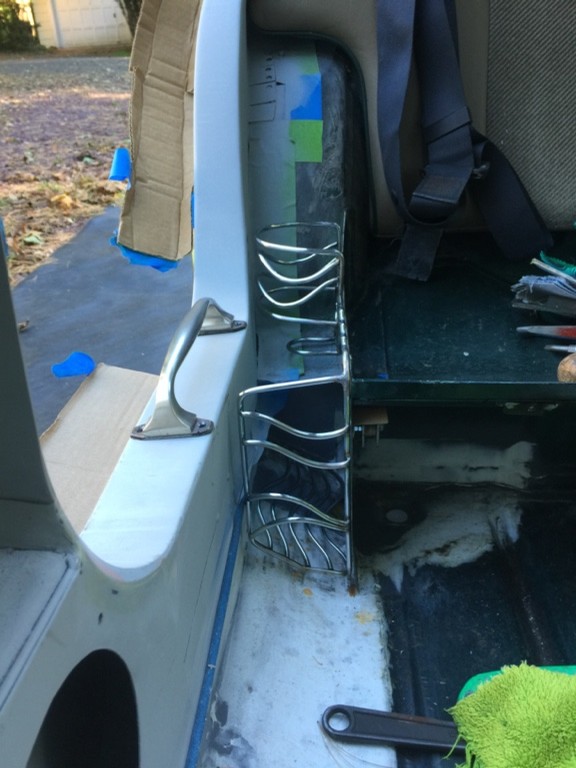
I just finished welding in my last panel. The valence panel. Having started with a new front panel and working to the rear.
I haven't updated this thread for a while because I've been working on the under the rear seat storage boxes and the towel bins / cup holders. Sorry no pictures of the finished boxes, but I did make them locking and front tilt opening with a self stop. The boxes are floating because I want to be able to slide the carpeting under them and to be able to remove them easily.
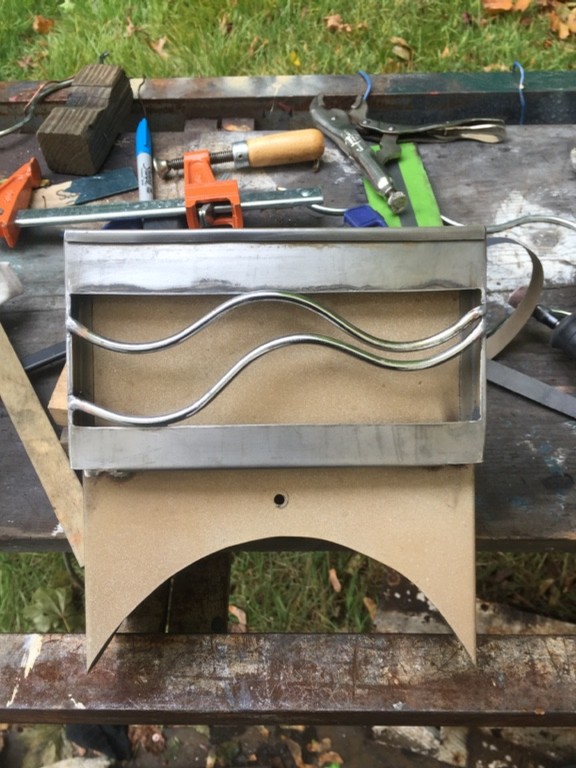
The picture of the side panel is the new revised version towel basket in the front with a cup holder higher up. The other picture is the center support for the bins. This supports the left and right bin and makes them float. The silver part in the front is a cell phone holder. If you look with imagination, I bent metal to be abstract waves on these pieces. Yes there is a mirror image of the towel / cup holder for the other side.
|
|
Total posts: 1723
Last post: Oct 20, 2020 Member since:Jun 18, 1999
|
Cars in Garage: 0
Photos: 0 WorkBench Posts: 0 |
|
Image Gallery

|
|
Total posts: 67
Last post: Mar 4, 2021 Member since:Dec 18, 2009
|
Cars in Garage: 0
Photos: 0 WorkBench Posts: 0 |
|
Jim, it sure would be really, really nice to see and appreciate the work that has gone into the Mini Beach car. I hope that you could find a way to have this work of craftsmanship at MME 2021 in Dayton, Ohio. With Covid, several of us has had more time to work on projects that have been neglected, we are hoping to have a showing of Mini's that haven't seen the time of day for several years. Not to single anyone out, but when was the last time you have seen _____________Mini.........
Save the Date: Mini Meet East 2021 Saturday July 3rd - July 6th
2021 - 50th Anniversary of the Ohio Mini Owners
|
|
Total posts: 1723
Last post: Oct 20, 2020 Member since:Jun 18, 1999
|
Cars in Garage: 0
Photos: 0 WorkBench Posts: 0 |
|
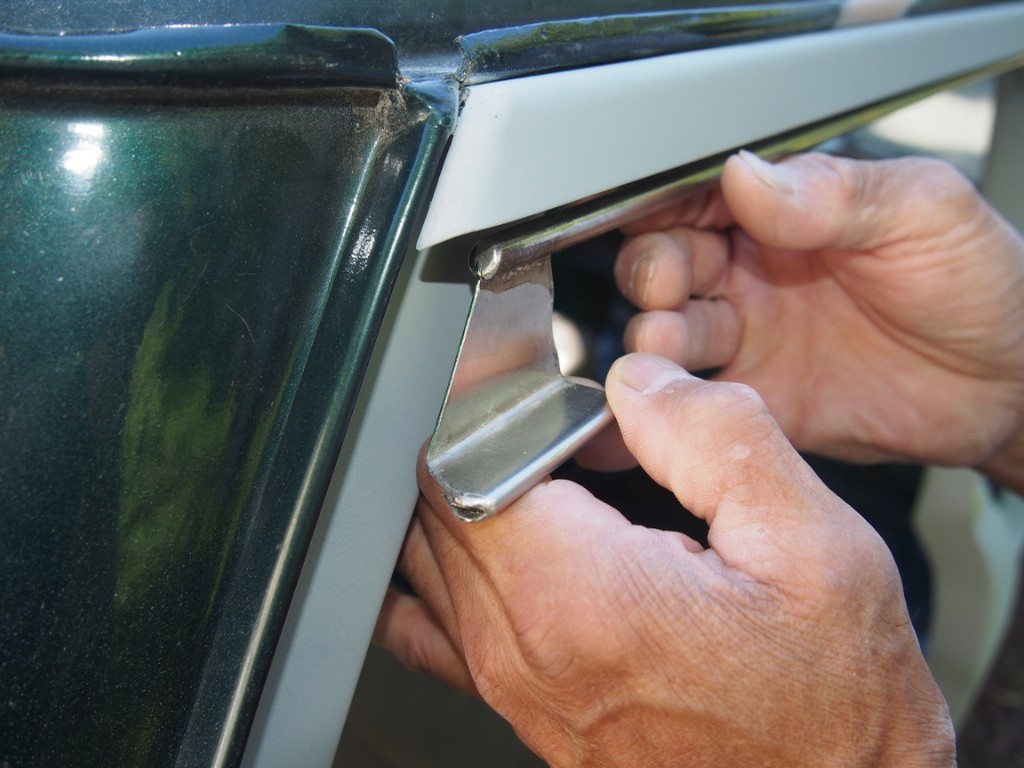
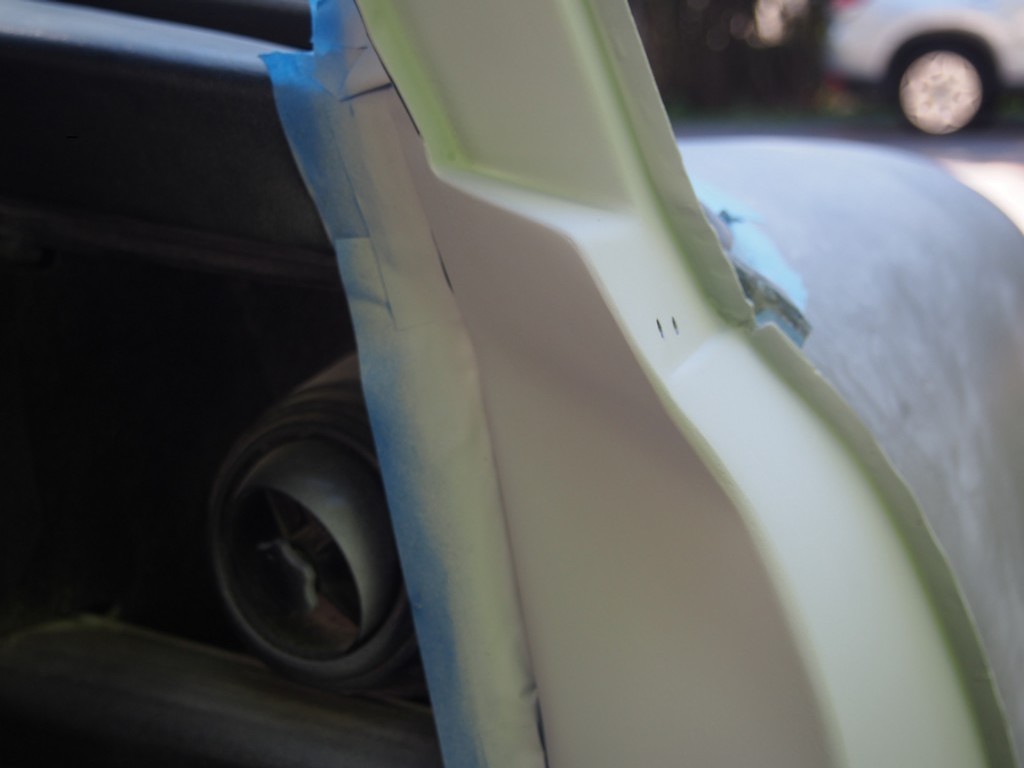
 What you are looking at is a drain pipe, placed just after the front A panel. Because I left the bottom part of the door jam for strength and welded the new sheet metal sides to the jam, there is no where for the water to exit. I took a short length of steel 3/8 brake line and cut the length in half. I wanted the flaring, countersunk the flare, welded to the lowest part of the jam. I will cut this pipe shorter: not sure how I want to cut this tube.
|
|
Total posts: 8382
Last post: Jan 13, 2022 Member since:Feb 7, 2006
|
Cars in Garage: 0
Photos: 0 WorkBench Posts: 0 |
|
Looking good with some nice touches Jim.
If in doubt, flat out. Colin Mc Rae MBE 1968-2007.
Give a car more power and it goes faster on the straights,
make a car lighter and it's faster everywhere. Colin Chapman.
|
|
Total posts: 1723
Last post: Oct 20, 2020 Member since:Jun 18, 1999
|
Cars in Garage: 0
Photos: 0 WorkBench Posts: 0 |
|
Image Gallery
Howard, I'm glad we're thinking a like. Mark, minimania, will not allow a change in original emails. My current address is [email protected]
This post is about the rear seating area.
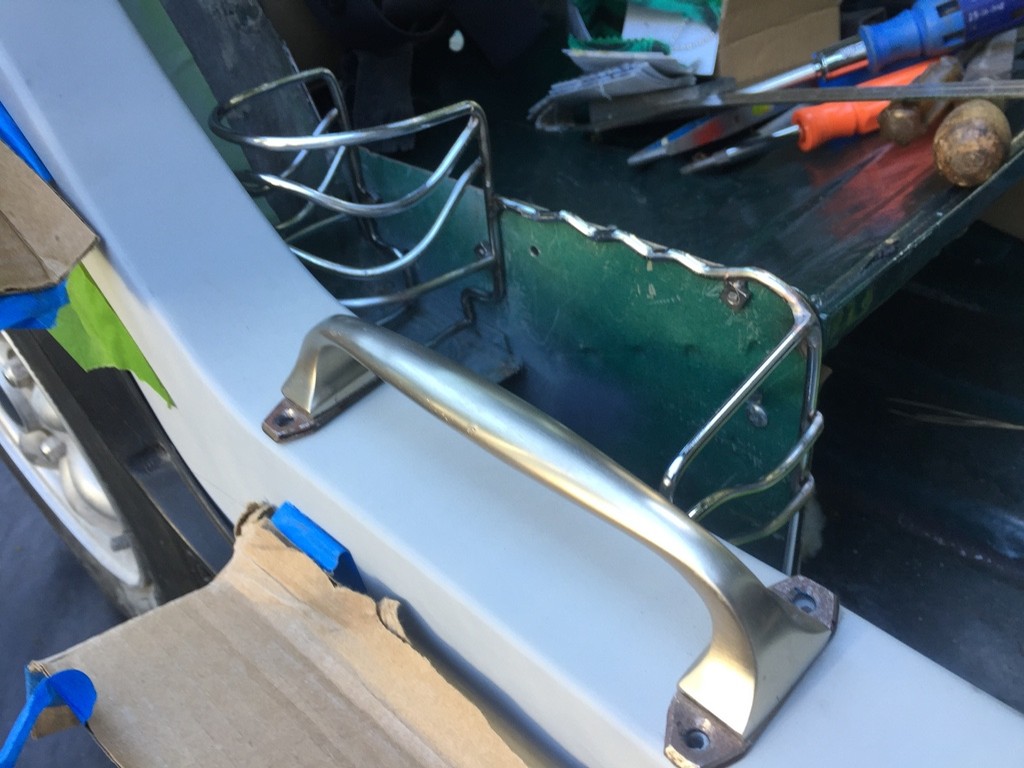
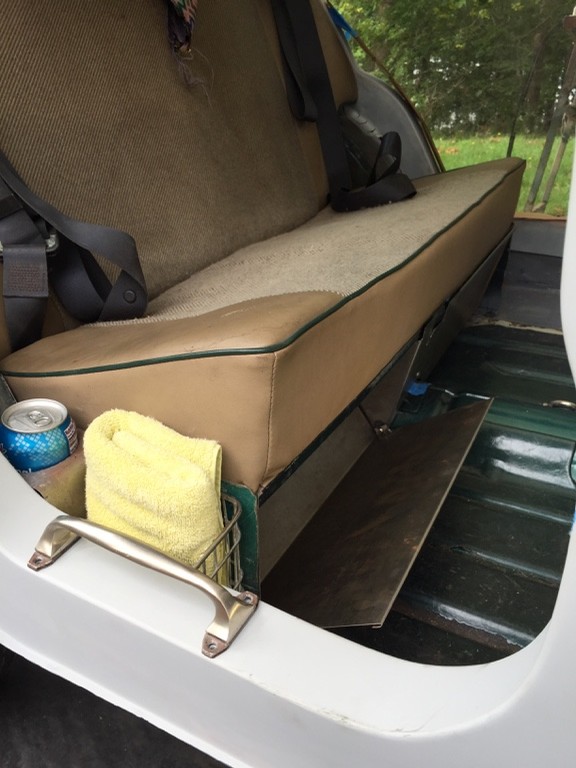
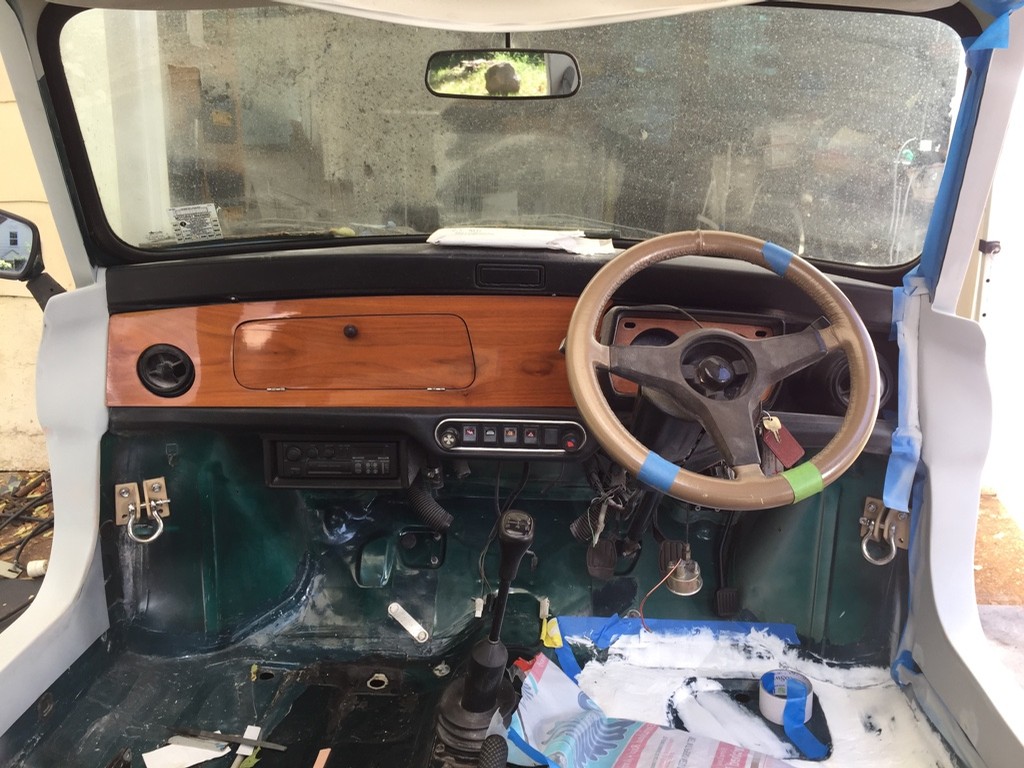
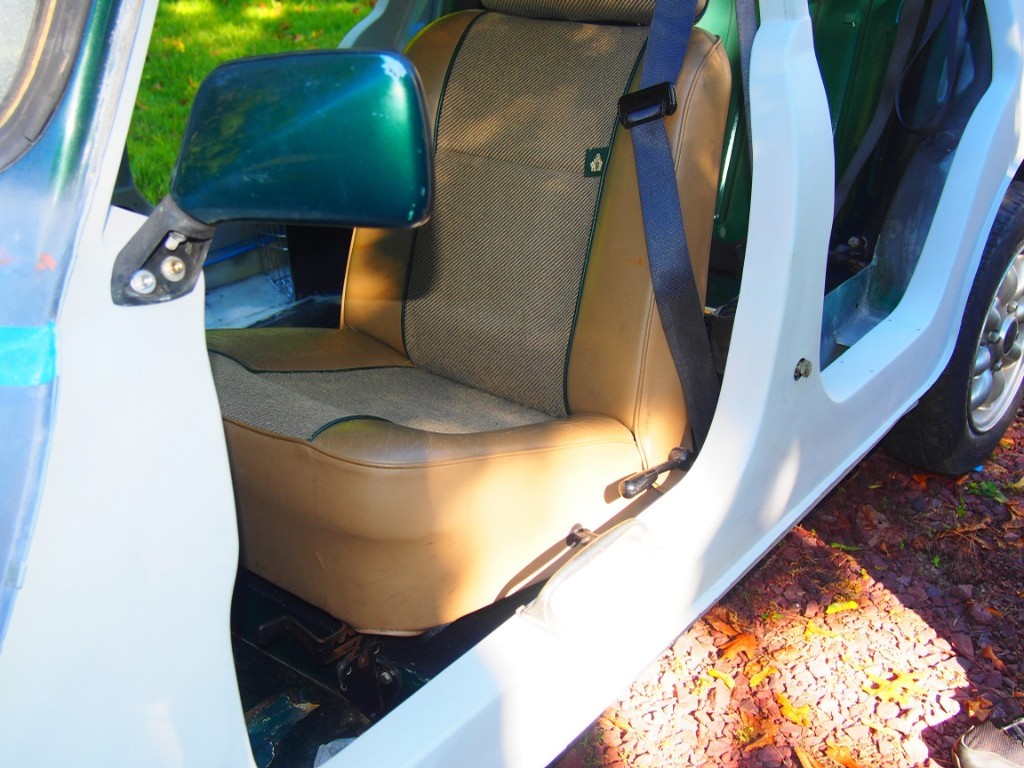
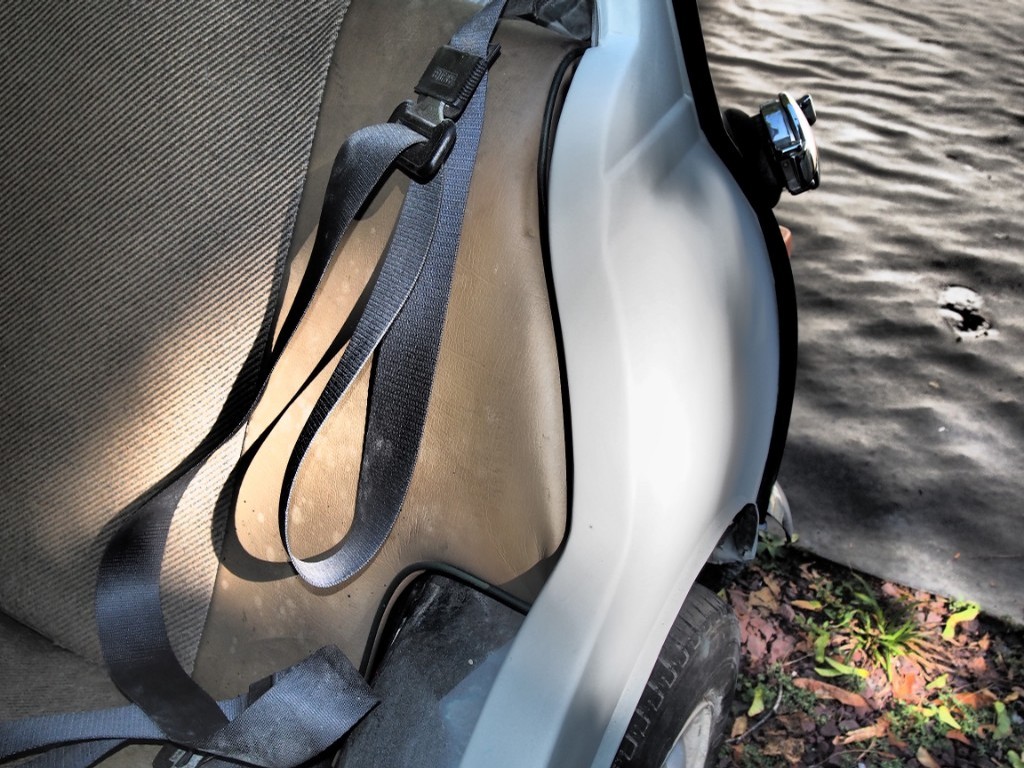
I never understood what the chrome grab handles were doing in the original mini beach car. It makes no sense on how to grab and hold onto them. I think they were put there to keep the the rear passengers from falling out. As you can see, I put mine ala Moke style. Behind the handle, I made a little metal wire basket for a rolled towel and a beverage holder. The beverage holder is in flux because it is made out of sheet metal. I want something that can be removed to be able to clean that corner. I saw some wire framed beverage holders on eBay that are removable.
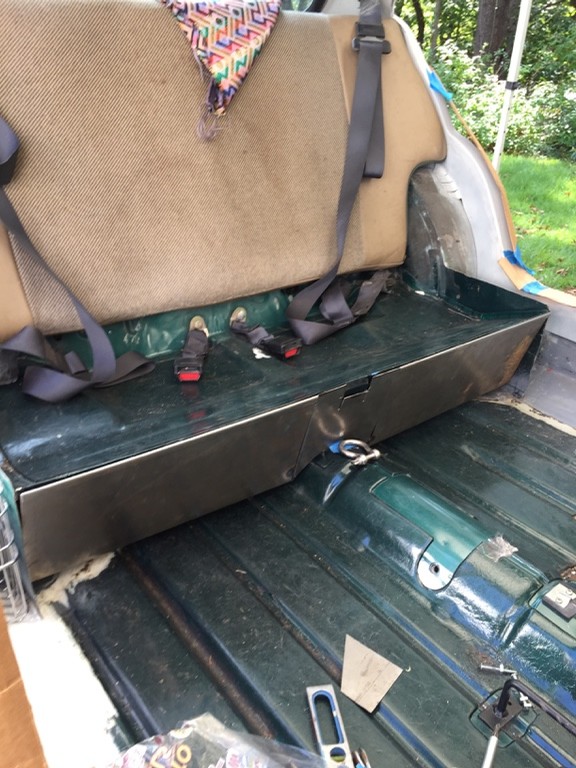
Under the seat I made two small storage bins. They just pivot forward with a self stop; of course lockable. This is for wallets and phones, watches, jewelry. I'm thinking, you're driving around on an island and you see a spot that you must take a swim. Rather than leaving everything on a blanket to get stolen. Locals watching tourists. Yes, I know the boot has a lock, but these are dedicated for personal effects.
This simple idea was pretty hard to construct because right now there is only one nut and screw is holding everything in place. The picture with the seat cushion has the bin front tilting forward and it will have sides. These bins are not finished.
The two bins are floating. I wanted room for the carpeting to slide in or out. There are to two countersunk drain holes in each corner under the rear seat with more to be added on the floor. I'm sure that the interior will get wet at least once.
|
|
Total posts: 694
Last post: Apr 13, 2024 Member since:Aug 6, 2002
|
Cars in Garage: 0
Photos: 0 WorkBench Posts: 0 |
|
What a great build, Jim!
I am looking forward to seeing that pearl BRG as well.
I've sent you a private mail which bounced saying your lib. ny . us can't receive mail. Please email me direct when you have time.
Once again, NICE Work!
Best,
Mark
I am looking forward to seeing that pearl BRG as well.
I've sent you a private mail which bounced saying your lib. ny . us can't receive mail. Please email me direct when you have time.
Once again, NICE Work!
Best,
Mark
All Together Now.... Everybody......
|
|
Total posts: 3078
Last post: Mar 13, 2024 Member since:Aug 17, 1999
|
Cars in Garage: 0
Photos: 0 WorkBench Posts: 0 |
|
Yes Jim, you've satisfied my curiosity regarding the strengthening of the shell. Thanks, and keep up the great work!
|
|
Total posts: 1723
Last post: Oct 20, 2020 Member since:Jun 18, 1999
|
Cars in Garage: 0
Photos: 0 WorkBench Posts: 0 |
|
Image Gallery
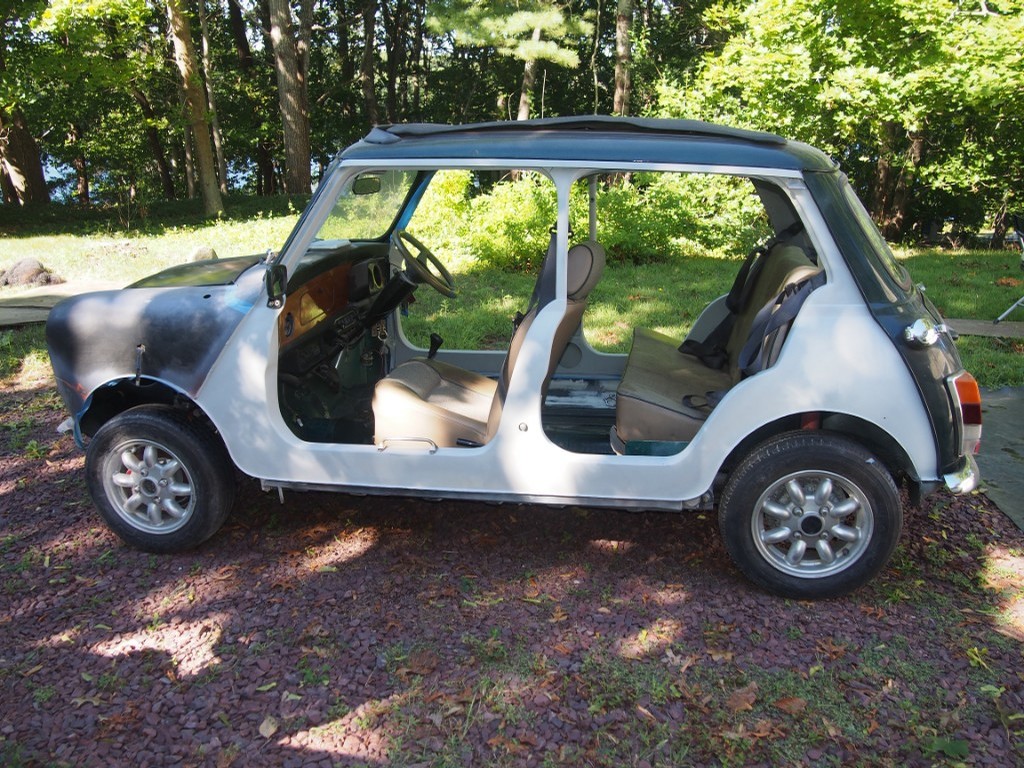
Big Al, Thank you for that sentiment. I'm so glad that you recognize this as art. It is to me.
Howard, You won't being seeing this at MME Ohio next year. Everything is new, rebuilt or will be. I only drive my mini to the meets.
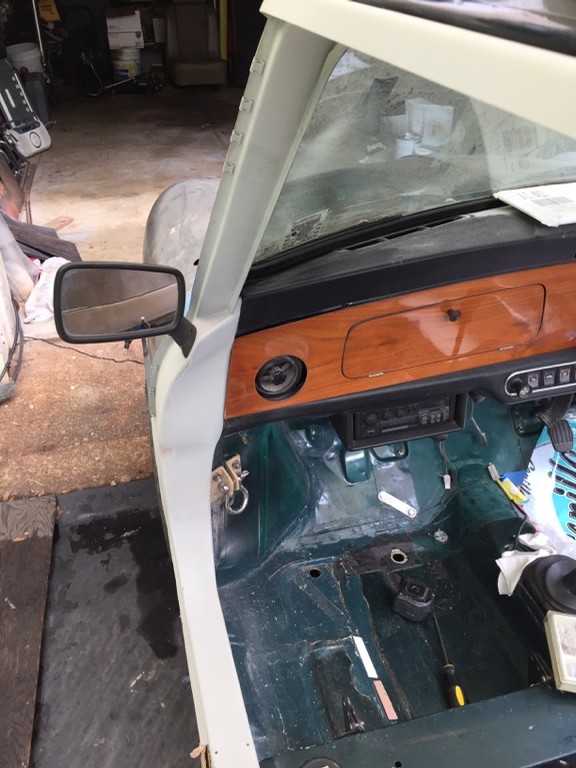
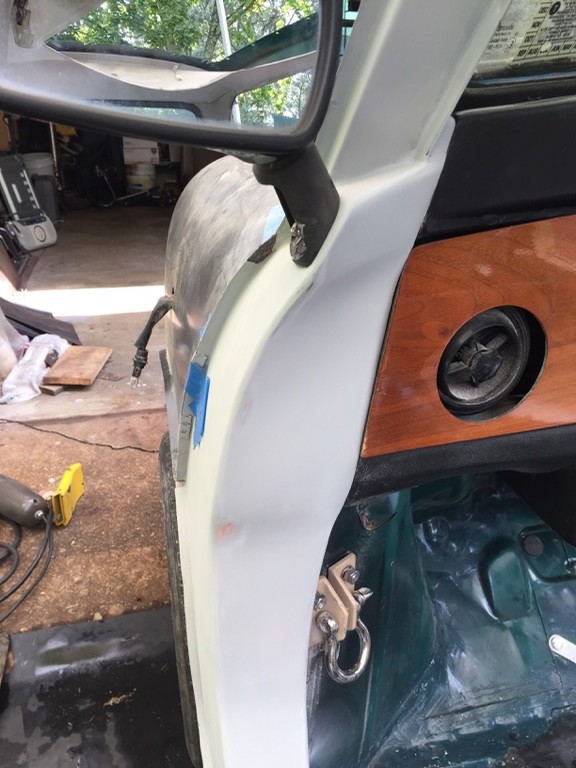
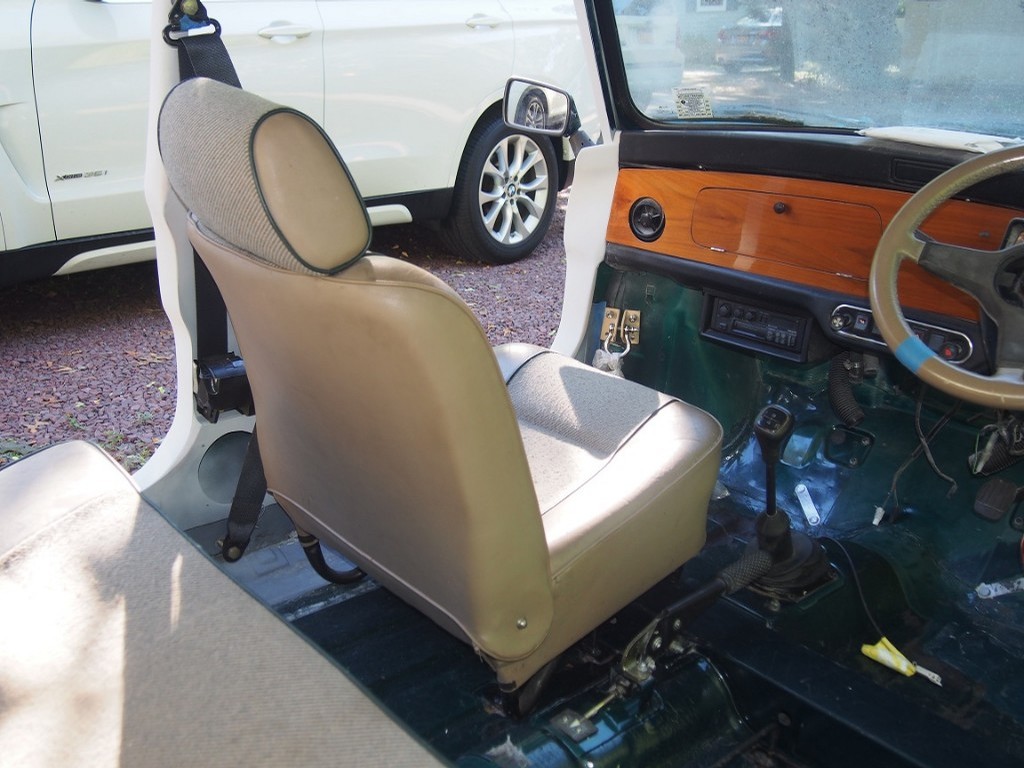
Here are some detail pics of the A pillar. I did sculpt (bend) the sheet metal as described in a previous post to follow the dash. I think I achieved my goal ( see the picture taken from back seat ) to make the mini seem wider. This section of the "U" was done in two pieces. The sill varies in width from about two to 2 3/16 of an inch. This was done on purpose. Starting at the dash top to the back part of the "U" is 5 feet long. Where the seat belt reel nests in the B pillar another 20 inch piece was added to complete the curve to the Rover manufacture seat belt post.
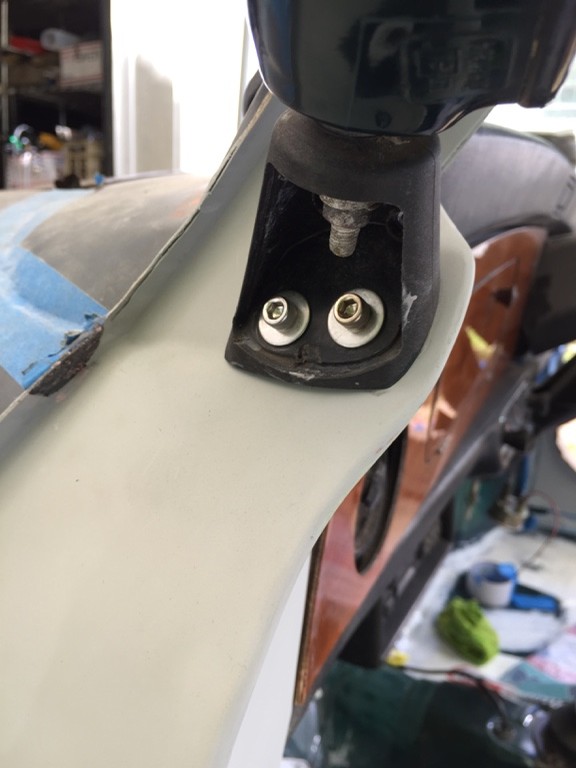
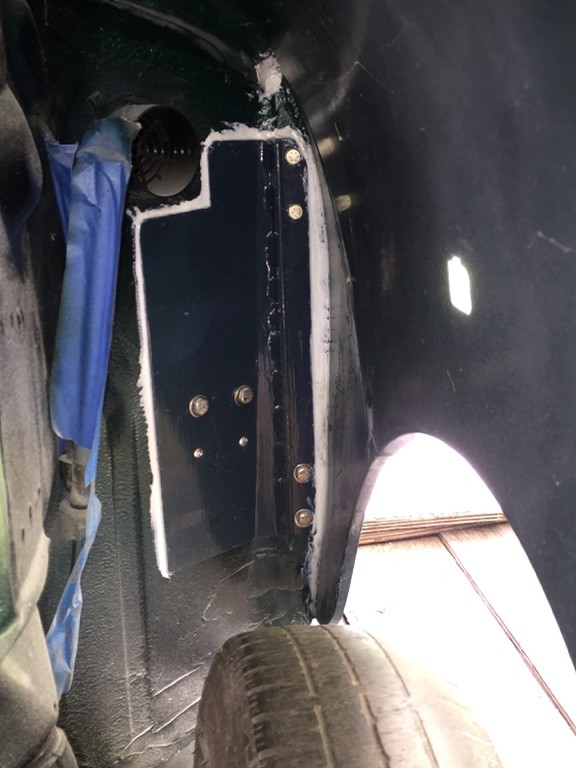
The inside the wheel well pic is a steel plate with a length of angle iron welded to it. This is for the yacht mount. That whole unit was bolted to the body using the door hinge holes with grade 8 bolts and double nuts. I coated the inside of the steel plate with grease before bolting together. Howard is this what you meant when you asked about reinforcement?
I don't know why the pics turned on their side when clicked on. They were correct in the image preview. Maybe someone can chime in on how to correct. Maybe it's because I did this post with a Mac, previous posts were done with a PC. Thanks Jim
|
|
Total posts: 2515
Last post: Dec 14, 2021 Member since:May 28, 2012
|
Cars in Garage: 0
Photos: 0 WorkBench Posts: 0 |
|
Good luck and great progress on the “Work of Art”
Big AL
PS- Jim Ding, “ The nicest & most sincere guy in the mini scene”
Big AL
PS- Jim Ding, “ The nicest & most sincere guy in the mini scene”
Niagara Ontario Canada
|
|
Total posts: 8592
Last post: Apr 6, 2024 Member since:Sep 30, 2002
|
Cars in Garage: 4
Photos: 40 WorkBench Posts: 2 |
|
I have the same seats and pretty sure, the steering wheel, in my car.(87 Austin Mini City-E) Was told they came out of a 1992 British Open Classic.
Anyways--it's looking good 6464 !
Anyways--it's looking good 6464 !
~ 30 minutes in a Mini is more therapeutic than 3 sessions @ the shrink. ~
Mike ![]() NB, Canada
NB, Canada
|
|
Total posts: 1723
Last post: Oct 20, 2020 Member since:Jun 18, 1999
|
Cars in Garage: 0
Photos: 0 WorkBench Posts: 0 |
|
Image Gallery
This picture shows the yacht mount located in the foot well below the the fresh are vent. On other side of the mount, there is a 1/8 inch plate on the wheel well side which is welded to a 1X1X1/4 inch thick angle iron that is bolted to the door post using the holes. Grade 8 bolts and double nuts jammed.
In the primered grey metal work, I hope you see the step down of the padded dash board top, the extension of the wood dash. And the roll of the lower knee rail.
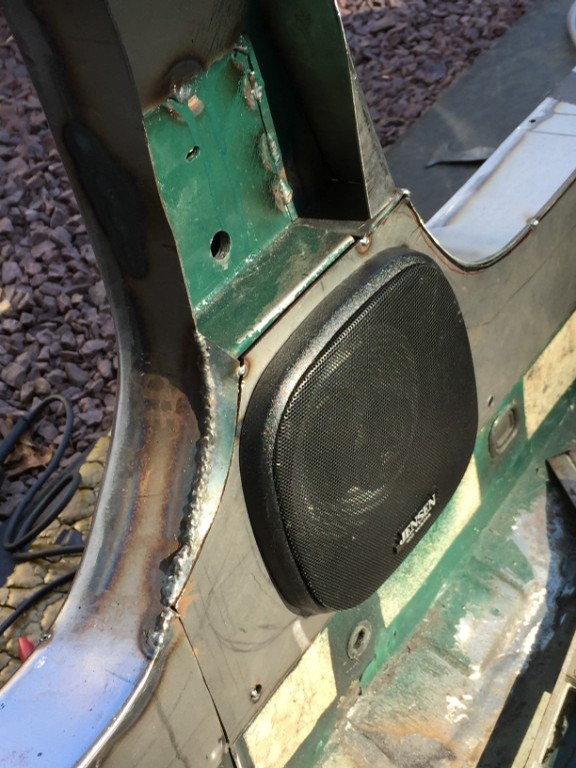
The seat belt reel holder is doubled walled with the inner wall curved like a backwards "S". Below it is the hole for the speaker. The grill is a rounded corner square.
Second pic shows the push/pull handle of the rod for the eisenglass enclosure where the spring clip is and the hood that covers it all.
|
|
Total posts: 1723
Last post: Oct 20, 2020 Member since:Jun 18, 1999
|
Cars in Garage: 0
Photos: 0 WorkBench Posts: 0 |
|
Image Gallery
I wanted a similar look to the original mini beach car but with a little more style or curves. I made the shark fin taller to hide the seat belt reel in the B pillar with a 5 inch speaker underneath it and kept the shoulder belt anchor points. The hole is for the reel mounting bolt and will be covered with a rubber plug. At the C pillar, I followed the curve of the wheel opening and rear seat cushion. The A pillar has 4 distinct curves. Top follows the padded dash top but with a small step down, next I wanted to create a wider look and feel from the seating position by following the wood dash and next is a curve of the knee pad. Lastly the cut out for the feet. That cut out was repeated on the B pillar for continuity.
The original mini beach car had shaved door and window seals. I decided to keep them and will use the rubber seals in modified form. I did shave the upper B post.
All three passengers will have a grab handles mounted to the top of the sills. All have T nuts welded to the bottom side. Same for the mirrors. I did reinforce all the sills in case someone stands on them. All the bodywork was done in 18ga steel, the same as the mini. For me to get the radius (inside and outside edges), I tacked the two metal sides together at 90 degrees, then cut the corners off and inserted a 5/32 arc welding rod in the space and continuously welded all three pieces together. I used large pieces of metal, no small pieces. To give you idea, the "U" of the rear seat section is one piece 5 feet long. I have to say that I really enjoyed the metal work and then to recreate it again in the mirror image.
Thanks for looking.
|
|
Total posts: 1007
Last post: Jul 19, 2022 Member since:Jul 24, 2014
|
Cars in Garage: 0
Photos: 0 WorkBench Posts: 0 |
Looking really good.
|
|
Total posts: 9539
Last post: Apr 13, 2024 Member since:Aug 14, 2002
|
Cars in Garage: 0
Photos: 0 WorkBench Posts: 0 |
|
wow... just WOW!
Nice work!
Nice work!
.
"Hang on a minute lads....I've got a great idea."
|
|
Total posts: 3078
Last post: Mar 13, 2024 Member since:Aug 17, 1999
|
Cars in Garage: 0
Photos: 0 WorkBench Posts: 0 |
|
Mighty ambitious project there, Jim....nice work!
I couldn't tell by the photo's, but how have you stiffened the body structure?
Although you say this Mini is being designed for a yacht, will we be seeing it at MME next year?
I couldn't tell by the photo's, but how have you stiffened the body structure?
Although you say this Mini is being designed for a yacht, will we be seeing it at MME next year?
|
|
Total posts: 1723
Last post: Oct 20, 2020 Member since:Jun 18, 1999
|
Cars in Garage: 0
Photos: 0 WorkBench Posts: 0 |
|
Image Gallery
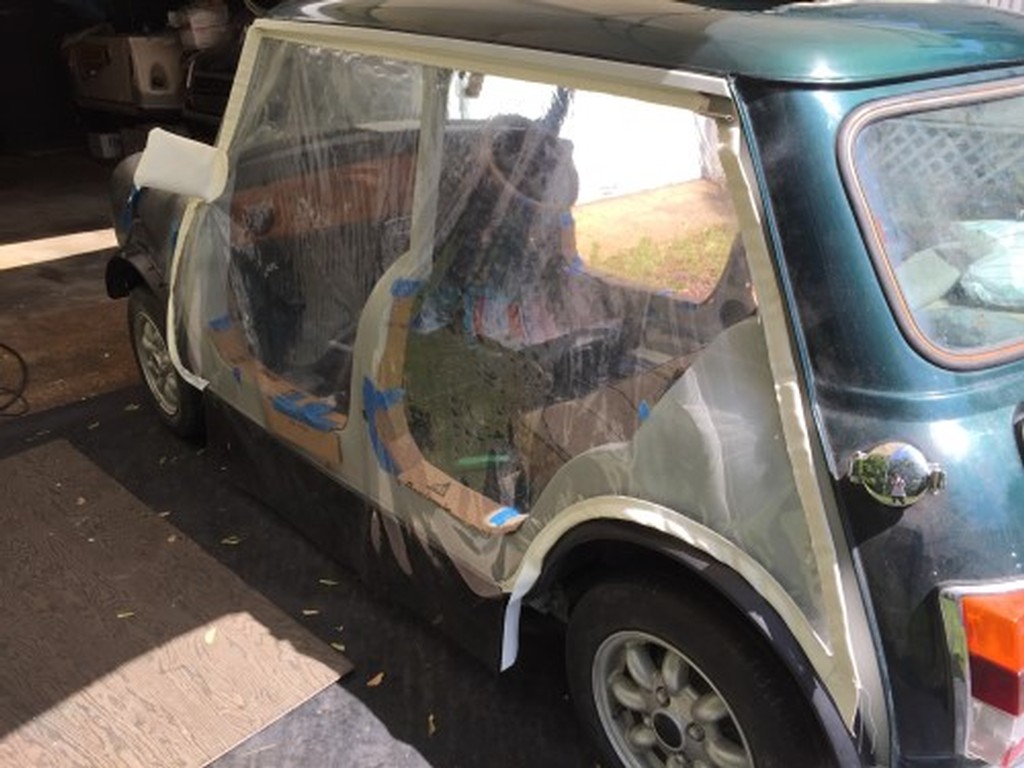
This past Sunday, with the help of a dear friend, we made a mock up of the eisenglass enclosure. I want the interior protected from foul weather and ocean going seas. I am using the Loxx fasteners, not the old push the DOT or twist lock fasteners, 14 per side. I made a hood that I welded to the underside of the drip rail, which does quite a few things, one it hides the slide in mount at the A pillar, and the spring clip at the C pillar. The hood diverts the rain water to flash over the eisenglass enclosure. It hides the rod and top of the enclosure. It also hides the door moulding from the exterior view. And lastly it makes the top of the mini look a little more substantial.
Second picture-
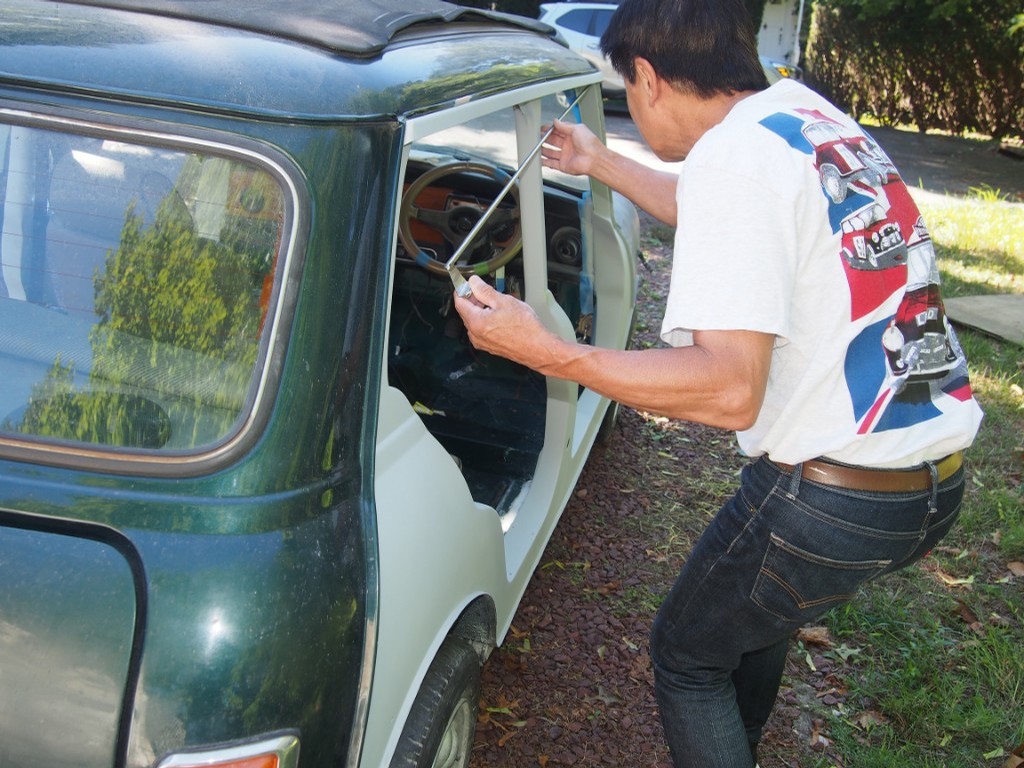
The stainless rod (without the eisenglass) that I'm holding and inserting into a drilled coupler at the A pillar. At the rear C pillar corner there is a spring clip to press the rod in place. The rod at this end has a small push / pull handle.
I wanted the enclosure to go on the mini fast and simple. The use of the loxx fasteners makes the outer perimeter very secure in the wind.
This mini beach car is being designed for a yacht. Yacht mounts were put at the door posts and one just forward of the rear seat on the tunnel. The cabling will come through the pull back sunroof. Detail pictures will follow as I am learning how to post pictures on this site.
Comments are welcomed. The mini beach car will be painted at the end of Sept. I'm going to use Jaguar Racing Green 2003 -2008. It's very similar to the mini BRG but has pearl in it.


