

|
Total posts: 1
Last post: Jan 29, 2012 Member since:Jan 29, 2012
|
|
|
John, I have the same problem...been tearing my hair out trying to figure this out. What is the correct way to align this...the BMW book is obviously wrong. Do you just use the gold links to align the camshaft sprocket to the crank sprocket...or do you have a better recomendation....Obviously the R50 must not be an interference fit wit the pistons to the valves or by now I would have broken a piston?????
|
|
Total posts: 2271
Last post: May 23, 2023 Member since:Dec 29, 2004
|
Cars in Garage: 1
Photos: 9 WorkBench Posts: 0 |
|
Thanks for the tip - glad to hear the MINI is up and running!
Ken
|
|
Total posts: 377
Last post: Sep 25, 2014 Member since:Feb 4, 2007
|
Cars in Garage: 0
Photos: 0 WorkBench Posts: 0 |
|
Glad you got her back on the road! Thanks for the tip on timing chain marks.
Jeremy
2004 Liquid Yellow MCS Sport/Chrome Pkg, 17% Alta SC Pulley, 2005 refreshed SC, Alta Intake, Alta IC Diverter, Ultrik Cam, CM Flywheel/FX200, OBX ATB Diff, JCW Software, 1 Ball Exhaust, JCW Plugs, Powerflex Front Subframe Bushings, Powerflex Motor Mount Inserts, Alta Springs, Alta Lower Control Arms, Alta 19mm Rear Sway Bar, Rear Seat Deleted, 16x7 Motegi/205 Kumhos, Auto Meter Boost/Vacuum And Oil Pressure Gauges.
|
|
Total posts: 34
Last post: Sep 14, 2012 Member since:Apr 28, 2007
|
|
|
|
|
Total posts: 2271
Last post: May 23, 2023 Member since:Dec 29, 2004
|
Cars in Garage: 1
Photos: 9 WorkBench Posts: 0 |
|
| Originally Posted by johne Ken I went into alldata today and the info they have is different than what the book says. So I have set it up according to what alldata says. They say the the two marks on the crank are not on the bottom but line up with the copper links about 3 links up on the right side. I put the chain on this way and the cam gear comes out at the top where your picture shows. It's too late to finish it up tonight but I will let you know how this works later. |
johne, thanks for the feedback. Let me know when you have it running!
Ken
|
|
Total posts: 34
Last post: Sep 14, 2012 Member since:Apr 28, 2007
|
|
|
|
|
Total posts: 2271
Last post: May 23, 2023 Member since:Dec 29, 2004
|
Cars in Garage: 1
Photos: 9 WorkBench Posts: 0 |
|
This is the only information we can find on the procedure:
|
|
Total posts: 34
Last post: Sep 14, 2012 Member since:Apr 28, 2007
|
|
|
|
|
Total posts: 1649
Last post: Jun 22, 2022 Member since:Apr 30, 2009
|
Cars in Garage: 0
Photos: 0 WorkBench Posts: 0 |
|
You might have to settle and take it to the dealer and have the timing set using facory locking tools. When i replaced the head on my mothers car...I had no tools, and honestly didnt line timing marks up at all.
When looking at the service manual there is a tool, that enters the cam gear that locks it into place, using the holes outside of the center bolt. To me, photos apeared to refrence the cam gear parallel with the top of the head... {when i mean parallell} i mean the Fat metal 180 degree weighted side of the cam gear... the other 180 degrees are on the inside, towards the valves.
I set my eye on having that part of the gear as flush with the top of the head as possible. I then marked the gear. marked the cheain to the gear and Removed the tensioner...
This allowed me to take off the head. Not move the chain and re install identical. The cam is keyed, so if the chain and gear went back on the same way the cam would line up the same...
I do remember however, with the head taken off. and the chain and crank left in this positon it was WAY off from TDC... more than a tooth or TWO would correct. .. so if you rotate your cam gear as pictured backwards. Couter Clock... it would put the piston down more..
Basically your refrence is gone, and no alignment tool... youll be pulling this head apart tooth by tooth trying to re align.
Might as well paysome one to just put it in time, and you can finish up the rest and go for a drive.
Goodluck
|
|
Total posts: 34
Last post: Sep 14, 2012 Member since:Apr 28, 2007
|
|
|
|
|
Total posts: 2271
Last post: May 23, 2023 Member since:Dec 29, 2004
|
Cars in Garage: 1
Photos: 9 WorkBench Posts: 0 |
|
| Originally Posted by robwkamm there has to be a way to index it if you didnt mark it before removal. how did the factory do it when the original virgin motor was assembled? |
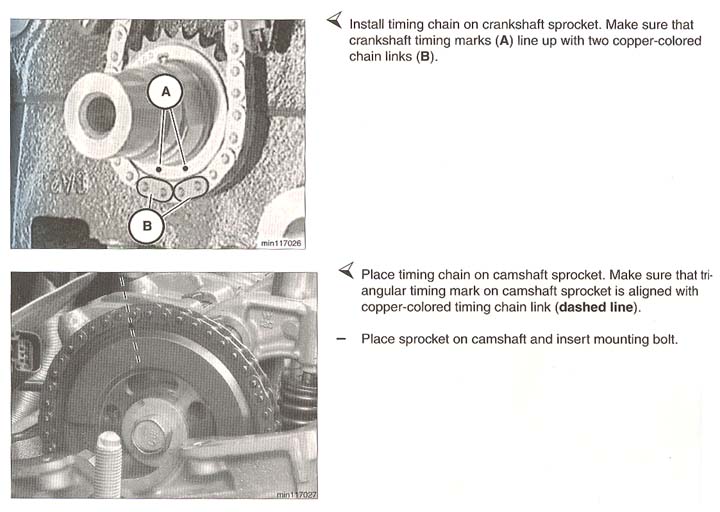
Yes, the two adjacent copper colored chain links need to match up to the two dots on the crank gear. The single copper chain link needs to align with the angular timing mark on the cam sprocket.
|
|
Total posts: 703
Last post: Jun 15, 2011 Member since:Dec 12, 2006
|
|
|
there has to be a way to index it if you didnt mark it before removal. how did the factory do it when the original virgin motor was assembled?
|
|
Total posts: 2271
Last post: May 23, 2023 Member since:Dec 29, 2004
|
Cars in Garage: 1
Photos: 9 WorkBench Posts: 0 |
|
The timing marks on the crank and cam vs. chain do not line up with every rotation - you may need to rotate a few turns for them to line up.
We've seen many installations where the chain is off by a tooth - and the car runs but down on power and the installer blames the cam / head / whatever. It's very important that everything lines up to spec.
As ForcedIndie mentioned, the chain & gear should have been indexed with a marking so you can re-assemble exactly the way it was...
Ken
|
|
Total posts: 377
Last post: Sep 25, 2014 Member since:Feb 4, 2007
|
Cars in Garage: 0
Photos: 0 WorkBench Posts: 0 |
|
During disassembly you were supposed to mark chain and cam sprocket to index them(Triangle on sprocket at noon and chain scribe mark) for reassembly. If you've not rotated the crank you should be close. I would bolt it up and rotate the crank to confirm.
Jeremy

2004 Liquid Yellow MCS Sport/Chrome Pkg, 17% Alta SC Pulley, 2005 refreshed SC, Alta Intake, Alta IC Diverter, Ultrik Cam, CM Flywheel/FX200, OBX ATB Diff, JCW Software, 1 Ball Exhaust, JCW Plugs, Powerflex Front Subframe Bushings, Powerflex Motor Mount Inserts, Alta Springs, Alta Lower Control Arms, Alta 19mm Rear Sway Bar, Rear Seat Deleted, 16x7 Motegi/205 Kumhos, Auto Meter Boost/Vacuum And Oil Pressure Gauges.
|
|
Total posts: 34
Last post: Sep 14, 2012 Member since:Apr 28, 2007
|
|
|


