
| Orig. Posting Date | User Name | Edit Date |
| Aug 23, 2013 10:48AM | pixieracing | |
| Aug 22, 2013 06:48AM | GaryE | |
| Aug 21, 2013 04:34PM | pixieracing | |
| Aug 1, 2013 01:23PM | jeg | |
| Jul 28, 2013 02:42PM | jeg | |
| Jul 26, 2013 12:35PM | stu from cornwall | |
| Jul 26, 2013 08:05AM | Spank | |
| Jul 25, 2013 02:01PM | jeg | |
| Jul 24, 2013 07:18PM | GaryE | |
| Jul 24, 2013 02:45PM | jeg | Edited: Jul 24, 2013 03:13PM |
| Jul 21, 2013 02:07AM | jeg | |
| Jul 20, 2013 04:34PM | Benny | |
| Jul 20, 2013 01:31PM | jeg | |
| Jul 20, 2013 01:15PM | jeg | |
| Jul 19, 2013 07:30AM | Benny | |
| Jul 18, 2013 10:01PM | DBO | |
| Jul 18, 2013 04:54PM | Benny | |
| Jul 18, 2013 02:45PM | jeg | |
| Jul 18, 2013 07:07AM | Benny | |
| Jul 18, 2013 06:29AM | malsal | Edited: Jul 18, 2013 06:36AM |
Found 29 Messages

|
Total posts: 747
Last post: Jun 12, 2015 Member since:Feb 15, 2003
|
Cars in Garage: 0
Photos: 0 WorkBench Posts: 0 |
|
carol smiths book on suspension is the best by far ,
I have seen one about only front wheel drive cars try google.
how you set up a front wheel suspension is very different then rear wheel, I did write a ebook on mini race car prep and there is a good bit on suspension in it , available at dmrpcb.com
|
|
Total posts: 137
Last post: Mar 23, 2016 Member since:Apr 26, 2012
|
Cars in Garage: 0
Photos: 0 WorkBench Posts: 0 |
|
What is "a good book on suspension"? Any recommendations?
|
|
Total posts: 747
Last post: Jun 12, 2015 Member since:Feb 15, 2003
|
Cars in Garage: 0
Photos: 0 WorkBench Posts: 0 |
|
guess you don't want to hear rear or front anti sway bars on a mini don't really work the right way, as you corner the bar lifts the unloaded wheel off the road, to get traction you need rubber on the road, In all my race cars over 40 years I tried a few bars front and back but never worked, read a good book on suspension and you will see sway bars are not the answer on front wheel drive , sure of you want neat high tech looking stuff. to add more suspension movement I added Bellville washers to the rear rubber donut rod at the end where the knuckle goes in , as the rear wheel started to unload the Bellville washers started to open up giving me a extra 1/2 inch X 5 wheel downward movement , set the rear Bellville washer pressure at 250 lbs other mini drivers always asked why I did not lift rear wheels . you need rubber to contact something to go fast
|
|
Total posts: 7075
Last post: Nov 5, 2019 Member since:Apr 25, 2000
|
Cars in Garage: 0
Photos: 0 WorkBench Posts: 0 |
|
What a hoot! Tons o'fun to be had with one of these bars once you've gotten it installed. Incredibly enough, the suspension feels just a little bit tighter, still sensitive and responsive and it corners with only a small amount of body roll. Even more like a gocart than before, yet maintaining sensible road manners. I haven't driven it really 'hard' yet, will most likely do so this weekend - have an 'event' in Copenhagen...
Some things you may have notice in the pictures that I posted, namely the number of 5/16" flat washers used. The stack of 5 washers located against the upper metalastic bush / mounting bracket is because the enclosed instructions mention a 7mm thick spacer which should have been included in the bag o'bits, but of course was missing. 5 x 5/16" flat washers is really close to 7mm thick. Also, it became necessary to remove the innermost washer fitted against the bolt head on the same upper link bolt as the bolt head sits perilously close to the rubber suspension cone and really couldn't be comfortably tightened, even by open-end wrench. So, as much as it irks me, I've got the metalastic bush inner sleeve resting tight against the bolt head, giving just a couple of mm clearance.
All in all, not a bad product, but lacking the spacers and clarity in fitting instructions made installation a tad trickier than expected.
 The peasants are revolting...
 ![]()
"Gone with the Wind" - a brief yet moving vignette concerning lactose intolerance
|
|
Total posts: 7075
Last post: Nov 5, 2019 Member since:Apr 25, 2000
|
Cars in Garage: 0
Photos: 0 WorkBench Posts: 0 |
|


Ok, I've got a few pictures to share. I can't tell you how different it feels or if it was really worth the trouble, but it's at least installed. I'll write up some instructions later on.
I did need to make a couple of brake pipes as the ones that were previously installed were interfering with the blade. Someone, not myself, installed them way back when I lacked the time and space to do things myself. The old pipes looped around the rear of the shock absorber and then up to the flexible hose. My new pipes look like the ones in the Haynes manual and since I had them, decided to fit new rubber hoses as well.
Except that unlike the ones in Haynes, mine are now leaking. Yes, I've the correct single/double/convex/concave/male/female ends and used new brass fittings. The problem is my flaring tool (Oakes Flairing Tool) - a very nice tool indeed, 'cept that it was in the process of breaking it's thrust washer and retaining circlip which resulted in fantastic concave flares, but the first iteration convex form ends are a little bit askew, resulting in a bit of weapage under pressure. The worst pipe is the short 6" pipe that fits between the 3-way connector and the flexible hose on the RH side. I was forming 3/16" Cunifer tubling, which I've done many times before; today it kicked my butt. I'm going to take a trip to by buddy's shop on Wednesday and borrow his flairing tool.
Hopefully I'll make the big event on Saturday.
The peasants are revolting... ![]()
"Gone with the Wind" - a brief yet moving vignette concerning lactose intolerance
|
|
Total posts: 1911
Last post: Jan 18, 2016 Member since:Oct 30, 2002
|
Cars in Garage: 0
Photos: 0 WorkBench Posts: 0 |
|
Hello....
I have a 66 Morris Cooper with a full race1430 and I run a non adjustable solid 14mm anti roll bar....something that minispares would have made years ago and probably still make. It makes it "right". You do need to set the rear track dead ahead though otherwise it will feel weavy/wandery depending on tow in/out.
I got mine for the simple reason that it allowed the rear to share the load and run the wheels concentric in the arches without them binding, as they did.
Red one sold years ago. Blue one "tuned" a bit.
|
|
Total posts: 6349
Last post: Oct 22, 2023 Member since:Mar 9, 1999
|
Cars in Garage: 0
Photos: 0 WorkBench Posts: 0 |
|
I used the msc "road" rear swaybar and it was enough to lift the inside wheel on track days with only a 998. The metalistic bushings in the dogbones wore out rather quickly I feel, and the hole at one end of the swaybar blades broke. Twice (welded it up once and it broke again).
I feel it certainly did help with making the back end swing around (rear steer) but I got the same effect by putting a smidge (1/16") of toe out at the rear with no swaybar.
I'm back to zero toe at the rear and an sracer adjustable rear swaybar on my street car, which has a bow in it to go under the exhaust. It's pretty low.
On the LeMons mini, there's no swaybar. We tried one once back in 2011 and it just looped and looped until we black flagged out for the day. Without the swaybar we get a nice, controllable 4-wheel drift going.
Personally, I think flat cornering is overrated.
|
|
Total posts: 7075
Last post: Nov 5, 2019 Member since:Apr 25, 2000
|
Cars in Garage: 0
Photos: 0 WorkBench Posts: 0 |
|
Hi Gary,
No need to make hanger extensions, I installed a C-19G3258 rear exhaust bracket and the GEX7248 hanger (I conveniently had them in a storage box already) and it gave the clearance I needed between the bar and the tailpipe as it leaves the silencer. Why the RC40 fitting kit doesn't have these, I'll never know.
I'll write up a complete and comprehensive installation instruction once I've finished mine. I know that I can't be the only one who's had difficulties with this project, and I really can't wait to feel the difference it made. Hopefully, I'll be able to get some pictures after I'm finished and with a little editing, incorporate them into the instructions.
One tip for the time being - have a pair of small clamps on hand. The mounting blocks are about an inch thick and the subframe around 1/8" thick. You'll need to clamp the blocks to the subframe on the small outer lip and there isn't much space. I drilled the top hole first, bolted it in place and then marked the bottom holes (which are, incidentally closer to the edge of the lip than the top hole, so be sure to get it right!) Also, don't grease anything but the 'nests' in the aluminium blocks until your finished with your installation, only then remove each bolt and grease individually; unless of course you're prepared also to get absolutely covered in copper grease.
A helper would be nice also, but maybe because my garage is quite small and I have a hard time moving about between the car, the extra 2 3/4 sets of wheels and other stuff. Soon, I'll throw away the plastic pallet that something arrived on, the old windshield resting against the wall, etc.
The peasants are revolting... ![]()
"Gone with the Wind" - a brief yet moving vignette concerning lactose intolerance
|
|
Total posts: 137
Last post: Mar 23, 2016 Member since:Apr 26, 2012
|
Cars in Garage: 0
Photos: 0 WorkBench Posts: 0 |
|
I will have the same issues as you when I get ready to install one on the rear as the RC-40 exhaust system is mounted up tight also. I will most likely have to add 1 inch hanger extensions.
|
|
Total posts: 7075
Last post: Nov 5, 2019 Member since:Apr 25, 2000
|
Cars in Garage: 0
Photos: 0 WorkBench Posts: 0 |
|
Whew, what a day – I could use a little more time.
I installed a C-19G3258 rear exhaust bracket and the GEX7248 hanger to give a little extra space for the tailpipe. Aside from the awkwardness of trying to remove the old rubber bobbins, t’was easy enough and did lower the rear box by about an inch.
But – installation is not going as well as I had hoped. I got the holes drilled for the aluminium mounting blocks, fitted the rod and assembled the blades to the drop links. Looked really good until I went to lower the car, the upper droplink bolt sits really close to the rubber suspension cone (1 – 2mm, what will happen if the cone gets fatter under compression?) and the lower droplink bolt head will surely hit the emergency brake cable bracket (it’s Really close!), and when suspension rises, the bottom of the drop link/blade will crush my brake pipe. Somehow my brake pipe comes out of the wheel cylinder and loops behind the damper. I’ll make a pair of new pipes and route them forward of the damper, hopefully problem solved.
The bar doesn’t swing ‘freely’, not even when the blocks are assembled to the bar in ‘free air’. The blocks are a tight fit on the bar (Ball-joint snug) when they’re bolted to the subframe – maybe they’ll wear in or perhaps I should use a bit of valve lapping paste and hone the blocks?
A thought occurred to me - what if the drop links faced 'upwards'? The blades wouldn't interfere with the brake pipes, there's a ton of space for the blade to arc - ok, well, not a whole lot, maybe ½" - 3/4" between the top of the blade and the boot floor/wheel tub seam. I wonder if the links are strong enough for this - 'lifting' instead of 'pulling' against the torsion spring?
Pictures will follow, once the soreness in my neck subsides or I'm able to venture back into the garage; perhaps Saturday after work or it'll be next Wednesday.
The peasants are revolting... ![]()
"Gone with the Wind" - a brief yet moving vignette concerning lactose intolerance
|
|
Total posts: 7075
Last post: Nov 5, 2019 Member since:Apr 25, 2000
|
Cars in Garage: 0
Photos: 0 WorkBench Posts: 0 |
|
Ok, then - I've got a rear competition exhaust mount (C-19G3258) that I've never gotten 'round to fitting sitting in a box along with an extra GEX7248 hanger, so maybe I can lower it enough. I'll try to take a few pictures next time I'm in the cave.
The peasants are revolting... ![]()
"Gone with the Wind" - a brief yet moving vignette concerning lactose intolerance
|
|
Total posts: 1746
Last post: Feb 2, 2017 Member since:May 28, 1999
|
Cars in Garage: 0
Photos: 0 WorkBench Posts: 0 |
|
Wow, yes, your exhaust does appear to sit quite 'high'. I can see how that could cause clearance issues.
|
|
Total posts: 7075
Last post: Nov 5, 2019 Member since:Apr 25, 2000
|
Cars in Garage: 0
Photos: 0 WorkBench Posts: 0 |
|

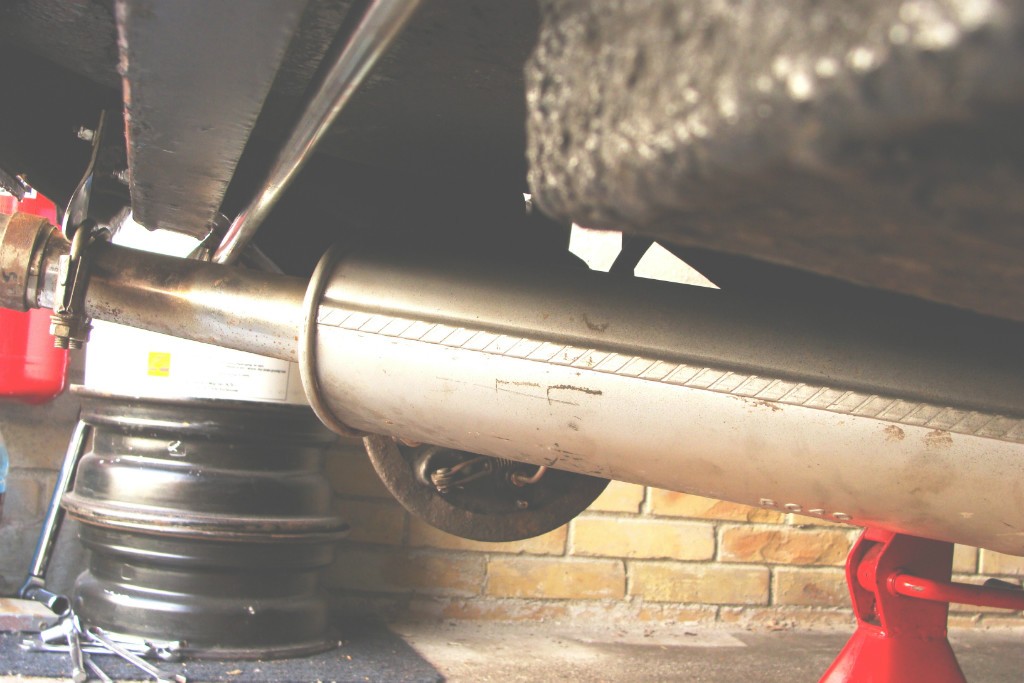
I haven't any pictures from under the car, but I've found a picture which somewhat shows how close the exhaust pipe is to the crossmember/rear valance. You may not be able to see it very clearly, but I've carved a relief with a pair of sheers for the tailpipe to clear the rear valance. Without the carved arch, the tailpipe struck the rear valance and needed close to ½" of rear valance panel to be removed.
The image also shows a short rolled-edge Maniflow extension as used on vans and pickups which I shortened by around 5" off to bring the end of the RC40 (genuine, from MSC) to the edge of the bumper. Without the extension, the tailpipe was pretty short, even thought the silencer box is pretty much right against the rear crossmember.
The peasants are revolting... ![]()
"Gone with the Wind" - a brief yet moving vignette concerning lactose intolerance
|
|
Total posts: 7075
Last post: Nov 5, 2019 Member since:Apr 25, 2000
|
Cars in Garage: 0
Photos: 0 WorkBench Posts: 0 |
|
Hi guys,
Yeah, I agree that including pictures or drawings in the instructions would really help. As I look at Dennis' exhaust hanger, it looks like his center-exit system hangs lower than the side-exit bobbin/bracket system. When I spoke with Rich at MSC North (he's got one on his car(s)), his side exit system is hanging on the rubber donut, also perhaps a wee-bit lower than the bobbin/bracket hanger. Unfortunately, I'd also previously opted for 80mm diameter tow-brackets instead of Dennis' 50mm brackets and they're pretty close to the blades as well.
On mine, the tailpipe fits really tight against the rear crossmember - maybe 1/4", and as the silencer box fits slightly above the crossmember, I'll need to lower the exhaust a small amount. Guess I'll try to make a couple of straps to hang the bracket lower.
We've now got reviews from Steve and Dennis - although conflicting views for a fast-road/track day car, fantastic to have the voices of experience!
Although I've got the ½" unit half-installed, I'm really tempted to spring for the 3/4", set it 'soft', see what happens and pass the smaller bar on to a local club member. I need to chew on this for a day or two before any holes are drilled, as the car is continually evolving and who really knows what the future holds...
The peasants are revolting... ![]()
"Gone with the Wind" - a brief yet moving vignette concerning lactose intolerance
|
|
Total posts: 1746
Last post: Feb 2, 2017 Member since:May 28, 1999
|
Cars in Garage: 0
Photos: 0 WorkBench Posts: 0 |
|
Dennis,
Thanks for posting those pics....they are worth a 1,000 words. That is exactly the type of this that MSC should include with the kit....I've always said their instructions tend to be lacking.
Jeg,
from those pics, I really can't see how I would interfere with an RC-40. Did you feel it was going to run into the tail-pipe, or the rear muffler?
|
|
Total posts: 395
Last post: Jun 17, 2017 Member since:May 6, 1999
|
Cars in Garage: 0
Photos: 0 WorkBench Posts: 0 |
|


Here's a few shots of the competition MSC adjustable bar. Fits really nice and tight and works great on the street. I wouldn't waste my time with the non adjustable small diameter bar.
Cheers
Dennis
|
|
Total posts: 1746
Last post: Feb 2, 2017 Member since:May 28, 1999
|
Cars in Garage: 0
Photos: 0 WorkBench Posts: 0 |
|
If you don't mind, post some pics when you get them.
|
|
Total posts: 7075
Last post: Nov 5, 2019 Member since:Apr 25, 2000
|
Cars in Garage: 0
Photos: 0 WorkBench Posts: 0 |
|
I spoke with one at MSC today who actually has one on his daily driver mini and will be soon installing one on his other mini. I believe his race mini has the 3/4" bar. He was astonished to hear that the tailpipe interfered with the bar, but agreed to take a couple of photos of his installation this weekend. His exhaust system is hanging on the rubber bands, mine is the old-type 'bobbin/bracket' setup. He also mentioned that when it's mounted, it sits really close to the battery box.
The peasants are revolting... ![]()
"Gone with the Wind" - a brief yet moving vignette concerning lactose intolerance
|
|
Total posts: 1746
Last post: Feb 2, 2017 Member since:May 28, 1999
|
Cars in Garage: 0
Photos: 0 WorkBench Posts: 0 |
|
I think the ones with the arc in the middle tend to mount from the front of the subframE, and run parallel to the trailing arms. I don't believe I've ever seen a rear-mount sway bar that arches over the exhaust.....could be wrong.
Thankfully, I was able to cancel my MSC sway bar, so I can do some more research on the topic. I don't feel like dealing wpoorly other poorly designed kit right now....had enough of those lately.
|
|
Total posts: 8382
Last post: Jan 13, 2022 Member since:Feb 7, 2006
|
Cars in Garage: 0
Photos: 0 WorkBench Posts: 0 |
|
I have seen some rear anti roll bars/sway bars installed on Mini's that have an arch in the center to clear tthe exhausts, sorry but i don't know who the manufacturer is.
Edit : The one offered by Seven has an arch in it and also states you may need spacer blocks to clear some exhausts.
If in doubt, flat out. Colin Mc Rae MBE 1968-2007.
Give a car more power and it goes faster on the straights,
make a car lighter and it's faster everywhere. Colin Chapman.
Found 29 Messages


