
| Orig. Posting Date | User Name | Edit Date |
| Aug 19, 2014 07:57AM | MiniCord | |
| Aug 19, 2014 04:21AM | Dan Moffet | |
| Aug 18, 2014 02:18PM | MiniCord | |
| Aug 18, 2014 01:52PM | Cheleker | |
| Aug 18, 2014 01:40PM | Dan Moffet | |
| Aug 17, 2014 05:42PM | MiniCord | |
| Aug 16, 2014 02:50AM | Dan Moffet | |
| Aug 12, 2014 12:43PM | malsal | |
| Aug 12, 2014 12:30PM | Jemal | |
| Aug 12, 2014 12:19PM | Dan Moffet | |
| Aug 12, 2014 09:16AM | Jemal | Edited: Aug 12, 2014 09:16AM |
| Aug 12, 2014 03:52AM | MiniCord | |
| Aug 11, 2014 09:45PM | minimans | |
| Aug 10, 2014 07:59AM | Spitz | |
| Aug 10, 2014 06:46AM | MiniCord | |
| Aug 10, 2014 05:52AM | zippypinhead | |
| Aug 9, 2014 06:37PM | malsal | |
| Aug 9, 2014 05:55PM | jeffm5150 | |
| Aug 9, 2014 05:18PM | MiniCord | Edited: Aug 9, 2014 05:21PM |

|
Total posts: 1179
Last post: Jan 22, 2021 Member since:Jul 31, 2008
|
Cars in Garage: 5
Photos: 107 WorkBench Posts: 3 |
|
Hi Dan,
Yep, it's only up on one ramp. This trick aslo makes changing the rear tires a breeze.
The rear end is very light indeed. I'm not very strong so I can't lift it by myself, however, once a night out with a friend, we found a perfect place in front of the pub, but it was too small to parallel park, even in the Moke, So I just pulled the nose in, got of the car, and liftet the back end with my friend. People at the pub patio, they applauded and laughed.
It was cool this morning, but I drove the Moke to work. Gotta enjoy what's left of the summer before it's gone.
Miguel

|
|
Total posts: 9547
Last post: Apr 26, 2024 Member since:Aug 14, 2002
|
Cars in Garage: 0
Photos: 0 WorkBench Posts: 0 |
|
Just looking out for your health and safety!
Your 4th pic with the yellow Fiat behnd the Moke was funny too. It looks like the moke is so light it only took one steel ramp to raise it - even the backwheel is off the ground.
Others can see what kind of a summer we've been having too.
.
"Hang on a minute lads....I've got a great idea."
|
|
Total posts: 1179
Last post: Jan 22, 2021 Member since:Jul 31, 2008
|
Cars in Garage: 5
Photos: 107 WorkBench Posts: 3 |
|
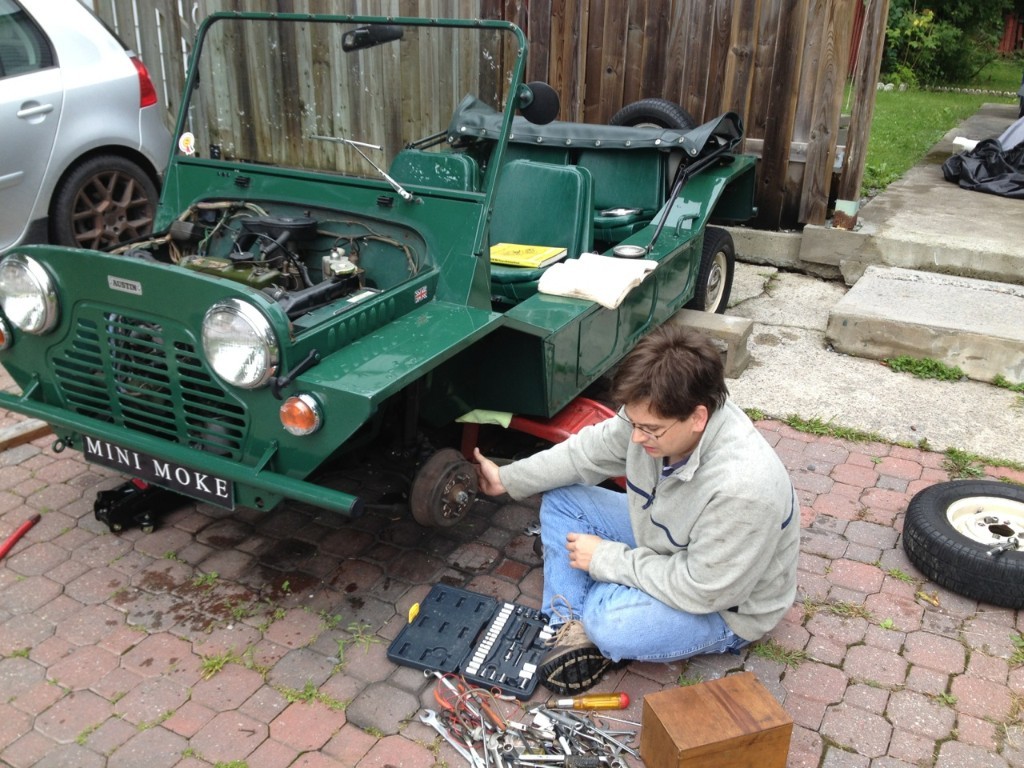
hahaha, I knew I was going to get grilled on the Cinder Block.
I want to add, that
1: The car was never supported by the block. It was just there as a backup to the car jack that was holding the subframe, if the jack or the pieces of wood fail. The suframe could not go any lower. I could not oriet it the other way as the block was taller.
The one at the rear is just as a precaution, the garage has a slight incline, I don't want the car moving when I'm jacking it up.
I should have removed the swiss army knife.
Miguel
|
|
Total posts: 10330
Last post: Jan 27, 2021 Member since:Dec 3, 2002
|
Cars in Garage: 0
Photos: 0 WorkBench Posts: 0 |
|
To add to Malsal's good advice about testing and adjusting the U-bolts before trying to reuse them, make the test easy by doing it from inside the car rather than outside. Seems obvious, but I've seen it done the other way.
|
|
Total posts: 9547
Last post: Apr 26, 2024 Member since:Aug 14, 2002
|
Cars in Garage: 0
Photos: 0 WorkBench Posts: 0 |
|
Good going!
Next time you work under your car, a few tips:
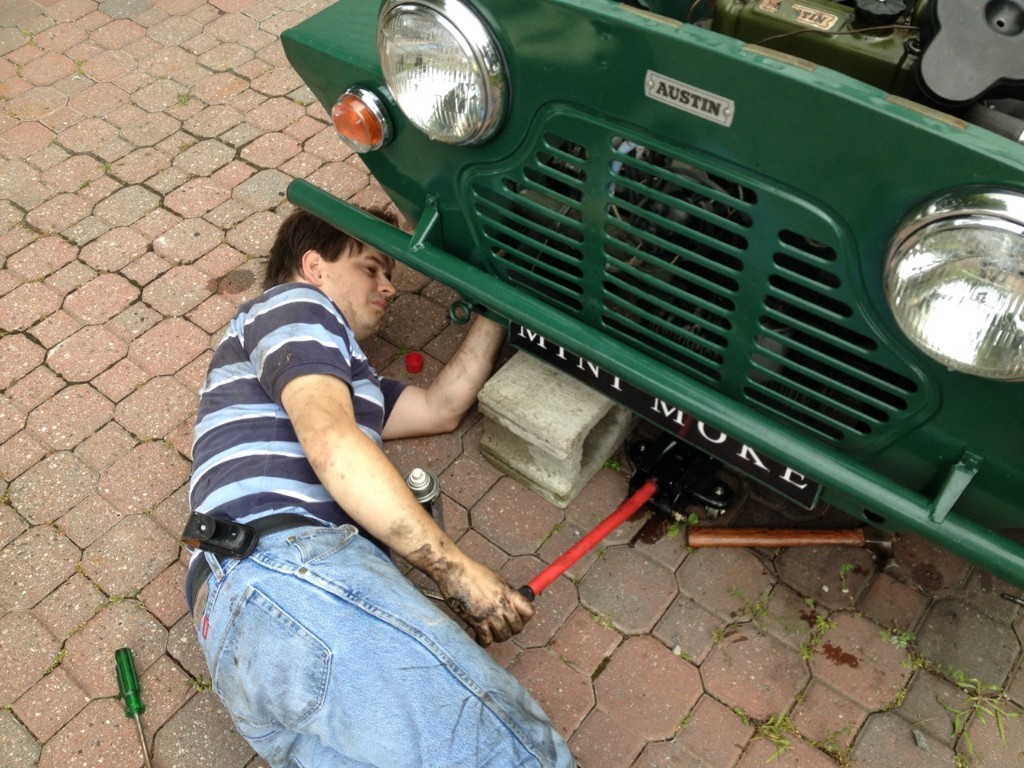
1. Empty pockets and remove pocket knife holster etc. It make it easier to sqirm around, and you don't end up with a bunch of weird bruises from lying on stuff.
2. Although a Moke isn't heavy, using a concrete block in that orientation is dangerous. It is the weakest oreintation - there are only 3 webs supporting the weight and if not fully supported underneath,, or the car frame exerts a point load, the weight may only be carried on one web, and if it has a hidden crack.... squish! If you use a conrete block, always orient the cells vertically AND use a block of wood to spread load on top. If you think it is stong, take a hammer and whack the concrete block a few times on the side face (the upward face in Miguel's pic.), - it won't take much to make gravel out of it.
.
"Hang on a minute lads....I've got a great idea."
|
|
Total posts: 1179
Last post: Jan 22, 2021 Member since:Jul 31, 2008
|
Cars in Garage: 5
Photos: 107 WorkBench Posts: 3 |
|
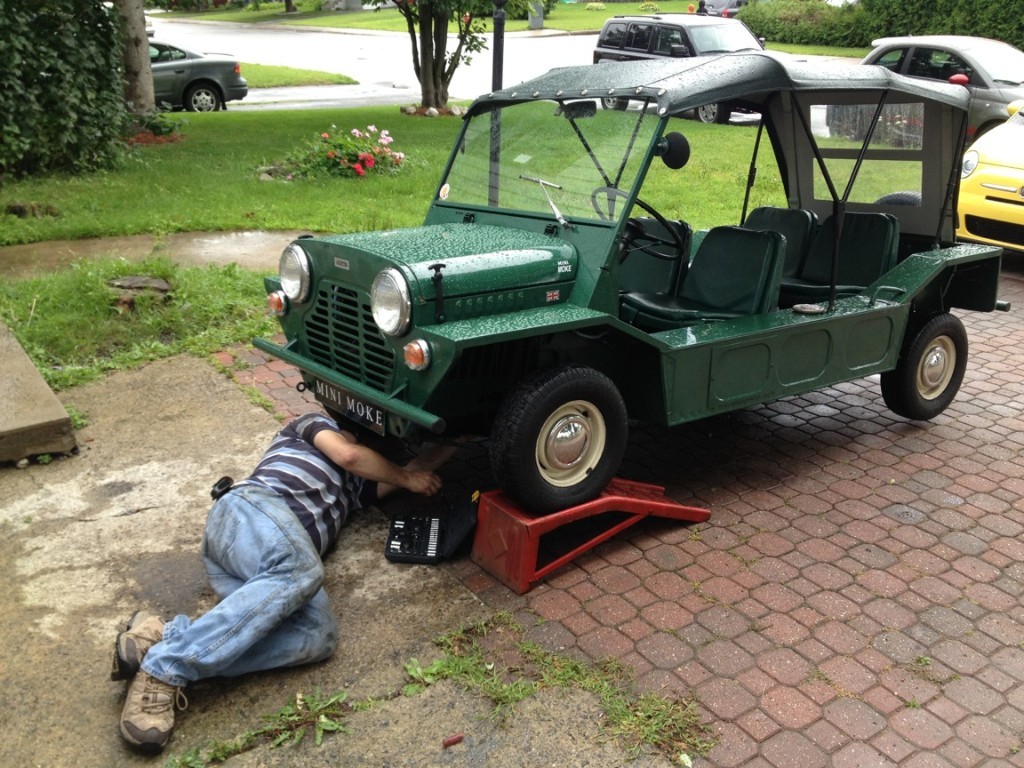
Well, the Moke is back on the road.
Changing the steering Rack was not the hardest job I have done, but I hope this rack lasts another 49 years.
I can now confirm the subframe does not need to come out completely. Altough getting the U-Bolts back in was not an easy task as they just had enough clearance to be squeezed in between the body and the subframe.
Masal, thanks for suggesting the compression of the U-Bolts with a vice. Without it, I would still be working on it.
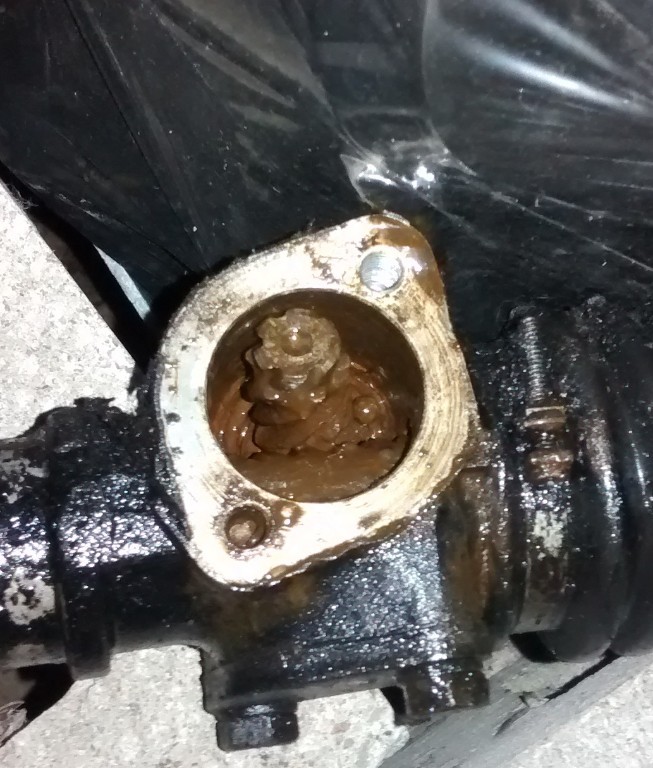
About the rack, I opened the access door, and everything desintegarted, the bearing was in pieces, bushings in pieces. The inside was full of a brown mud, so I guess water got in.
Alligment, I did the best I could, and the test run I did, the car has never driven so straight. I will run it like that for now, my tires are not that good anyways. Eventually I will have it alligned, but my garage can't do 10" wheels, so I will need to find another place locally that is willing to do it and the clamps that can do it.
I was lucky a friend came down and helped me, as it is certainly a two man job.
Regards,
Miguel
|
|
Total posts: 9547
Last post: Apr 26, 2024 Member since:Aug 14, 2002
|
Cars in Garage: 0
Photos: 0 WorkBench Posts: 0 |
|
It's a big fat one for huge Phillips screws!!! Actually I'm using a modified engine bracket from my bigger engine stand (you know, for REAL engines like Chevy big and small block V8s!), and the pin wouldn't quite fit the existing holes !
Oh, OK then... an appropriate use for a Phillips screwdriver.
.
"Hang on a minute lads....I've got a great idea."
|
|
Total posts: 8382
Last post: Jan 13, 2022 Member since:Feb 7, 2006
|
Cars in Garage: 0
Photos: 0 WorkBench Posts: 0 |
|
When I was building and upgrading my friend's 67 Moke, I installed a new rack, but I did it with the subframe completely out.... It seemed to me you'd have to lower it at least 6 inches in the rear, and neither my 66 S or the Moke would "let me" lower the rear by simply loosening the front... the frame is too tight a fit to let it pivot down in back....
I show lowering the frame from the body and explain some things, but lovely assistant was filming and she gets distracted by dogs playing and such!
I have done them before without dropping the frame Jemal just a small amount at the rear and loosen up the front bolts. Just make sure the U clamps that hold the rack in place are checked by fitting them in the holes before you put the rack back in, they tend to spring out and need to be compressed back to shape in a vice so it makes for a lot easier install.
Miguel you will probably find that the end bushings near the inner knuckles have come apart or fell out.
If in doubt, flat out. Colin Mc Rae MBE 1968-2007.
Give a car more power and it goes faster on the straights,
make a car lighter and it's faster everywhere. Colin Chapman.
|
|
Total posts: 1087
Last post: Sep 15, 2023 Member since:Nov 3, 2011
|
Cars in Garage: 0
Photos: 0 WorkBench Posts: 0 |
|
It's a big fat one for huge Phillips screws!!! Actually I'm using a modified engine bracket from my bigger engine stand (you know, for REAL engines like Chevy big and small block V8s!), and the pin wouldn't quite fit the existing holes !
|
|
Total posts: 9547
Last post: Apr 26, 2024 Member since:Aug 14, 2002
|
Cars in Garage: 0
Photos: 0 WorkBench Posts: 0 |
|
But Jemal!..... a screwdriver for a lock-pin on the engine stand?????
.
"Hang on a minute lads....I've got a great idea."
|
|
Total posts: 1087
Last post: Sep 15, 2023 Member since:Nov 3, 2011
|
Cars in Garage: 0
Photos: 0 WorkBench Posts: 0 |
|
When I was building and upgrading my friend's 67 Moke, I installed a new rack, but I did it with the subframe completely out.... It seemed to me you'd have to lower it at least 6 inches in the rear, and neither my 66 S or the Moke would "let me" lower the rear by simply loosening the front... the frame is too tight a fit to let it pivot down in back....
I show lowering the frame from the body and explain some things, but lovely assistant was filming and she gets distracted by dogs playing and such!
|
|
Total posts: 1179
Last post: Jan 22, 2021 Member since:Jul 31, 2008
|
Cars in Garage: 5
Photos: 107 WorkBench Posts: 3 |
|
Parts have been ordered, work is schedule to take place on saturday if weather is nice.
minimans, I'll make sure to post some pictures and if I can, I will do some forensic engineering on the rack. I'm also puzzled.
Miguel
|
|
Total posts: 1404
Last post: Jun 21, 2018 Member since:Oct 8, 2013
|
Cars in Garage: 0
Photos: 0 WorkBench Posts: 0 |
The way it's wobbling about it seems the pinion gear bearing has disintegrated! I've never seen one do that!! on any car..................I lost the through bolt on my Marcos once driving over Putney bridge sideswiped a double decker bus half a second sooner and I would have hit it head on..............................
Mini's are like buses they come along in a bunch
|
|
Total posts: 13978
Last post: Jan 15, 2024 Member since:Jan 22, 2003
|
Cars in Garage: 4
Photos: 381 WorkBench Posts: 1 |
|

Lucky indeed
"Everybody should own a MINI at some point, or you are incomplete as a human being" - James May
"WET COOPER", Partsguy1 (Terry Snell of Penticton BC ) - Could you send the money for the unpaid parts and court fees.
Ordered so by a Judge
|
|
Total posts: 1179
Last post: Jan 22, 2021 Member since:Jul 31, 2008
|
Cars in Garage: 5
Photos: 107 WorkBench Posts: 3 |
|
I know Zippy.
I just confirmed is the rack. Check the video below (you don't need to be on facebook.
https://www.facebook.com/photo.php?v=10153124180783712&l=6208831717925633299
Miguel
|
|
Total posts: 2510
Last post: Sep 5, 2015 Member since:Jul 15, 2010
|
Cars in Garage: 0
Photos: 0 WorkBench Posts: 0 |
|
|
|
Total posts: 8382
Last post: Jan 13, 2022 Member since:Feb 7, 2006
|
Cars in Garage: 0
Photos: 0 WorkBench Posts: 0 |
|
If it is the column turning on the splines Miguel the column will wear first as the metal is softer. i have managed in the past to "re furb" the splines with a small triangular file and then open up the clamping space so it will clamp down harder, i also was able to use a larger 5/16" grade 5 or 8 bolt after drilling the collar to size and clamp it tight. The column ends are available in Australia i believe Kevin (dr Mini) posted them once maybe a Mini Sport item but it will be needed to be welded on all in all still a lot cheaper than a column. The rack will come out with the upper subframe mounts loosened up along with the stabilizer bar, front subby mounts and rear mounting bolts removed, make sure the brake line has enough bend in it to absorb the drop or loosen it up too (maybe just off the bulkhead mount). Make sure there is enough room for the exhaust to drop also.
If in doubt, flat out. Colin Mc Rae MBE 1968-2007.
Give a car more power and it goes faster on the straights,
make a car lighter and it's faster everywhere. Colin Chapman.
|
|
Total posts: 193
Last post: May 19, 2015 Member since:Feb 5, 2013
|
Cars in Garage: 0
Photos: 0 WorkBench Posts: 0 |
Either the worm gear drive inside the steering rack has broken teeth, or the steering column to steering rack connection is loose/damaged. The first thing I would check is the bolt holding the steering column to the rack at the bottom of the column right where it ends at the floor. If the bolt has come off or is loose the clamp collar will be able to spin on the rack splines. If it's been loose for a long time the column and/or rack could be damaged since the splines can become rounded off due to the loose fit.
If the rack itself is the problem you'll have to replace it. Unfortunately the rack is sandwiched between the subframe and body. I've been told you can loosen the rear subframe mounts so that the subframe can separate from the floor a couple of inches. This will allow you to drop the steering rack between the subframe and the body and replace it. The only other option is to fully drop the subframe to allow removal of the rack. When I replaced my rack I had pulled my entire front subframe which gave good access.
The rack itself is held on with a couple of u-bolts that can be removed with simple hand tools. Similarly the subframe mounts to the body with bolts that can be loosened or removed with simple hand tools. Aside from the tools you'll need some jack stands as well as one or two floor jacks.
|
|
Total posts: 1179
Last post: Jan 22, 2021 Member since:Jul 31, 2008
|
Cars in Garage: 5
Photos: 107 WorkBench Posts: 3 |
|
Last night I was out in downtown with my Moke, when the steering started to do loud bangs. I pulled over and parralleled park, and the steering just gave out.
I believe is the Steering rack. The steering wheel has ponits where it just spins freely and others that tries to catch but skips.
How easy is it to change it? Is it something I can tackle alone with basic tools in my driveway?
I know the car will need to be alligned afterwards. I'm just trying to save some money.
Thanks
Miguel


