
| Orig. Posting Date | User Name | Edit Date |
| Aug 12, 2015 02:09PM | jeg | |
| Aug 12, 2015 01:20PM | tmsmith | |
| Aug 12, 2015 01:12PM | jeg | |
| Aug 12, 2015 10:46AM | tmsmith | Edited: Aug 12, 2015 11:18AM |
| Mar 4, 2015 04:33PM | dklawson | |
| Mar 4, 2015 04:08PM | tmsmith | |
| Mar 4, 2015 04:05PM | jeg | |
| Mar 4, 2015 03:32PM | tmsmith | |
| Mar 4, 2015 03:19PM | jeg | Edited: Mar 4, 2015 03:30PM |
| Mar 4, 2015 04:36AM | dklawson | |
| Mar 3, 2015 06:29PM | jeg | |
| Mar 3, 2015 06:20PM | MPlayle | |
| Mar 3, 2015 05:14PM | jeg | Edited: Apr 15, 2015 03:42PM |

|
Total posts: 7075
Last post: Nov 5, 2019 Member since:Apr 25, 2000
|
Cars in Garage: 0
Photos: 0 WorkBench Posts: 0 |
|
It makes the parcel shelf pretty crowded though. And no place to put my wifes fan...could be trouble on that one.
If you have the same tach I do(purchased within the last year), make note that switch 8 is always set to on. The diagrams don't exactly make it clear.
Terry
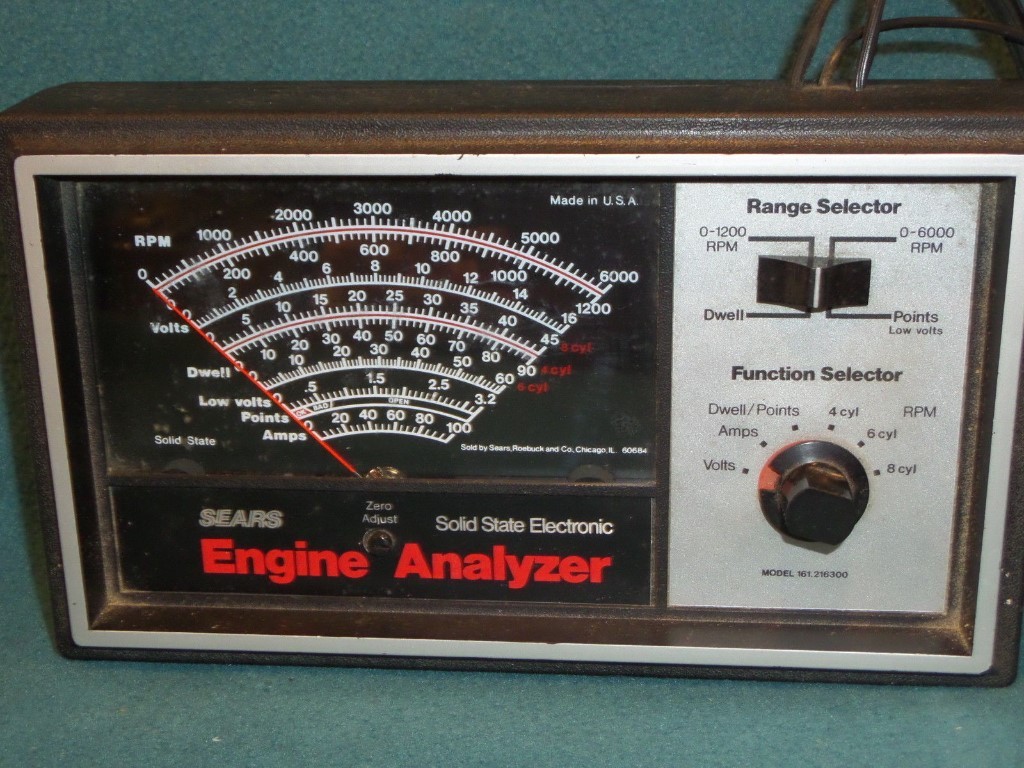
I bought mine from MSC this past February, so yes, it's the same as yours. Switch '8'? As I remember it, it appeared to be 'good to go' right out of the box; I didn't need to change any settings. I've checked it against an engine analyzer that I'd bought a million years ago from Sears, and it seems to be working fine.
I've still got one of these - love it, still works great!
 The peasants are revolting...
 ![]()
"Gone with the Wind" - a brief yet moving vignette concerning lactose intolerance
|
|
Total posts: 3749
Last post: Mar 26, 2024 Member since:Jun 23, 2000
|
Cars in Garage: 1
Photos: 201 WorkBench Posts: 0 |
|
It makes the parcel shelf pretty crowded though. And no place to put my wifes fan...could be trouble on that one.
If you have the same tach I do(purchased within the last year), make note that switch 8 is always set to on. The diagrams don't exactly make it clear.
Terry
|
|
Total posts: 7075
Last post: Nov 5, 2019 Member since:Apr 25, 2000
|
Cars in Garage: 0
Photos: 0 WorkBench Posts: 0 |
|
That pod looks quite elegant! Very nice indeed!
Thanks for the instruction manual scan -
The peasants are revolting... ![]()
"Gone with the Wind" - a brief yet moving vignette concerning lactose intolerance
|
|
Total posts: 3749
Last post: Mar 26, 2024 Member since:Jun 23, 2000
|
Cars in Garage: 1
Photos: 201 WorkBench Posts: 0 |
|
Nick made something similar for our cars.

Link to tach PDFs some slight variations.
from gauge
//www.tmsmini.com/cooper/pdf/Caerbont_tach.pdf
from website
//www.tmsmini.com/cooper/pdf/Prog-Tacho_New.pdf
There is one more type here:
//www.caigauge.com/page29.html
|
|
Total posts: 9241
Last post: Aug 17, 2023 Member since:Jun 5, 2000
|
Cars in Garage: 0
Photos: 0 WorkBench Posts: 0 |
|
John, it's interesting that you brought that up. I was putting away something in the kitchen this weekend and saw the jar the marmelade had been in. Being a British car owner you know I can't throw anything away. I have kept the jar for some future homemade (probably blackberry) preserves of my own.
I'm sorry to say that I don't think I have drawings of either pod. The square one John has was made by cutting pieces of manila folders to size, taping them together, then "unfolding" to make a flat pattern template. The template profile was transfered to some mild steel sheet, trimmed out, then bent up and tack welded togehter. The oval pod was drawn in CAD at least one computer crash ago and I haven't seen those drawings since. The pod was made from heavy gauge galvanized sheet. The CAD drawings were printed out to scale, glued to the sheet and then trimmed to size. After abrading and acid washing the edges of the sheet it was soldered together. Final fitment of both was sort of a "file to fit" thing once the parts were on the parcel shelf.
|
|
Total posts: 3749
Last post: Mar 26, 2024 Member since:Jun 23, 2000
|
Cars in Garage: 1
Photos: 201 WorkBench Posts: 0 |
|
I think I asked Doug for a picture of his as well.
I am getting to the point where I need to figure out what to do with gauges, so this post is very timely.
I have a new Smiths tach as well.
Terry
|
|
Total posts: 7075
Last post: Nov 5, 2019 Member since:Apr 25, 2000
|
Cars in Garage: 0
Photos: 0 WorkBench Posts: 0 |
|
Hi Terry,
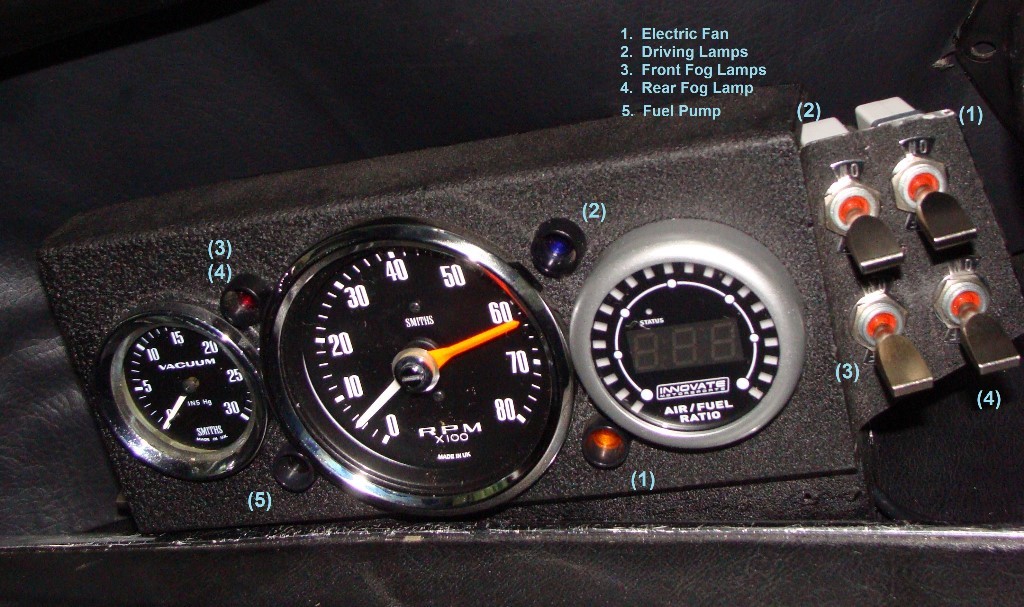
Doug Lawson made the gauge pod around 100 years ago; it was the forerunner to the 'domed' version (mimics the center binacle) that he's got in his car. I bought it from him many years ago for the princely sum of $20.- and a jar of my homemade mirabella (tiny wild plums) marmelade.
Since I've owned it, I've added the 4 indicator lamps, cut one side and folded it outwards to hold 4 switches. Today, there's a lot of wiring inside. I've also added a threaded insert on the bottom edge to allow it to be screwed fast to the lower dash rail.
I might have sent a picture to you, but don't remember. I can't find on on my PC, perhaps Doug still has a drawing?
The peasants are revolting... ![]()
"Gone with the Wind" - a brief yet moving vignette concerning lactose intolerance
|
|
Total posts: 3749
Last post: Mar 26, 2024 Member since:Jun 23, 2000
|
Cars in Garage: 1
Photos: 201 WorkBench Posts: 0 |
|
John:
Did you hand make your instrument pod?
I think I had you send me a picture before, but do you have any more?
Terry
|
|
Total posts: 7075
Last post: Nov 5, 2019 Member since:Apr 25, 2000
|
Cars in Garage: 0
Photos: 0 WorkBench Posts: 0 |
|
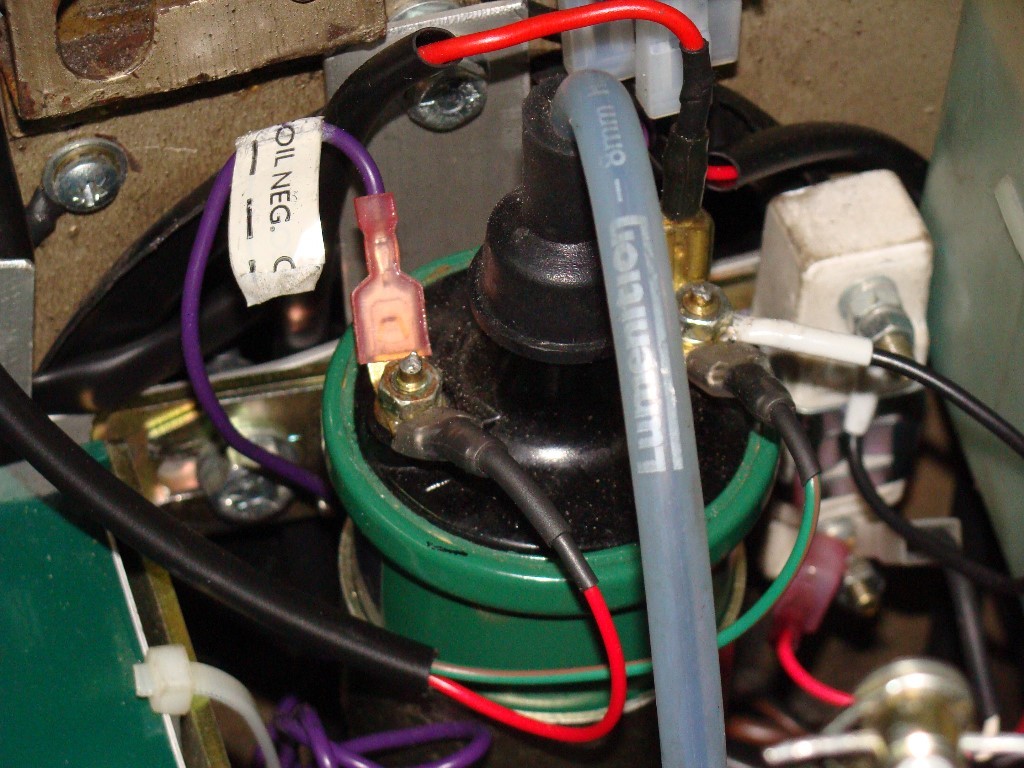
Thanks, it's mounted and plugged in, fired up the car and it seemed to work in the 15 or so seconds that I had the engine running. Of course, I didn't exceed 1500 RPM, so maybe I'll have a chance to finish the new air/fuel gauge install tomorrow and actually try it out. Primarily using the Luminition diagram, I was able to re-use much of my original 'TIMS' wiring - just swapped the coil leads, so the green(+) from the tach connects to a green/brown on the coil (+). Colorwise, it's close enough; I'll stick a 3Amp inline fuse on this later on.
Of course, I don't happen to have any red/blue wire on hand, so the red/blue connects to a simple red lead on coil (-). Red/white I've got, so illumination is 'true'. Black, well, it's grounded.
Btw, the white/black, which I had a bit of, but not enough of, caused the tack to work intermittantly. It was the red/blue wire that I needed to connect to the coil neg...
The peasants are revolting... ![]()
"Gone with the Wind" - a brief yet moving vignette concerning lactose intolerance
|
|
Total posts: 9241
Last post: Aug 17, 2023 Member since:Jun 5, 2000
|
Cars in Garage: 0
Photos: 0 WorkBench Posts: 0 |
|
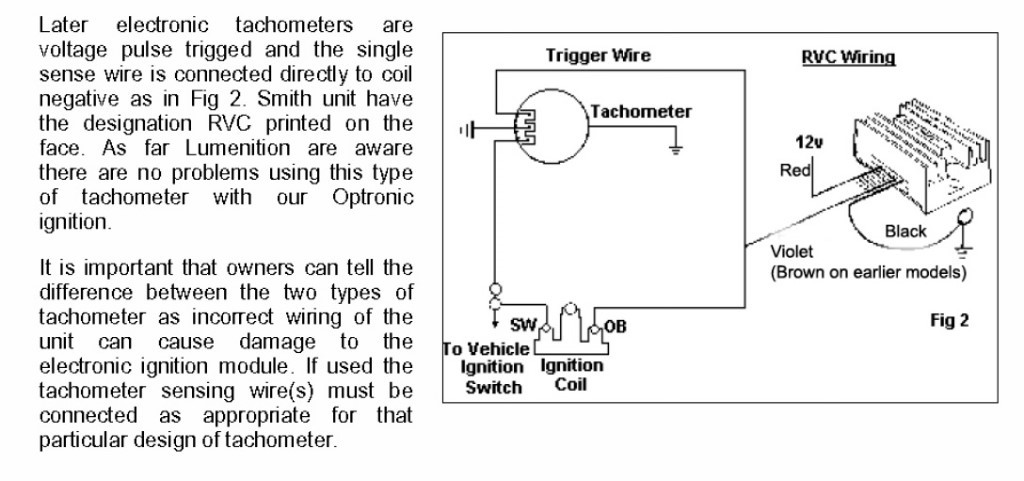
John, you are likely to find discrepancies between their (Caerbont's) online instructions and those that came with the tach. If you are unable to get the tach to work using the instructions that came with the tach, check the Caerbont web site. ![]() ay particular attention to the dip switch settings and be prepared to switch which sense wire you are using. Some people seem to get the white/black to work while others find the red/blue works. Regardless, with the Lumenition, one of those two wires will connect to coil (-). As you suggest, tape off the wires that are not connected.
ay particular attention to the dip switch settings and be prepared to switch which sense wire you are using. Some people seem to get the white/black to work while others find the red/blue works. Regardless, with the Lumenition, one of those two wires will connect to coil (-). As you suggest, tape off the wires that are not connected.
|
|
Total posts: 7075
Last post: Nov 5, 2019 Member since:Apr 25, 2000
|
Cars in Garage: 0
Photos: 0 WorkBench Posts: 0 |
|
Thanks - given the number of choices for the Red/blue wire, I wasn't sure. Just might make it to the garage tomorrow and install it. Time allowing, I'll replace my air-fuel meter as well.
The peasants are revolting... ![]()
"Gone with the Wind" - a brief yet moving vignette concerning lactose intolerance
|
|
Total posts: 1787
Last post: Mar 26, 2024 Member since:Feb 1, 2000
|
Cars in Garage: 0
Photos: 0 WorkBench Posts: 0 |
|
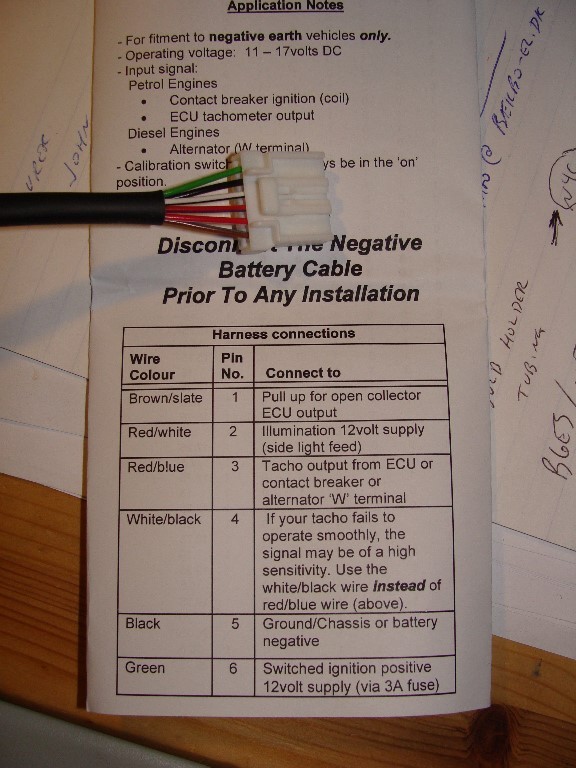
Looking at the pictures you posted and reading the signal descriptions, I think the following would be the correct configuration:
Brown/slate = unused, wrap off. Red/white = back light, tied to other instrument lighting Red/blue = unused, wrap off (would connect to digital out from an ECU if present) White/black = trigger signal to coil - Black = body ground Green = main power, tied to an ignition switched power feed
|
|
Total posts: 7075
Last post: Nov 5, 2019 Member since:Apr 25, 2000
|
Cars in Garage: 0
Photos: 0 WorkBench Posts: 0 |
|
The new Smiths RVC tachometer arrived today as a replacement for the TIMS that I broke a couple of weeks ago - lightning fast, as I ordered it only yesterday. I called Luminition and they said the Smiths RVC shouldn't have any compatability issues.
A quick wiring question, though - it's got 'extra wires', and I'm not really up to speed on 'ECU' equipt vehicles. (My mini is more like an old lawn mower, no computer controlling anything...)
Most of the wiring is pretty straight forward, though I'm not sure why they've assigned the 'switched B+' lead to 'green'. Ok, I'll adapt...
So, looking at the Smiths instructional reference sheet and the Luminition Optronic technical bulletin nr.15:
- Brown/slate = pullup for ECU open collector output??? What is it? I don't think I'll be using this... So, just wrap it up?
- Red/white = illumination, same as other gauges...
- Red/blue = charging system brown or most likely the ignition coil 'positive'
- White/black = alternative to Red/blue should the tachometer exhibit eratic behavior. I don't think I'll be using this either, wrap it up?
- Black = vehicle ground
- Green = Switched B+
So, does this seem about right? (The TIMS was so convenient...
I'll never understand why 'modern' instruments come with such skinny wires; I didn't plan on using bullet connectors to extend the leads to the newly installed 8-pin multi-connectors situated under the dashboard, but now it looks like I'll have to.
Edit:
It's got 'extra wires', so here's how to connect it:
Most of the wiring is pretty straight forward, though I'm not sure why they've assigned the 'switched B+' lead to the color green. Ok, you'll adapt...
Looking at the Smiths instructional reference sheet:
- Brown/slate = pullup for ECU open collector output??? I won't be using this, just wrap it up.
- Red/white = illumination, same as other gauges...
- Red/blue = Ignition coil 'Negative'
- White/black = alternative to Red/blue should the tachometer exhibit eratic behavior. I won't be using this, just wrap it up.
- Black = vehicle ground
- Green = Switched B+ (12V side of ballast resistor if fitted or Ignition Coil + if non-ballast system)
Hope this helps -
The peasants are revolting... ![]()
"Gone with the Wind" - a brief yet moving vignette concerning lactose intolerance


