
Found 23 Messages

|
Total posts: 185
Last post: Apr 14, 2015 Member since:Jan 18, 2011
|
Cars in Garage: 0
Photos: 10 WorkBench Posts: 0 |
well, it really depends on what breaks. Most people never stop upgrading thier printers, so you may be printing better parts, or stronger parts. Odds are you may have a spare already sitting around. Also, is something cracks, you can usually glue it, tape it, whatever long enough to print a new part out.
|
|
Total posts: 9547
Last post: Apr 26, 2024 Member since:Aug 14, 2002
|
Cars in Garage: 0
Photos: 0 WorkBench Posts: 0 |
|
well, most 3d printers are built to have all the replacement parts printed on a printer, so yes, i can actually print you the plastic parts you need
MIni Mike's 'ask' made me laugh! But your post made me wonder... if you can print the replacement 3d printer parts, how would you do that if the needed part is broken? Is this a feindish way of selling you a second 3D printer?
.
"Hang on a minute lads....I've got a great idea."
|
|
Total posts: 2876
Last post: Feb 17, 2017 Member since:Oct 13, 1999
|
Cars in Garage: 0
Photos: 0 WorkBench Posts: 0 |
|
wow, thanks for sharing! the final product is incredible. I have done a bit with vacu-forming polystyrene and lots of 3d printing with PLA and ABS filament, but yeah, until the higher resolution printers become a little more readily available, these other types of printers are mostly just good for prototyping / playing around. in the end, for what most of us want, its a shortcut and you can only really get the exceptional quality as you have by putting the time and energy into it. Like anything with this hobby though, its not really feasable to get that value back...
thanks again for sharing all those details. I have read tonnes about similar processes on The RPF, but most of those guys use simpler resin setups. this is way cooler ![]()
|
|
Total posts: 3113
Last post: Mar 5, 2021 Member since:Feb 9, 2002
|
Cars in Garage: 0
Photos: 1 WorkBench Posts: 0 |
|
Craig, that is what I am talking about... if(when) i go back to 3d printing it will be with resin. probably homebuilt based on something like the b9creator or whatever that one was... dlp projector under resin tub... mostly because I have almost all the parts already and really enjoy designing and building that sort of stuff.
do you have any pics from the lamp making process? very interested in that sort of stuff. not likely to do it myself but would love to see how its done
I unfortunately couldn't find my old photos of the actual process, but can briefly summarize and post what pics I do have.
I started with a NOS MK1 interior lamp. I actually found an old British car repair garage that had 5 of them in the original Lucas boxes and lamps inside wrapped in Lucas watermarked wax paper on a shelf in the back store room and I bought out their inventory. I built mold boxes large enough to fit one interior lamp body and another for the lense, and another for the lever. Mold boxes are built using foam board base and sides, duct taped together and sprayed inside with mold release.
the underside of the lamp body is filled with sulfur free clay and the lamp is placed right side up on the bottom of the mold box. The clay prevents silicone from flowing into the underside of the lamp. 2 part silicone is mixed, vacuum degassed and poured over the lamp body, completely covering it and filling up the mold box. Once cured, the silicone is pulled out of the box, then the lamp is pulled out of the bottom of the silicone mold. The clay is removed from the underside of the lamp body, then the lamp is placed back into the silicone mold.
Small, straight gauge pins are used to create air vents, and they are tacked with super glue onto the bottom edge of the lamp in several places, and one larger gauge pin is tacked to a flat area of the lamp in the center, which will create the fill port for the urethane material that will create the lamp.
After a mold box is built around the existing mold, which is upside down in the box so that the underside of the lamp is facing up with the air vent gauge pins pointing up, everything is coated with mold release again so that the new silicone does not stick to the first half of the mold or to the underside of the lamp, or mold box. 2 part silicone is mixed and poured into the mold box. Once cured, the mold is removed, separated and the lamp pulled out.
One of the previous steps involved the creation of locating features on the first half of the silicone mold, which the second pour flows into. This locks the mold halves together in the same orientation each time.
When ready to mold, the two halves of the mold are put together, and held tight with rubber bands to prevent visible parting lines. 2-part urethane is mixed after the correct white colorant is added to one part first. All of the material volumes and ratios were carefully calculated and measured using a gram scale to ensure uniformity. After thoroughly mixing, the urethane is placed into a vacuum degassing chamber - which was a paint pressure pot with a clear acrylic lid and silicone seal. This made it easy to look inside to make sure the material was not boiling over as the air was being degassed out of it. I used a small vacuum pump to achieve the degassing.
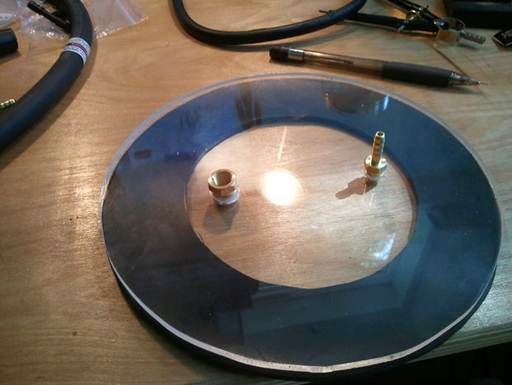


The urethane was then injected using syringes into the mold inlet until urethane flowed out through each small vent hole that was created by the gauge pins. A reservoir at the top of the inlet hole was created with clay for the pressure step which comes next. The reservoir is filled with urethane.
Once the mold is filled, it is placed into a pressure pot (the paint sprayer pictured above). The paint sprayer doubled as a vacuum degassing chamber when used with the clear lid and vac pump, and as the pressure vessil when used with the clamped steel lid and an air compressor.
between 50 and 80 psi pressure is applied to the pressure pot which reduces any remaining air bubbles in the urethane inside the mold to microscopic levels. As air bubbles shrink in size, the volume where the bubbles were is filled by the urethane material left in the clay reservoir. This prevents large voids from appearing at the bottom of the lamp body once it is cured. After several hours under pressure, the mold is removed from the pressure pot and placed into an oven at about 150 to 175 deg F. I built an oven for this project using 1" foam insulation sheets from Home Depot and a thermostat controlled space heater that blew into the foam box (oven) I created. I used a digital meat thermometer poking into the top of the foam oven box to regulate the temperature by moving the heater closer or further from the opening, and I also cut vent holes in the opposite side of the oven box.
The end result (after months of trial and error) was a pretty flawless reproduction of a MK1 interior lamp with lense, switch, brass contacts and bulb. I produced molds as above for the lense and switch. For the lense, I used a semi translucent urethane to replicate the OEM lense.
It was a fun project, but too much work to really make any money at it. I made and sold about 25 of them, and you could not tell that they were not OEM originals. The Japanese (on Ebay) paid $115 each for them, but some of them went for as little as $35 - which didn't come close to covering my time. Even at $115, it was a labor of love and not sustainable. Hopefully with SLA printing materials and processes improving, it will be possible for someone to produce parts like these cost effectively so that these 'Rare as Hen's Teeth' parts can once again become available in quality reproductions for our cars.
Here are 6 of my reproduction lamps:

Close-up of a pair of my reproduction lamps:

"I drive a Mini. What are you compensating for?"
|
|
Total posts: 2876
Last post: Feb 17, 2017 Member since:Oct 13, 1999
|
Cars in Garage: 0
Photos: 0 WorkBench Posts: 0 |
|
Craig, that is what I am talking about... if(when) i go back to 3d printing it will be with resin. probably homebuilt based on something like the b9creator or whatever that one was... dlp projector under resin tub... mostly because I have almost all the parts already and really enjoy designing and building that sort of stuff.
do you have any pics from the lamp making process? very interested in that sort of stuff. not likely to do it myself but would love to see how its done
|
|
Total posts: 3113
Last post: Mar 5, 2021 Member since:Feb 9, 2002
|
Cars in Garage: 0
Photos: 1 WorkBench Posts: 0 |
|
I'll be ordering a Form 1 desktop SLA printer for work in a few weeks as I run our machining and additive manufacturing departments. Much better resolution than FDM printers (material on a spool), and faster.
At one point I was molding reproduction MK1 interior lamps using silicone molds and 2-part urethane, and it was taking me 8 to 10 hours to produce 1 complete lamp assembly (body, lense, brass contacts, switch and assembly with LED bulb). I may model up some parts - like the interior light and heater vent control plastic lever knob to see how they come out on the SLA.
//formlabs.com/products/form-1-plus/
"I drive a Mini. What are you compensating for?"
|
|
Total posts: 3749
Last post: Mar 26, 2024 Member since:Jun 23, 2000
|
Cars in Garage: 1
Photos: 201 WorkBench Posts: 0 |
|
There was a young guy in Canada somewhere who built up a mini and created his own website with a forum. Maybe we could find him to build the website.
Terry
maybe this is his new website:
|
|
Total posts: 2876
Last post: Feb 17, 2017 Member since:Oct 13, 1999
|
Cars in Garage: 0
Photos: 0 WorkBench Posts: 0 |
|
yeah that's one of the main features of a delta is that it looks so cool. The big deltas my buddy has built he is printing with flexible nylon as well as abs, pla, etc... not sure what he's running for extruders though. I am more into lasers these days, myself. faster, and destructive rather than additive hehe. let me tell you though, a 60W co2 laser through a pumpkin is one nasty smell and it'll stick in your nose hairs for days...
It would be cool to get a library of printable Mini parts going, like the Thingiverse... I printed some nice scale Minilites off of grabcad, and could 3d scan parts off of my Minis... hmmm if only i knew a guy to build the website... ![]()
|
|
Total posts: 185
Last post: Apr 14, 2015 Member since:Jan 18, 2011
|
Cars in Garage: 0
Photos: 10 WorkBench Posts: 0 |
my next one will be a Delta printer. Most deltas use a bowden extruder, which is hard if you want to use flexible filament. I want to build a large delta as they just look really cool
|
|
Total posts: 2876
Last post: Feb 17, 2017 Member since:Oct 13, 1999
|
Cars in Garage: 0
Photos: 0 WorkBench Posts: 0 |
|
unfortunately the parts that you can't print on a 3d printer make up most of the costs of a 3d printer... the motors, motor controllers, wiring, bar stock, bearings, extruder, build plate, etc... but yeah it's way easier to build one once you have one... a few hundred bucks for all the parts you can't print and you have a decent reprap.
I met a fellow - good friend now- at a hackerspace when the printers first came out- he had been building a 3d printer from a kit but one of the parts for the extruder broke and he was waiting for the replacement to be shipped... I say well its trivial to just print that part out... he says well I don't have a working printer. Surprise, I had one and was able to print him the part that night for him.
another friend has made a few repraps and is now building delta printers which are -I think- the way to go if printing with filament. If I build another printer it will be a DLP resin printer with much higher resolution.
|
|
Total posts: 185
Last post: Apr 14, 2015 Member since:Jan 18, 2011
|
Cars in Garage: 0
Photos: 10 WorkBench Posts: 0 |
well, most 3d printers are built to have all the replacement parts printed on a printer, so yes, i can actually print you the plastic parts you need
|
|
Total posts: 6909
Last post: Apr 13, 2024 Member since:Feb 26, 1999
|
Cars in Garage: 0
Photos: 0 WorkBench Posts: 0 |
|
NIk, can you print me a 3 d printer?
I can wait for it.
|
|
Total posts: 185
Last post: Apr 14, 2015 Member since:Jan 18, 2011
|
Cars in Garage: 0
Photos: 10 WorkBench Posts: 0 |
I am new to 3D printing, the responce about new products was concerning car audio from a few post up. When designing a new speakerbox, a few dimensions, and some 2D cad work is all thats needed.
|
|
Total posts: 2876
Last post: Feb 17, 2017 Member since:Oct 13, 1999
|
Cars in Garage: 0
Photos: 0 WorkBench Posts: 0 |
|
I can model parts in 3d and create stl files for print... to be honest though, it would probably have to be something interesting to me in order for me to get the modelling done, as right now I am pretty much occupied with other hobbies and chores ![]()
not a lot of parts on the mini Lend themselves to 3d printing, but there are certainly a few. Things like the fuel line clip sound interesting. I have modelled and printed the sun visor hinge of my ’80 mini.
im not sure how you 'develop' 'products' without the ability to do any 3d modelling.
Every so often I have an opportunity to have some 3d printed parts cast in aluminum and/or brass, but I havenot gotten any done yet, just a sampler.
|
|
Total posts: 185
Last post: Apr 14, 2015 Member since:Jan 18, 2011
|
Cars in Garage: 0
Photos: 10 WorkBench Posts: 0 |
im on oklahoma city. However, i have remotely designed boxes for people located in Denmark before, so l dont have to have someone local, just someone willing to do some measurements and test fitting
|
|
Total posts: 328
Last post: Jun 9, 2018 Member since:Sep 28, 2010
|
Cars in Garage: 1
Photos: 67 WorkBench Posts: 0 |
|
Where are you located?
|
|
Total posts: 185
Last post: Apr 14, 2015 Member since:Jan 18, 2011
|
Cars in Garage: 0
Photos: 10 WorkBench Posts: 0 |
I would love to offer some products for the classic mini. Only issue is without owning one, it is hard to test it. If someone has an idea for a product, and is willing to help test fit it, i can usually do it at cost. THis is how i normally develope new products
|
|
Total posts: 2492
Last post: Sep 25, 2019 Member since:Jan 9, 2003
|
Cars in Garage: 1
Photos: 2 WorkBench Posts: 3 |
|
rusted subframe bolts are the hardest material known to man...
|
|
Total posts: 185
Last post: Apr 14, 2015 Member since:Jan 18, 2011
|
Cars in Garage: 0
Photos: 10 WorkBench Posts: 0 |
I dont really have any 3d modeling skills, so if someone needs something, i will basically need a .stl file of it. THere are some good free design software, like good sketch up, or tinkercad, both i am just starting to figure out
|
|
Total posts: 3749
Last post: Mar 26, 2024 Member since:Jun 23, 2000
|
Cars in Garage: 1
Photos: 201 WorkBench Posts: 0 |
|
There are some nifty plastic fuel line clips that were used on later Rover cars.
They come in handy when adding a larger feed and a return line for FI, like a twinky or vtec.
There are not available any longer that I can find.
Terry
Found 23 Messages


