
| Orig. Posting Date | User Name | Edit Date |
| Feb 9, 2016 01:48PM | malsal | |
| Feb 9, 2016 10:09AM | Jemal | |
| Feb 9, 2016 12:43AM | 1963SV2 | |
| Feb 8, 2016 02:03PM | Jemal | |
| Feb 8, 2016 01:31PM | malsal | |
| Feb 8, 2016 01:20PM | Rosebud | |
| Feb 8, 2016 12:39PM | Rosebud | |
| Feb 8, 2016 12:28PM | Rosebud | Edited: Feb 8, 2016 12:34PM |
| Feb 8, 2016 11:53AM | Rosebud | |
| Feb 8, 2016 11:40AM | Rosebud | Edited: Feb 8, 2016 12:01PM |
| Feb 8, 2016 11:29AM | Rosebud | |
| Feb 8, 2016 11:01AM | Jemal | |
| Feb 8, 2016 07:40AM | malsal | |
| Feb 8, 2016 05:56AM | Cup Cake | |
| Feb 8, 2016 04:15AM | Dan Moffet | |
| Feb 7, 2016 11:39PM | jeg | Edited: Feb 8, 2016 01:51AM |
| Feb 7, 2016 09:08PM | Rosebud | Edited: Feb 8, 2016 11:04AM |

|
Total posts: 8382
Last post: Jan 13, 2022 Member since:Feb 7, 2006
|
Cars in Garage: 0
Photos: 0 WorkBench Posts: 0 |
|
"....This little adjustable push-rod gives you MUCH more flexibility for optimising the hydraulic stroke, that is matching the pedal travel with the available stroke from the master cylinder:.."
In a word.. KEEEERRRRRRAAAAPPPP.
Especially reprehensible from someone trying to make money from ignorance...
The only condition an extended push rod will cure is when wear at the clutch end of the mechanism is so serious that the slave piston runs out of travel.
The existence (or not) of this problem is easilly confirmed by removing the slave boot, having the assistant put the pedal to the floor and looking into the slave to see whether the piston hits the C clip retainer before full travel is achieved..
"...To check to see if the slave rod is the problem you can lengthen the length of the slave push rod by adding an acorn type nut to the end of the rod. " You can do as cupcake suggests but its easier to just get a torch and peek...
If you really want to keep your insulation/carpet but get more travel you can reduce he bore of the slave cylinder by using a stainless sleeve.... smaller bore = longer strioke..... Don't forget to reduce the piston diameter as well.
I'm told that here in Oz the Holden Torana actually used a similar slave to the Mini but with the reduced bore....
Good luck, Ian
My suggestion actually Ian not cupcake's. If you read my post fully i suggested he may have wear on the ball at the end of the arm and he could lengthen the slave rod while he had the arm removed for inspection.
If in doubt, flat out. Colin Mc Rae MBE 1968-2007.
Give a car more power and it goes faster on the straights,
make a car lighter and it's faster everywhere. Colin Chapman.
|
|
Total posts: 1087
Last post: Sep 15, 2023 Member since:Nov 3, 2011
|
Cars in Garage: 0
Photos: 0 WorkBench Posts: 0 |
|
"In a word.. KEEEERRRRRRAAAAPPPP"
REALLY??
If anyone thinks it's easier to sleeve a $40 slave cylinder, go for it!! I last adjusted my clutch in 2008 ... how's yours holding up??
Does anyone seriously think my primary motivation is "making money"? My answers and suggestions would be very different if that was so! I always try to tell folks how to do things WITHOUT necessarily BUYING things. Even for this little pushrod, I tell you how to make one! A 5/16ths Heim joint is about $6 at True Value Hardware in our small town, less than the cost of the standard pushrod!
And it absolutely does work! Yes it makes up for "wear", and there are about 5 places that do wear! No adjustability other than the stop bolt in the clutch cover is provided by the original set-up. Yes, you CAN choose to replace ALL the linkage, arms, clevis pins, throwout plunger, even the wok itself if the plunger wobbles in it! That's how we'd make some money!
It seems pretty obvios, but here's how to "lengthen" the original pushrod to move the slave piston into it's bore so it doesn't bottom. OK, simply remove the upper clevis pin, slip the pushrod out of the boot, slip a 5/16th nut over the end (can be 'accorn' or just a regular 2 cent nut, or even an actual 1 cent coin would probably work!!). push the piston in a little ways (yes you can do this by hand, the return spring does, and it's not that heavy, you can temporarily remove the boot), so you can re-install the clevis pin, and walla, your pushrod is a little longer! If you have enough clutch travel now, you'll know the adjustable push rod WILL work, so you won't even be risking the six bucks!!
|
|
Total posts: 1716
Last post: Oct 18, 2020 Member since:Oct 18, 2011
|
Cars in Garage: 0
Photos: 0 WorkBench Posts: 0 |
"....This little adjustable push-rod gives you MUCH more flexibility for optimising the hydraulic stroke, that is matching the pedal travel with the available stroke from the master cylinder:.."
In a word.. KEEEERRRRRRAAAAPPPP.
Especially reprehensible from someone trying to make money from ignorance...
The only condition an extended push rod will cure is when wear at the clutch end of the mechanism is so serious that the slave piston runs out of travel.
The existence (or not) of this problem is easilly confirmed by removing the slave boot, having the assistant put the pedal to the floor and looking into the slave to see whether the piston hits the C clip retainer before full travel is achieved..
"...To check to see if the slave rod is the problem you can lengthen the length of the slave push rod by adding an acorn type nut to the end of the rod. " You can do as cupcake suggests but its easier to just get a torch and peek...
If you really want to keep your insulation/carpet but get more travel you can reduce he bore of the slave cylinder by using a stainless sleeve.... smaller bore = longer strioke..... Don't forget to reduce the piston diameter as well.
I'm told that here in Oz the Holden Torana actually used a similar slave to the Mini but with the reduced bore....
Good luck, Ian
|
|
Total posts: 1087
Last post: Sep 15, 2023 Member since:Nov 3, 2011
|
Cars in Garage: 0
Photos: 0 WorkBench Posts: 0 |
|
Yes! Look at mine in the video... I CUT the threaded portion of the plunger off completely, and nothing on the inside will be affected!
And the problem IS with the stop bolt! Too much freeplay means much of your pedal travel is 'wasted' taking out that freeplay! You just need a tiny bit so that your throwout bearing is not loaded onto the diaphram.... the pre Verto throwout bearing is NOT designed to spin at engine speed non-stop! I think in the second video clip, I show operating my clutch pedal with two fingers. The freeplay is gone when that pedal only moves about half an inch.
|
|
Total posts: 8382
Last post: Jan 13, 2022 Member since:Feb 7, 2006
|
Cars in Garage: 0
Photos: 0 WorkBench Posts: 0 |
|
To check to see if the slave rod is the problem you can lengthen the length of the slave push rod by adding an acorn type nut to the end of the rod. You will need to pull the pivot clevis pin or take of the slave to do this. Yes you can throw away the stop nuts if you so please. I know you probably have a new clutch arm installed but there are a few of them around that are not hardened correctly and wear out at a much greater rate, it is easy enough to pull off and you could lengthen the slave rod at the same time.
If in doubt, flat out. Colin Mc Rae MBE 1968-2007.
Give a car more power and it goes faster on the straights,
make a car lighter and it's faster everywhere. Colin Chapman.
|
|
Total posts: 1368
Last post: Jul 20, 2023 Member since:Jul 15, 2008
|
Cars in Garage: 0
Photos: 117 WorkBench Posts: 1 |
|
.... and don't worry about the stop nuts, just take them off and throw them away.
//cooperroadmini.com/2013/05/06/by-special-request-clutch-adjustment/
Questions for Jemal:
1) In your video you mentioned that a nut or spacer can be used to lengthen the slave cylinder pushrod. I assume that the spacing nut is to be placed on the inboard side of the pushrod, correct? Do I need to disassemble the slave cylinder for access to the inboard side of the pushrod or does the pushrod unscrew from the cylinder or just pull out.
2) Did I understand you to say I can remove and toss the throw-out stop adjustment locknut and the dome-shaped 15/16" stop nut?
|
|
Total posts: 1368
Last post: Jul 20, 2023 Member since:Jul 15, 2008
|
Cars in Garage: 0
Photos: 117 WorkBench Posts: 1 |
|
+1 to what Jeg wrote...
ESPECIALLY about the "Clean".
I'm trying to get it dirty, but chasing down these gremlins that seem forever to be popping up is keeping Rosebud off the road way more then I care for.
|
|
Total posts: 1368
Last post: Jul 20, 2023 Member since:Jul 15, 2008
|
Cars in Garage: 0
Photos: 117 WorkBench Posts: 1 |
|
It's been a few weeks since I put up this video of the pre-Verto clutch adjustment on my own car (your diagram was for the Verto type).... and don't worry about the stop nuts, just take them off and throw them away.
//cooperroadmini.com/2013/05/06/by-special-request-clutch-adjustment/
This little adjustable push-rod gives you MUCH more flexibility for optimising the hydraulic stroke, that is matching the pedal travel with the available stroke from the master cylinder:
//www.minimania.com/part/C-13H396/Fully-Adjustable-Stainless-Steel-Slave-Pushrod
You can easily make one with a hadrware store 5/16 Heim Joint and a bolt and jam-nut if your time is worth less than the cost of the little stainless steel one!
I think that adjustable push-rod for the slave cylinder is just what I need to give me additional travel at the throw-out shaft. I just ordered one, thanks!
Question: I also orderd another throw-out stop nut as I've done a pretty good job of rounding off the original. Can I simply unscrew and remove the existing throw-out stop nut without dislodging something on the other end of the shaft inside the flywheel housing?
|
|
Total posts: 1368
Last post: Jul 20, 2023 Member since:Jul 15, 2008
|
Cars in Garage: 0
Photos: 117 WorkBench Posts: 1 |
|
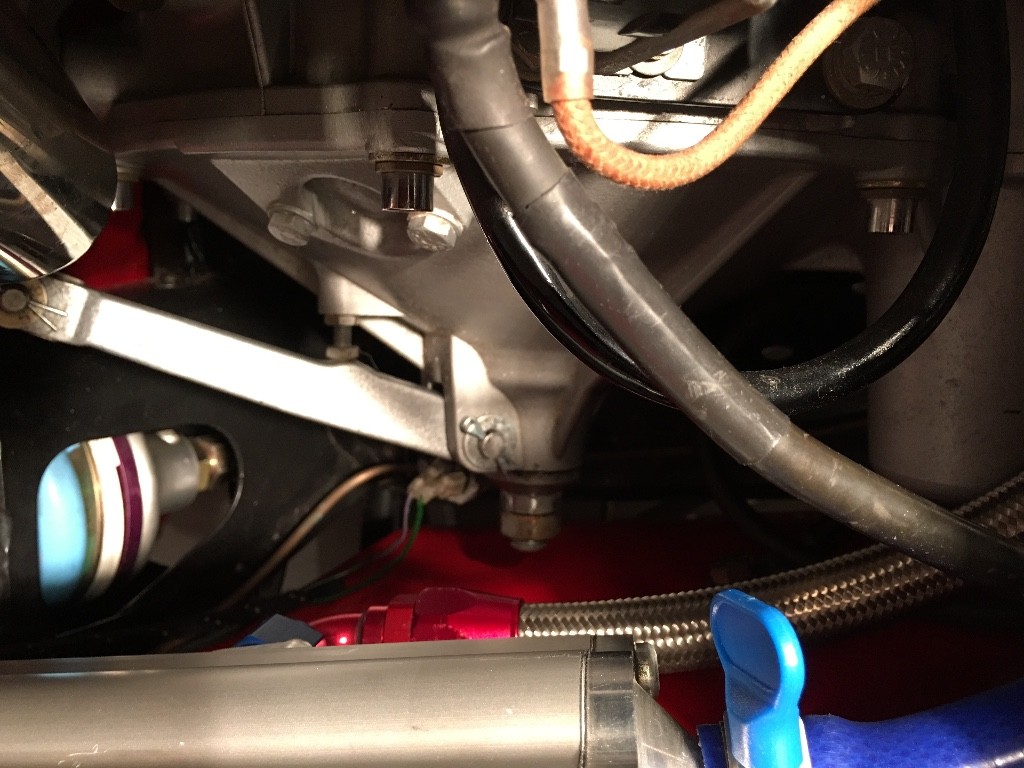
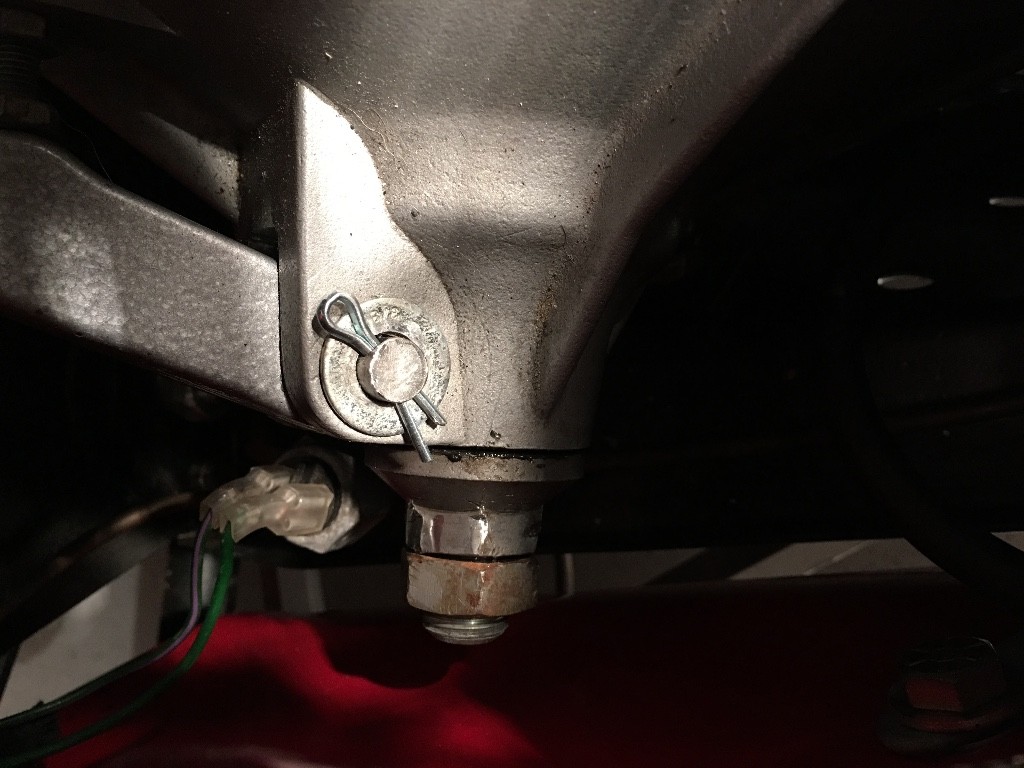
The stop nut in the picture looks way too close to the clutch cover to me which would limit your pedal throw. Adjust those two nuts back and out of the way and do the clutch adjustment Jeg described then adjust the stop nuts to spec. If you are hitting the carpet and the clutch will still not release you may want to look for wear on the arm especially on the ball end. Also check all the pivot points it does not take much wear to loose clutch adjustment as you have found out, your's may have been at the "tipping" point when you installed the carpet and soundproofing.
The throw-out stop nut is 6.5mm from the flywheel housing boss like the books says and I don't suspect wear is an issue as everything is new or rebuilt w/ very low mileage. My clutch peddle was indeed at the tipping point before the carpet—the clutch engaged an inch or two off the floor. With the addition of the carpet I lost at least an inch of travel. Hence, the problem.
|
|
Total posts: 1368
Last post: Jul 20, 2023 Member since:Jul 15, 2008
|
Cars in Garage: 0
Photos: 117 WorkBench Posts: 1 |
|
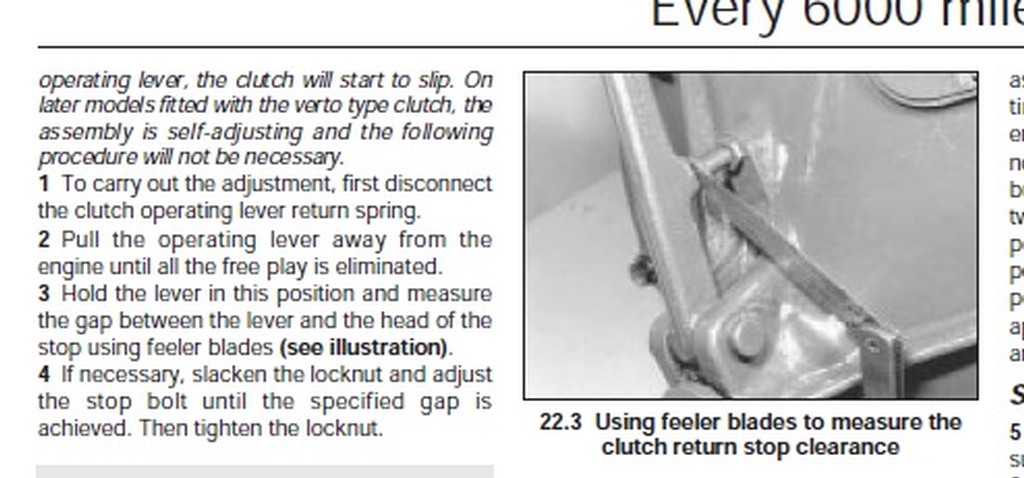
Sometimes a picture is worth a thousand words.
It sounds like you need to adjust the return stop. Here's what I do - Take up the slack in the pedal assembly (or lever the arm outwards until you meet the diaphragm spring resistance - return spring removed if necessary), loosen the locknut and adjust the 7/16" UNF screw such that it just touches the boss on the arm, screw inwards toward the cover 1 flat and snug the locknut.
Edit: Of course, you could always remove a strip of insulating/deadening material from under the pedal...
By the way, it's too clean in there...
It seems to me that the return stop adjustment is not my problem—the return stop adjustment simply limits the free-play of the arm. I have too much free-play. I think my problem lies w/ the throw-out stop adjustment. Yes?
|
|
Total posts: 1368
Last post: Jul 20, 2023 Member since:Jul 15, 2008
|
Cars in Garage: 0
Photos: 117 WorkBench Posts: 1 |
|
If you put layers of material on the floor under the pedal you'll reduce the travel.
Yep.
|
|
Total posts: 1087
Last post: Sep 15, 2023 Member since:Nov 3, 2011
|
Cars in Garage: 0
Photos: 0 WorkBench Posts: 0 |
|
It's been a few weeks since I put up this video of the pre-Verto clutch adjustment on my own car (your diagram was for the Verto type).... and don't worry about the stop nuts, just take them off and throw them away.
//cooperroadmini.com/2013/05/06/by-special-request-clutch-adjustment/
This little adjustable push-rod gives you MUCH more flexibility for optimising the hydraulic stroke, that is matching the pedal travel with the available stroke from the master cylinder:
//www.minimania.com/part/C-13H396/Fully-Adjustable-Stainless-Steel-Slave-Pushrod
You can easily make one with a hadrware store 5/16 Heim Joint and a bolt and jam-nut if your time is worth less than the cost of the little stainless steel one!
|
|
Total posts: 8382
Last post: Jan 13, 2022 Member since:Feb 7, 2006
|
Cars in Garage: 0
Photos: 0 WorkBench Posts: 0 |
|
The stop nut in the picture looks way too close to the clutch cover to me which would limit your pedal throw. Adjust those two nuts back and out of the way and do the clutch adjustment Jeg described then adjust the stop nuts to spec. If you are hitting the carpet and the clutch will still not release you may want to look for wear on the arm especially on the ball end. Also check all the pivot points it does not take much wear to loose clutch adjustment as you have found out, your's may have been at the "tipping" point when you installed the carpet and soundproofing.
If in doubt, flat out. Colin Mc Rae MBE 1968-2007.
Give a car more power and it goes faster on the straights,
make a car lighter and it's faster everywhere. Colin Chapman.
|
|
Total posts: 10335
Last post: Aug 19, 2016 Member since:May 13, 2001
|
Cars in Garage: 0
Photos: 0 WorkBench Posts: 0 |
|
If you put layers of material on the floor under the pedal you'll reduce the travel.
The power of accurate observation is commonly called cynicism by those who have not got it. G.B.S. Sarcasm is the lowest form of wit. Oscar Wilde
//www.cupcakecooper.ca/
|
|
Total posts: 9547
Last post: Apr 26, 2024 Member since:Aug 14, 2002
|
Cars in Garage: 0
Photos: 0 WorkBench Posts: 0 |
|
+1 to what Jeg wrote...
ESPECIALLY about the "Clean".
.
"Hang on a minute lads....I've got a great idea."
|
|
Total posts: 7075
Last post: Nov 5, 2019 Member since:Apr 25, 2000
|
Cars in Garage: 0
Photos: 0 WorkBench Posts: 0 |
|

Sometimes a picture is worth a thousand words.
It sounds like you need to adjust the return stop. Here's what I do - Take up the slack in the pedal assembly (or lever the arm outwards until you meet the diaphragm spring resistance - return spring removed if necessary), loosen the locknut and adjust the 7/16" UNF screw such that it just touches the boss on the arm, screw inwards toward the cover 1 flat and snug the locknut.
Edit: Of course, you could always remove a strip of insulating/deadening material from under the pedal...
By the way, it's too clean in there...
 The peasants are revolting...
 ![]()
"Gone with the Wind" - a brief yet moving vignette concerning lactose intolerance
|
|
Total posts: 1368
Last post: Jul 20, 2023 Member since:Jul 15, 2008
|
Cars in Garage: 0
Photos: 117 WorkBench Posts: 1 |
|

After having just put down a layer of Dynamat, carpet and pad, I realized I lost considerable throw on my clutch peddle. So, I opened the Haynes Manual and followed the procedure for “clutch throw-out stop adjustment” hoping to find some additional throw. I adjusted the throw-out nut to spec and returned to the cabin to check the peddle and it seemed like I lost throw. So I returned the throw-out stop nut to it’s original position and re-checked the clutch peddle, and I swear I lost even more throw… to the point where the engine will no longer turn over with the trans in gear and the clutch peddle mashed down to the floor. What the heck??
I’m coming dangerously close to rounding off the throw-out stop nut, so I thought I’d put the wrench down and check w/ you folks. Any recommendation appreciated.
ref: Transmission and clutch professionally rebuilt 1.5k miles ago. No other changes to the trans, clutch or clutch hydraulics. No leaks, no other alterations.


