
| Orig. Posting Date | User Name | Edit Date |
| May 21, 2016 07:39AM | dogscarf | |
| May 18, 2016 01:44PM | Jemal | |
| May 14, 2016 12:43PM | dogscarf | |
| May 13, 2016 04:34AM | malsal | |
| May 13, 2016 03:12AM | jedduh01 | |
| May 13, 2016 01:30AM | nkerr | |
| May 12, 2016 06:22PM | Cheleker | |
| May 12, 2016 06:17PM | dogscarf |

|
Total posts: 367
Last post: Jul 19, 2022 Member since:Jun 18, 2014
|
Cars in Garage: 0
Photos: 0 WorkBench Posts: 0 |
Jemel,...great advice. Thanks! I rana die down the threads of the existing banjo bolt to clean them up and switched left to right line and it seems to work now. The rerouting idea sounds good too. Thanks!
|
|
Total posts: 1087
Last post: Sep 15, 2023 Member since:Nov 3, 2011
|
Cars in Garage: 0
Photos: 0 WorkBench Posts: 0 |
|
I just sent this explanation to another customer:
This is Jemal.... we spoke years ago when I built your 1275HP engine, I remember it well. Ed asked me about your brake lines at the pressure switch, and I thought I'd share my experience. I replaced all the brake lines on my 66 Cooper S and had the same trouble. I discovered that the thread on the banjo bolt (that accepts the pressure switch and threads through the 3-way connector into the brake flex-hose) was a bit too long and was bottoming out in the hose before the two copper sealing washers could tighten up around the "banjo" like connection of the 3-way adapter. I've seen inconsistent depths into the hose, if using a steel-braided brake hose in particular.
My solution was to grind about .050" off the thread of the banjo bolt, such that it does not bottom out in the hose. That allows the sealing washers to do their job.
If that's NOT the problem in your case, consider a simple modification to an under-dash conventional brake light switch. Simply route the wires under the dash, mount the switch on an 'L' bracket above the brake pedal, plug the end of the banjo bolt and eliminate the hydraulic switch altogether. Here's the switch:
//www.minimania.com/part/13H3735/Austin-Mini-Late-Model-Brake-Light-Switch
NOTE: I have not seen the braided hose kits supplied with a right and left hose.... just two identical hoses. I had this trouble even when using stock rubber hoses. Also, be very careful with that 1" socket! The fittings and threads are relatively tiny!
|
|
Total posts: 367
Last post: Jul 19, 2022 Member since:Jun 18, 2014
|
Cars in Garage: 0
Photos: 0 WorkBench Posts: 0 |
AAHHHHAAAAAAAAAAA!!! Yes indeed, that was the problem. I ordered a new pipe piece that threads into the 2-way brake union and new washers. As far as switching the brake hoses it is way too much work. Removal of grill and driving lights to get under the radiator etc etc....I will just replace the right side with the old one. Figures,...... it was a 50/50 chance and it went the wrong way upon installation. Thanks!
Dogscarf
1968 Morris Cooper S
Dogscarf
1968 Morris Cooper S
|
|
Total posts: 8382
Last post: Jan 13, 2022 Member since:Feb 7, 2006
|
Cars in Garage: 0
Photos: 0 WorkBench Posts: 0 |
|
X 2 what Jed said. I had the same problem when installing braided lines and converting to discs it bottomed out before everything was tight. I could have got away with using two copper washers but did not like that option so in my case i removed the brass 3 way fitting and filed just a small area of brass so the hose and fitting would snug down tight.
If in doubt, flat out. Colin Mc Rae MBE 1968-2007.
Give a car more power and it goes faster on the straights,
make a car lighter and it's faster everywhere. Colin Chapman.
|
|
Total posts: 1649
Last post: Jun 22, 2022 Member since:Apr 30, 2009
|
Cars in Garage: 0
Photos: 0 WorkBench Posts: 0 |
|
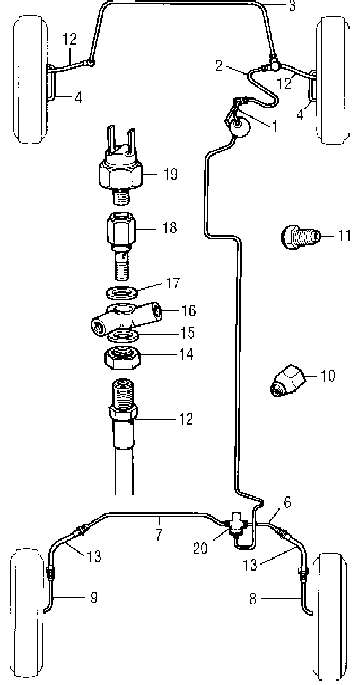
The brake switch - screws into a Fitting that fits into the Banjo. With copper seals to make it seal
The front brake hoses -For stainless hoses its noted that one side is drilled and tapped DEEPER than the other line so this fitting will screw down and compress properly. Possible it is bottoming out - and not sealing by copper compression seals and has been stripped out of the end of the brake hose,.
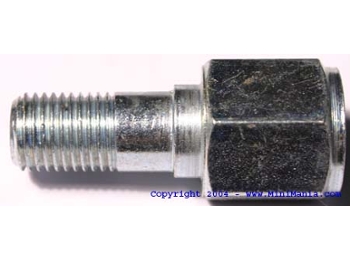
Note: Upon receipt of your braided hose set, please inspect the subframe ends of the front hoses. One of the two hoses will be drilled and tapped more deeply than the other. The deep one needs to be used on the right side of the car, where the banjo bolt threads in.
The front brake hoses -For stainless hoses its noted that one side is drilled and tapped DEEPER than the other line so this fitting will screw down and compress properly. Possible it is bottoming out - and not sealing by copper compression seals and has been stripped out of the end of the brake hose,.
Note: Upon receipt of your braided hose set, please inspect the subframe ends of the front hoses. One of the two hoses will be drilled and tapped more deeply than the other. The deep one needs to be used on the right side of the car, where the banjo bolt threads in.
|
|
Total posts: 654
Last post: Dec 20, 2017 Member since:Sep 24, 2011
|
Cars in Garage: 0
Photos: 0 WorkBench Posts: 0 |
|
a banjo type joint uses a copper washer and seals under compression, so if the threads are stripped that will definitely lead to a leak
If you hadn't touched that, then, maybe a DPO had cross threaded it and left that little easter egg for you to find, eventually, like this.
If you remove the assembly it might be possible to repair it with a heli-coil.
Copper washers should be replaced each time, but if in a bind you can "fluff up" a used one by heating it with a propane torch until it changes color, then cool and it will be softened again for re-use.
|
|
Total posts: 10330
Last post: Jan 27, 2021 Member since:Dec 3, 2002
|
Cars in Garage: 0
Photos: 0 WorkBench Posts: 0 |
|
Did you just replace any of the associated parts?
|
|
Total posts: 367
Last post: Jul 19, 2022 Member since:Jun 18, 2014
|
Cars in Garage: 0
Photos: 0 WorkBench Posts: 0 |
Fellow Minioids, I have been in the process of trying to bleed my brake on my 1968 Morris Cooper S. Anyway, I have a massive leak that pissed out about a pint of fluid onto my garage floor. It took a while to find it as it was dripping off of the right side subframe rail. I removed the power booster and horns that were underneath. It turns out it is at the brake light switch or more correctly the banjo bolt after the switch. I put a 1" socket on it ant tried to tighten to no avail. It spins in both directions quite freely. I think that it must be stripped. It does have the copper washers in the fitting. Thoughts?
Frustrated in Wisconsin.
Frustrated in Wisconsin.


