
| Orig. Posting Date | User Name | Edit Date |
| May 23, 2015 02:04PM | MisterCinders | |
| May 20, 2015 06:10AM | MisterCinders | |
| May 2, 2015 05:43AM | Dan Moffet | |
| May 1, 2015 12:06PM | jchealey | |
| May 1, 2015 11:49AM | MisterCinders | |
| May 1, 2015 11:47AM | jchealey | |
| May 1, 2015 11:33AM | MisterCinders | Edited: May 1, 2015 11:33AM |
| Apr 29, 2015 06:48PM | MisterCinders | |
| Apr 29, 2015 05:21PM | jchealey | |
| Apr 29, 2015 03:57PM | jeg | |
| Apr 29, 2015 10:20AM | MisterCinders | |
| Apr 29, 2015 08:23AM | jchealey | |
| Apr 29, 2015 06:14AM | MisterCinders | |
| Apr 29, 2015 06:07AM | MisterCinders | |
| Apr 28, 2015 07:50PM | Minimike1 | |
| Apr 28, 2015 10:57AM | Spitz | Edited: Apr 28, 2015 10:59AM |
| Apr 28, 2015 10:44AM | Dan Moffet | |
| Apr 28, 2015 10:35AM | Dan Moffet | Edited: Apr 28, 2015 10:39AM |
| Apr 28, 2015 10:22AM | Dan Moffet | Edited: Apr 28, 2015 10:42AM |
| Apr 28, 2015 09:12AM | MisterCinders |
Found 28 Messages

|
Total posts: 26
Last post: Jul 20, 2020 Member since:Nov 21, 2013
|
Cars in Garage: 0
Photos: 0 WorkBench Posts: 0 |
After a week of wrestling with the tuning, she runs . . . superbly.
Seriously, you can feel the added power, and the revs are silky smooth. The booming exhaust note (through my 1.75" LCB + 2-box pipe) is . . . sexy.

|
|
Total posts: 26
Last post: Jul 20, 2020 Member since:Nov 21, 2013
|
Cars in Garage: 0
Photos: 0 WorkBench Posts: 0 |
Here's an update. After plenty of effort, which including needing to replace the speedo cable (the absolute worst task on the Mini) and then replacing the radiator I ham-handedly cracked when trying to wrestle it back in (the second worst task on the Mini), we have this . . .

Grinding and "adjusting" the edge of the bulkhead gave me still only nominal clearance around that float bowl, but I have 2 of the 3 engine steadies mentioned in this thread (top left and bottom right). Just in case, I will rig a simple fire-suppression system - basically run a hose from an extinguisher in the cabin into the bay through the console opening. That way, should that bowl ever crack (God forbid), I can at least put the fire out in time to have something left to put on the flatbed.
Got a pair of No. 5 needles in there, and have it tuned for a nice steady idle and smooth revs. Once I rig up the extinguisher, I can start testing her under load around the neighborhood.
Thanks much for all the help in this thread.
|
|
Total posts: 9546
Last post: Apr 26, 2024 Member since:Aug 14, 2002
|
Cars in Garage: 0
Photos: 0 WorkBench Posts: 0 |
|
Here's one version of the right-front engine steady.
.
"Hang on a minute lads....I've got a great idea."
|
|
Total posts: 358
Last post: Feb 20, 2020 Member since:Jul 20, 2013
|
Cars in Garage: 0
Photos: 0 WorkBench Posts: 0 |
There is a left hand and right hand. If you look at the brackets and hold them up to the transmission from underneath you can figure out where they go. Then you drill a hole into the front frame and bolt it in.
Jerry
|
|
Total posts: 26
Last post: Jul 20, 2020 Member since:Nov 21, 2013
|
Cars in Garage: 0
Photos: 0 WorkBench Posts: 0 |
Where do those bottom steadies attach though? I was looking through my engine bay trying to figure out where another steady might go down there, and I am stumped.
|
|
Total posts: 358
Last post: Feb 20, 2020 Member since:Jul 20, 2013
|
Cars in Garage: 0
Photos: 0 WorkBench Posts: 0 |
Jerry
|
|
Total posts: 26
Last post: Jul 20, 2020 Member since:Nov 21, 2013
|
Cars in Garage: 0
Photos: 0 WorkBench Posts: 0 |
Where do you have that third engine steady? Dog-bone on the flywheel side, top arm on the radiator bracket and . . . . ?
|
|
Total posts: 26
Last post: Jul 20, 2020 Member since:Nov 21, 2013
|
Cars in Garage: 0
Photos: 0 WorkBench Posts: 0 |
I do have heat shields in place, just no spacers. I have about an 1/8" between the bowl and the bulkhead/MC. Now to fab up some filter plates.
|
|
Total posts: 358
Last post: Feb 20, 2020 Member since:Jul 20, 2013
|
Cars in Garage: 0
Photos: 0 WorkBench Posts: 0 |
Jerry
|
|
Total posts: 7075
Last post: Nov 5, 2019 Member since:Apr 25, 2000
|
Cars in Garage: 0
Photos: 0 WorkBench Posts: 0 |
|
If you haven't them yet, don't forget the heat shields -
//www.minimania.com/part/MSSK1004/Hs4-Twin-Carb-Heatshield-Kit---Black
//www.minimania.com/part/MSSK1006/Heat-Shield-Kit-S-s-Hs4
 The peasants are revolting...
 ![]()
"Gone with the Wind" - a brief yet moving vignette concerning lactose intolerance
|
|
Total posts: 26
Last post: Jul 20, 2020 Member since:Nov 21, 2013
|
Cars in Garage: 0
Photos: 0 WorkBench Posts: 0 |
I am in Chicago. How much clearance did you end up having in that build? So far I can get the carb to fit, but clearances are super tight. Given the issue is at the fuel bowl and sits above the exhaust header, the potential for disaster is pretty high. What's a good threshold amount of clearance?
|
|
Total posts: 358
Last post: Feb 20, 2020 Member since:Jul 20, 2013
|
Cars in Garage: 0
Photos: 0 WorkBench Posts: 0 |
Fitting is still tight but there is clearance. Works great but then I have a 1380 vs a 1275, might make a difference. I also suggest mounting an air/fuel flow meter for tuning. I could not have made it work without it.
Your profile does not say were you live but if around NOrthern California, there is a British car show on May 17th in Dixon CA. There will be lots of minis and about 290 other British cars. //www.ubscc.org/CarShow.htm
You can see the conversion in person there!
Jerry
|
|
Total posts: 26
Last post: Jul 20, 2020 Member since:Nov 21, 2013
|
Cars in Garage: 0
Photos: 0 WorkBench Posts: 0 |
Can anyone post a pic of the offset baseplate? Although, I can make one based on the actual positioning, I'd like to know what the standard offset looks like. For instance, if it won't accomodate my situation, I'll have to plan on using some custom filter plates long-term.
|
|
Total posts: 26
Last post: Jul 20, 2020 Member since:Nov 21, 2013
|
Cars in Garage: 0
Photos: 0 WorkBench Posts: 0 |
A wild guess: would swapping fuel bowls make any difference?
The float bowl in question does have a pretty heavy casting flange, compared to the other one. So this actually may yield a few more mm of clearance.
I tried adjusting the radiator steady last night, but that didn't really get me anywhere. I think I can grind a bit more around the base of the MC to pick up a bit more clearance. THen I could fab up some offset filter baseplates to clear the MC up top. That may get me in the ballpark. If so, I'll order some actual offset filters. If not, I can look into changing out that MC for something leaner.
|
|
Total posts: 6909
Last post: Apr 13, 2024 Member since:Feb 26, 1999
|
Cars in Garage: 0
Photos: 0 WorkBench Posts: 0 |
|
I was going to suggest looking at the yellow band brake m/c. Not sure you won't have to do some other tweeks to the brakes if you use that. but it's tall and likely out of the way.
|
|
Total posts: 13978
Last post: Jan 15, 2024 Member since:Jan 22, 2003
|
Cars in Garage: 4
Photos: 381 WorkBench Posts: 1 |
|
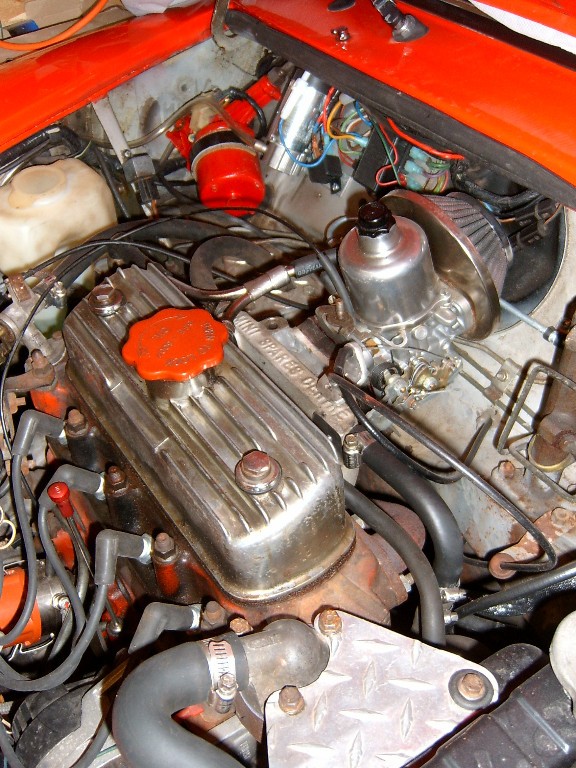
I have twin HS4 fitted to a LHD MkIV......no space issues....although my master is the tandem type. Looks like the same manifold
Not too much carb at all.....I'm running great with #5 needles.....nice idle also
"Everybody should own a MINI at some point, or you are incomplete as a human being" - James May
"WET COOPER", Partsguy1 (Terry Snell of Penticton BC ) - Could you send the money for the unpaid parts and court fees.
Ordered so by a Judge
|
|
Total posts: 9546
Last post: Apr 26, 2024 Member since:Aug 14, 2002
|
Cars in Garage: 0
Photos: 0 WorkBench Posts: 0 |
|
A wild guess: would swapping fuel bowls make any difference?
.
"Hang on a minute lads....I've got a great idea."
|
|
Total posts: 9546
Last post: Apr 26, 2024 Member since:Aug 14, 2002
|
Cars in Garage: 0
Photos: 0 WorkBench Posts: 0 |
|
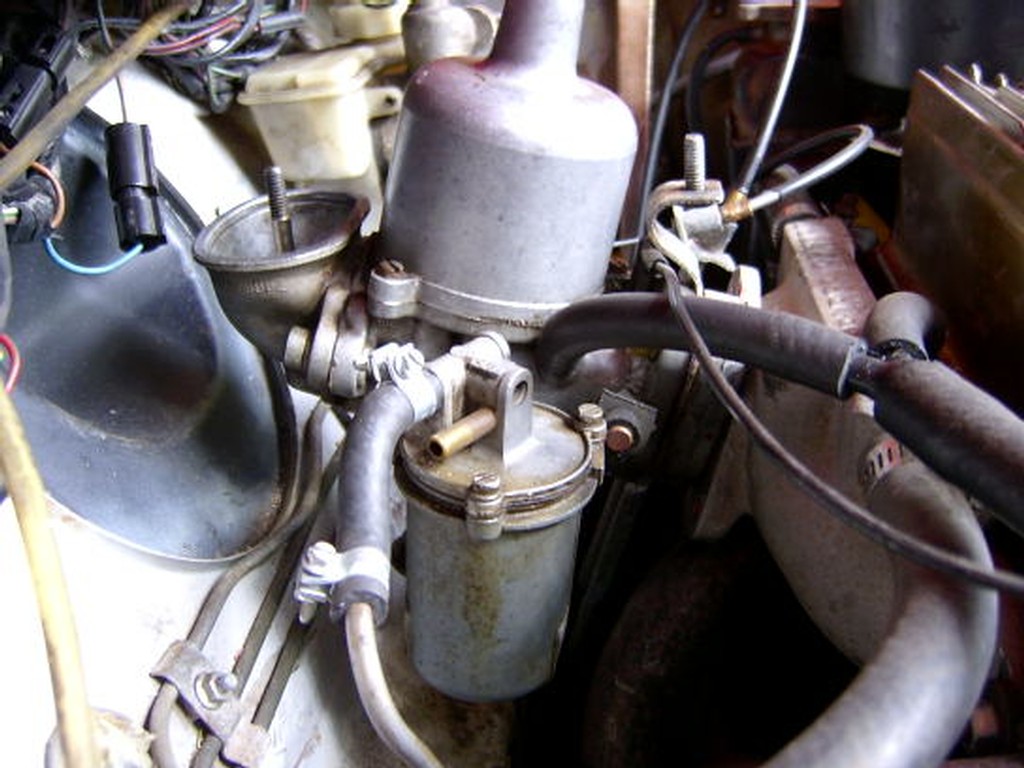
Here's what the other end of a 1275 transplant looks like. You can see the bottom of the split-system brake master cylinder has no pale under it. (Factory original, judging from the patina of age.) and the clearance between the engine and the firewall cross-member. My car was originally built with a 998cc lump, so I don't know if the engine mounts were moved forward in the transplant. Judging from some other aspects of that work, I strongly doubt it. The car, BTW is a mid 1980's body, so the crossmember may be a bit different than yours, but not where the master cylinders sit. The carb is a single HIF44, with spacer and the Minispares inlet manifold. There's about 1/4" or so between the carb and the crossmember and brake lines.
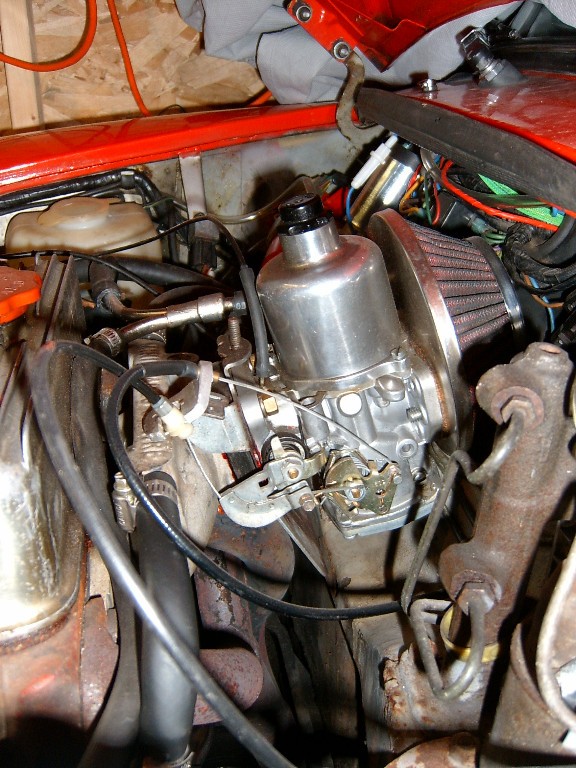
For comparison I have added a picture of a single HS4 on the same manifold
.
"Hang on a minute lads....I've got a great idea."
|
|
Total posts: 9546
Last post: Apr 26, 2024 Member since:Aug 14, 2002
|
Cars in Garage: 0
Photos: 0 WorkBench Posts: 0 |
|
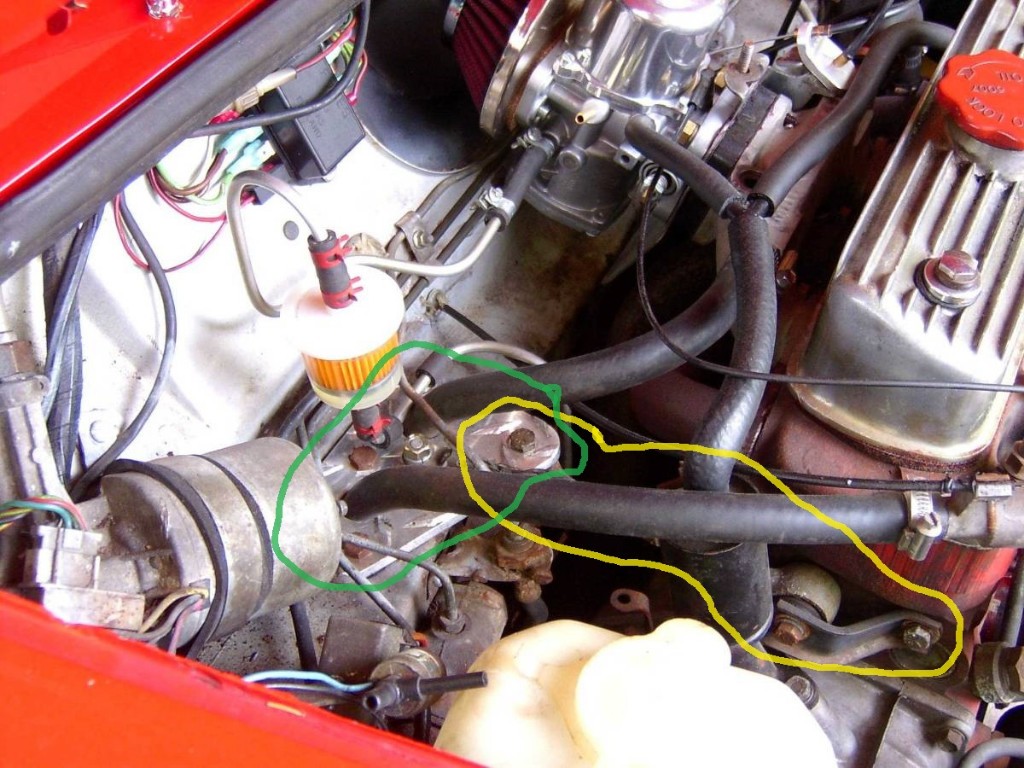
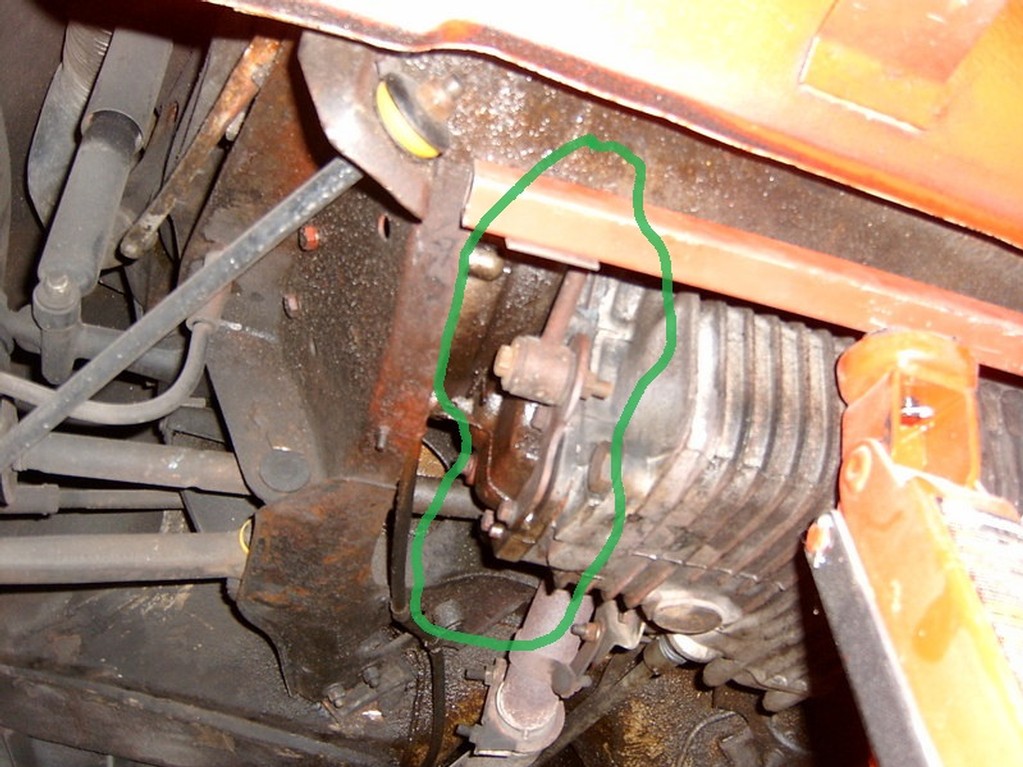
The 'dogbone' stock engine steady is on the clutch end of the engine - outlined in yellow in the attached photo.The plate under your master cylinders should be on the right side of the car in the location outlined in green. My car was built as a leftie, and it had that plate here (but it was broken so I had to fabricate my own out of aluminum checker-plate). In my car, the heater hoses pass through the plate, as it was built originally.
You should NOT have that plate under the master cylinders. Maybe some thin shims or similar to match the thickness - there's another thread somewhere about brakes locking up because it wasn't shimmed here roperly.
Becaus you do have that plate there, it is causing some confusion - other responders think you have an engine steady at the rad end, but that plate won't work on the rad engine - the water pump etc. is in the way of putting a dog-bone there. Rad-end steadies typically are positioned above the head, connecting to the head at the thermostat housing location.
EDIT: I now see you do have an engine steady on the front of your engine.
.
"Hang on a minute lads....I've got a great idea."
|
|
Total posts: 26
Last post: Jul 20, 2020 Member since:Nov 21, 2013
|
Cars in Garage: 0
Photos: 0 WorkBench Posts: 0 |
"Block one" = dog-bone on the right then? Sorry to be dense.
Found 28 Messages


