

|
Total posts: 440
Last post: May 2, 2017 Member since:Sep 24, 2013
|
Cars in Garage: 0
Photos: 0 WorkBench Posts: 0 |

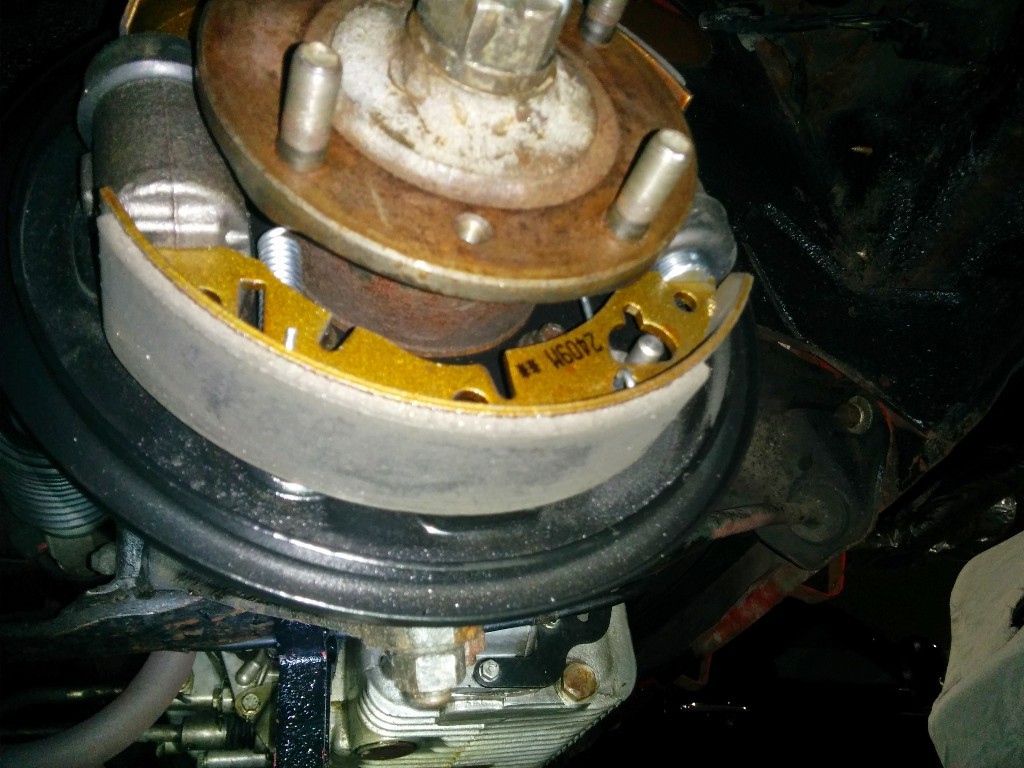
Front Brake Images
'73 Innocenti Mini (non-export)
Morristown, NJ
|
|
Total posts: 440
Last post: May 2, 2017 Member since:Sep 24, 2013
|
Cars in Garage: 0
Photos: 0 WorkBench Posts: 0 |
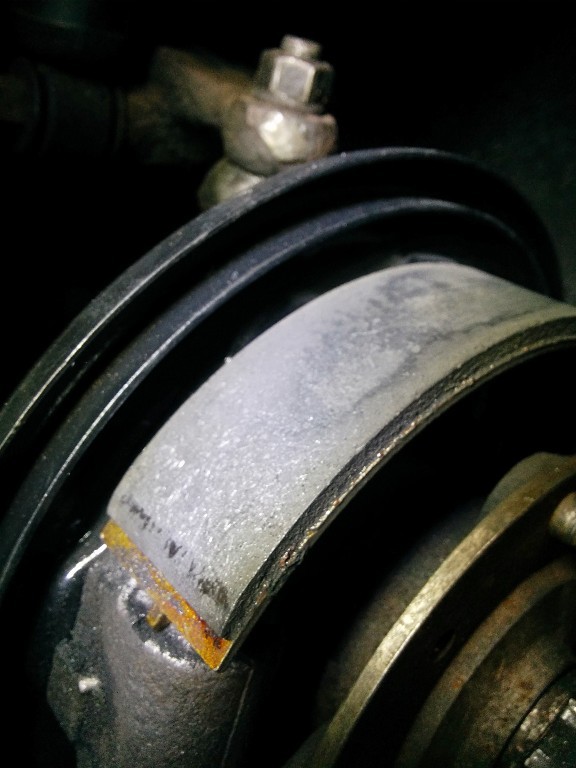
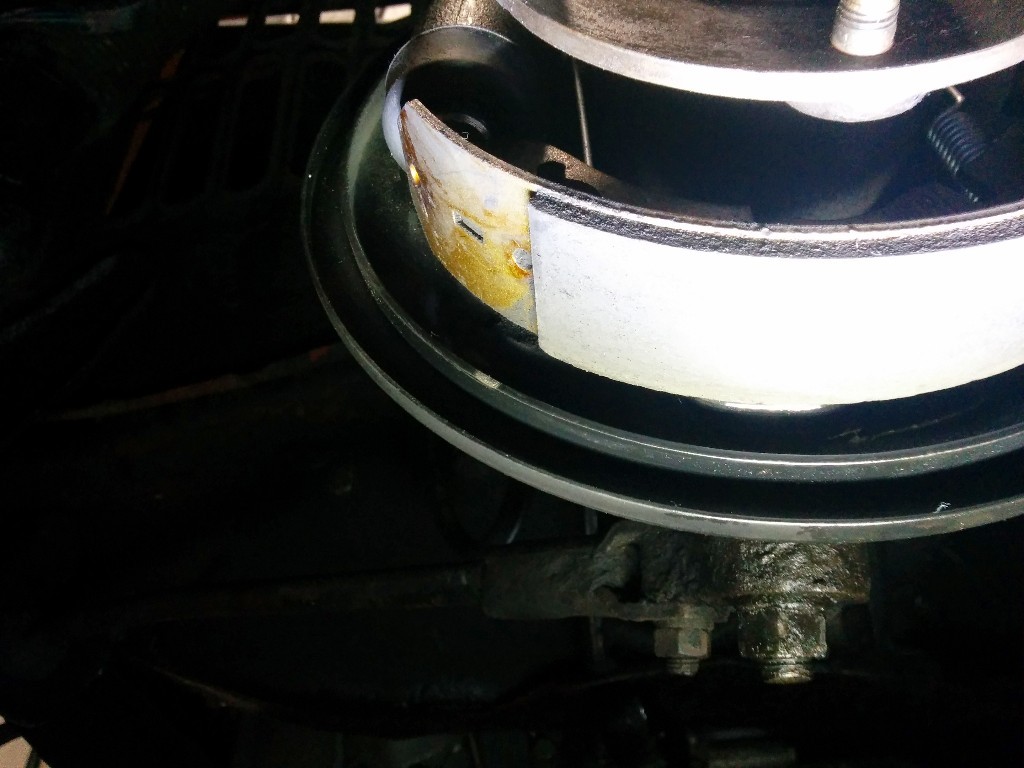
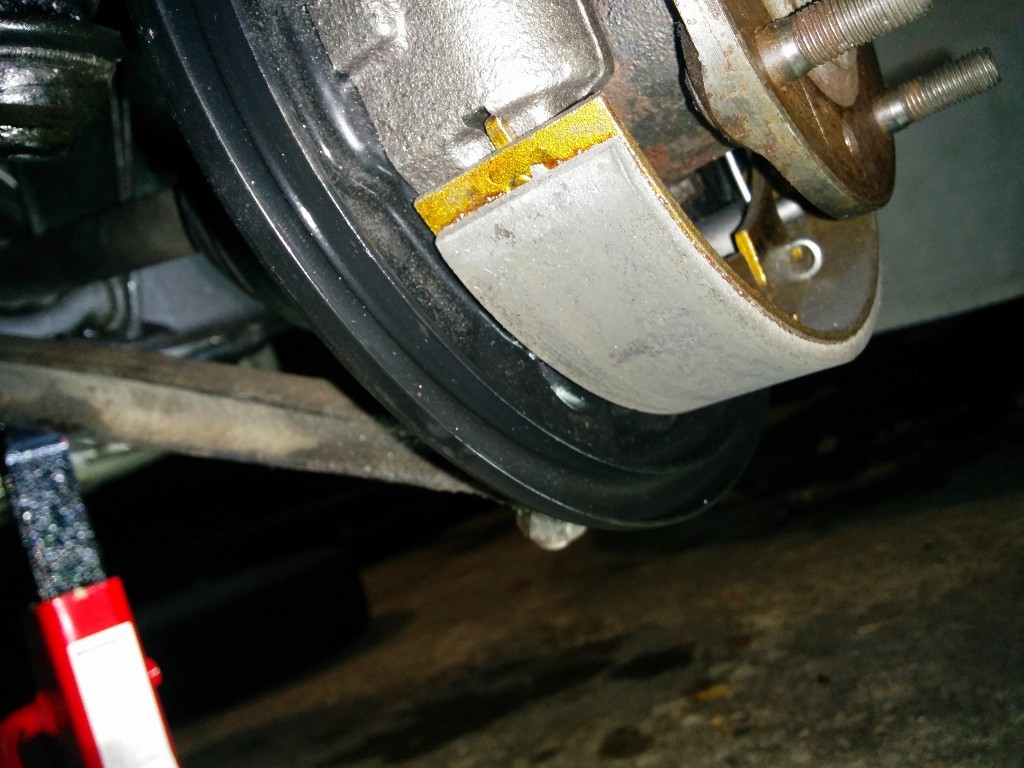
Here are what my front brakes look like.
No major hot spots like the images posted above. Maybe just a bit at the edges?
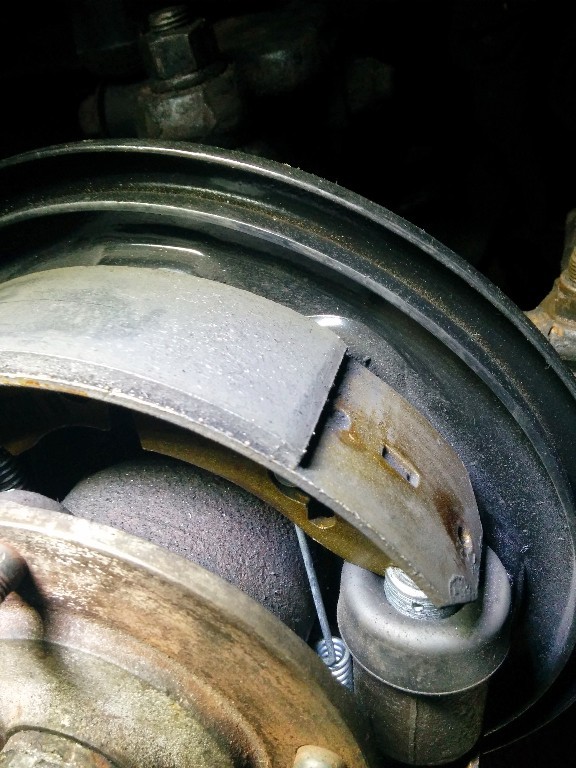
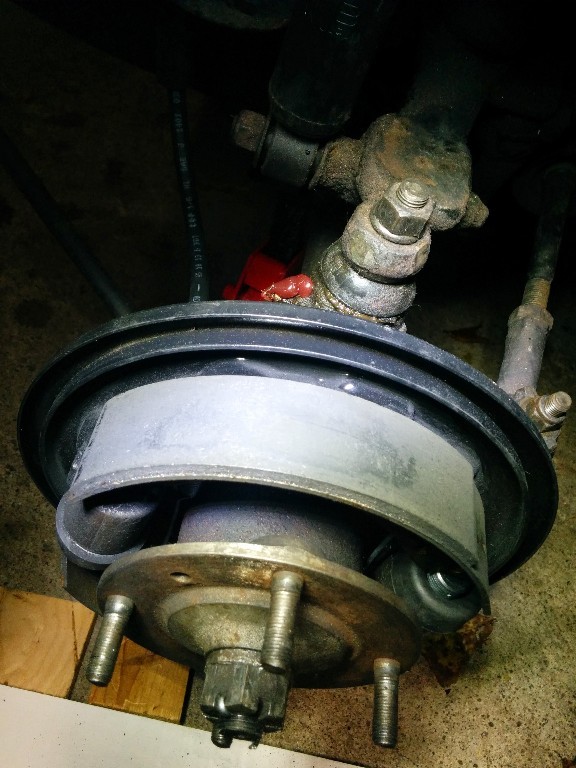
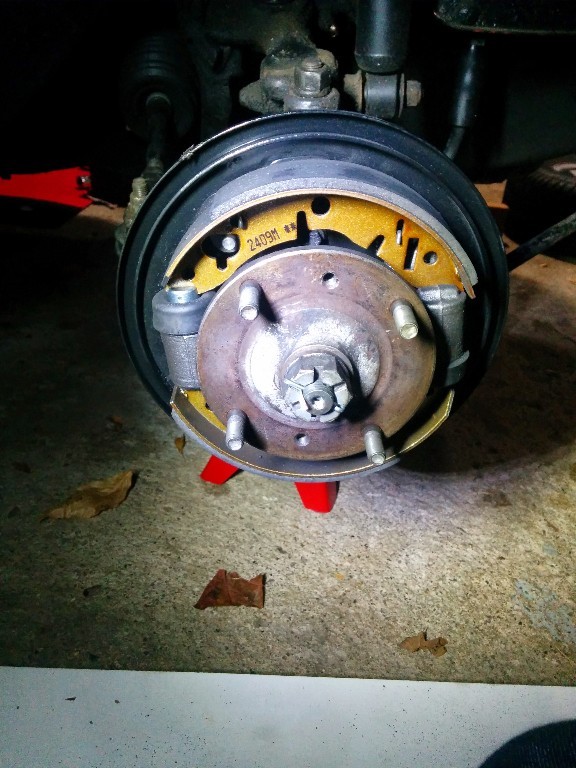
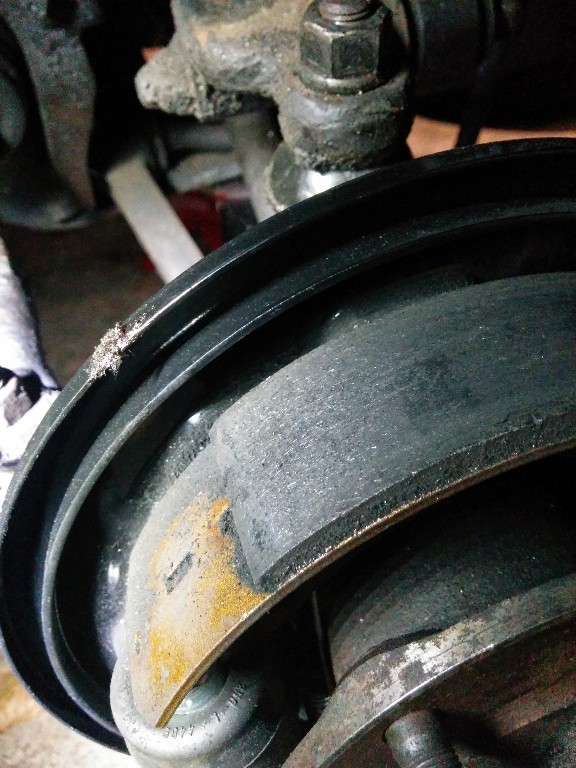
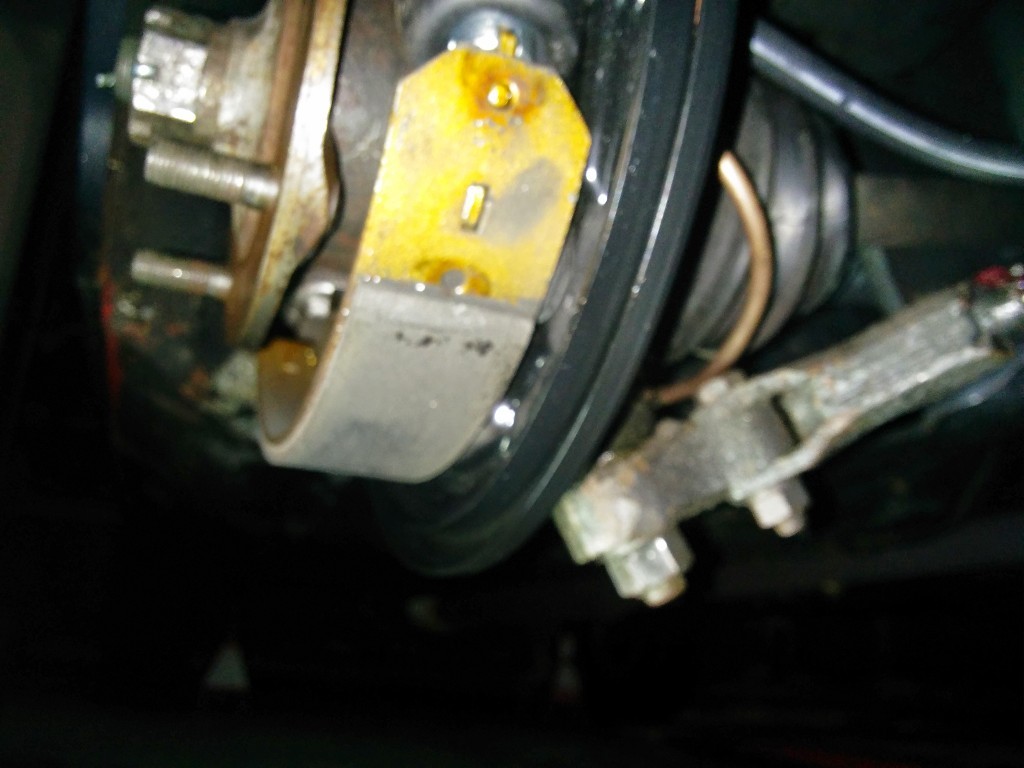
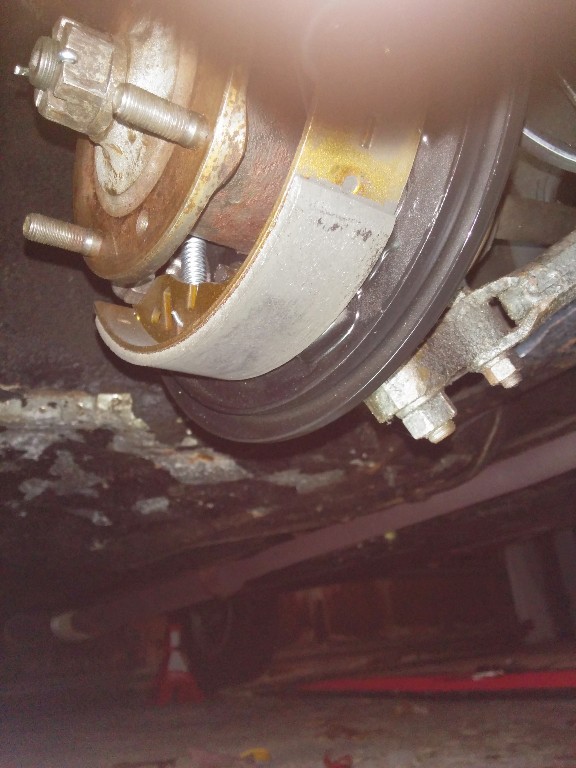
Here are photos of the rear brakes.
Unless someone advises otherwise, i think i might just try adjusting them.
Also, you guys have been great. I really haven't had hands on auto experiance since auto shop in 2001. Thanks again!
'73 Innocenti Mini (non-export)
Morristown, NJ
|
|
Total posts: 8382
Last post: Jan 13, 2022 Member since:Feb 7, 2006
|
Cars in Garage: 0
Photos: 0 WorkBench Posts: 0 |
|
someone asked about location of bleeder valave- why at bottom, not top?
i wondered about that, too. I assume maybe it is at bottom so any water that gets absorbed, collects, and settles there, can get blown out.
From the amount of rusty and seized rear wheel cylinders i have replaced over the years i would say water / moisture does settle there.
speaking of blown out, at a certain speed (feet per second) of flow of a liquid, air bubbles get pushed out, no matter where they are. I learned this lesson when I had to drain for repairs the whole house hot water radiator heating system. Had to change from a standard slow flow to "fast fill" combination fill valve/ pressure regulator. This pushed out all bubbles, allowed all radiators to fill full of water, and prevented any of them from being cold ( air pockets).
Same analogy must exist with filling or flushing brake fluid lines. Speed (pressure) must be enough. I don't see how so-called gravity bleeding could work at all.
You have to be delicate with the rear brakes as the proportioning valve kicks in when you apply fast hard pressure resulting in no flow of brake fluid to the wheel cylinders.
If in doubt, flat out. Colin Mc Rae MBE 1968-2007.
Give a car more power and it goes faster on the straights,
make a car lighter and it's faster everywhere. Colin Chapman.
|
|
Total posts: 379
Last post: Feb 6, 2024 Member since:Jul 26, 2010
|
Cars in Garage: 0
Photos: 0 WorkBench Posts: 0 |
|
I adjust the shoes up and drive the car up and down the road a few times double pumping the brakes to get pedal pressure. After that there should be some good witness marks on the shoes showing the high spots. These can be sanded off with some course sand paper, refit shoes, adjust brakes and repeat the process until you get a firm pedal at the top of it's travel.
|
|
Total posts: 2037
Last post: Mar 29, 2024 Member since:Aug 29, 2001
|
Cars in Garage: 0
Photos: 0 WorkBench Posts: 0 |
|
someone asked about location of bleeder valave- why at bottom, not top?
i wondered about that, too. I assume maybe it is at bottom so any water that gets absorbed, collects, and settles there, can get blown out.
speaking of blown out, at a certain speed (feet per second) of flow of a liquid, air bubbles get pushed out, no matter where they are. I learned this lesson when I had to drain for repairs the whole house hot water radiator heating system. Had to change from a standard slow flow to "fast fill" combination fill valve/ pressure regulator. This pushed out all bubbles, allowed all radiators to fill full of water, and prevented any of them from being cold ( air pockets).
Same analogy must exist with filling or flushing brake fluid lines. Speed (pressure) must be enough. I don't see how so-called gravity bleeding could work at all.
|
|
Total posts: 8382
Last post: Jan 13, 2022 Member since:Feb 7, 2006
|
Cars in Garage: 0
Photos: 0 WorkBench Posts: 0 |
|
Sandpaper on a flat even surface, just the each end of the shoe linings need trimming.
If in doubt, flat out. Colin Mc Rae MBE 1968-2007.
Give a car more power and it goes faster on the straights,
make a car lighter and it's faster everywhere. Colin Chapman.
|
|
Total posts: 440
Last post: May 2, 2017 Member since:Sep 24, 2013
|
Cars in Garage: 0
Photos: 0 WorkBench Posts: 0 |
Quick update:
I spent my lunch hour (yay work from home days) getting teh car on 4 jack stands. That took about 45 minutes but a quick test revealed the following:
Wheels:
Front Left (driver): Spins free
Front Right (Passenger): Spins free, but once per rotation you hear a dragging sound (leading me to believe the radius of the shoes is off).
Rear Right: Spins free
Rear Left: Drags, only spins once at the most and drags to a stop.
Parking brake: after reading the hayne manual the handle should click 3 times to be fully engages. Mine clicks once.
Plan of attack:
1. Adjust parking brake, retest rear wheels
2. Adjust all 4 shoes (adjust to wheel lock, and then back it off).
3. Inspect for radius
Anthing i am missing?
I wouldn't worry too much about the parking brake because as the shoes wear it will develop more travel and works just as effectively on one or three clicks. I like tto adjust my shoes with some drag as they do settle in qucikly, be sure to look at the clearance issues that Minibitz posted otherwise you will never get a good pedal.
Shrimps, you just sand the corners/edges by hand enough to relieve the high spots.
What material do you use to sand the shoes? Sandpaper? Cement Garage Floor? :-)
'73 Innocenti Mini (non-export)
Morristown, NJ
|
|
Total posts: 8382
Last post: Jan 13, 2022 Member since:Feb 7, 2006
|
Cars in Garage: 0
Photos: 0 WorkBench Posts: 0 |
|
Quick update:
I spent my lunch hour (yay work from home days) getting teh car on 4 jack stands. That took about 45 minutes but a quick test revealed the following:
Wheels:
Front Left (driver): Spins free
Front Right (Passenger): Spins free, but once per rotation you hear a dragging sound (leading me to believe the radius of the shoes is off).
Rear Right: Spins free
Rear Left: Drags, only spins once at the most and drags to a stop.
Parking brake: after reading the hayne manual the handle should click 3 times to be fully engages. Mine clicks once.
Plan of attack:
1. Adjust parking brake, retest rear wheels
2. Adjust all 4 shoes (adjust to wheel lock, and then back it off).
3. Inspect for radius
Anthing i am missing?
I wouldn't worry too much about the parking brake because as the shoes wear it will develop more travel and works just as effectively on one or three clicks. I like tto adjust my shoes with some drag as they do settle in qucikly, be sure to look at the clearance issues that Minibitz posted otherwise you will never get a good pedal.
Shrimps, you just sand the corners/edges by hand enough to relieve the high spots.
If in doubt, flat out. Colin Mc Rae MBE 1968-2007.
Give a car more power and it goes faster on the straights,
make a car lighter and it's faster everywhere. Colin Chapman.
|
|
Total posts: 440
Last post: May 2, 2017 Member since:Sep 24, 2013
|
Cars in Garage: 0
Photos: 0 WorkBench Posts: 0 |
Quick update:
I spent my lunch hour (yay work from home days) getting teh car on 4 jack stands. That took about 45 minutes but a quick test revealed the following:
Wheels:
Front Left (driver): Spins free
Front Right (Passenger): Spins free, but once per rotation you hear a dragging sound (leading me to believe the radius of the shoes is off).
Rear Right: Spins free
Rear Left: Drags, only spins once at the most and drags to a stop.
Parking brake: after reading the hayne manual the handle should click 3 times to be fully engages. Mine clicks once.
Plan of attack:
1. Adjust parking brake, retest rear wheels
2. Adjust all 4 shoes (adjust to wheel lock, and then back it off).
3. Inspect for radius
Anthing i am missing?
'73 Innocenti Mini (non-export)
Morristown, NJ
|
|
Total posts: 328
Last post: Jun 9, 2018 Member since:Sep 28, 2010
|
Cars in Garage: 1
Photos: 67 WorkBench Posts: 0 |
|
Haul the drums off and make sure you are getting full contact around the entire shoe. As I mentioned before incorrectly radiused shoes is a huge issue lately and is catching a lot of people out.
Do you line the inside of a drum with sandpaper (or some such material), refit shoes and rotate the drum while tightening up the adjustment to get a good fit?
Or do you sand the shoes by hand?
|
|
Total posts: 379
Last post: Feb 6, 2024 Member since:Jul 26, 2010
|
Cars in Garage: 0
Photos: 0 WorkBench Posts: 0 |
|
Haul the drums off and make sure you are getting full contact around the entire shoe. As I mentioned before incorrectly radiused shoes is a huge issue lately and is catching a lot of people out.
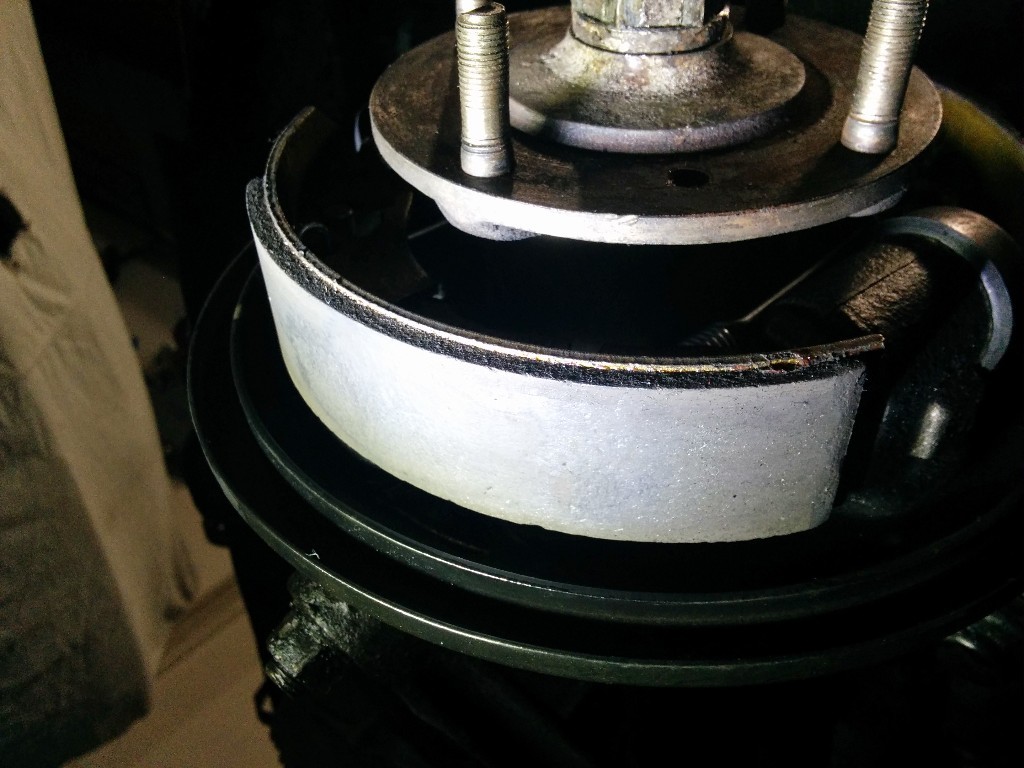
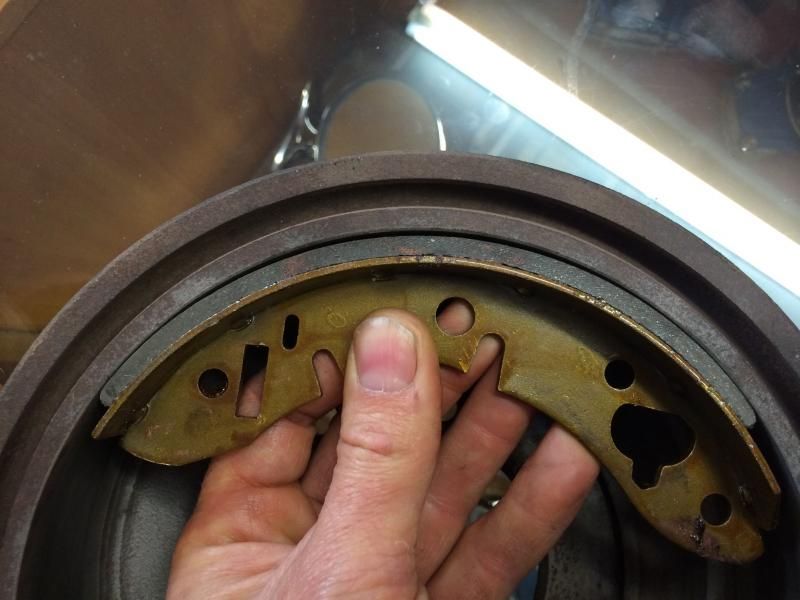
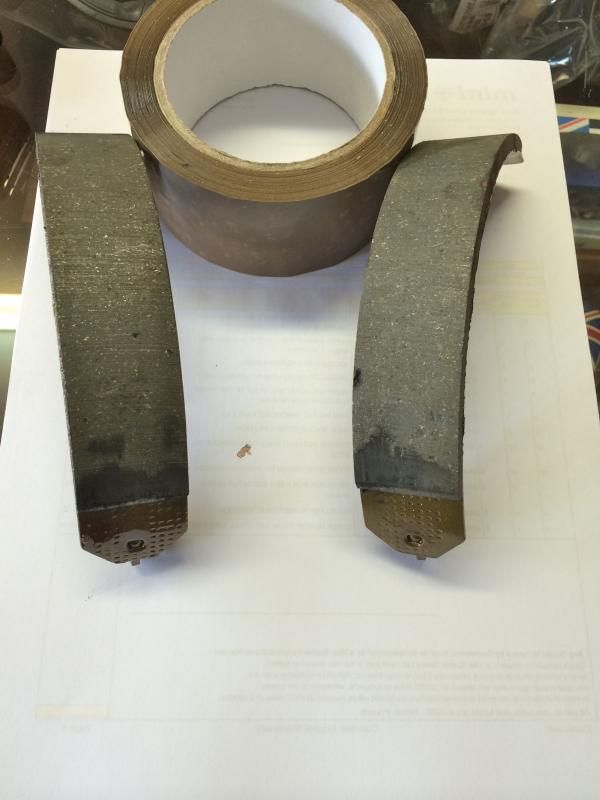
See attached pictures of some shoes I fitted this week. These are from one of the big two UK mini parts suppliers. We decided to source from them as what we were being supplied here in NZ is so dire. These UK sourced shoes are substantially worse!!! The witness marks show how little of the shoe was making contact.
As you can see only the outer ends of the shoe touch and there is a honking great gap between shoe and drum at the top of the radius. System is fully bled and adjusted and we were getting zero pedal due to this issue. Swapped out for a better (not perfect, still needed sanding to match the drum) set of shoes and surprise, surprise, instant pedal.
|
|
Total posts: 4594
Last post: Nov 10, 2015 Member since:Jul 16, 2001
|
Cars in Garage: 2
Photos: 79 WorkBench Posts: 6 |
|
|
|
Total posts: 6349
Last post: Oct 22, 2023 Member since:Mar 9, 1999
|
Cars in Garage: 0
Photos: 0 WorkBench Posts: 0 |
|
Bleeder nipples are supposed to be at the bottom.
Look, here's my advice:
Adjust all 6 adjusters up as tight as you can get them-- go ahead and make it so they lock the wheels up.
Pump your brake pedal 3-4 times. If you don't have a hard brake pedal after a few pumps there's either air in the line or some other problem like the master cylinder or the proportioning valve or the clevis pin is too small or the master cylinder pushrod is elongated or some combination of the above.
If you have a hard pedal, which is what I suspect you'll have-- then your problem is your adjustment-- you need to have drag at each adjuster.
What you are finding is the reason people switch to disc brakes-- Drum brakes work great when you know how to set them up. If you don't know how to set them up, they are a nightmare or frustrations.
|
|
Total posts: 440
Last post: May 2, 2017 Member since:Sep 24, 2013
|
Cars in Garage: 0
Photos: 0 WorkBench Posts: 0 |
I re-bled the back left wheel with it elevated about 12 inches. a few more bubbles came out, but still no good on the pedal. But i did notice something. The bleeder nipples are on the bottom of the back plate! Shouldn't they be at the top??? Did someone in the past 40 years install then backwards and now i have air stuck?
'73 Innocenti Mini (non-export)
Morristown, NJ
|
|
Total posts: 440
Last post: May 2, 2017 Member since:Sep 24, 2013
|
Cars in Garage: 0
Photos: 0 WorkBench Posts: 0 |
Hey All,
Ever since i've had my 73 Innocenti it has need a double pump to get bressur on the brake pedal. Last weeki dropped it off at the mechanic to have a look. My front wheel cylinders were leaking as was one rear cylinder. The car has twin leadiner shoes so i bought the pre-assembled kit for the fronts, a new rear cyclynder, and a new master cylinder. He has pressure bled the system, yet we can not get good pedal feel. THe only other component that could be left is the prop valve, but he is kind of at a loss. Its not a complicated system!
ANy ideas?
Take all the advice given in the above posts, putting adjustment at the top of the list.
The adjusters ( the rears especially ) may be VERY hard to turn, so might need heat etc.
The front adjusters ( two on each side ) work on sort of a "cam" and should be adjusted in the direction of forward wheel travel.....it may only take a tiny amount of adjustment
The rears are threaded and a turned "in" to tighten
This is all asumming you have good shoes of course.
I now have the car back since the mechanic was out of ideas. He said he did adjust the brakes as well as bleed in the proper order. Used the correct fluid and had good flow out of 4 corners. Assuming he did all of that correctly, I started to do more searching. Are any of these threads possibilities? On the plus side on the second pump of the brakes I get great stopping power and I no longer pull to the right!
Clevis pin on brake pedal
//www.minimania.com/msgThread/111173/1/1/Ha__no_clevis_on_brake_pedal
'73 Innocenti Mini (non-export)
Morristown, NJ
|
|
Total posts: 13978
Last post: Jan 15, 2024 Member since:Jan 22, 2003
|
Cars in Garage: 4
Photos: 381 WorkBench Posts: 1 |
|
Hey All,
Ever since i've had my 73 Innocenti it has need a double pump to get bressur on the brake pedal. Last weeki dropped it off at the mechanic to have a look. My front wheel cylinders were leaking as was one rear cylinder. The car has twin leadiner shoes so i bought the pre-assembled kit for the fronts, a new rear cyclynder, and a new master cylinder. He has pressure bled the system, yet we can not get good pedal feel. THe only other component that could be left is the prop valve, but he is kind of at a loss. Its not a complicated system!
ANy ideas?
Take all the advice given in the above posts, putting adjustment at the top of the list.
The adjusters ( the rears especially ) may be VERY hard to turn, so might need heat etc.
The front adjusters ( two on each side ) work on sort of a "cam" and should be adjusted in the direction of forward wheel travel.....it may only take a tiny amount of adjustment
The rears are threaded and a turned "in" to tighten
This is all asumming you have good shoes of course.
"Everybody should own a MINI at some point, or you are incomplete as a human being" - James May
"WET COOPER", Partsguy1 (Terry Snell of Penticton BC ) - Could you send the money for the unpaid parts and court fees.
Ordered so by a Judge
|
|
Total posts: 379
Last post: Feb 6, 2024 Member since:Jul 26, 2010
|
Cars in Garage: 0
Photos: 0 WorkBench Posts: 0 |
|
Adjustment, adjustment, adjustment!!!
I get sooooo many phone calls from customers struggling to bleed brakes and the usual outcome is there is no air in the system, they have simply neglected to correctly adjust the brakes.
The one recent exception is shoes that have not been correctly radiused. I have come across multiple brands with this problem. When inspected closely the friction material has a slight dip across the shoe so only the outer edges make contact with the drum, giving a soft pedal even when correctly adjusted. Careful sanding of the outer edges to allow full contact is required.
|
|
Total posts: 6349
Last post: Oct 22, 2023 Member since:Mar 9, 1999
|
Cars in Garage: 0
Photos: 0 WorkBench Posts: 0 |
|
If you've read the below about how to bleed and you've then adjusted all 4 front and the two rear wheel cylinders up until they have a good amount of dragon the drum, then either you did something wrong or there's still air in the lines.
One test is to completely block off the rear brake line feed at the T connector with a bolt. then try your pedal. If you still have no pedal, then there's something wrong with the way you set up the front.
Generally it is the rear adjustment that goes out / wears down on cars equipped with disc brakes. Adjusting the rear shoes til they drag will bring your pedal higher. But it won't be until like the 2nd or third pump--- You need to take up the slack after the adjustment. But once you've taken up the "hydraulic slack" then one push should have it at the top straight away.
|
|
Total posts: 440
Last post: May 2, 2017 Member since:Sep 24, 2013
|
Cars in Garage: 0
Photos: 0 WorkBench Posts: 0 |
Hey All,
Ever since i've had my 73 Innocenti it has need a double pump to get bressur on the brake pedal. Last weeki dropped it off at the mechanic to have a look. My front wheel cylinders were leaking as was one rear cylinder. The car has twin leadiner shoes so i bought the pre-assembled kit for the fronts, a new rear cyclynder, and a new master cylinder. He has pressure bled the system, yet we can not get good pedal feel. THe only other component that could be left is the prop valve, but he is kind of at a loss. Its not a complicated system!
ANy ideas?
'73 Innocenti Mini (non-export)
Morristown, NJ
|
|
Total posts: 64
Last post: Jun 15, 2020 Member since:Oct 20, 2008
|
Cars in Garage: 0
Photos: 1 WorkBench Posts: 0 |
|
Make Shure all your wheel cylinders are working, not leaking, and replace any old rubber lines before you start
This works for me


