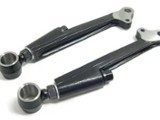
Improved one-piece, forged, adjustable, bottom front suspension arm
Get these front lower adjustable arms here.
Questions? Please contact us by calling 1-800-946-2642 or emailing us here.
Further improved quality of one-piece, forged, adjustable, bottom front suspension arm, to be on-car adjustable and accept all types of non-rod-end (Rose joint) bushings, by including a purpose-forged trunnion.
Safety critical, the one-piece forging is of the highest quality. Far stronger and with ultimate integrity compared with the now-ancient method of cutting and welding-on of adapters – a process that demands the most specialized equipment and skill to be sure of component integrity.
Manufactured from a new forge tool, the bottom arm inner joint boss has been extended to accept a tube-nut adjuster that accepts the purpose-forged trunnion. The tube nut allows easy adjustment of camber without needing to jack the car up and disassemble the suspension. The trunnion gives all Mini owners an option previously only available to racers – the capability of having fully adjustable suspension without the need to use spherical rod-ends. The trunnion will take any of the rubber/plastic type bushes currently available to keep maintenance, cost, and road noise down to a sane level when used on the street. For race use, simply replace the trunnion with a spherical rod-end. Simplicity itself.
Fitting instructions for the C-AJJ3360
First, jack the car up and place securely on axle stands.
Remove road wheels for easier access.
Undo tie-rod to bottom arm pinch bolt/nut (1/2”AF).
Undo bottom swivel pin nut (11/16”AF).
Use ball-joint breaker (either wedge type splitter tool part number 660490 or, preferably, scissors type 660550,) to separate the ball joint from the bottom arm.
Undo inner bottom arm mounting pin retaining nut (9/16”AF) and remove inner mounting pin.
Set adjustable bottom arm length to standard length for reference (10.20”/259mm from center of trunnion to center of swivel pin hole,) fit new bushings, and re-fit in reverse sequence to removal.
Check manual for torque settings.
Once all is in place, lower car to ground and nip inner trunnion lock nut up.
To adjust bottom arm length, slightly undo inner trunnion lock nut, use tube nut head to lengthen arm to decrease positive camber/increase negative camber value to required setting, then tighten inner trunnion lock nut up again.
Set the geometry
Specialist tools will be required to set the geometry. Mini Mania offers these as TOOL10 for caster/camber measurement, and TOOL11 for tracking adjustment.
These bottom arms were designed mainly with modified cars/suspension in mind. As a consequence they come assembled with full lock nuts for maximised mechanical integrity where negative camber is set.
Where used on near standard cars or where near standard geometry is required, disassemble the trunnions/adjuster tube nuts, fit the half lock nuts supplied, and re-assemble.
With the full lock nuts fitted, the arm at it's shortest length will reduce existing standard geometry settings by approximately 1 degree of negative camber (i.e. If standard is 2 degrees positive, this will be reduced to approximately 1 degree positive camber.)
With the half lock nut fitted the shortest length will add barely 1/4-degree negative camber to existing standard setting. All else is as above.