MINI Cooper Quad Light Brackets For
G2NMX2335
G2NMX2335
-
 G2NMX2335$367.90
1. Removal of Grille: Start at one end of the lower chrome trim to remove it, then work your way across by pulling towards you slowly. Prey out the four top clips located on the grill. After those are removed, squeeze each of the four lower clips *, and pull the grill straight out. (behind the lower chrome trim *)
2. Remove the 2 factory Torx head screws that hold the plastic bumper cover on and set aside. (picture #1)
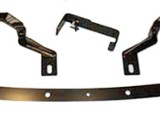
3. Center bracket: Mark the center of bumper to locate the center bracket. Turn the bracket sideways between the radiator and bumper support and slide it downward. Once it clears the bottom of the bumper, twist and lock it in place. Make sure the bracket fits tight against the bumper support and tighten the 2 allen set screws with a 3/32 allen wrench. You must pull the bumper cover forward about ¾ of an inch in order to tighten the two set screws. Mount the L-bracket to the Clamp bracket.
4. Mount the left and right brackets using the factory hardware. Torque the 13 mm nuts to 15 ft-lbs.
5. Center bracket height adjustment: The crossbar can go on top of, or bottom of the brackets (either way) depending on the size of the lights you are using. Adjust the center bracket accordingly by using a straight edge between all three brackets. Tighten all bolts.

6. Use the supplied template to trim the grill for Cooper and Cooper S and reinstall the grill.
7. Attach the center radius bar and adjust the depth according to the size of your lights. (Closer to the grill or farther away from the grill). The bar will be stiffer if it is closer to the grill.
Tools Required
- 11 MM Open End Wrench
- 14 MM Open End Wrench
- T25 Torx Socket (male)
- 13 MM Socket
- 3/8 inch Ratchet
- 3/32 Allen Wrench (Included)
- 5/32 Allen Wrench
- 7/32 Allen Wrench
- Use Anti-Seize grease for All Stainless Steel bolt threads