Servicing Your
|
WEEKLY EVERY 3,000 MILES EVERY 6,000 MILES EVERY TWO YEARS |
by: Rob Thomasson
Doing your own servicing is more than a way of saving money. It gives you the opportunity to gain experience working on your car when it is going, which gives you a much better chance of fixing it when it isn't.
The various books give different service intervals for the same components. This was probably due to Morris trying to keep up with the opposition, rather than for a good engineering reason.
| TOOLS - Jack - Axle stands - Drain plug key - Grease gun - Tyre pressure gauge - Wheel brace - Large screwdriver - Small screwdriver - Large Philips screwdriver - Set of spanners (AF) |
PARTS - Air filter - Oil filter - Set of points - Condenser - Brake fluid - Grease - Distilled water - Antifreeze - Engine oil (5L) - EP90 oil - Spark plugs (4) - Screenwash fluid |
WEEKLY CHECKS
1. Check tyre pressure
2. Check engine oil level with dipstick
3. Check brake fluid level (the reservoir is under the carpet where the driver's left heel goes)
4. Check screenwash level
5. Check radiator level and top up if necessary with a mixture of antifreeze and water
6. Check that all bulbs work, especially the brake lights
EVERY 3,000 MILES
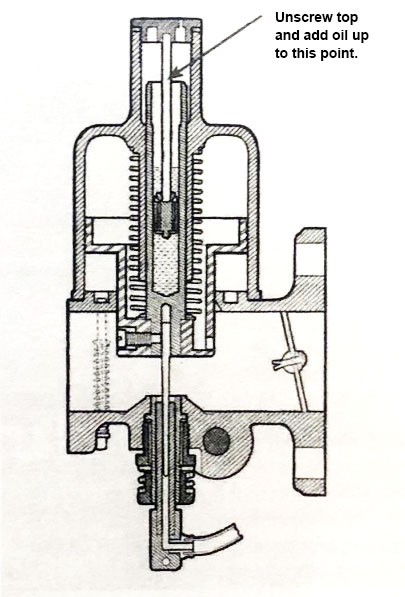
Carburetor
Top up the dashpot on the carb. This unscrews by hand. Add a small amount of thin oil until it is 1.2 inches above the interior lip. If you overdo it the excess will escape from the little hole in the top.
Fan belt
Tighten the fan belt as necessary. I try to turn the generator pulley by hand. If I succeed easily the belt needs tightening. Do not overdo this as it will wear out the water pump bearings.
Lubrication
Grease all the grease points. There are two on each leg, one on each steering arm ball joint, one on each handbrake cable and two on the propshaft. It is possible that the handbrake cables and propshaft do not have the nipples any longer as new parts often have these deleted.
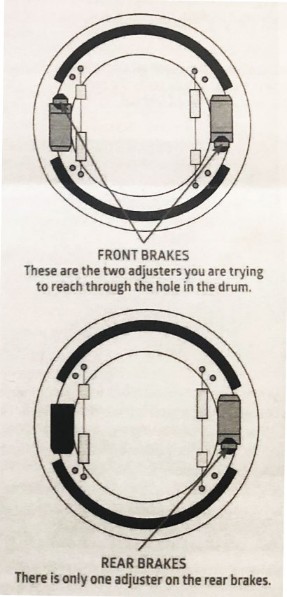
Brakes
While the front wheels are off for the greasing, you can get at the brakes and adjust them.
Look through the hole in each drum with a torch. You will see two screw-head adjusters in each of the front drums. Turn each adjuster clockwise until it locks and then come back one click. If you reach the end of the adjustment but you can still turn the drum, the shoes need replacing.
The rear brakes are adjusted in the same way but there is only one adjuster on each wheel. This is at the front of the drum. Do this with the handbrake off and make sure the cables go slack when the handle is down.
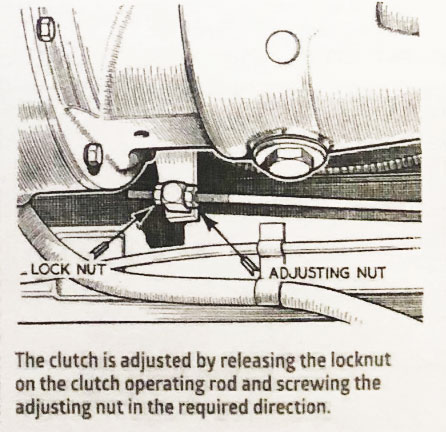
Clutch
When you press the clutch pedal, there should be 1 1/2 inches of free movement before the mechanism engages (3/4" on non-1098 models). The adjuster is between the gearbox and the chassis leg. Be careful as there is a locknut on the end of the rod as well as the adjusting nut. Lubricate all the joints while you are under there.
Gearbox oil
Check the gearbox oil level. The filler is accessed from inside the car. Lift the carpet on the passenger side and remove the filler plug. The oil should be to the bottom of the filler hole. Use engine oil to fill it, except on Series MMs which require EP90.
Axle oil
Also check the level of the axle oil. Remove the filler plug and the oil should be to the bottom of the hole. Use EP90 on all models.
Series II and MMs only:
Engine oil and filter
Change the engine oil and filter. The later MMs have a disposable element on the nearside of the engine. Use the normal 1098 element for this.
Series IIs have a canister type on the offside.
Warm up the engine, then remove the plug on the bottom of the sump and give it ten minutes to drain. Remove the filter and replace it. I often leave the old sealing ring in place as they are difficult to replace and are good for several filters. Don't forget to put the plug back!
Refill the sump with fresh quality oil. Remove the spark plugs and turn the engine over on the starter until the oil pressure warning light goes out. Then replace the plugs and start the engine. Check the filter for leaks before driving off.
EVERY 6,000 MILES
Repeat the 3,000 mile service with the following additions:
Engine oil and filter
On the 948 and 1098 engines, change the engine oil and filter. The filter housing undoes by removing the long bolt through the centre. Always check it for leaks after replacement.
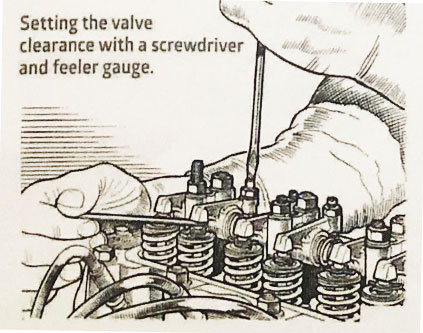
Tappets
Adjust the tappets to a clearance of 12 thou (.012in) with the engine cold. Use the crank handle to turn the engine so that each valve opens (rocks from the horizontal). Use the 'rule of 9' to find which valve is now fully open, ie if no. 2 is tilted then no. 7 is ready for adjustment (7+2=9).
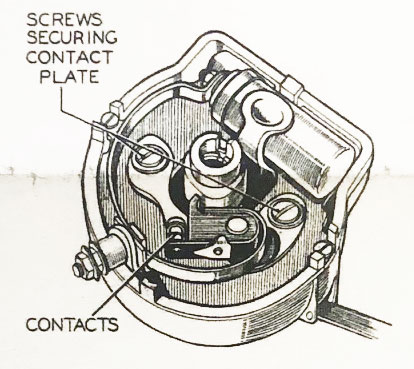
Distributor
Remove the distributor cap and check inside for cracks and wear. Replace the points and the condenser. Turn the engine over with the handle until the points are fully open. Set the gap to 15 thou (.015in) with the feeler gauges. If you have a timing light then set the dwell angle to 60 degrees. If not just set the gap correctly.
Timing
Set the timing with a small test bulb. This goes to earth on one side and to the springy arm in the distributor on the other. Turn the engine over with the crank handle until the timing marks are correct.
You can use the knurled wheel on the side of the distributor to adjust the timing (if fitted). If not, or you run out of range, then you need to move the distributor body. Slacken the locking bolt and turn the body until the light just comes on. Check it by making slight movements of the distributor so that the bulb flashes on and off.
Spark plugs
Replace the spark plugs with new. Set the gap to 25 thou (.025in) on 1098s and 22 thou (.022in) on the others.
Steering rack
Top up the oil in the steering rack through the nipple in the passenger footwell. This is towards the top left of the well and should be covered with a rubber plug. Give it a couple squirts with the oil gun (NB oil, not grease).
Air filter
Replace the paper air filter with new. The earlier ones were an oil bath and can be washed and used again.
Odds and ends
If the water pump still has a grease point then give it a couple of shots.
Oil the hinges, latches and locks.
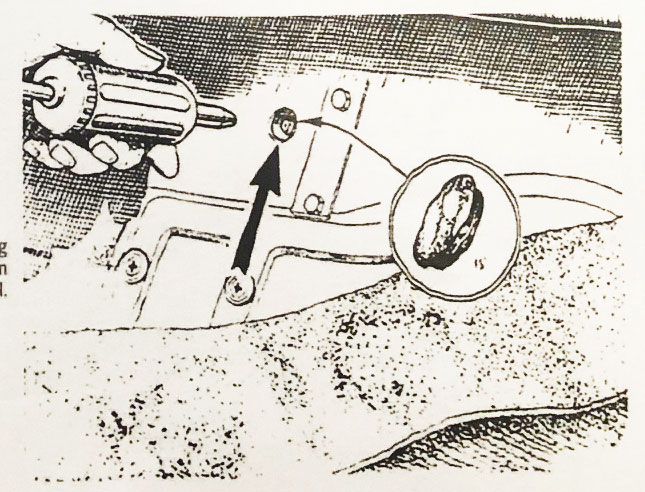
Remove the filter from the fuel pump and clean it.
Remove the black cover from the fuel pump and clean the points with fine sandpaper.
EVERY 2 YEARS
Brakes
Replace the brake fluid. This is necessary from time to time due to the fluid attracting water through the flexible hoses. This causes corrosion and reduces the ability of the brakes to dissipate heat.
Remove the cap from the brake master cylinder and top up as necessary. Use a brake spanner to loosen the bleed nipple on the rear offside brake. Fit a flexible tube to the end to guide the old fluid into a jar. Get a friend to pump the pedal down and then close the nipple. Call 'up' and then open the nipple when they have released the pedal. Open the nipple and call 'down' - a squirt of rusty fluid will go into the jar. Repeat this until the new fluid comes through. You need to do this for all four wheels. Alternatively you can use silicon brake fluid so you only ever have to do it once. The fluid is more expensive but it saves a lot of labour.
Front hubs
Replace the grease in the front hubs. Remove the drums and the grease caps in the middle. Remove the split pins and undo the nuts. Note that the left-hand side is a left-hand thread.
The hubs can now be levered off and washed. Re-grease the hubs and replace them.
Originally published in the Morris Minor Registry's newsletter "Minor News"
Re-published with permission by the author, Rob Thomasson