

| Orig. Posting Date | User Name | Edit Date |
| Nov 16, 2011 01:12PM | DRMINI | |
| Nov 16, 2011 04:34AM | Christopher | |
| Nov 16, 2011 12:24AM | DRMINI | |
| Nov 15, 2011 09:20PM | 1963SV2 | |
| Nov 15, 2011 08:54PM | DRMINI | Edited: Nov 15, 2011 08:57PM |
| Nov 15, 2011 05:37PM | Christopher |

|
Total posts: 8645
Last post: Dec 16, 2020 Member since:Oct 27, 2000
|
Cars in Garage: 0
Photos: 0 WorkBench Posts: 0 |
|
No rebalancing is needed if the 3 washers are all the same size.
The drive straps should be parallel to the flywheel when assembled.
Kevin G
1360 power- Morris 1300 auto block, S crank & rods, Russell Engineering RE282 sprint cam, over 125HP at crank, 86.6HP at the wheels @7000+.
|
|
Total posts: 29
Last post: Jun 12, 2013 Member since:Aug 12, 2010
|
Cars in Garage: 0
Photos: 0 WorkBench Posts: 0 |
| Originally Posted by 1963SV2 Kev, I don't think he literally means "snapping" - more that it just "goes" over centre when compressed This is indeed what happens when the diaphragm is set flat. Using the picture as a reference, the spring (in a free state) is concave upwards. When installed properly, the spring is flat. As the clutch is operated the spring holder is pushed downwards and the spring goes convex upwards (ie overcentre from its original orientation). I would be more concerned about the use of a thin ring gear as pictured. I've found them to be not that robust... Cheers, Ian |
|
|
Total posts: 8645
Last post: Dec 16, 2020 Member since:Oct 27, 2000
|
Cars in Garage: 0
Photos: 0 WorkBench Posts: 0 |
|
OK yes, it does go `over centre' in that sense, that is why a properly set up Mini clutch has a lighter pedal than an old one that's been refaced many times and height unadjusted.
Max clamping pressure occurs when the plate is flat on assembly.
I run orange dot diaphragms on both my engines, they grip great but the pedal feels quite light compared to yer average old clunker Mini.![]()
Kevin G
1360 power- Morris 1300 auto block, S crank & rods, Russell Engineering RE282 sprint cam, over 125HP at crank, 86.6HP at the wheels @7000+.
|
|
Total posts: 1716
Last post: Oct 18, 2020 Member since:Oct 18, 2011
|
Cars in Garage: 0
Photos: 0 WorkBench Posts: 0 |
Kev, I don't think he literally means "snapping" - more that it just "goes" over centre when compressed This is indeed what happens when the diaphragm is set flat. Using the picture as a reference, the spring (in a free state) is concave upwards. When installed properly, the spring is flat. As the clutch is operated the spring holder is pushed downwards and the spring goes convex upwards (ie overcentre from its original orientation).
I would be more concerned about the use of a thin ring gear as pictured. I've found them to be not that robust...
Cheers, Ian
|
|
Total posts: 8645
Last post: Dec 16, 2020 Member since:Oct 27, 2000
|
Cars in Garage: 0
Photos: 0 WorkBench Posts: 0 |
|
I have found on old flywheels and backplates (after faces are machined), it's necessary to take up to .070" off the 3 lugs to get the spring assembled flat.
I don't use a drill press like some- I put a 1/8" twist drill shank against the spring (there are 3 spots where you can see this) and play about until it sits parallel to the flywheel.
I assemble it with the 3x 2 straps and check, then with 1 strap and check again, each strap is .035" thick.
If you take all the straps out and bolt up with none, this is equivalent height to taking .070" off.
Once I work out what it needs off, I clock the backplate up in the lathe with a dial gauge on the running face, and machine the 3 lugs.
I have done heaps of clutches this way, never has the problem of the spring snapping over center.
On your pic there should be a 1/16" (approx) flat washer between the straps and flywheel, It looks like yours are missing.
[edit] I always use a new clutch drive plate to set this up. Usually a new diaphragm too (but is not essential).
Kevin G
1360 power- Morris 1300 auto block, S crank & rods, Russell Engineering RE282 sprint cam, over 125HP at crank, 86.6HP at the wheels @7000+.
|
|
Total posts: 29
Last post: Jun 12, 2013 Member since:Aug 12, 2010
|
Cars in Garage: 0
Photos: 0 WorkBench Posts: 0 |
I am working at installing the replacement flywheel for the one that I heated to red hot to remove. With a new clutch disk I found that the three posts of the pressure plate stuck up quite a bit from the top of the flywheel. (about 0.110"). The old flywheel, pressure plate and clutch combination were about flush. This flyhweel and pressure plate is a used one I bought and had the friction surfaces machined. I was told they would remove how ever much material was ground off the friction surfaces from the three posts.
Previously my understanding from reading about lightened flywheels was the drive straps should be parallel with the flywheel. I am not sure how this would work with standard flywheels (without spacers) since the drive strap overlaps the hole in the flywheel the post sticks through. The drive strap would resist movement of the pressure plate since it is bearing against the flywheel surface everywhere except the hole. So, I am not sure if the drivestraps should be parallel with the flywheel on a stock setup.
I then read this article on having the diaphragm spring flat. //www.minimania.com/web/SCatagory/CLUTCH/DisplayType/Technical%20Information/DisplayID/153/ArticleV.cfm
I set up the replacement parts on a drill press. I had a hard time telling when the spring was flat. My best guess is this took about 0.040" of travel. Somewhere between .050 and .060" of travel the spring seems to snap overcenter. There is a total of 0.100" travel which is limited by what apears to be stops on the diaphragm spring housing.
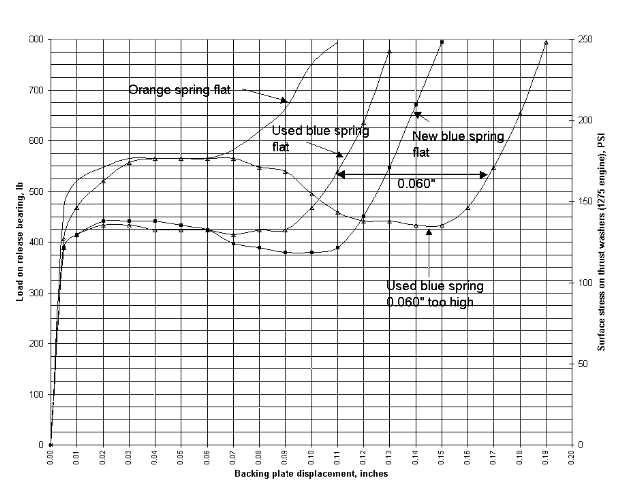
Should I remove another 0.040" from the three posts, or is there a better way to tell when the spring is flat then trying to visually look at it? Does having 0.010 to 0.020" travel before the over center point is reached seem correct? One of my concerns with doing this is I would then have only 0.060" of travel before the stops are reached. Figure 8 in the article linked above is indicating 0.130 to 0.150" of travel for a correctly setup blue spring.
Do I need to add spacers where the drive strap bolts to the flywheel so that the drive straps are parallel to the flywheel when the clutch is fully engaged?
I should probably also note I am reusing the old diaphragm spring and I don't know what color it is. This all started with fixing an oil leak. I wasn't having any problems with the clutch. Also, the total thickness from where the drivestrap bolts to the flywheel to the bottom (as oriented below) is teh same on both of the flywheels I have. I don't think anyone has tried to lighten either one.


