
| Orig. Posting Date | User Name | Edit Date |
| Aug 31, 2013 06:37AM | DyeLooper | |
| Aug 23, 2013 02:33PM | DyeLooper | |
| Aug 23, 2013 02:21PM | DyeLooper | |
| Aug 23, 2013 02:12PM | malsal | |
| Aug 23, 2013 01:43PM | DyeLooper | Edited: Aug 23, 2013 01:45PM |
| Jul 29, 2013 04:40PM | DyeLooper | |
| Jul 27, 2013 03:11PM | DyeLooper | |
| Jul 5, 2013 07:43PM | DyeLooper | |
| Jul 3, 2013 02:56AM | Dan Moffet | |
| Jul 2, 2013 05:15PM | travellering | |
| Jul 2, 2013 04:13PM | DyeLooper | |
| Jul 2, 2013 06:53AM | Dan Moffet | Edited: Jul 2, 2013 06:58AM |
| Jul 2, 2013 06:47AM | Dan Moffet | |
| Jun 30, 2013 03:40PM | dimitris | Edited: Jun 30, 2013 03:41PM |
| Jun 30, 2013 03:24PM | DyeLooper | |
| Jun 29, 2013 04:29AM | Dan Moffet | |
| Jun 29, 2013 01:21AM | dimitris | |
| Jun 28, 2013 05:30PM | DyeLooper | |
| Jun 28, 2013 04:37PM | dimitris | Edited: Jun 28, 2013 04:56PM |
| Jun 28, 2013 04:31PM | DyeLooper |
Found 38 Messages

|
Total posts: 232
Last post: Mar 17, 2019 Member since:Oct 8, 2012
|
Cars in Garage: 0
Photos: 0 WorkBench Posts: 0 |
So I ended up talking to Mike at Seven Enterprises. He said I was over thinking the float setting. He says just take a .125 1/8 inch drill bit aand set the float to it. Virtually no clearance then between the lip of the carb and the center portion oif the float. My thinking is that this really closes the needle valve when not needed. Non the less, I attempted to fire up the car and it ran like doo doo. Had other committments to attend to so I came back the next day. I went to start to remove the carb again, and then I saw it...I had left the vacuum line of to the carb!! Did I do this all these other times too??? Well, she's running, but still working on fine tuning the AF mixture.....Anyone local to MD/Delaware line with a CO analyzer. I really wanna nail this thing down. I will come to you.....
P.S. //www.oceangrovenj.com/ Brits on the Beach
Jason
|
|
Total posts: 232
Last post: Mar 17, 2019 Member since:Oct 8, 2012
|
Cars in Garage: 0
Photos: 0 WorkBench Posts: 0 |
So the SU website states this for the float:
After fitting the float and valve, invert the carburetter so that the needle valve is held in the shut position by the weight of the float only. Check that the point indicated on the float (see illustration) is 1.0 +/- 0.5 mm (0.04 +/- 0.02 in) below the level of the float chamber face (see illustration). Then adjust the float position by carefully bending the brass pad. Check that the float pivots correctly about the spindle
Since I set the float at .040 already and had a very lean mixture, If I set at .020-.040 this would allow more fuel in to the needle valve, YES? I am looking for confirmation here. If I place the float at .060 this would close the needle more and allow less into the needle and would run lean? Take off carb, make adjustment, run car, Take off carb, make adjustment, run car, Take off carb, make adjustment, run car, Take off carb, make adjustment, run car........Aggghh!!!
Jason
|
|
Total posts: 232
Last post: Mar 17, 2019 Member since:Oct 8, 2012
|
Cars in Garage: 0
Photos: 0 WorkBench Posts: 0 |
Just checked... .087/.088 on both.
Jason
|
|
Total posts: 8382
Last post: Jan 13, 2022 Member since:Feb 7, 2006
|
Cars in Garage: 0
Photos: 0 WorkBench Posts: 0 |
|
Just a wild guess did you check the size of the jet hole ? there are 90 thou and 100 thou sizes.
If in doubt, flat out. Colin Mc Rae MBE 1968-2007.
Give a car more power and it goes faster on the straights,
make a car lighter and it's faster everywhere. Colin Chapman.
|
|
Total posts: 232
Last post: Mar 17, 2019 Member since:Oct 8, 2012
|
Cars in Garage: 0
Photos: 0 WorkBench Posts: 0 |
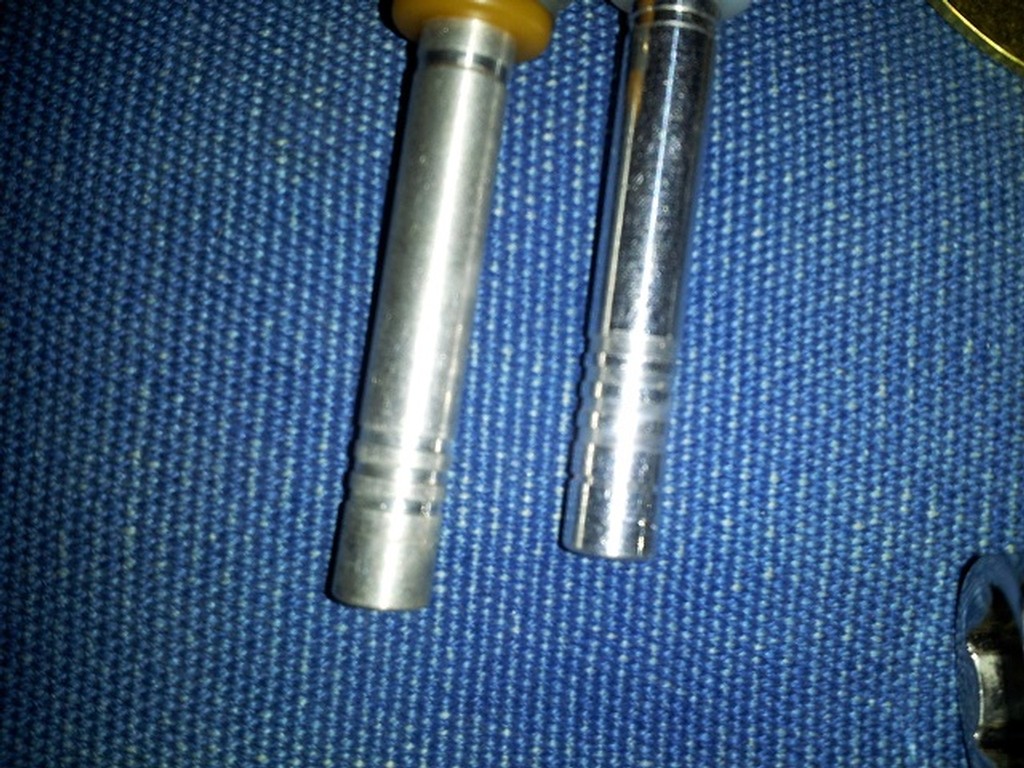
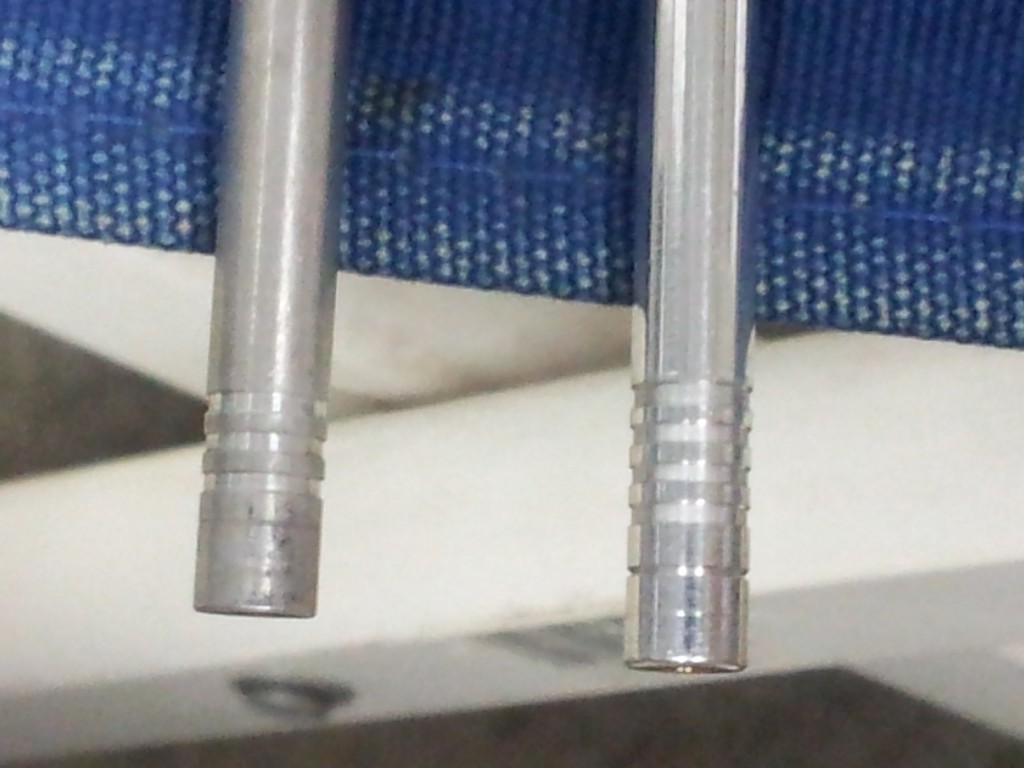
So I got alot of things sorted out. But I new I had to get a new float needle & seat for my HIF44. So since I was in there I would replace the jet too. Well, things has caused running problems. Car running lean, hiccuping alot. Wont steady run when I'm getting on the gas. I had the idle up, and had the fuel/air wide open, Nuttin. Still running like poop. Removed carb, double checked clearance of float, had at .050, set to .040. Re-assemble, no change. getting ready to set float at .060 and re-assemble. I know I have a BFY needle. The Jet I removed is below with the one I installed. Definite differences frolm the markings, just not sure what those differences are. Old on the left, new on the right. Any help wouod be appreciated...
Jason
|
|
Total posts: 232
Last post: Mar 17, 2019 Member since:Oct 8, 2012
|
Cars in Garage: 0
Photos: 0 WorkBench Posts: 0 |
|
|
Total posts: 232
Last post: Mar 17, 2019 Member since:Oct 8, 2012
|
Cars in Garage: 0
Photos: 0 WorkBench Posts: 0 |
Jason
|
|
Total posts: 232
Last post: Mar 17, 2019 Member since:Oct 8, 2012
|
Cars in Garage: 0
Photos: 0 WorkBench Posts: 0 |
So we are making progress.... The car ran really bad in the morning when it ran fine the night before. So I removed the distributor all together, broke it down into stages. I sprayed some WD40 into the springs and moving parts (not sure of the name of this area). In the (vacuum area)? the coil looked pretty bad. So in the end, I put it all back together and the car ran great!!!!!!!!! The next morning it ran bad again. So I re-did the timing with the carb vacuum plugged and did not use the vacuum advance at all. Car is running fine and it did the following day too. Ordering a new distributor....
Jason
|
|
Total posts: 9845
Last post: May 23, 2025 Member since:Aug 14, 2002
|
Cars in Garage: 0
Photos: 0 WorkBench Posts: 0 |
|
DyeLooper:
In the photos I posted of the cut-away lever, the original poster (not me!) apparently cut away the top and bottom laminations, leaving the middle piece. For him, the removal of these pieces elimintated the bending caused by the meals expanding at different rates.
The other pattern diagram is for the replacement of the entire laminated section with plain metal. This requires cutting away the 4 rivets and fastening on the new plate somehow.
In my case, I folded a piece of sheet stainless steel to match the shape of the entire part, then drilled and filed to the same shape.
Check Travellering's suggestion for correct connections first. You could also temporarily cap off the vacuum advance ports and tune as if it was a non-advance distributor to see if that helps determine if it is the carb or dizzy.
.
"Hang on a minute lads....I've got a great idea."
|
|
Total posts: 2492
Last post: Sep 25, 2019 Member since:Jan 9, 2003
|
Cars in Garage: 1
Photos: 2 WorkBench Posts: 3 |
|
Do you have a photo of the connections as you are running them on your carb? I found out on my HIF38 that a line I had plugged off as an extra vacuum line was actually a bit of the part-throttle lean off setup, and needed to link back to another air/vacuum fitting before the throttle plate. You could have some similar issue preventing you from achieving an optimum tune.
As a pointer on the digital camera closeup issue, you need to check to see if you have the little flower icon selected for macro photography. I've seen this option on very cheap cameras before, so likely yours has it or something similar. You will find that if you point your finger at the item from the side, it will give the camera a better chance of focussing on the desired area instead of behind it.
rusted subframe bolts are the hardest material known to man...
|
|
Total posts: 232
Last post: Mar 17, 2019 Member since:Oct 8, 2012
|
Cars in Garage: 0
Photos: 0 WorkBench Posts: 0 |
So I did re-do my timing again yesterday, set at 5 degrees and found out I needed to plug the vacuum line after I disconnected it from the dizzy. Tried starting it up after work today and again it would not hold an idle...DAN, So if I have this right... The Bi-metal piece is having to much thermal expansion and is causing the the needle and slide to get jammed up when heated. You only changed out the non-metal piece? You cut off the non-metal piece, made a new one out of SS and riveted on your new piece. Another thought is that tommorow before I do anything, I will double check my timing I set at 5 degrees to see if it has changed at all. Maybe the internals of my distributor are all jammed up and need some TLC..... Thoughts??
Dan and all, thanks again for all your help.....
Jason
|
|
Total posts: 9845
Last post: May 23, 2025 Member since:Aug 14, 2002
|
Cars in Garage: 0
Photos: 0 WorkBench Posts: 0 |
|
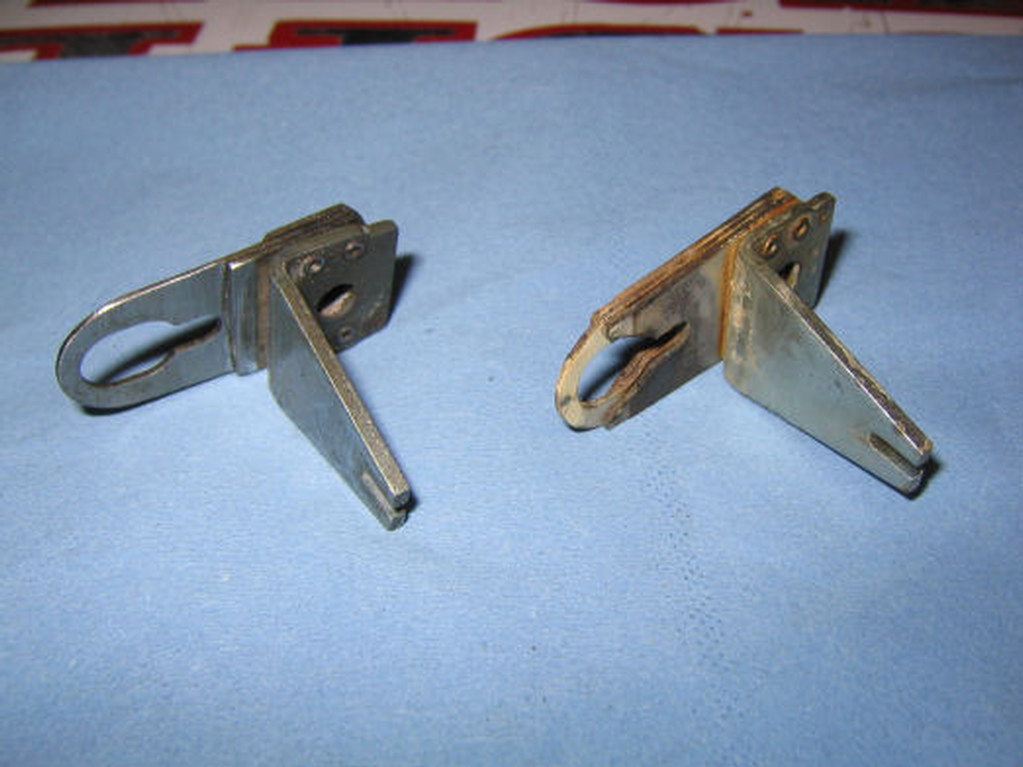
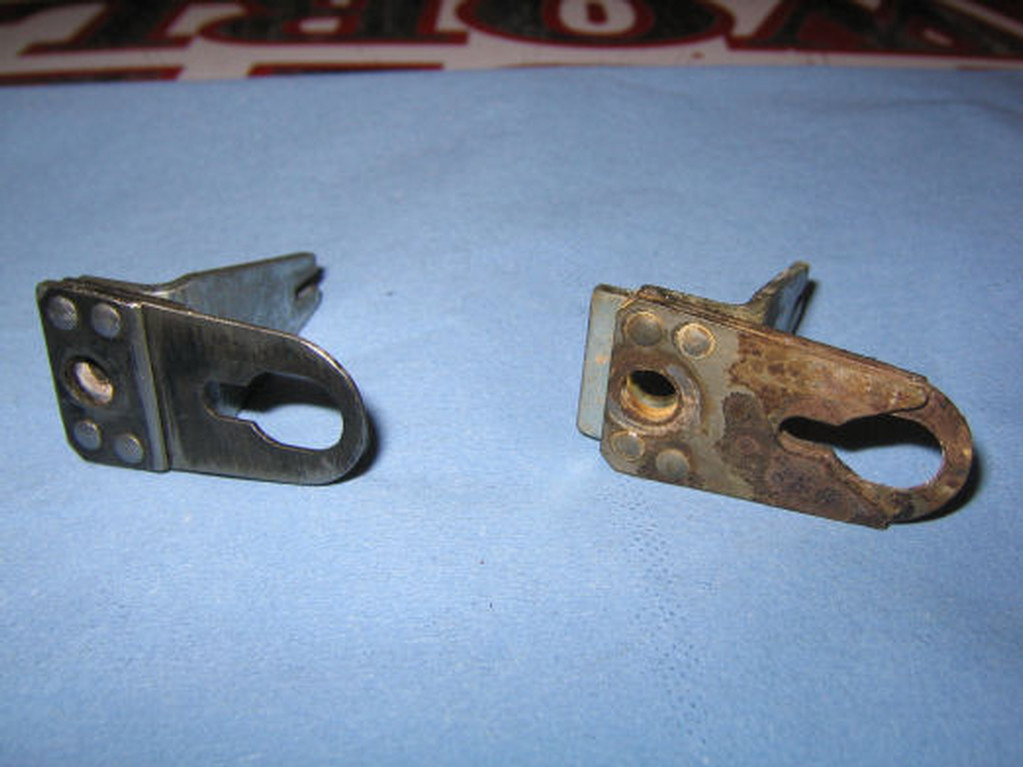
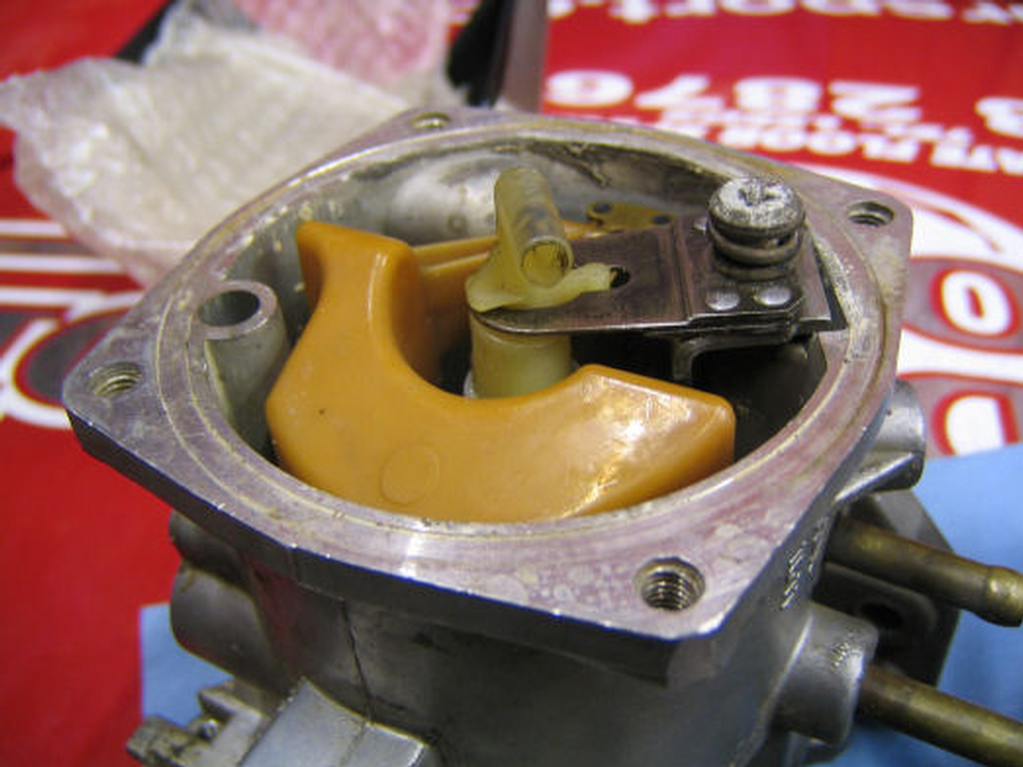
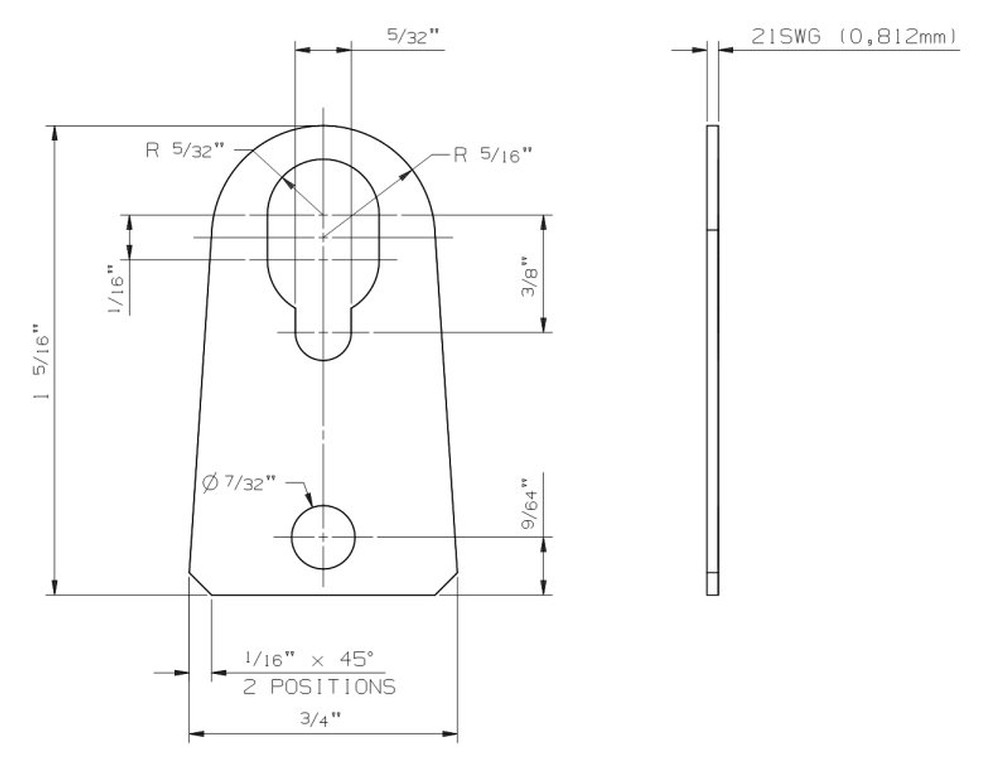
Here is some photos gleaned from this board when I wnet through this stage of life:
The scuzzy lever is a "before" version; the nice clean part is the "after" he bi-metal was cut away by the original poster.
The bottom of a HIF carb is shown to indicate where it lives.
The drawing is the cutting pattern for a metal shim to repale the bi-metal plate.
.
"Hang on a minute lads....I've got a great idea."
|
|
Total posts: 9845
Last post: May 23, 2025 Member since:Aug 14, 2002
|
Cars in Garage: 0
Photos: 0 WorkBench Posts: 0 |
|
It sounds now that you are up against the HIF's bi-metal lever in the idle mixture adjustment mechanism. This miserable piece of British humour is intended to lean out the engine once it warms up - to improve fuel economy and reduce emissions (supposedly). The trouble is, we home mechanics are slow and careful s we set idle mixture. Meanwhile the engine warms up and the heat rising from the exhaust manifold warms the carb. But it gets warmer than optimum, meaning the lever continues to lean out the engine as we continue to adjust for optimum mixture. (The carb gets warmer than normal because the bonnet is up, the car isn't moving and there's no air flow to move the heat away from the carb.)
The solution is to either get really quick at making these adjustments or modify the lever to make it non- bi-metallic. I made one out of a piece of stainless steel folded to match the angles, then drilled and filed to match the hole and notch. Some people take it apart and replace the bi-metal piece with something else.
A rolling road WITH an operator knowledgeable in SU carbs will solve it, but you'd be doomed to going back for tune-ups.
.
"Hang on a minute lads....I've got a great idea."
|
|
Total posts: 2022
Last post: Jan 14, 2022 Member since:Mar 8, 2002
|
Cars in Garage: 0
Photos: 1 WorkBench Posts: 1 |
|
|
|
Total posts: 232
Last post: Mar 17, 2019 Member since:Oct 8, 2012
|
Cars in Garage: 0
Photos: 0 WorkBench Posts: 0 |
Jason
|
|
Total posts: 9845
Last post: May 23, 2025 Member since:Aug 14, 2002
|
Cars in Garage: 0
Photos: 0 WorkBench Posts: 0 |
|
.....But the BIG problem it took many attempts to cure was the size of the needle in the inlet valve - the tolerance was too close and when the carb warmed up, the needle would stick open, causing the bowl to overflow, resulting in flooding and stalling. I filed down the corners of each fin (4 fins x 2 edges = 8 edges total) a couple of thou of an inch and never have had a problem since. Rub them an eqaul number of srokes on a fine flat file.
What you describe is like the problems I had. I even had it stall while idling. This finally solved it for me. If you have a mechanical fuel pump, it stops when the engine does, so flow out the overflow may not be noticed. You may see a bit of bubbling there, but not if you have a drain tube attached. I even tried a fuel pressure regulator without success before I figured out the tolerance problem.
The Grose Jet may appear to be a solution, but I've read they need periodic cleaning. They also do not have a pre-jet filter screen.
.
"Hang on a minute lads....I've got a great idea."
|
|
Total posts: 2022
Last post: Jan 14, 2022 Member since:Mar 8, 2002
|
Cars in Garage: 0
Photos: 1 WorkBench Posts: 1 |
|
//www.youtube.com/watch?v=vPCfwkIdWpc
|
|
Total posts: 232
Last post: Mar 17, 2019 Member since:Oct 8, 2012
|
Cars in Garage: 0
Photos: 0 WorkBench Posts: 0 |
Piston moves freely and I did set the jet level with the deck before I started everything.....Thanks for the input
Jason
|
|
Total posts: 2022
Last post: Jan 14, 2022 Member since:Mar 8, 2002
|
Cars in Garage: 0
Photos: 1 WorkBench Posts: 1 |
|
|
|
Total posts: 232
Last post: Mar 17, 2019 Member since:Oct 8, 2012
|
Cars in Garage: 0
Photos: 0 WorkBench Posts: 0 |
My float cap came in today, and I haved re-installed the HIF44, I adjusted the idle and air/fuel mixture before I even tried cranking it up. I increased the idle and backed off the AF mixture. I do not have the choke cable attatched. There is slack in the throttle cable. I was able to get the car to idle steady at 11-1200 befor I shut it down. I waited a few minutes and then re-attempted to start it up, it would not. Car keeps flooding, I would assume. When I removed and cleaned the carb, all I did was replace the float bottom plate do to warpage and cleaned everything else. If anything was suspect was the float was set at at about .000, I set at .049 according to manual. Also the needle and seat, the needle was ever so slightly scored. If this was bleeding by would I see fuel coming out the overflow or would the carb flood and not be able to re-start? I have the plugs pulled, will try again and restart again tomomrrow with setting proper idle and f/A mixture. Anyone have a great way to do thsese or a link? Cylinder 3 & 4 were dry, 2 was wet, 1 was pretty dry of fuel. Making progress but they are baby steps....
Jason
Found 38 Messages


