Video How To on Keeping Your New Paint Looking Great
Spoiler Alert: Use a car cover to protect the paint. And better still... paint the bolts, then use Brendan's trick to putting them back on
Hey gang it's Brendan from Spirits Mania here and well we're back making videos again. Who would have guessed? This time I'm actually at my home garage which is about 10 miles of the crow flies from many many headquarters in Nevada City California and I'm in my own garage.
I'm working on my own 67 Sprite which I've talked about before to a lot of you that have called in and you may have seen it on the forums about paint in September. And I've been working on well putting it back together and I'm just going to share a series of small short little videos about things that I'm discovering as I put the car back together; annoying stuff, weird stuff, cool stuff, unusual stuff, funny stuff, just stuff.
And today one of the things I'm going to share with you is “what do you do when you don't want to screw up your new paint and you're trying to put your car back together?”
Yeah it's a trick. So the first thing that I do is I have a car cover. If you get yourself a car cover, be careful. When you take and put the car cover back on and off the car, don't drag it against the side.
Make sure you're always lifting it over the paint as you set it back down because you're going to cause lots of little swirl marks and stuff that's just going to be annoying and you'll have to buff out later. So try not to do that.
And when you lay it on there, don't drag it across. I don't care how soft it is. Just don't drag it across the paint. It's not a good idea.
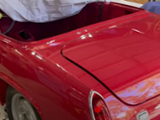
Now I'm going to show you another really weird little thing. I'm putting my boot lid on as you can see. I've got most of the rear end already on the car. And when I had the car painted, the car wasn't completely assembled at every stage. And so I actually had my painter paint some of the bolts so that I could replace some of the ones he was doing when he was mopping it up and he was blocking the car out and he was doing stuff to it so that I could replace them with painted bolts later.
But of course you always know what the problem is. Once you do that, the minute you stick a socket or something like that on one of these, you're just going to take the paint right off.
Are you going to get it greasier? It's just going to be terrible.
Well anyway, this is the solution I came up with.
So what I did, I cut the finger off of a rubber glove. And I just used it over the end of the socket, just like that. Focus, Danielson. Focus. Focus, Danielson. There it is. Can you see? Can you see?
Anyway, so I just put that over the tip of the socket to keep it so that I can, well you know, I can go and get it over the end of that and not screw up the paint that's on any of my painted fasteners.
So I'm going to go and I'm going to reattach the six on the hinge for the boot lid and then I'll lift it up and we'll see if any of them are scratched. Still needs to be sort of set in place and tweaked and moved around and sat in all the rest of it. But let's see if it works.
All right. Let's see how that worked. And look, nary scratch. Looks like they were pretty much painted in place. So you know what? That little trick works. And I invented that. I'm kidding. I don't know. I'm sure somebody else came up with that before.
But that was an idea that I just had. And it seems to work like a charm. So that's just your little tip for the day, right? So again, all I did, right?
Was I just took rubber gloves and I just put a little tip on it. Now I started with a nice clean socket, right? It's not filthy dirty. But then if you just put that over the end of it, you'll notice that you can pretty much twist any of those without having any of your paint come off.
Well, it's kind of a cool thing. I'll continue to do that because I got a few more that I've got to actually mess with. But I figured, you know, the results speak for themselves. So there you go, right? I mean, why not? Looks good.
Okay. All right. So tip of the day. Nice day here on Grass Valley. It's going to snow next week. Anyway, keep watching this space because I'm going to continue doing this.
Maybe I'll just give you a really quick show of how far along I am on the car. Okay. Well, there she is. As you can see, she's got full front and rear suspension on now. And let's take a look. We got the steering rack. We got the steering column. We got brakes. All the brake lines run.
We've even got a wiper motor over there. Trying to get as many of the mechanicals that are hard to get to when you got everything together.
And then inside under the dash, you know, obviously we have the pedals. I don't have the dip switch or the accelerator pedal in yet. I've got the flap for the heater. And then I've got under the dash.
If you can see it there, I've got the nozzles for the, the demister part of that. There already there. And then the wiper wheelboxes and everything.
And check out these nifty little red covers I put on my wiper wheelboxes so that it doesn't, doesn't snag on the, on the car cover. There you can see the rear wiring harness as it goes into the back. All of that's done back there, obviously. And then of course I also have, I've got rear suspension and gas tank.
And over there. I've got, can you see it? A fuel pump. And the main line. Mean fuel line. That's been run. As you can see. To there. Now about the fuel line.
Little tip. If you have your original fuel line clips, keep them. Reuse them. I found that the newer ones you can get, they appear to be a little small. They appear to really only be brake line clips made for the 316s brake line. Of course your fuel line is quarter inch.
I couldn't, I mean I could get them to work but not without way too much force. So I just cleaned up my old ones and used them. In fact I've been doing that with a lot of things on this car so far. If you have a good original, bit of hardware or anything else.
Now I'm, I'm apt to just want to use it. I don't know if that's where the car is as of right now.