

| Orig. Posting Date | User Name | Edit Date |
| Jan 23, 2015 12:27PM | dklawson | |
| Jan 23, 2015 09:27AM | Dan Moffet | |
| Jan 22, 2015 07:05AM | CooperTune | |
| Jan 22, 2015 06:44AM | Spitz | |
| Jan 22, 2015 06:36AM | CooperTune | |
| Jan 22, 2015 06:05AM | Mini41 | |
| Jan 21, 2015 05:59PM | swgray | |
| Jan 21, 2015 05:35PM | DyeLooper | |
| Jan 21, 2015 05:32PM | DyeLooper | |
| Jan 21, 2015 12:47PM | dklawson | Edited: Jan 21, 2015 12:52PM |
| Jan 21, 2015 11:55AM | SXSMAN | |
| Jan 21, 2015 11:46AM | Alex | |
| Jan 21, 2015 10:06AM | Spitz | Edited: Jan 21, 2015 11:52AM |
| Jan 21, 2015 09:53AM | SXSMAN | |
| Jan 21, 2015 09:30AM | Cup Cake | Edited: Jan 21, 2015 09:31AM |
| Jan 21, 2015 09:14AM | Mini41 | |
| Jan 21, 2015 09:06AM | dklawson | |
| Jan 21, 2015 08:54AM | Mini41 |

|
Total posts: 9241
Last post: Aug 17, 2023 Member since:Jun 5, 2000
|
Cars in Garage: 0
Photos: 0 WorkBench Posts: 0 |
|
Turning backwards can ruin the cutting edge on the ream making it dull.
|
|
Total posts: 9831
Last post: May 12, 2025 Member since:Aug 14, 2002
|
Cars in Garage: 0
Photos: 0 WorkBench Posts: 0 |
|
That's the general idea. I double ended................ Do not turn your reamer backwards. Steve (CTR)
Okay Steve, that sounds like a shop tip given by an 'old head' of a machine shop. Never having taken a shop class, I (and probably others) wonder why.
(I'm guessing turning one backwards tends to push cuttings into the bushing surface, scarring it.) Please explain.
.
"Hang on a minute lads....I've got a great idea."
|
|
Total posts: 4141
Last post: Jul 28, 2024 Member since:Oct 8, 2011
|
Cars in Garage: 0
Photos: 0 WorkBench Posts: 0 |
|
That's the general idea. I double ended my guides for, with and without bearing option both arms. I also machined flats at the chucking end of the reamer for turning by hand. It helps to pull a wet stone along the face of cutters every few years. The bush is tough material and hard on the reamer. Had acess to small adjustable reamers with guides at work but now have my own set up. About time to order another reamer. Do not turn your reamer backwards. Steve (CTR)
|
|
Total posts: 13996
Last post: Mar 31, 2025 Member since:Jan 22, 2003
|
Cars in Garage: 4
Photos: 381 WorkBench Posts: 1 |
|
I made this in the shop. The step on the aluminum is sized for the oppsite end of the bushing before the needle bearing is pushed in. This is what you are talking about correct?
Tough to tell what the business end is like in the pic
"Everybody should own a MINI at some point, or you are incomplete as a human being" - James May
"WET COOPER", Partsguy1 (Terry Snell of Penticton BC ) - Could you send the money for the unpaid parts and court fees.
Ordered so by a Judge
|
|
Total posts: 4141
Last post: Jul 28, 2024 Member since:Oct 8, 2011
|
Cars in Garage: 0
Photos: 0 WorkBench Posts: 0 |
|
Hate to be the guy who points it out. You need to replace the bushing that is reamed out of line before going ahead. If the pin passes though that end alone the clearance is there. Any additional cutting you do will increase clearance. Yes it will go in and feel good but if you check the fit on the bushed end only it will be sloppy and the whole job will be after awhile. I bought the reamer and made a couple of bushing to do the bush in line with or without the bearing in place for welded (which uses two bushes) and cast arms. I also convert cast swing arms to bush both ends for race cars. Just raised the price for doing rear arms for first time since 1976. Steve (CTR)
|
|
Total posts: 214
Last post: Aug 1, 2024 Member since:Nov 9, 2013
|
Cars in Garage: 0
Photos: 0 WorkBench Posts: 0 |
Doug,
You the man! The home made reamer looks like it would be the perfect solution. I'll see if it works.
Jack
|
|
Total posts: 31
Last post: Dec 17, 2020 Member since:Nov 29, 2011
|
Cars in Garage: 0
Photos: 0 WorkBench Posts: 0 |
|
I ordered a 13/16" reamer from McMaster-Carr 3106A53. Worked fine for me.
|
|
Total posts: 232
Last post: Mar 17, 2019 Member since:Oct 8, 2012
|
Cars in Garage: 0
Photos: 0 WorkBench Posts: 0 |
With a new pivot pin, needle bearing, and brass bushing, how tightly should a new pivot pin fit in the rear radius arm? With the arm off the car should you be able to turn the pin by hand when it is installed in the arm? On the car, should the arm fall of its own weight without the brakes attached?
Jack
I just got done re-building mine, and they were pretty stiff after puttiing it all back together. Nice and solid with no slop.
Jason
|
|
Total posts: 232
Last post: Mar 17, 2019 Member since:Oct 8, 2012
|
Cars in Garage: 0
Photos: 0 WorkBench Posts: 0 |
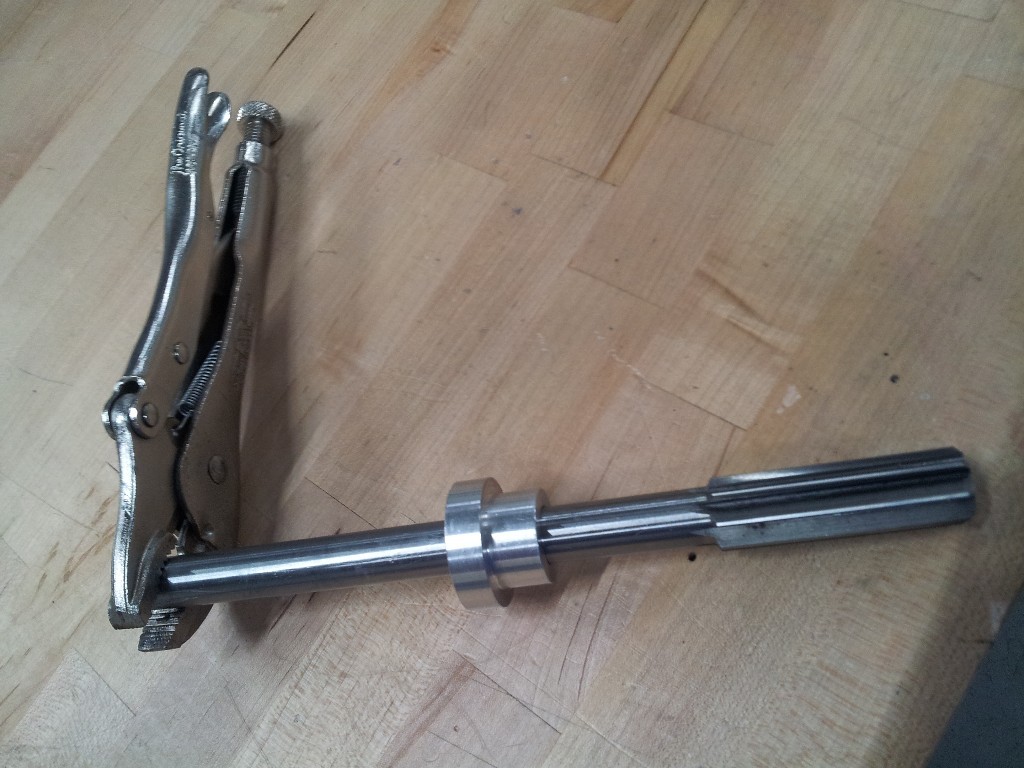
I made this in the shop. The step on the aluminum is sized for the oppsite end of the bushing before the needle bearing is pushed in. This is what you are talking about correct?
Jason
|
|
Total posts: 9241
Last post: Aug 17, 2023 Member since:Jun 5, 2000
|
Cars in Garage: 0
Photos: 0 WorkBench Posts: 0 |
|
I have some acquaintances in the U.K. who have used a DIY, homemade reamer method. (The method is similar to cutting slots in a bolt so it can chase the threads in a damaged tapped hole). The reamer is made from a not too badly worn, used pivot shaft. A thin wheel on an angle grinder or die grinder is used to cut axial slots on the "better" end of the used pivot shaft. The slots are cut about 1/16" deep and at least an inch long. They should be at an angle so that when turned by a drill the slots will "cut" the new bushing.
The installed needle bearing is greased up as is the shaft/reamer and the cutting/slotted end is inserted through the bearing and up against the bushing. A low speed drill is then used to drive the shaft/reamer through the bushing. The shaft is NOT retracted once it passes through. The drill chuck is loosened and the pin pulled out through the bushing so no swarf is drawn into the inside of the arm.
I have not had to use this method but I would certainly consider it if you want to rebuild the arms yourself.
The picture below shows a bolt modified into a thread chaser. You would be making the same modifications to the used pivot shaft to turn it into a reamer.

EDIT: You can find almost anything on the web if you look long enough. See the link below to a Scottish Mini owners photo records of the homemade reamer. Be sure to flip forward and back through a couple of additional pictures to see details of the reamer.
//s777.photobucket.com/user/carlukemini/media/mini%20welding/IMAG0380.jpg.html
|
|
Total posts: 1125
Last post: Nov 6, 2019 Member since:Jan 27, 2014
|
Cars in Garage: 0
Photos: 0 WorkBench Posts: 0 |
Thanks Matthew.
Just  $$$.
$$$.
|
|
Total posts: 10292
Last post: Apr 14, 2025 Member since:Mar 24, 1999
|
Cars in Garage: 0
Photos: 0 WorkBench Posts: 0 |
|
That reamer on its own isn't any good, you need the adaptor tool to go in the roller bearing end to hold it true.
If your bush has been reamed to size freehand (without the use of a long guide to line ream it) then you will get binding.
|
|
Total posts: 13996
Last post: Mar 31, 2025 Member since:Jan 22, 2003
|
Cars in Garage: 4
Photos: 381 WorkBench Posts: 1 |
|
There is....but pricey
ah...I see the additional bit Alex mentions. 18588A...NLA
"Everybody should own a MINI at some point, or you are incomplete as a human being" - James May
"WET COOPER", Partsguy1 (Terry Snell of Penticton BC ) - Could you send the money for the unpaid parts and court fees.
Ordered so by a Judge
|
|
Total posts: 1125
Last post: Nov 6, 2019 Member since:Jan 27, 2014
|
Cars in Garage: 0
Photos: 0 WorkBench Posts: 0 |
Larry, I never found a reamer made for this job. Think I found the correct size adjustable reamer and welded a longer shaft on it that would come out the end of the bearing.
I might have used a 1/2" extension so I could put a ratchet on it to drive it.
Cut it down on the lathe to correct bearing size, also to true it up.
Tool works great, but is there one out there made for this job ?
|
|
Total posts: 10335
Last post: Aug 19, 2016 Member since:May 13, 2001
|
Cars in Garage: 0
Photos: 0 WorkBench Posts: 0 |
|
There's special hand-held reaming tool for this job. One end goes through the bearing to maintain alignement. I'm not sure how to do it otherwise.
The power of accurate observation is commonly called cynicism by those who have not got it. G.B.S. Sarcasm is the lowest form of wit. Oscar Wilde
//www.cupcakecooper.ca/
|
|
Total posts: 214
Last post: Aug 1, 2024 Member since:Nov 9, 2013
|
Cars in Garage: 0
Photos: 0 WorkBench Posts: 0 |
Thanks Doug. Good info. Is there a way to insure the alignment of the bushing and the needle bearing?
I thought putting in a new needle bearing and bushing and reaming the bushing to size would do the trick. But my new pivot pin is definitely binding.
Jack
|
|
Total posts: 9241
Last post: Aug 17, 2023 Member since:Jun 5, 2000
|
Cars in Garage: 0
Photos: 0 WorkBench Posts: 0 |
|
As you are aware, the bushing has to be bored to fit the shaft and the bore has to be inline with the needle bearing. If the bushing is bored/reamed to size without taking into acount alignment with the needle bearing the shaft may bind.
There is only a small amount of clearance between the bushing and shaft... but it is clearance. The shaft should be free to turn by hand when the arm is off the car. With the arm mounted on the car (but no shocks attached) the arm should be able to drop on its own unless the rubber band seals are somehow creating a lot of drag.
|
|
Total posts: 214
Last post: Aug 1, 2024 Member since:Nov 9, 2013
|
Cars in Garage: 0
Photos: 0 WorkBench Posts: 0 |
With a new pivot pin, needle bearing, and brass bushing, how tightly should a new pivot pin fit in the rear radius arm? With the arm off the car should you be able to turn the pin by hand when it is installed in the arm? On the car, should the arm fall of its own weight without the brakes attached?
Jack


