


|
Total posts: 2277
Last post: Oct 6, 2022 Member since:Nov 18, 2007
|
Cars in Garage: 0
Photos: 77 WorkBench Posts: 2 |
|
For public information, you should consider what different lines you want. NiCopp lines are really nice, but easily double the price. I like mine, but they aren't for everyone. They are easy to bend and won't corrode with road salt/other chemicals we apply to our roads in the winter. Then you have steel lines and stainless lines. Stainless is nice but it's hard to work with. No my favorite, and not something I would recommend a novice try to take on. It's hard to bend and easy to screw up, but the corrosion characteristics are nice. If you want a great compromise, you should get PVF coated steel. Poly-vinyl Flourine coating is applied to steel lines which gives it a great wear and corrosion resistance. You probably won't have to replace them again in your lifetime unless you live in some REALLY harsh environments.
Fuel lines should be considered based on type of metal and size needed to supply your engine. I needed to go big on mine so they would feed the fuel injection. I also needed to run a return line that my car never had. Look at the difference between steel and aluminum for your application. Consider what kind of terminations you'll be using. Flared? Fittings? AN? Do your homework here on what you want to use.
I went with NiCopp brake lines and Aluminum fuel line. It's not for everyone but it fits my project perfectly.
|
|
Total posts: 96
Last post: Nov 20, 2018 Member since:Oct 14, 2002
|
Cars in Garage: 0
Photos: 0 WorkBench Posts: 0 |
|
Looked at using stainless steel brake tubing but too difficult to cut and form and seal.
Purchased a flaring tool from Eastwood and does double and bubble flairs.
What size fuel pipe , front to rear and under car, should be used? Would like to use Petroflex but only comes in 1/4" I.D.
The fittings from the fuel tanks, electric SU fuel pump and the crossover fuel pipe between the tanks are 5/16" O.D. The
crossover fuel pipe between the twin carbs is 1/4" O.D.
Jim
|
|
Total posts: 288
Last post: Jun 9, 2020 Member since:May 13, 2010
|
Cars in Garage: 1
Photos: 17 WorkBench Posts: 1 |
|
Hey Potato, not sure if you saw it on RestorationMini.com or not, but that's where I'm posting all of my restoration stuff.
http /restorationmini.com/forum/index.php?topic=473.375
Fuel lines start on page 18 I think.
-------------------------------------------------------------------------------
Check out my Classic Mini Podcast - Classic Mini Breakdown, www.classicminibreakdown.com
Basil - 1974 Mini 1000 /// THE BLOG: www.thebluepotato.net/blog
-------------------------------------------------------------------------------
|
|
Total posts: 2277
Last post: Oct 6, 2022 Member since:Nov 18, 2007
|
Cars in Garage: 0
Photos: 77 WorkBench Posts: 2 |
|
Hey Potato, not sure if you saw it on RestorationMini.com or not, but that's where I'm posting all of my restoration stuff.
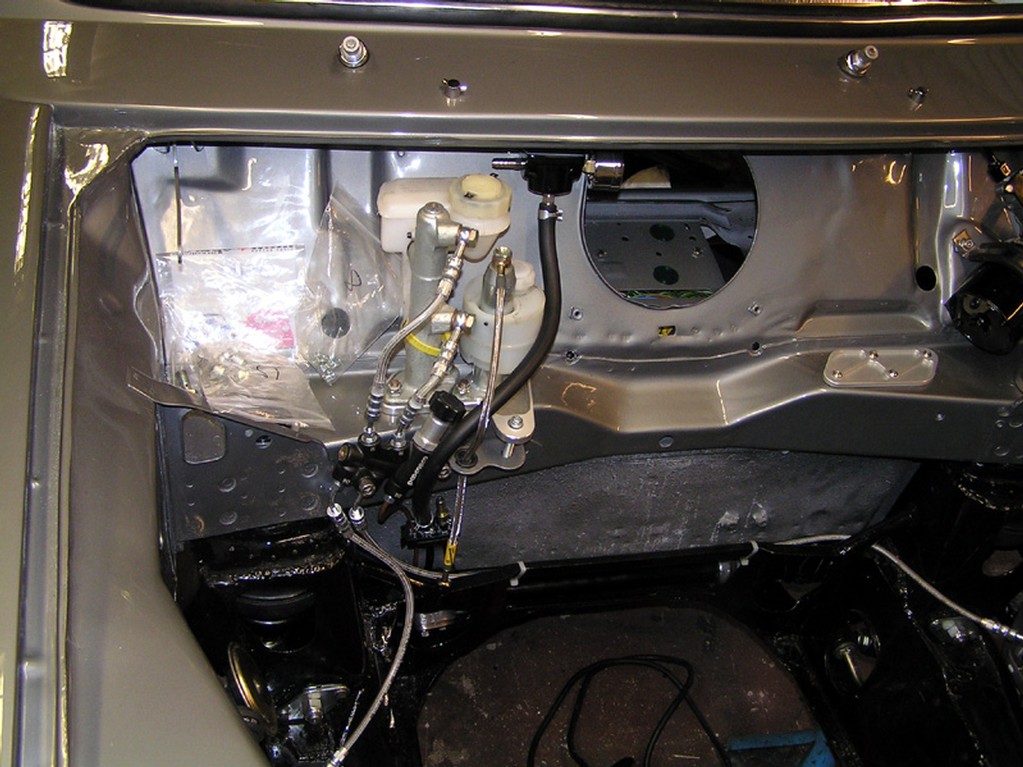
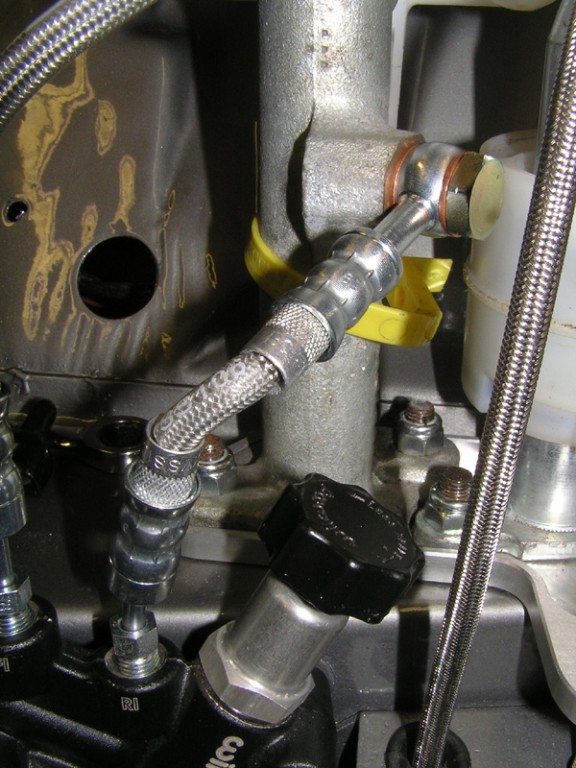
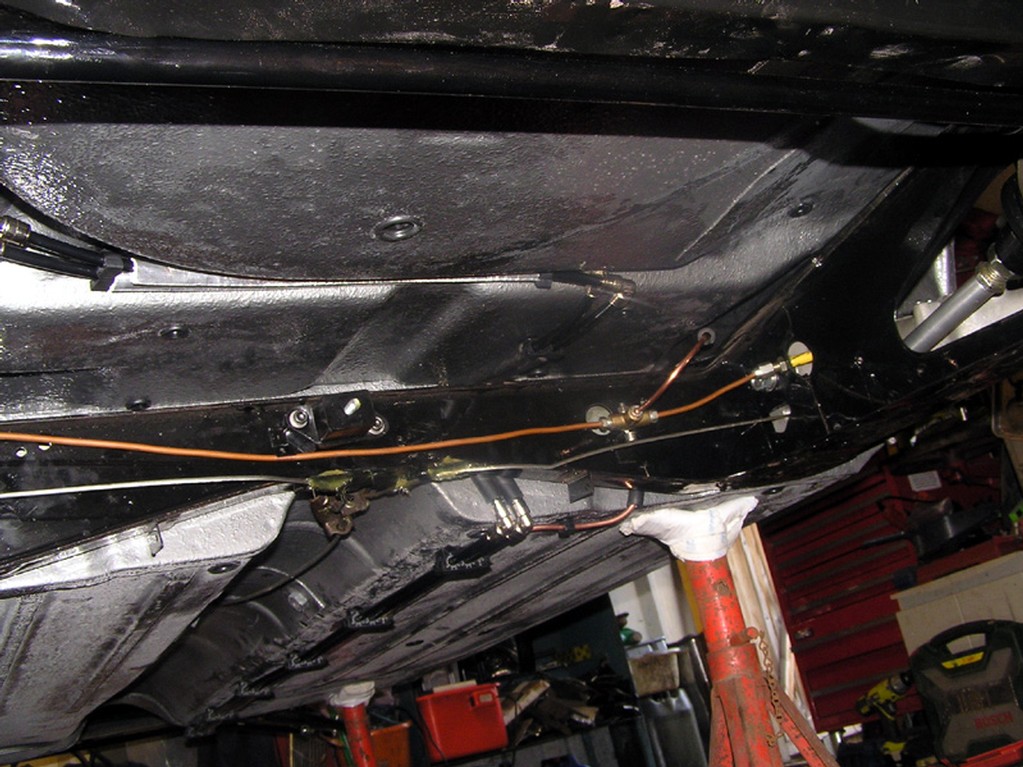
Anyway, I just did my brake lines and fuel lines. I also bought a kit exactly like that from that company. My kit was for a different year, but that's just a matter of a different combo of fittings and tube lengths. The one thing I will say is that, while mine was supposed to be a direct fit with all the pieces I needed.... it wasn't. The pipes are all labeled and give a very vague description of where they are supposed to go, but mine weren't right. nd I had some duplicates of things that weren't supposed to have a duplicate. haha. To be fair, the kit DID have everything I needed, but I had to cut some fittings off, cut tube to size, and then re-flare. I had some left overs that I'm keeping for anything I may run into down the road.
My comprehensive opinion of the kit? I paid less for the kit than I would have for all the pipe and new fittings I needed and I have extras... so... go for it.
Here's my kit

Some left over fittings to show the difference between old and new fittings
I would invest in a moderately prices flaring tool that does a bubble or double flare. If you need it (and I think you will) you will be glad you have it. I sure was.
Also, consider how you want to run them. I had to build mine from scratch without the benefit of having my old lines right beside me to make exact copies. If you want to do an exact copy, then be careful removing the old ones. The benefit of doing it my way was that I could get creative and clean it all up. Which I did.
I also have a wilwood proportioning valve, but not the one you've pictured. I have one that only does one line. I'm going to plumb it in line with the rear so that I can turn them up or down to ensure the right (safe) mix. I don't have it installed yet because of the move.
I also made my fuel lines recently. I won't bore you with all the details, but I did a lot of fitting and adjusting to get these right because I wanted the to terminate as close to the fuel injection as possible. If you want a full write-up and discussion on what I was doing, go to my thread on Restoration Mini.
//restorationmini.com/forum/index.php?topic=473.375
Fuel lines start on page 18 I think.
|
|
Total posts: 3411
Last post: Sep 3, 2022 Member since:Jan 24, 2004
|
Cars in Garage: 1
Photos: 138 WorkBench Posts: 1 |
|
90% of being smart is knowing what you are dumb at.
|
|
Total posts: 1404
Last post: Jun 21, 2018 Member since:Oct 8, 2013
|
Cars in Garage: 0
Photos: 0 WorkBench Posts: 0 |
well it's not hard but to do it nicely both subframes have to come out! The lines were all installed before the frames when built. You can fiddle and fanagle the pipes in but it's not easy and ends up looking ugly
Mini's are like buses they come along in a bunch
|
|
Total posts: 665
Last post: Feb 8, 2025 Member since:May 18, 2002
|
Cars in Garage: 0
Photos: 0 WorkBench Posts: 0 |
|
These guys have the fittings and the tool but I bought my tool directly from the UK
http/www.fedhillusa.com/
|
|
Total posts: 5840
Last post: Nov 1, 2019 Member since:Nov 12, 1999
|
Cars in Garage: 0
Photos: 0 WorkBench Posts: 0 |
|
The only reasonable advice to offer over the Internet is for you to use correct replacements of your original master cylinder and the original brake pressure control as fitted to the car, with replacement lines identical to the originals.
In the many thousands of posts I have made, my recent one is actually something that I should edit out, though it is merely a repeat of an idea printed in at least one mini book decades ago, and the part and modified part are readily available.
Keeping things simple sometimes requires a reminder. Considerations for what modifications are legal in various jurisdictions, or what personal liability might be in the event of a failure are, sadly, also important.
|
|
Total posts: 288
Last post: Jun 9, 2020 Member since:May 13, 2010
|
Cars in Garage: 1
Photos: 17 WorkBench Posts: 1 |
|
An original early pressure limiting valve would be my choice. While Unrestored ones look awful, if they have been on a car for fifty years they had brake fluid inside and in my experience are far enough away from the ends of the system that there is no rust and the seal is fine. You can make them adjustable. Easily. You can also buy one from our host.
http
/www.minimania.com/part/MS72/Austin-Mini-Brake-Adjustable-Proportioning-ValveWilwood also sell a simpler proportioning valve. Part 260-10922
-------------------------------------------------------------------------------
Check out my Classic Mini Podcast - Classic Mini Breakdown, www.classicminibreakdown.com
Basil - 1974 Mini 1000 /// THE BLOG: www.thebluepotato.net/blog
-------------------------------------------------------------------------------
|
|
Total posts: 358
Last post: Feb 20, 2020 Member since:Jul 20, 2013
|
Cars in Garage: 0
Photos: 0 WorkBench Posts: 0 |
I usually replace both brake and fuel lines on these 50 year old cars. I am working on a museum car right now and just flushed out the fuel lines, what a bunch of crap in there. No wonder the car would not run. That is why I just replace them.
Jerry
|
|
Total posts: 5840
Last post: Nov 1, 2019 Member since:Nov 12, 1999
|
Cars in Garage: 0
Photos: 0 WorkBench Posts: 0 |
|
An original early pressure limiting valve would be my choice. While Unrestored ones look awful, if they have been on a car for fifty years they had brake fluid inside and in my experience are far enough away from the ends of the system that there is no rust and the seal is fine. You can make them adjustable. Easily. You can also buy one from our host.
http
/www.minimania.com/part/MS72/Austin-Mini-Brake-Adjustable-Proportioning-ValveWilwood also sell a simpler proportioning valve. Part 260-10922
|
|
Total posts: 288
Last post: Jun 9, 2020 Member since:May 13, 2010
|
Cars in Garage: 1
Photos: 17 WorkBench Posts: 1 |
|
-------------------------------------------------------------------------------
Check out my Classic Mini Podcast - Classic Mini Breakdown, www.classicminibreakdown.com
Basil - 1974 Mini 1000 /// THE BLOG: www.thebluepotato.net/blog
-------------------------------------------------------------------------------
|
|
Total posts: 2628
Last post: May 8, 2025 Member since:Dec 1, 2002
|
Cars in Garage: 0
Photos: 0 WorkBench Posts: 0 |
|
"How can anything bigger be mini?"
|
|
Total posts: 358
Last post: Feb 20, 2020 Member since:Jul 20, 2013
|
Cars in Garage: 0
Photos: 0 WorkBench Posts: 0 |
Jerry
|
|
Total posts: 288
Last post: Jun 9, 2020 Member since:May 13, 2010
|
Cars in Garage: 1
Photos: 17 WorkBench Posts: 1 |
|
Wilwood Proportioning Valve
Wilwood PV on Mk4
-------------------------------------------------------------------------------
Check out my Classic Mini Podcast - Classic Mini Breakdown, www.classicminibreakdown.com
Basil - 1974 Mini 1000 /// THE BLOG: www.thebluepotato.net/blog
-------------------------------------------------------------------------------
|
|
Total posts: 2628
Last post: May 8, 2025 Member since:Dec 1, 2002
|
Cars in Garage: 0
Photos: 0 WorkBench Posts: 0 |
|
"How can anything bigger be mini?"
|
|
Total posts: 288
Last post: Jun 9, 2020 Member since:May 13, 2010
|
Cars in Garage: 1
Photos: 17 WorkBench Posts: 1 |
|
I too will be interested in this thread as I'll be installing new lines. Getting them nice and straight after winding up is one thing.
-------------------------------------------------------------------------------
Check out my Classic Mini Podcast - Classic Mini Breakdown, www.classicminibreakdown.com
Basil - 1974 Mini 1000 /// THE BLOG: www.thebluepotato.net/blog
-------------------------------------------------------------------------------
|
|
Total posts: 13996
Last post: Mar 31, 2025 Member since:Jan 22, 2003
|
Cars in Garage: 4
Photos: 381 WorkBench Posts: 1 |
|
I too will be interested in this thread as I'll be installing new lines. Getting them nice and straight after winding up is one thing.
"Everybody should own a MINI at some point, or you are incomplete as a human being" - James May
"WET COOPER", Partsguy1 (Terry Snell of Penticton BC ) - Could you send the money for the unpaid parts and court fees.
Ordered so by a Judge
|
|
Total posts: 288
Last post: Jun 9, 2020 Member since:May 13, 2010
|
Cars in Garage: 1
Photos: 17 WorkBench Posts: 1 |
|
My question is this...has anyone ran new brake/fuel lines and how hard was it? Any tips or experiences using some of the complete brake pipe kits out there.
Not going for looks here, but taking this area fairly seriously right now, etc.
-------------------------------------------------------------------------------
Check out my Classic Mini Podcast - Classic Mini Breakdown, www.classicminibreakdown.com
Basil - 1974 Mini 1000 /// THE BLOG: www.thebluepotato.net/blog
-------------------------------------------------------------------------------


