

| Orig. Posting Date | User Name | Edit Date |
| Jul 24, 2020 05:40AM | taviivat | |
| Jul 24, 2020 05:28AM | taviivat | |
| Jul 24, 2020 05:15AM | 6464 | |
| Jul 24, 2020 05:01AM | taviivat | |
| Jul 24, 2020 04:15AM | Dan Moffet | |
| Jul 24, 2020 03:30AM | 6464 | |
| Jul 24, 2020 01:21AM | charrison | |
| Jul 23, 2020 04:33AM | taviivat | Edited: Jul 23, 2020 05:03AM |
| Jul 23, 2020 04:22AM | taviivat | |
| Jul 23, 2020 03:39AM | 6464 | |
| Jul 23, 2020 01:09AM | charrison | |
| Jul 21, 2020 04:37PM | taviivat | Edited: Jul 21, 2020 05:41PM |
| Jul 21, 2020 03:22AM | 6464 | |
| Jul 19, 2020 10:14AM | taviivat | |
| Jul 19, 2020 07:49AM | RedRiley | |
| Jul 19, 2020 02:35AM | Dan Moffet | |
| Jul 18, 2020 06:18PM | taviivat | Edited: Jul 18, 2020 06:37PM |

|
Total posts: 19
Last post: Jul 24, 2020 Member since:Aug 27, 2019
|
Cars in Garage: 0
Photos: 0 WorkBench Posts: 0 |
This sill was referred to as "Best fitting narrow sill for MK1/2 that we have ever seen."

Maybe I'll see if I can source a Heritage piece locally.
thnx,
T
|
|
Total posts: 19
Last post: Jul 24, 2020 Member since:Aug 27, 2019
|
Cars in Garage: 0
Photos: 0 WorkBench Posts: 0 |

Not having access to a new sill, I made my own repair section from scratch.
And thanks for sharing these images, it really helps to see other peoples solutions to the same problems. I feel like I've watched the entire internet.
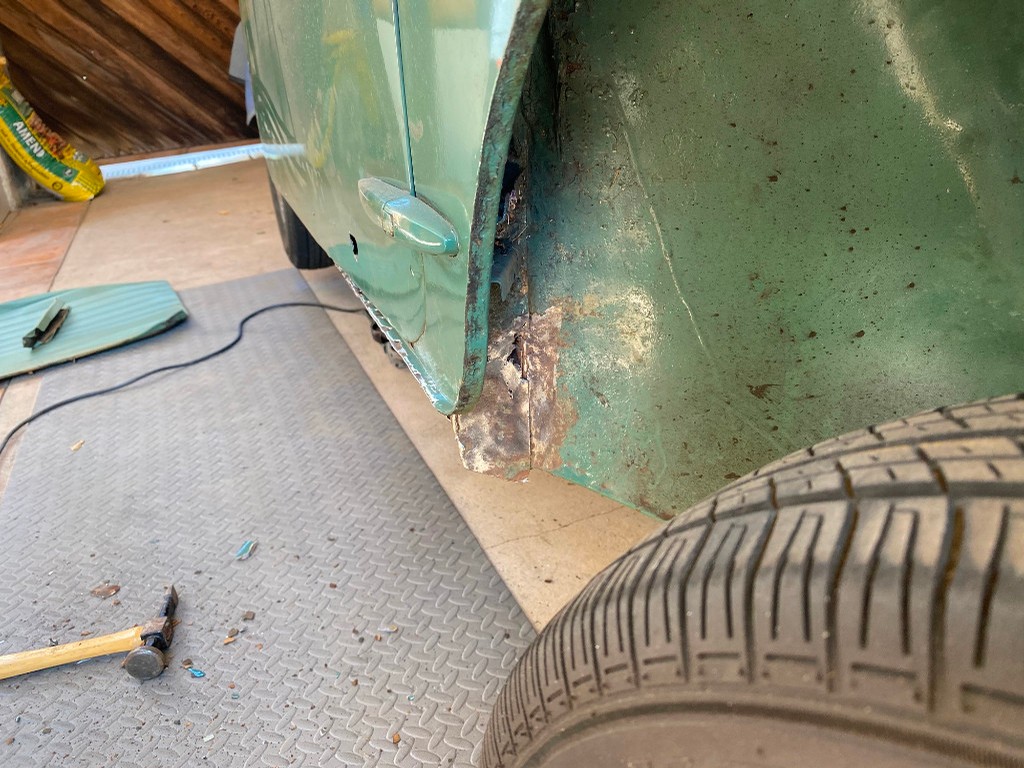
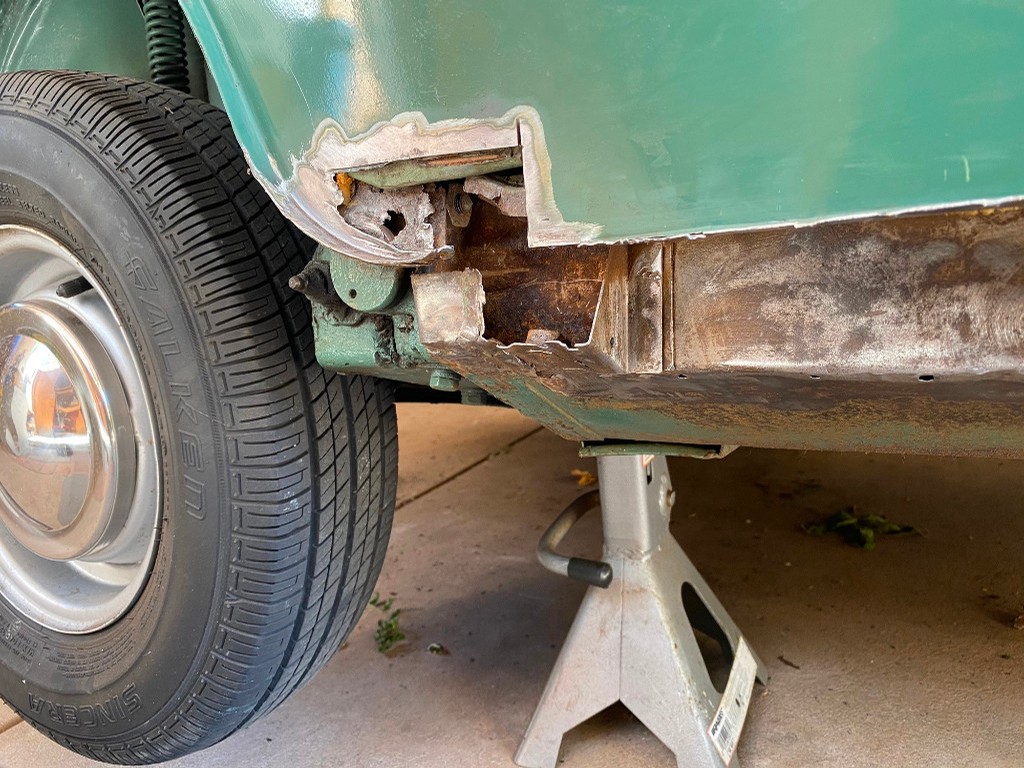
My jacking point inner area looks to be in better condition but check out the front bracket location. This rust spot looks to have impacted the outer sill, inner sill, A panel, and inner wheel arch. If I were a betting man I'd say the inner A panel too.
The rust under body filler scares me, I dont want to work on all of this and miss a spot only to have it bubble up through the new paint. I mentioned above that I'm considering a full strip down. I'm heading to the paint stripper today with my rusted out door, I'll see what they charge for a full shell dip!
|
|
Total posts: 1723
Last post: Oct 20, 2020 Member since:Jun 18, 1999
|
Cars in Garage: 0
Photos: 0 WorkBench Posts: 0 |
|
|
|
Total posts: 19
Last post: Jul 24, 2020 Member since:Aug 27, 2019
|
Cars in Garage: 0
Photos: 0 WorkBench Posts: 0 |
The rear section can made up and weld in.
It feels a little light duty and besides the odd jacking point hole it looks to be a good fit. Do you think the welded piece is a manufacturing error?
|
|
Total posts: 9832
Last post: May 13, 2025 Member since:Aug 14, 2002
|
Cars in Garage: 0
Photos: 0 WorkBench Posts: 0 |
|
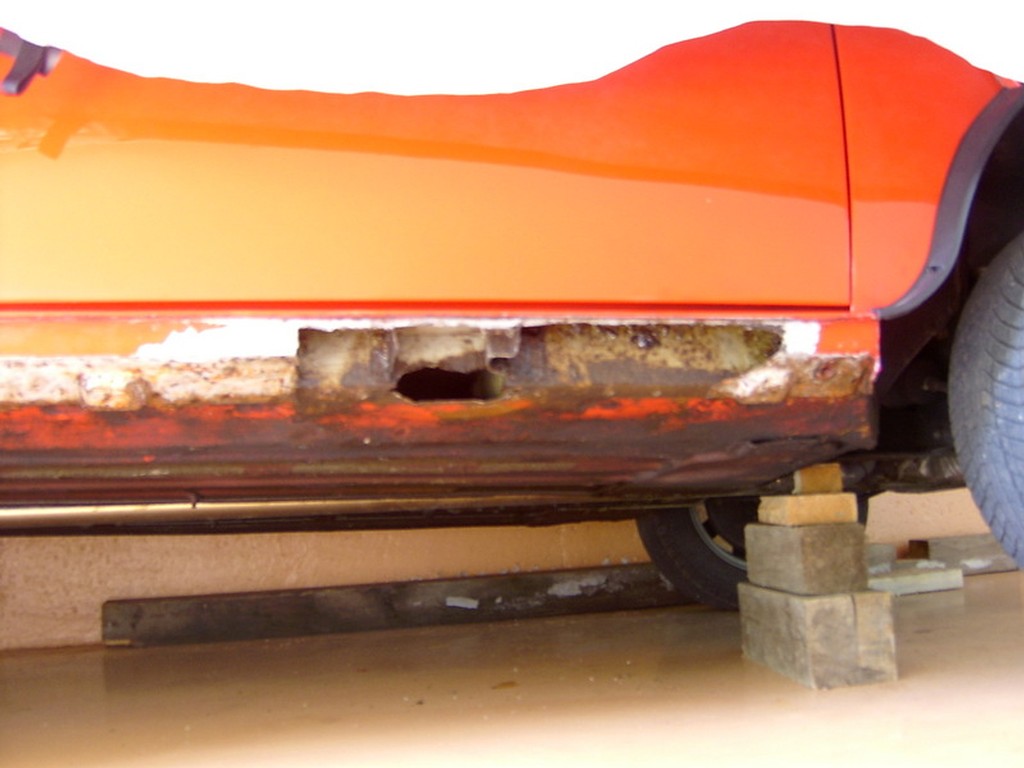
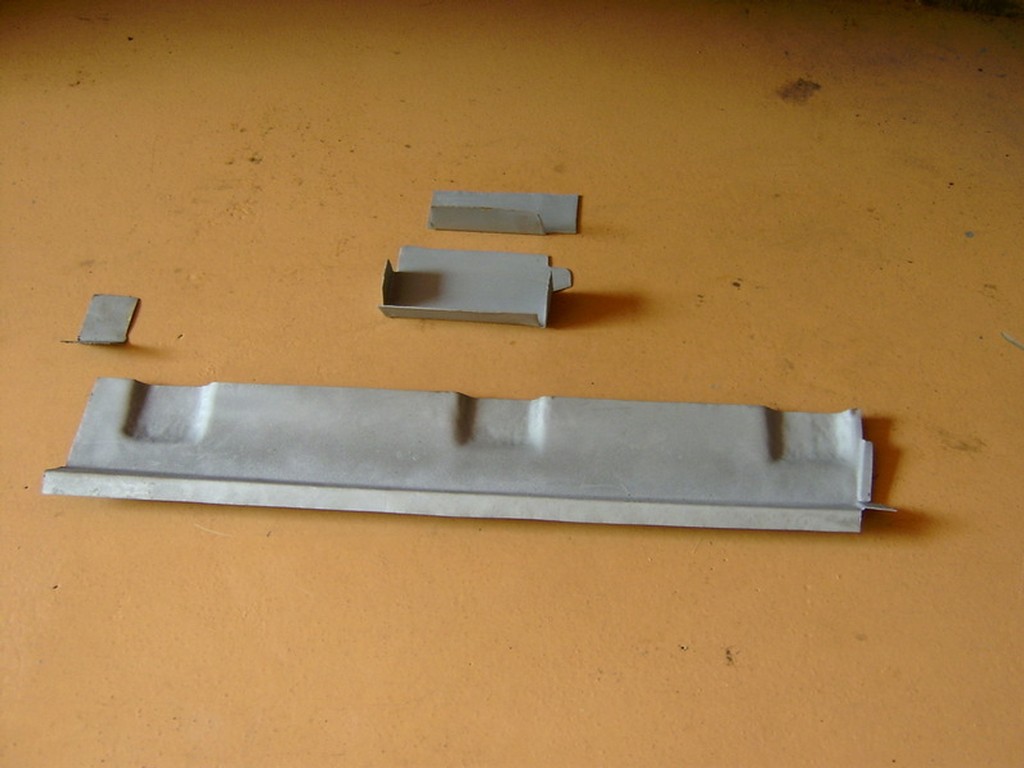


My sill needed almost the same amount of work. The back section only needed cleanup. As suggested, I cut back to solid metal. One clue is the condition of the inner side of the cut-away pieces... paint is good!
Note the jacking point structure is gone - it was probably a cause of the rust.
With everything cleaned up, I primed what I could see with weld-thru primer.
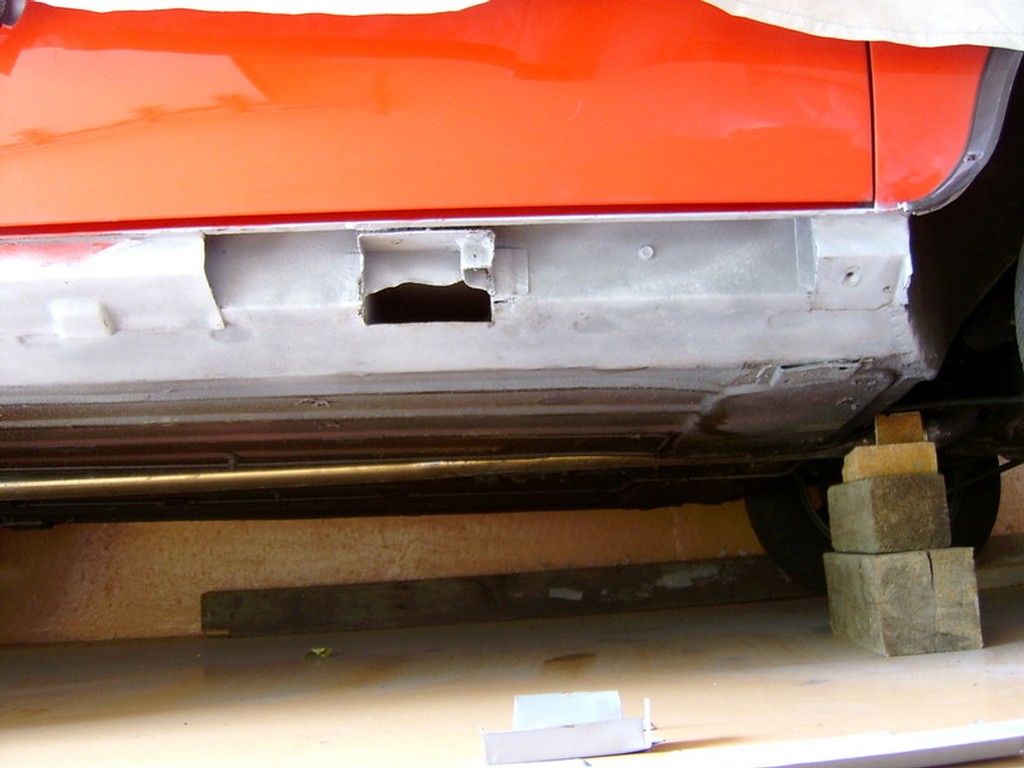
Not having access to a new sill, I made my own repair section from scratch. Note the front end is swaged to go behind the existing sill metal. The rear used a clip to align the new and old panels ready for welding. Pop-rivets were for panel alignment. All pieces primed with weld-thru primer.
I boxed in the end of the floor cross-member to keep water and dirt out.
All assembled ready for welding at a body shop. I don't have welding gear or experience. The long sill seam and underside were spot-welded at about 1" to 1.5" centres. The ends were butt-welded between the old and new panels. Pop rivets were ground flat and filled.
11 years later, still no rust!
.
"Hang on a minute lads....I've got a great idea."
|
|
Total posts: 1723
Last post: Oct 20, 2020 Member since:Jun 18, 1999
|
Cars in Garage: 0
Photos: 0 WorkBench Posts: 0 |
|
The rear section can made up and weld in.
|
|
Total posts: 960
Last post: Sep 9, 2024 Member since:Sep 11, 2000
|
Cars in Garage: 0
Photos: 0 WorkBench Posts: 0 |
|
So I plate over that hole, and any others in the outer sill, to make the sill area as waterproof as poss.
Car engines make CO2 and trees absorb CO2. By running your engine you're feeding a tree and helping the environment.
|
|
Total posts: 19
Last post: Jul 24, 2020 Member since:Aug 27, 2019
|
Cars in Garage: 0
Photos: 0 WorkBench Posts: 0 |
Thanks Charrison,
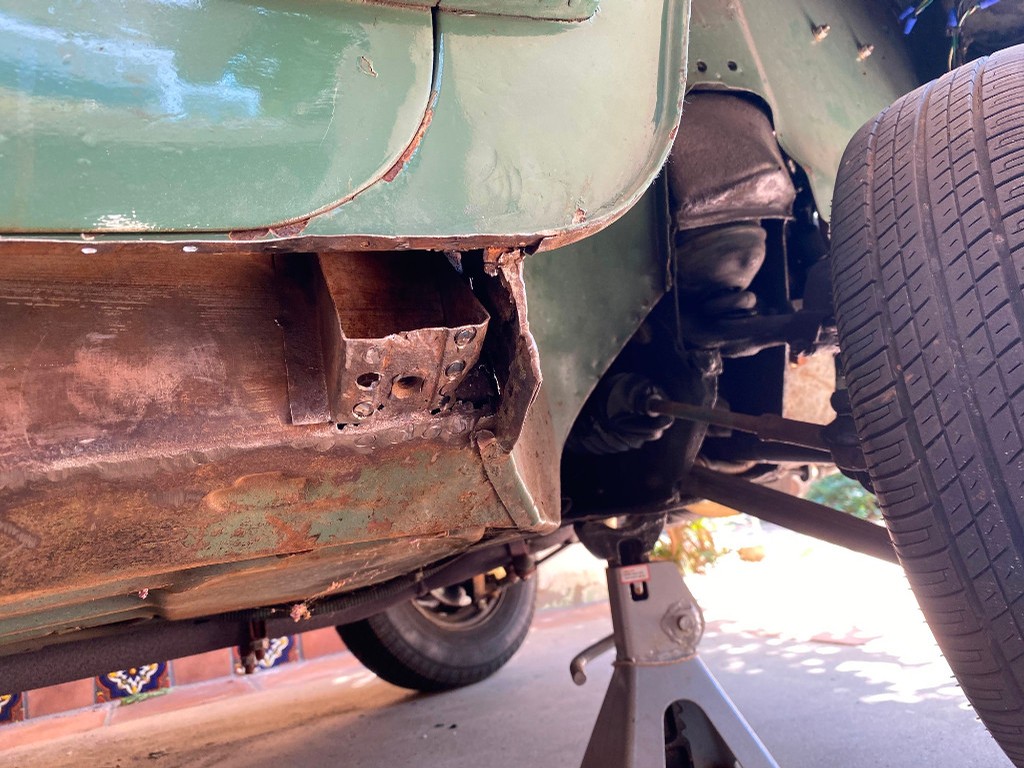
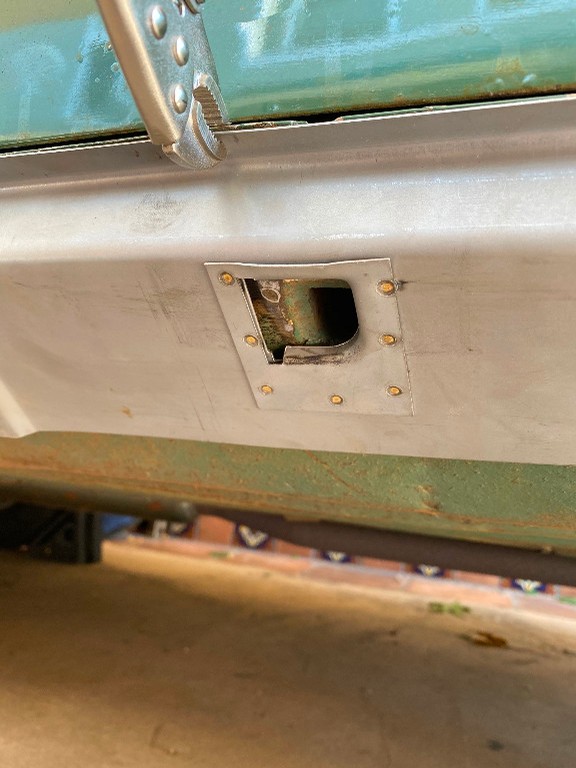
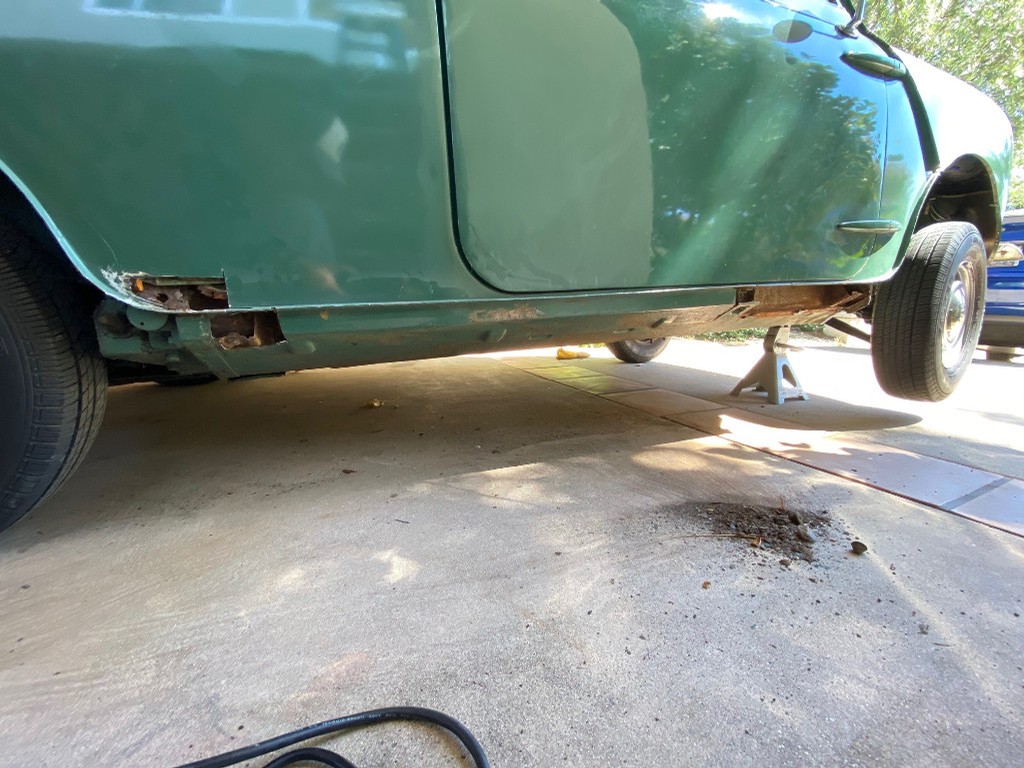
I have a quarter panel repair section in the mail (UK to US). I didn’t want to over “excavate” until it arrived, but I do plan to take more off. I also ordered new brackets for the inner sill so I can cut these off to get at the rust in there (see image).
Question: What do people do about the jacking points aligning with the repair outer sill (see image)? It’s not a clean fit in this location, I'm assuming just trim and fit... I'm just surprised is so far off.
Thanks again for your assistance,
T
|
|
Total posts: 19
Last post: Jul 24, 2020 Member since:Aug 27, 2019
|
Cars in Garage: 0
Photos: 0 WorkBench Posts: 0 |
Thanks 64,
im definitely trying to keep it together as long as possible. It is a domino effect though. Outer sill to inner to wheel arch etc etc. the previous owner put filler over rust holes in the 1990s and im concerned I’m going to miss a spot.
I was thinking about stripping the whole thing to bare metal. Kind of at the precipice, I need to figure out how far I need to go.
|
|
Total posts: 1723
Last post: Oct 20, 2020 Member since:Jun 18, 1999
|
Cars in Garage: 0
Photos: 0 WorkBench Posts: 0 |
|
1. Keep the mini on all 4 wheels as long as possible, so you can move it around.
2. Don't get ahead of yourself and tear everything apart. Many guys get discouraged and that leads to basket cases.
3. Work an area until complete, getting comfortable with your equipment and skills and fabrication.
4. Label everything and put parts in arranged boxes. Restoration takes more time than we think it will. You will forget.
5. Have Fun
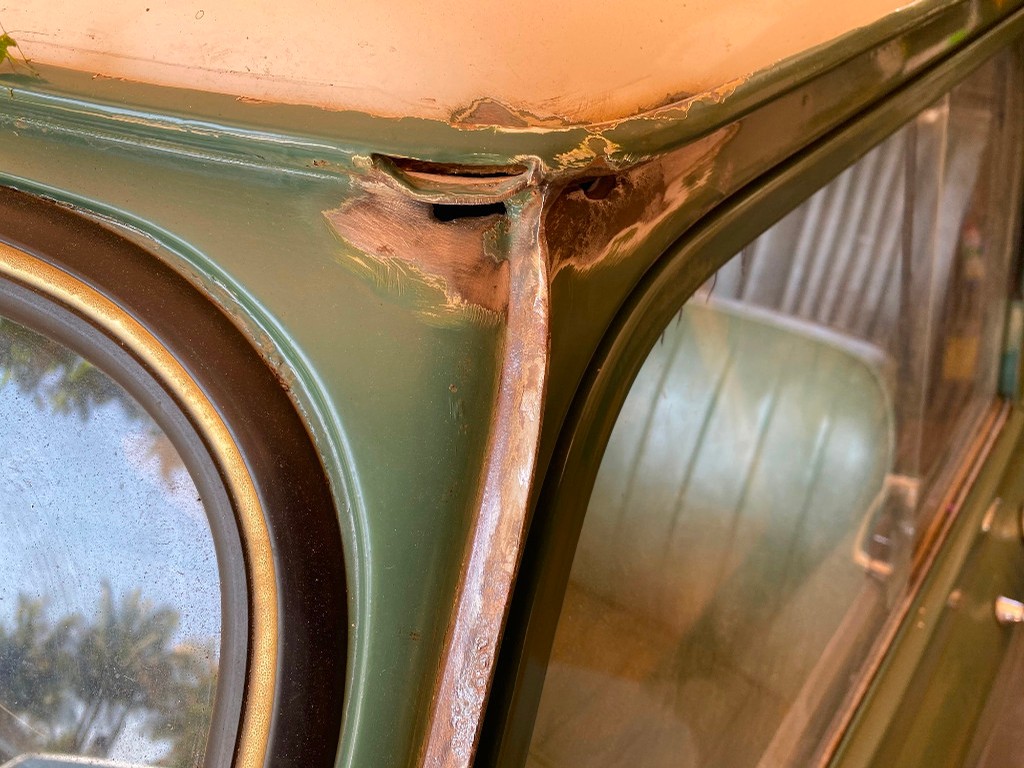
The area where the A pillar meets the roof will need metal replacement. Get yourself a Dremel tool with a few attachments such as cutting wheels. grinding stones and wire brushes.
|
|
Total posts: 960
Last post: Sep 9, 2024 Member since:Sep 11, 2000
|
Cars in Garage: 0
Photos: 0 WorkBench Posts: 0 |
|
You cant weld rust or filler.
The rear quarter panel looks to be full of filler and rippled with rust, so cut the bottom 4" off.
That will let you get in to repair the rear subframe mounts properly, while you repair the inner sill.
Finally fit that new out sill.
Car engines make CO2 and trees absorb CO2. By running your engine you're feeding a tree and helping the environment.
|
|
Total posts: 19
Last post: Jul 24, 2020 Member since:Aug 27, 2019
|
Cars in Garage: 0
Photos: 0 WorkBench Posts: 0 |
Thanks! Pulled the whole outer and did find some small holes on the inner sill.
its complicated as the Rust holes are at the brackets and jacking point.
next question: gutter repair! Do I need to cut of the rails to fix the roof/ gutter? See image thanks!!!
|
|
Total posts: 1723
Last post: Oct 20, 2020 Member since:Jun 18, 1999
|
Cars in Garage: 0
Photos: 0 WorkBench Posts: 0 |
|
Using a mig fill the holes and grind welds flat.
|
|
Total posts: 19
Last post: Jul 24, 2020 Member since:Aug 27, 2019
|
Cars in Garage: 0
Photos: 0 WorkBench Posts: 0 |
I'll be posting a few more pics for guidance (A-pillar@driprail rust, boot floor@rear body panel rust) I would love your input if you have the time.
Now I just need to wait till the local sound ordinance allows more grinding. (only gardening on Sundays. I have a neighbor that regularly quotes the ordinance)

Best,
T
|
|
Total posts: 2103
Last post: Dec 11, 2024 Member since:May 1, 2007
|
Cars in Garage: 1
Photos: 220 WorkBench Posts: 0 |
|
|
|
Total posts: 9832
Last post: May 13, 2025 Member since:Aug 14, 2002
|
Cars in Garage: 0
Photos: 0 WorkBench Posts: 0 |
|
.
"Hang on a minute lads....I've got a great idea."
|
|
Total posts: 19
Last post: Jul 24, 2020 Member since:Aug 27, 2019
|
Cars in Garage: 0
Photos: 0 WorkBench Posts: 0 |

I've cut out the rusty sections of the outer sill, I have a full replacement sill but still have a good 3' of good steel on the mini. I'm leaning towards full replacement and rust preventative treatment of all the interior metal. I just hate cutting out good original metal. Thoughts?
I'll have more rust related questions soon

Thanks!
T


