How to Install an Antenna Base in Your MINI
TRANSCRIPTION:
- This video contains general information about installing an antenna base to your MINI.
- Installing an antenna base can seem like a complicated problem, but basically it’s a matter of attaching this to this.
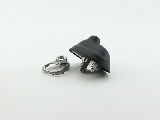
- This is the Antenna Base for a Clubman R55 or a Hatchback R56.
- And this is the bracket that it attaches to. It’s what holds your antenna base in place and is located under your headliner.
- And this is how they fit together.
- Your base has a slot it in that is used to guide it into this bolt and then hold it in place.
- So, this goes in here like this. Then you simply tighten the nut to secure the antenna base to your roof. And this is where all your cables connect. So those are the pieces that fit together.
- Next, is a generic instruction guide that outlines the basic steps of installing an antenna base.
- Steps to Installing Your R55 Antenna Base
- Gently remove the rubber weather stripping around the hatch area.
- Carefully undo the headline and pull it down enough that you reach the antenna bracket. (The headliner is held in place by clips so that you can undo it and put it back in place once you’re done.)
- You may have to also remove the handles on the roof above each rear window if you have them.
- Once you have the headliner down and the Antenna Bracket/Holder exposed, unscrew the antenna base from the bracket holder.
- From outside the car, gently remove the base from the holder to expose the wires.
- Disconnect the wires from the original antenna base and connect them to the new antenna base.
- Place the new antenna base back into place and be sure the "footprint" of the new base will cover the holes in the car roof.
- From inside, bolt the new antenna base down, and then reverse all processes to put the trim pieces back.
- And there you have it. The basic instructions for installing your antenna base.
- Removal of the antenna base: R50, R53
- Unscrew the antenna mast.
- Twist the black base cover 45° and this should come off.
- The base module is held on with a 17mm or 19 mm nut
- You'll now need to release the roof-lining to gain access to the module (you need to do this properly as you can easily damage it by creasing it and once the damage is there it doesn't always come out, releasing the roof-lining properly can turn out to be a big job ).
- Once you have enough access to the antenna module there is a white wire (power from audio unit) with a simple spade connector, this will just pull off. Now the antenna cable (coax cable) has a complicated clip on it , it has a sleeve in it which you can grip between two fingers, slide it back towards the module and the cable ejects , refitting it is simple it just pushes back in (easily done if you know how and someone who knows how to do it could do it with less access, however if you have never done one before it can be difficult and you may need more access.
- Once all the above has been done undo the nut on top and remove the module and replacement is a reversal of refitting making sure that any seals are in-place as water leaks can occur.
- Also there is a clip that holds up the rear of the roof-lining at the rear in the center this just pops out with the aid of a screw driver but it's better done with a clip removal tool if one is available this needs to be unclipped no matter what but when it's left in it holds up the roof-lining while you release of other panels to release of the roof-lining.