MINI Cooper Clutch Slave Cylinder - Bleeding the Right Way
I recently tackled a clutch swap job and reassembled the mess of parts I had removed. The only thing separating me from the winding roads was bleeding the hydraulic clutch system on my 03 MCS. Without this step, a clutch pedal is useless, and will drop to the floor unresponsive if stepped on.
So let’s discuss how to bring it back to life! Sure, in principle, it sounds like a fairly easy task: crack the bleeder open, press the clutch petal down, close the bleeder, and repeat until only fluid flows out from the bleeder valve (no air). Yet, the clutch slave cylinder on the Mini Cooper calls for a slightly more complicated process. Personally, I attempted the ole’ “crack, bleed, close, repeat” process over and over, and still found that my clutch pedal was lacking the resistance that it required. About 3/4 of the pedal movement was slop, and it didn't begin to engage until the pedal was nearly touching the floor. So what needs to be done, to ensure there is no air in the cylinder, is to compress the Slave cylinder piston completely, and then bleed the hydraulic system normally using the above described process. You can't compress the clutch slave cylinder piston by hand and bleed at the same time, for the piston has a lot of outward resistance. So, we need to build some sort of jig to compress it to properly and evacuate any air that may be inside.
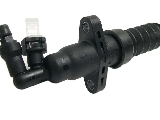
But first things first! Let’s remove the cylinder from its mounted position. What needs to be done is to remove the slave cylinder from the bottom of the bell housing. Remove the two mounting screws that are located on the very bottom of this bell housing, (I found these two screws to be pretty darn tight). Once you remove these two screws, your clutch slave cylinder will be hanging by the hydraulic line. Now, you don’t have to remove this line, but if you need more work space you can. In order to remove it from the hydraulic line, simply slide back the metal retention clip, and carefully pry the hydraulic line connection up off of the slave cylinder. Now the hydraulic line is going to want to drip fluid onto the ground, so find a means of capturing this fluid with a bottle/bucket to avoid making a mess of your garage! Now that we have access to it, let’s compress the piston of the cylinder. Personally, what I used was a metal plate with a screw on each side, complete with two nuts; as the nuts are tightened on the screws, the metal plate moves inward, compressing the piston, and evacuating the air (and fluid) from inside the cavity. Here's what the removed clutch Slave cylinder will look like with our fancy compression jig attached: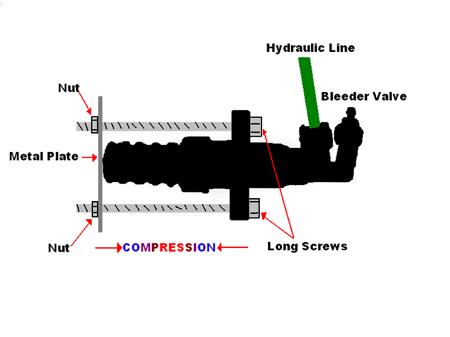
Alright! We can now push the piston in, and simultaneously tighten the two nuts. The reason we are compressing this cylinder is due to the close proximity between the hydraulic line and the bleeder valve. If we try to bleed the system without this compressed, any trapped air between the piston and the hydraulic line will not be purged.
Once fully compressed, let’s reconnect the hydraulic line to the cylinder (that’s if you decided to remove it). At this point, you can now bleed the system normally. Crack the bleeder valve open, push down the clutch pedal, close the bleeder valve, and slowly pull the pedal back up to its uppermost position. It’s best that this is done with a rubber hose connected to the bleeder valve with a catch can located above the master cylinder. This catches the purged fluid and prevents air from seeping back into the system. Repeat this process until only fluid comes out of the bleeder valve. Make sure you are keeping track of how much hydraulic fluid is in your reservoir.
When this process is completed, we can now remove our compression jig by loosening the two nuts, and remounting the cylinder to the bell housing. With the bleeder valve closed, test to see how much resistance your clutch pedal has. You should have much more than you started with, however, there still may be a small amount of air in your system preventing you from having an entirely responsive clutch pedal.
This next step is KEY! In order to evacuate the last remaining amount of air in your system, keep the clutch pedal fully pressed down overnight. You can do this by placing a rod between your driver’s seat and the pedal. By keeping the pedal pressed down overnight, this forces any remaining air trapped in the system to work its way out! After hours of letting this sit with the pedal pushed down, remove the rod and give the pedal a few pumps. You should find that the pedal is nice, crisp and responsive just like new! With no air in the system, the hydraulic clutch will function properly. Those winding roads are calling your name, MOTOR ON!