

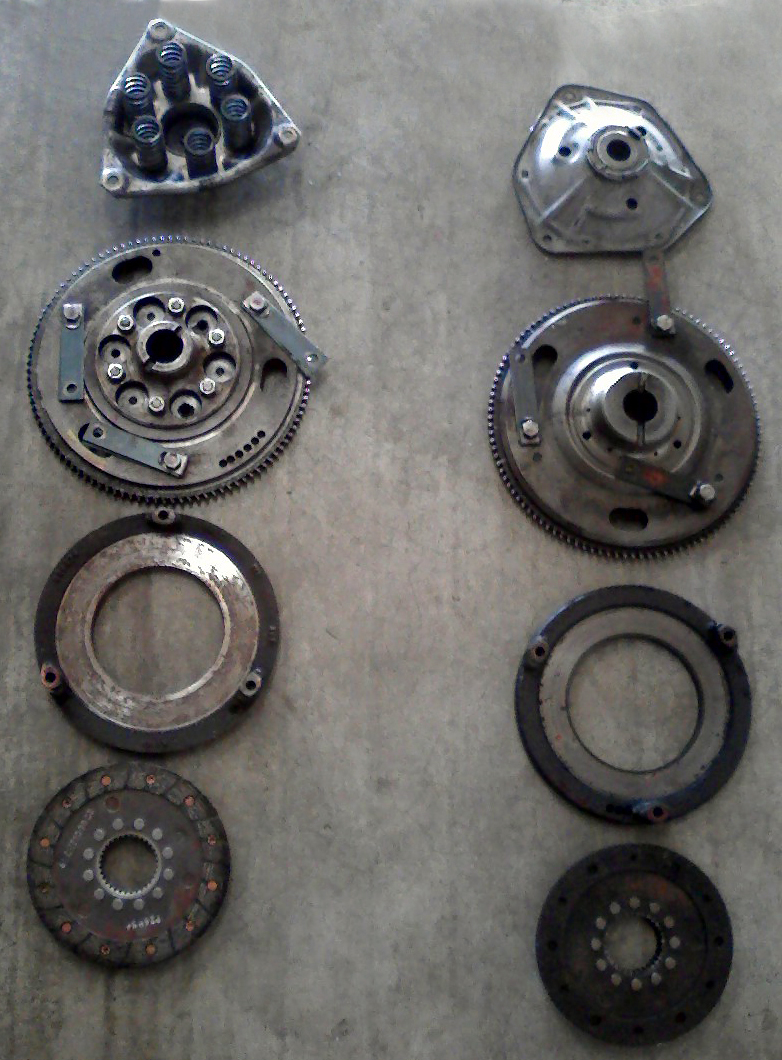
The pressure plate on the left is called a 'spring' type, as typically found on early 850 & 1098cc engines. The one on the right is called a 'diaphragm' type. While the pressure plates are NOT interchangeable on the flywheel itself, either flywheel can be used on any engine assuming you keep the flywheel with the correct pressure plate. The back plates and the clutch disc itself are interchangeable.
Pre-Verto versus Verto Clutch
In 1980, the Mini’s clutch underwent a major change. The internal clutch/ flywheel assembly changed as well as almost all of the external, connecting bits as far back as the master cylinder. They are pretty easy to tell apart with just a quick look inside the engine compartment. Here are two ways. There are others.
Clutch arm. The clutch arm for the Verto set up is a short, stubby little thing. The exposed length is only about 2” while the pre-Verto clutch arm is closer to 6”. With such a wide difference, there is no need to measure.
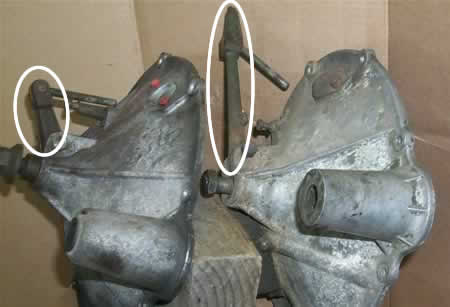
Clutch slave cylinder mounting. The pre-Verto clutch slave is mounted horizontally directly onto the flywheel housing about level with the top of the long clutch arm. With the Verto, the clutch slave cylinder is mounted on a bracket which is mounted on the flywheel housing allowing the clutch slave to point downwards at an angle to meet up with the clutch arm rod coming off the end of the very short clutch arm. The slave cylinders are visibly different, too.
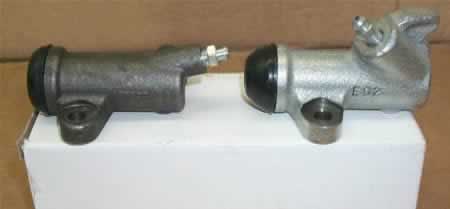
pre-Verto and Verto clutch slave cylinders
Verto Diaphragm Spring
The Verto/Valeo type diaphragm included the pressure plate in its assembly, much like a 'normal' car set-up. The spring being of the 'finger' type as opposed to the disc spring used on earlier, three-piece assemblies. There were originally three diaphragm specifications using progressively stronger springs - small-bore, big-bore, and Metro Turbo, later joined by the type used on the injection cars, though most definitely not interchangeable.
Initially, the biggest problem was the Turbo ones were never really available on their own. If you wanted one, you had to buy a whole clutch/flywheel assembly - at the exorbitant cost. Rover originally believed that if the clutch plate was worn out, then the flywheel and pressure plate would be too. It has only been in recent times that the diaphragm/pressure plate has been available on its own - but not until after the Turbo unit became unavailable. Even that has changed recently, with the cessation of the Turbo diaphragm as a service part. To add insult to injury there appears to be no easily identifying marks like on the older, color coded ones. It was all done by serial numbers, which weren't recorded anywhere accessible. The situation was totally and utterly confused further by the long series of supersessions from one number to another depending on which way the wind was blowing at the time, mixing both small and big-bore components up at will. So, to up-rate your small-bore Verto/Valeo clutch assembly, it was really necessary to purchase a new, big-bore, non-injection, diaphragm/pressure plate assembly to be sure you were getting a stronger spring. The standard 1300 big-bore type would cope with up to 75bhp. Up-rating big-bore engines meant using the Turbo one that would have to do for everything else. Fortunately, it was capable of dealing with 1380 'road rocket' power when used with the non-sprung centered standard clutch plate from the earlier pre-Verto/Valeo assemblies. Particularly if combined with the Mini Spares steel flywheel outer section, that offered yet further clamping pressure increases through cunning design.
Now, the only way to up-rate the non-injection Verto/Valeo set-up is to use the latest 1300 non-injection Mini diaphragm combined with the Mini Spares Steel Verto/Valeo flywheel section. This set-up provides the same clamping force as the Turbo diaphragm used to do, if not more.
As for the injection cars, trying to up-rate the diaphragm spring clamping pressure seemed impossible. The main problem is the pick-up sensor on the injection models. It reads from a reluctor ring pressed into the back of the flywheel. Unfortunately the designer who came up with the idea was rather single-minded in his approach. It didn’t occur to him to use the standard clutch assembly mounting and location points. Oh no, he deemed it necessary to ‘dabble’ – putting the flywheel locating key slot about 25 degrees out of position compared to the standard, aeons-old one! This meant that if you bolted a non-injection diaphragm to an injection flywheel section - as would be the case when trying to fit a Turbo diaphragm to up-rate it - the car wouldn’t run. The timing would be way too far out for the ECU to work. So a little re-alignment is needed, and is easy to do.
Before removing the standard flywheel assembly, remove the starter motor. You’ll see the pick-up sensor positioned just below the starter motor mounting hole. Carefully remove it. If you peer into the hole, you’ll see the flywheel and reluctor ring in its groove – it looks like a bunch of big staples stuck to a wire ring. Turn the engine over by jacking one wheel up under the adjoining bottom arm, selecting 3rd gear, and rotating the wheel/tyre. Set number one piston at top dead centre (TDC.) Peering into the hole again you’ll see a section on the reluctor ring where there’s a bigger gap between the prongs. Get a reasonably sized marker pen, insert it into the pick-up hole and - keeping the pen as central in the hole as possible – move the pen in until it touches the reluctor ring and marks it.
Now remove the flywheel assembly and look at the reluctor ring to make sure you’ve marked it. If not – put it back in position and try again.
Strip the flywheel down, and lay it clutch face down on a bench. Using a reasonably strong screwdriver, carefully pry each of the reluctor ring prongs around one side only (I do the inside ones) away from the recess’ side. Once all are done, the reluctor ring should pull out easily. If not, go round and check the prongs again. Don’t force it out – you’ll distort it. Once removed, carefully tweak the prongs back into their original positions.
Re-assemble the clutch/flywheel using the turbo diaphragm. Double check that number one piston is at TDC, then fit the flywheel assembly to the crank, and setting position by inserting the locating key plate. Note it’s not necessary to fit the retaining bolt and torque it all up – this is just for marking the reluctor ring position in relation to TDC. Passing the marker pen through the pick-up hole again, mark the bottom of the recess and remove the flywheel assembly again. Press the reluctor ring back into the recess so the two pen marks line up. And that’s it. Re-assemble the whole deal properly, and away you go.
You don’t have to be absolutely dead accurate when marking (i.e. within thousandths of an inch) as there’s an ELEVEN-degree tolerance on the ECU! Testing hasn’t shown any power increase/loss by artificially advancing/retarding the timing. Alternatively you could go for the new Mini Spares up-rated and lightened steel flywheel with machined-in reluctor ring and ingeniously up-rated diaphragm/clamping pressure through clever design.


